Restaurant Web Add-on
Sign Up
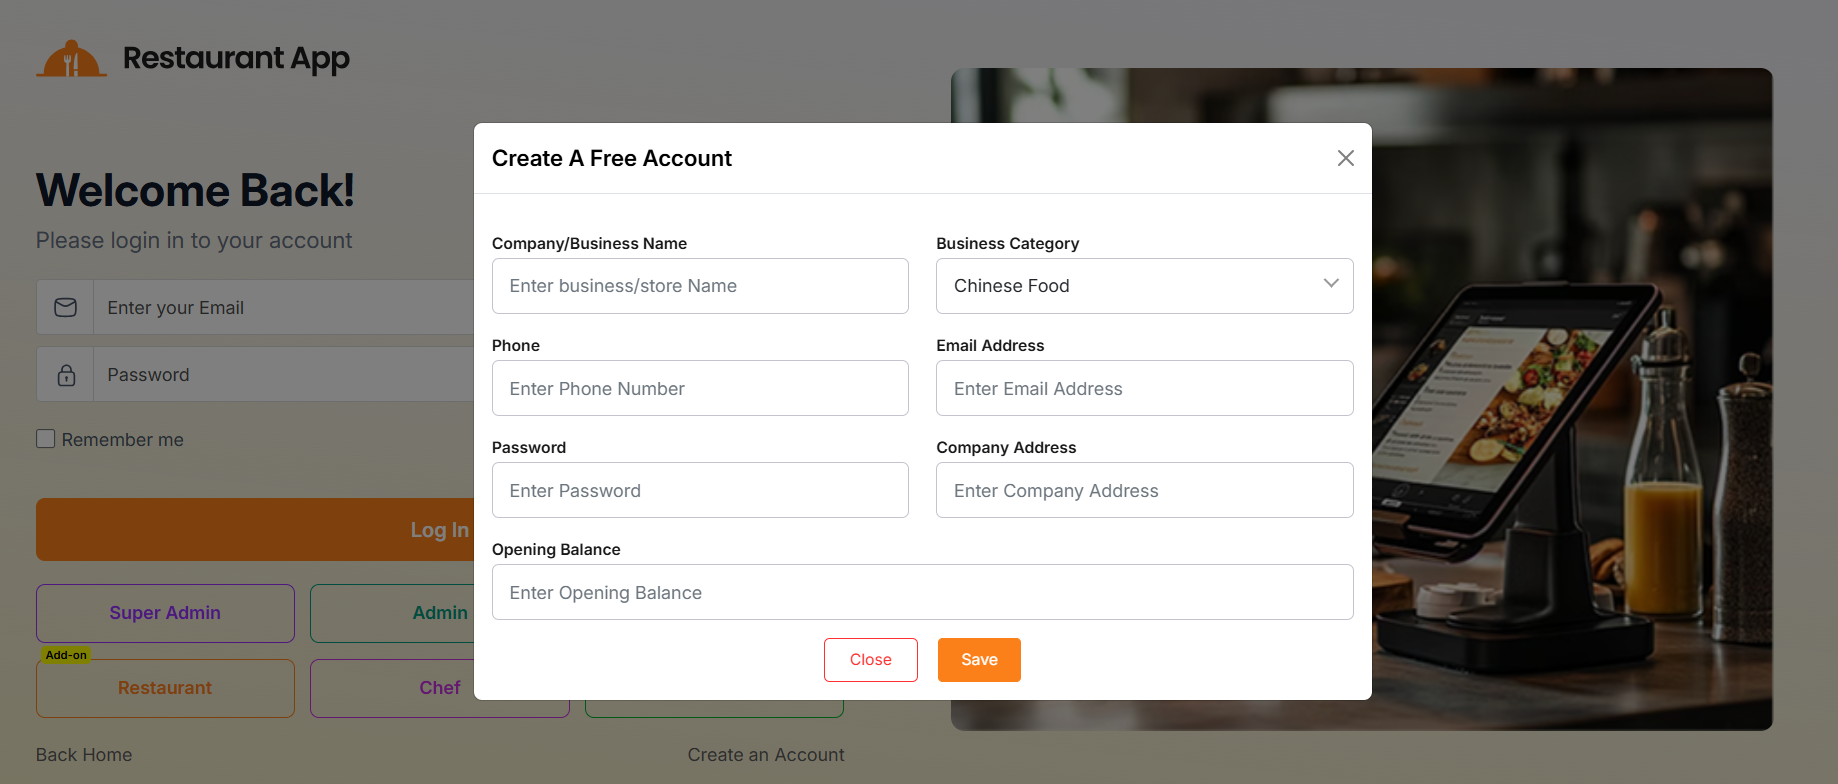
By clicking "Create an account", a modal will open where you can fill in your details such as business name, category, phone number, email, password, company address, and opening balance.
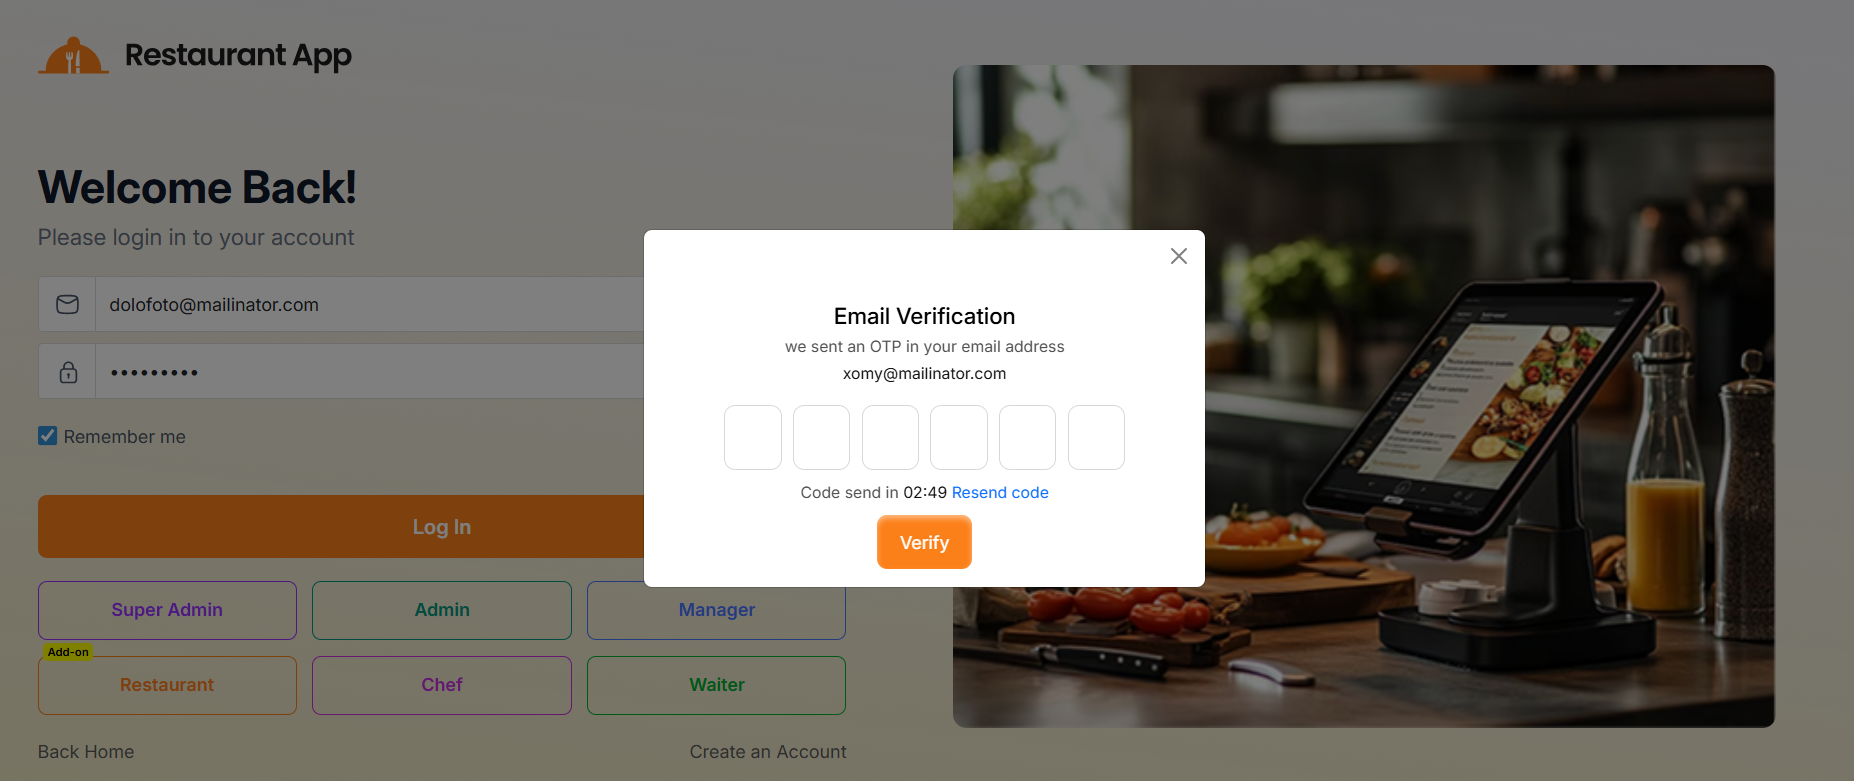
After submitting the form, a verification modal will appear where you need to enter the code sent to your email.
Once the OTP is verified, you will be redirected to the "Restaurant" Dashboard.
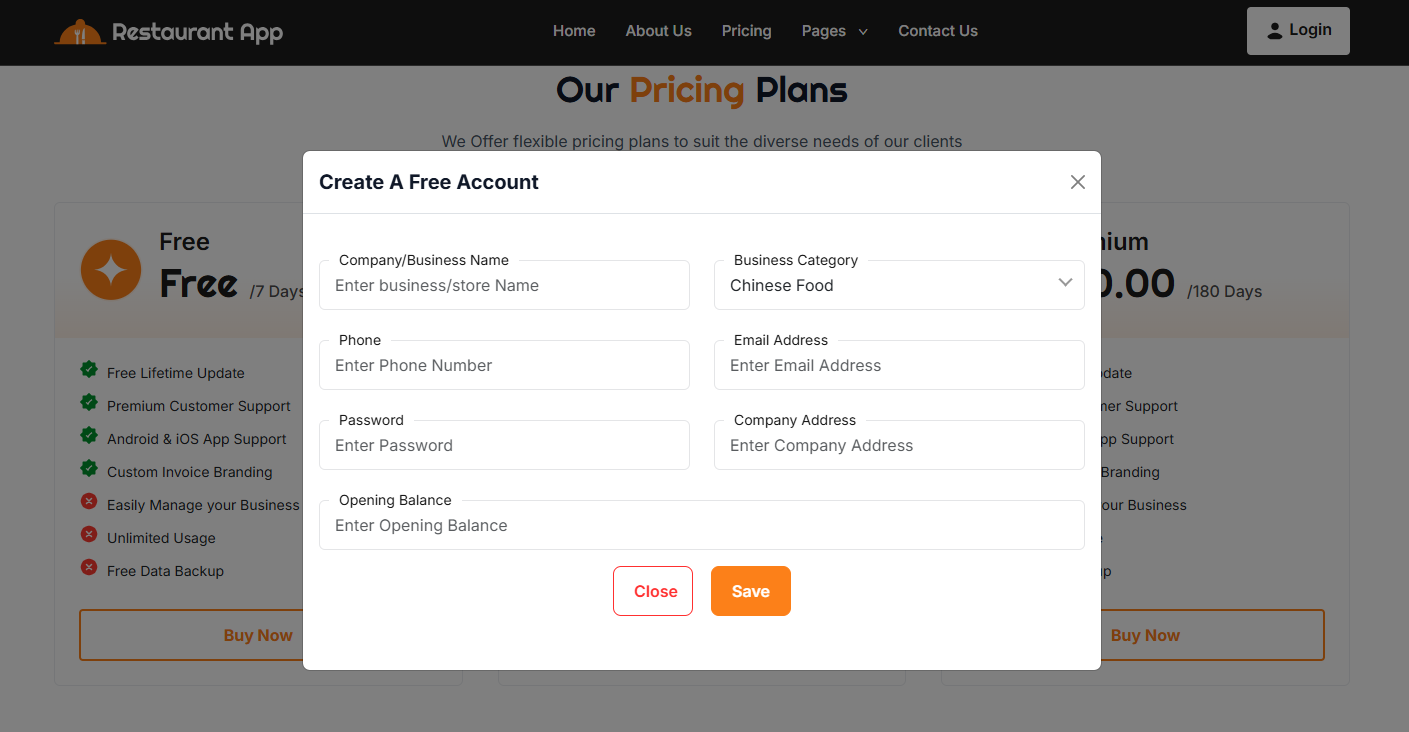
You can also "Create an account" in the same way by clicking "Buy Now" from the pricing plans section.
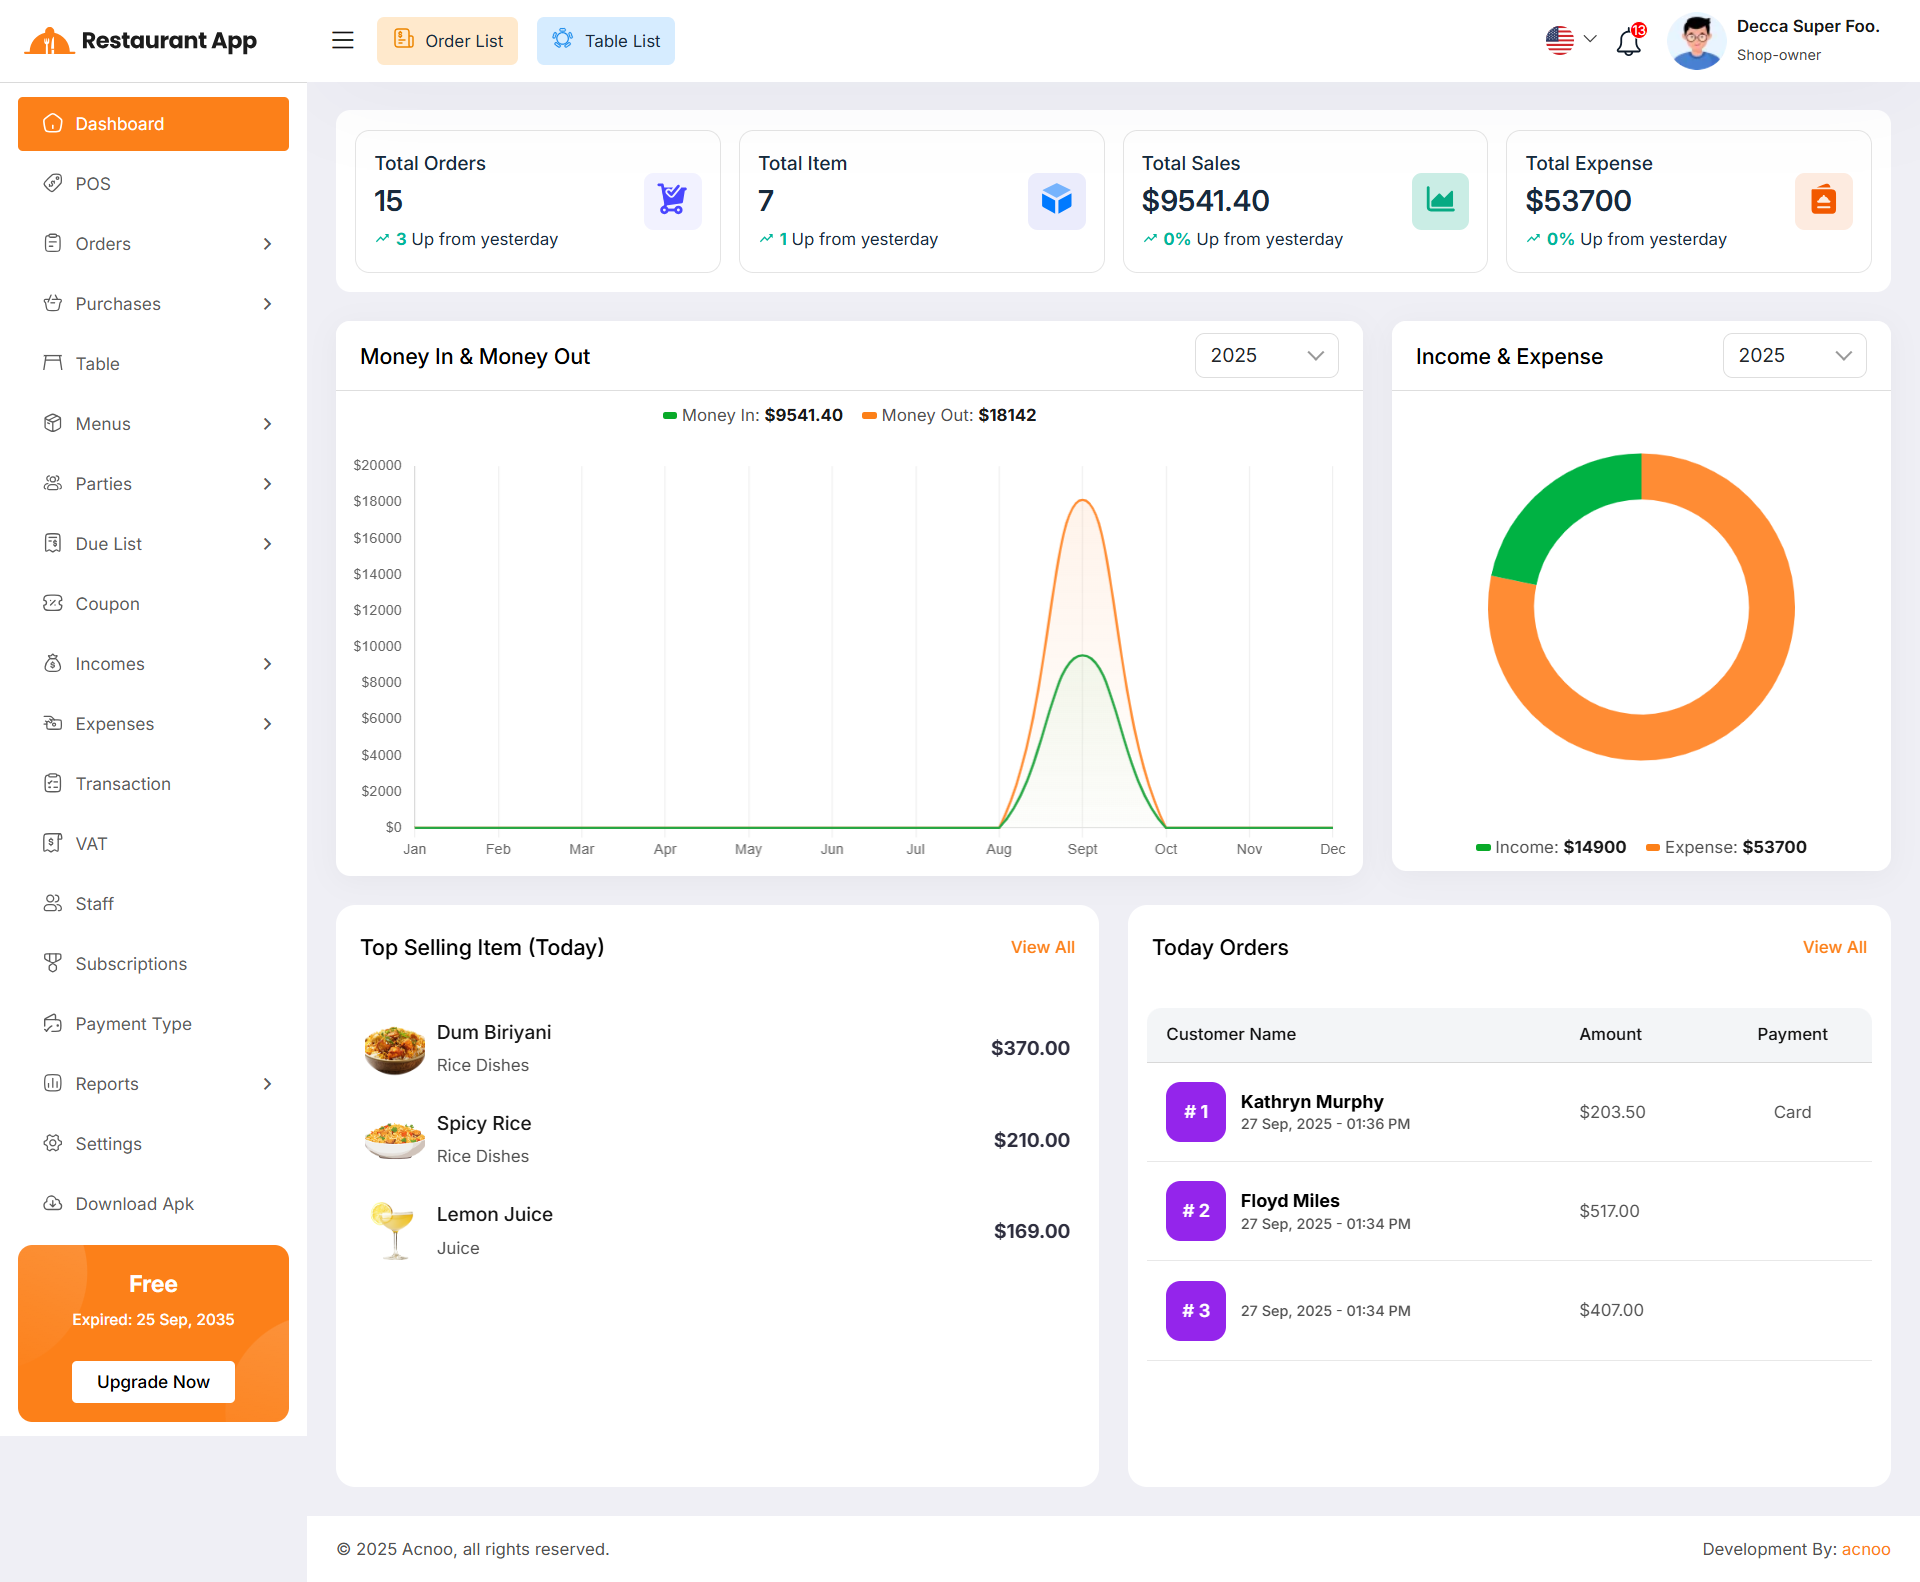
Dashboard
This is the Addon dashboard page, where key project information is presented.
Create Order
By clicking on "POS", you can create a new order. There are four sales types available: Dine-in, Pickup, Delivery, and Quotation. If you select Quotation, it will be saved in the quotation list, while the other types will be saved in the order list. Additionally, you can select Kitchen Order Ticket (KOT). In this case, the order status will remain Pending, and once the food is prepared, the status will change to Completed. You can also assign a Customer, Waiter, and Table while creating the order.
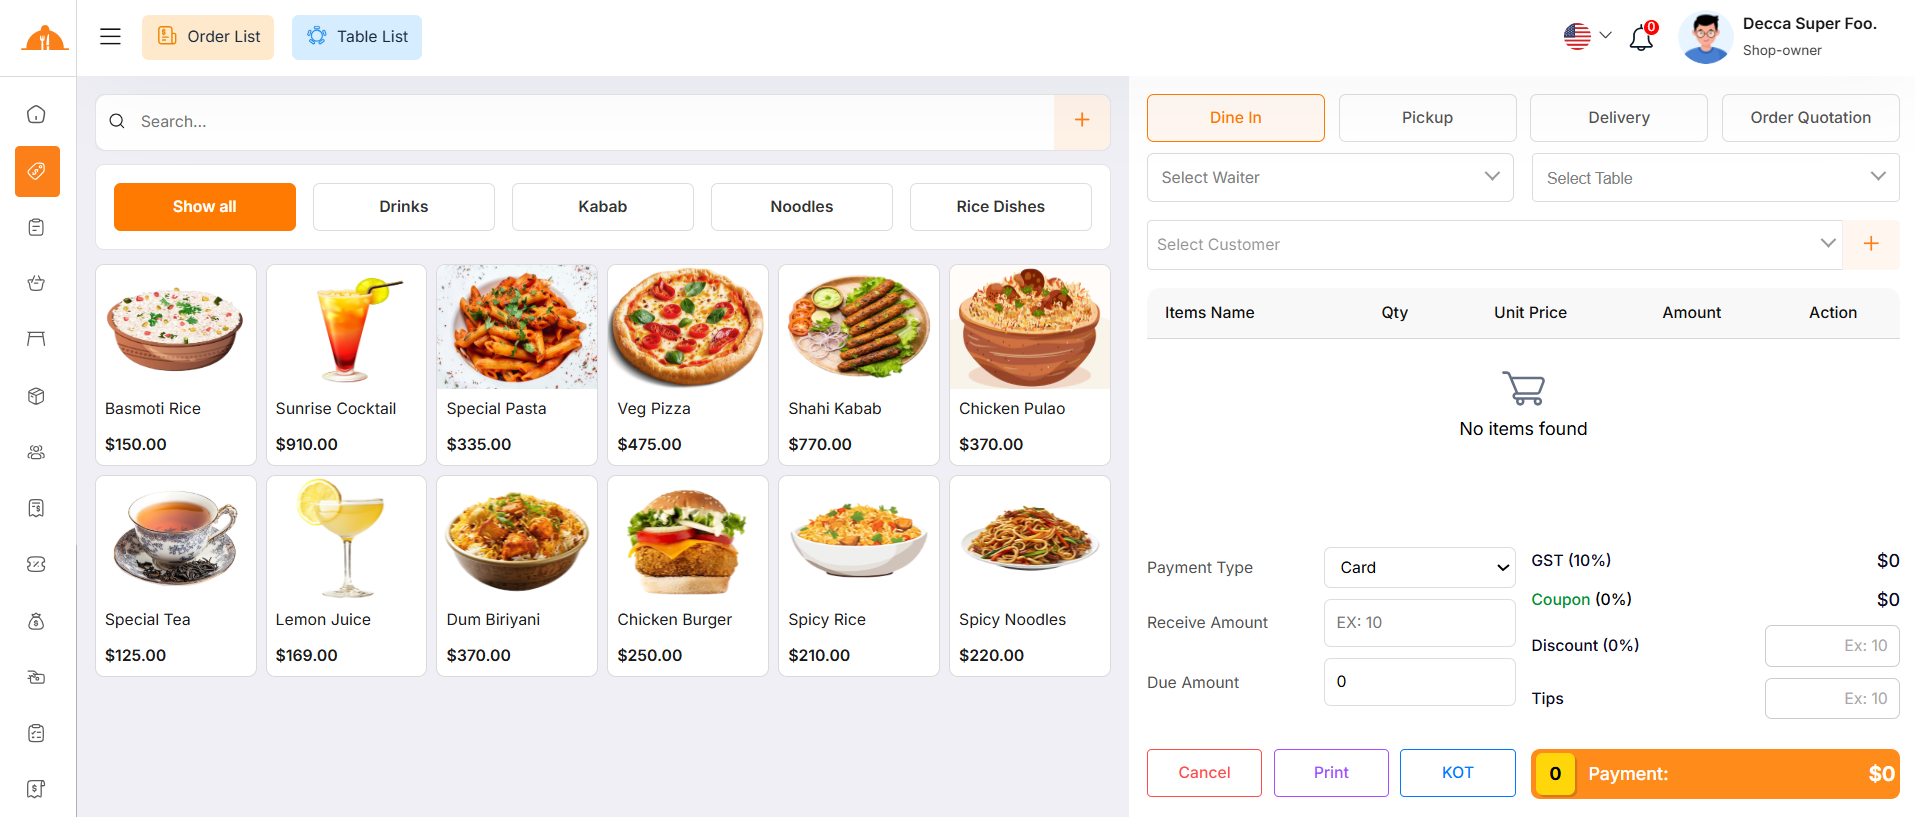
Select Item
Next, you need to select an item for the order. You can search by item name & also create item by clicking plus button
or filter items by category to easily find the item you need.
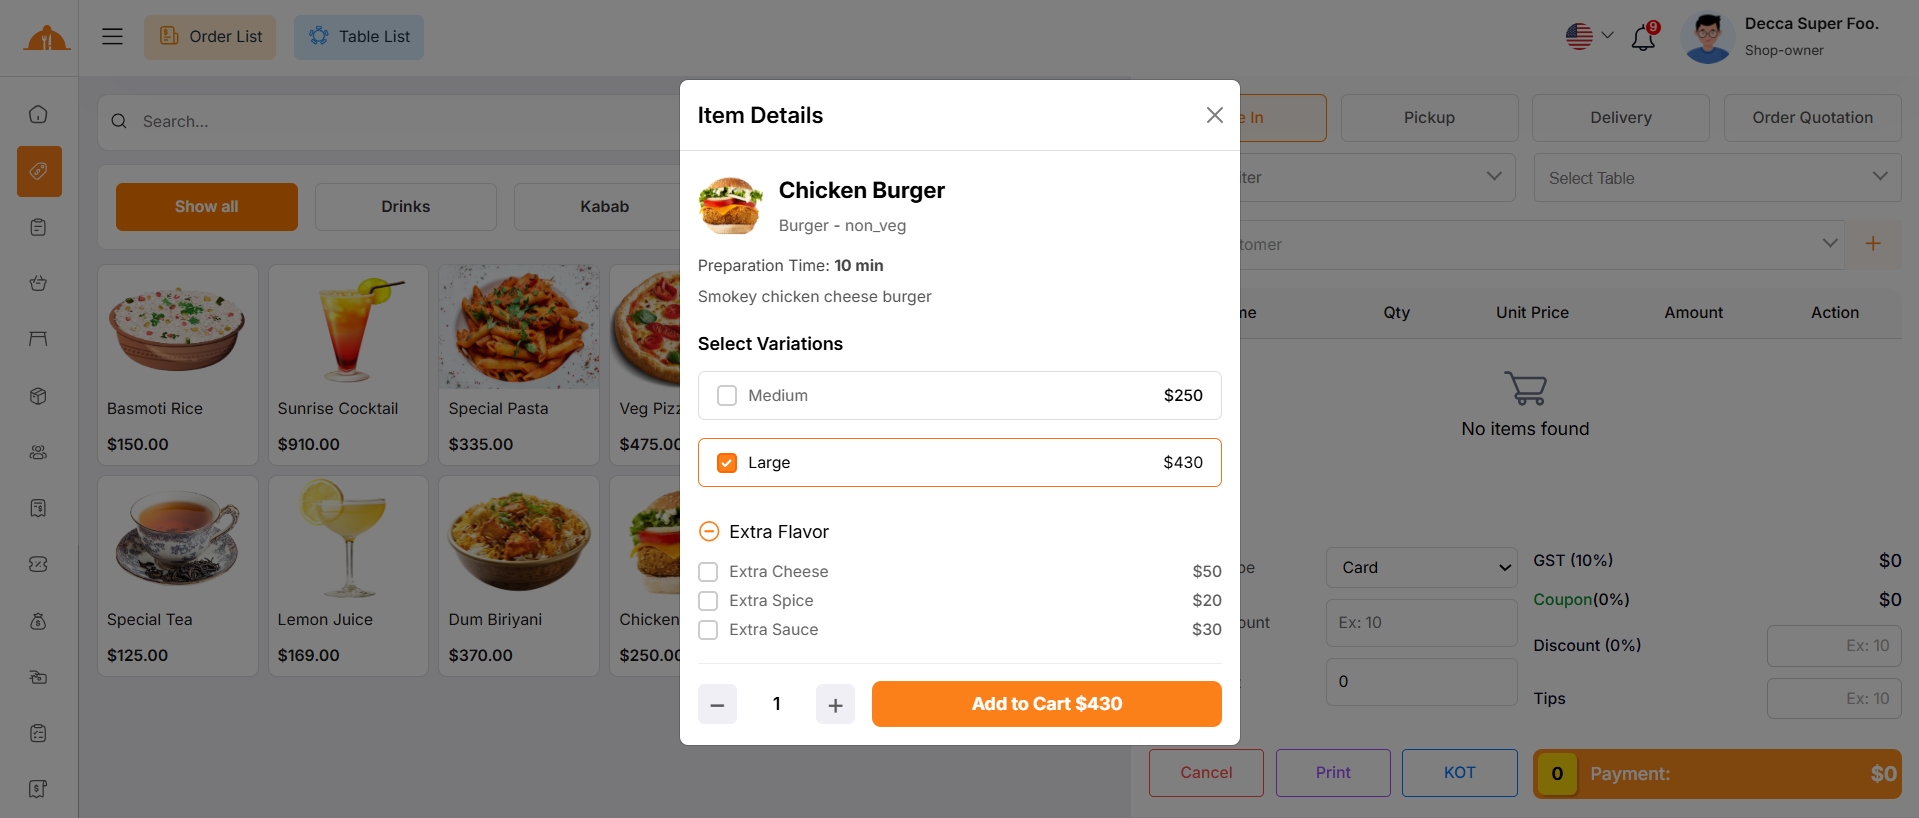
When you click on an item, if it has a variation price or modifiers with options,
a modal will open where you can choose your preferred variation and modifier before adding it to the cart.
If the item does not have any variation or modifier, it will be added to the cart automatically.
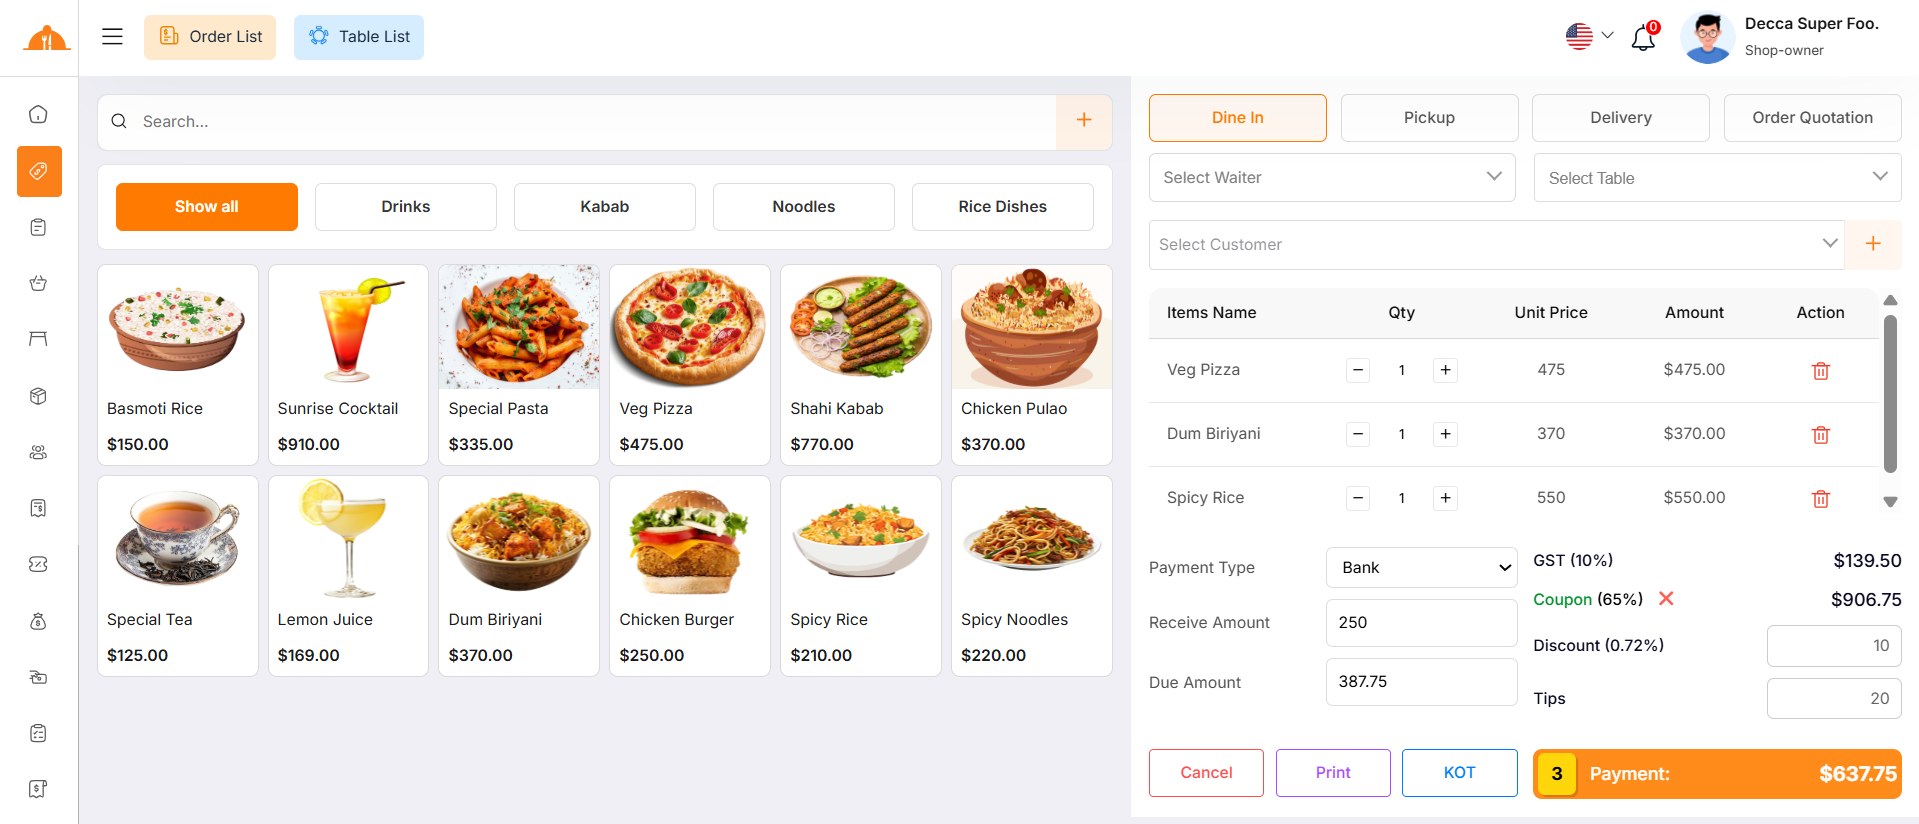
Add to Cart & Store Order
You can adjust the quantity using the plus or minus buttons, or directly enter a value to update the quantity.
To remove a product from the cart, simply click the red delete button.
Below, you will see the subtotal of all items. You can also add VAT, Coupon or a
discount to the subtotal. After the calculations, the total amount will be displayed. Next,
you can enter the received amount. If the received amount is greater than the total amount,
the remaining balance will be shown in the "Change Amount" field. If the received amount is
less, the "Due Amount" field will display the difference. If you want to remove all items
from the list, click the cancel button. Once everything is correct, click the "Payment" button to
complete the order.
Order List
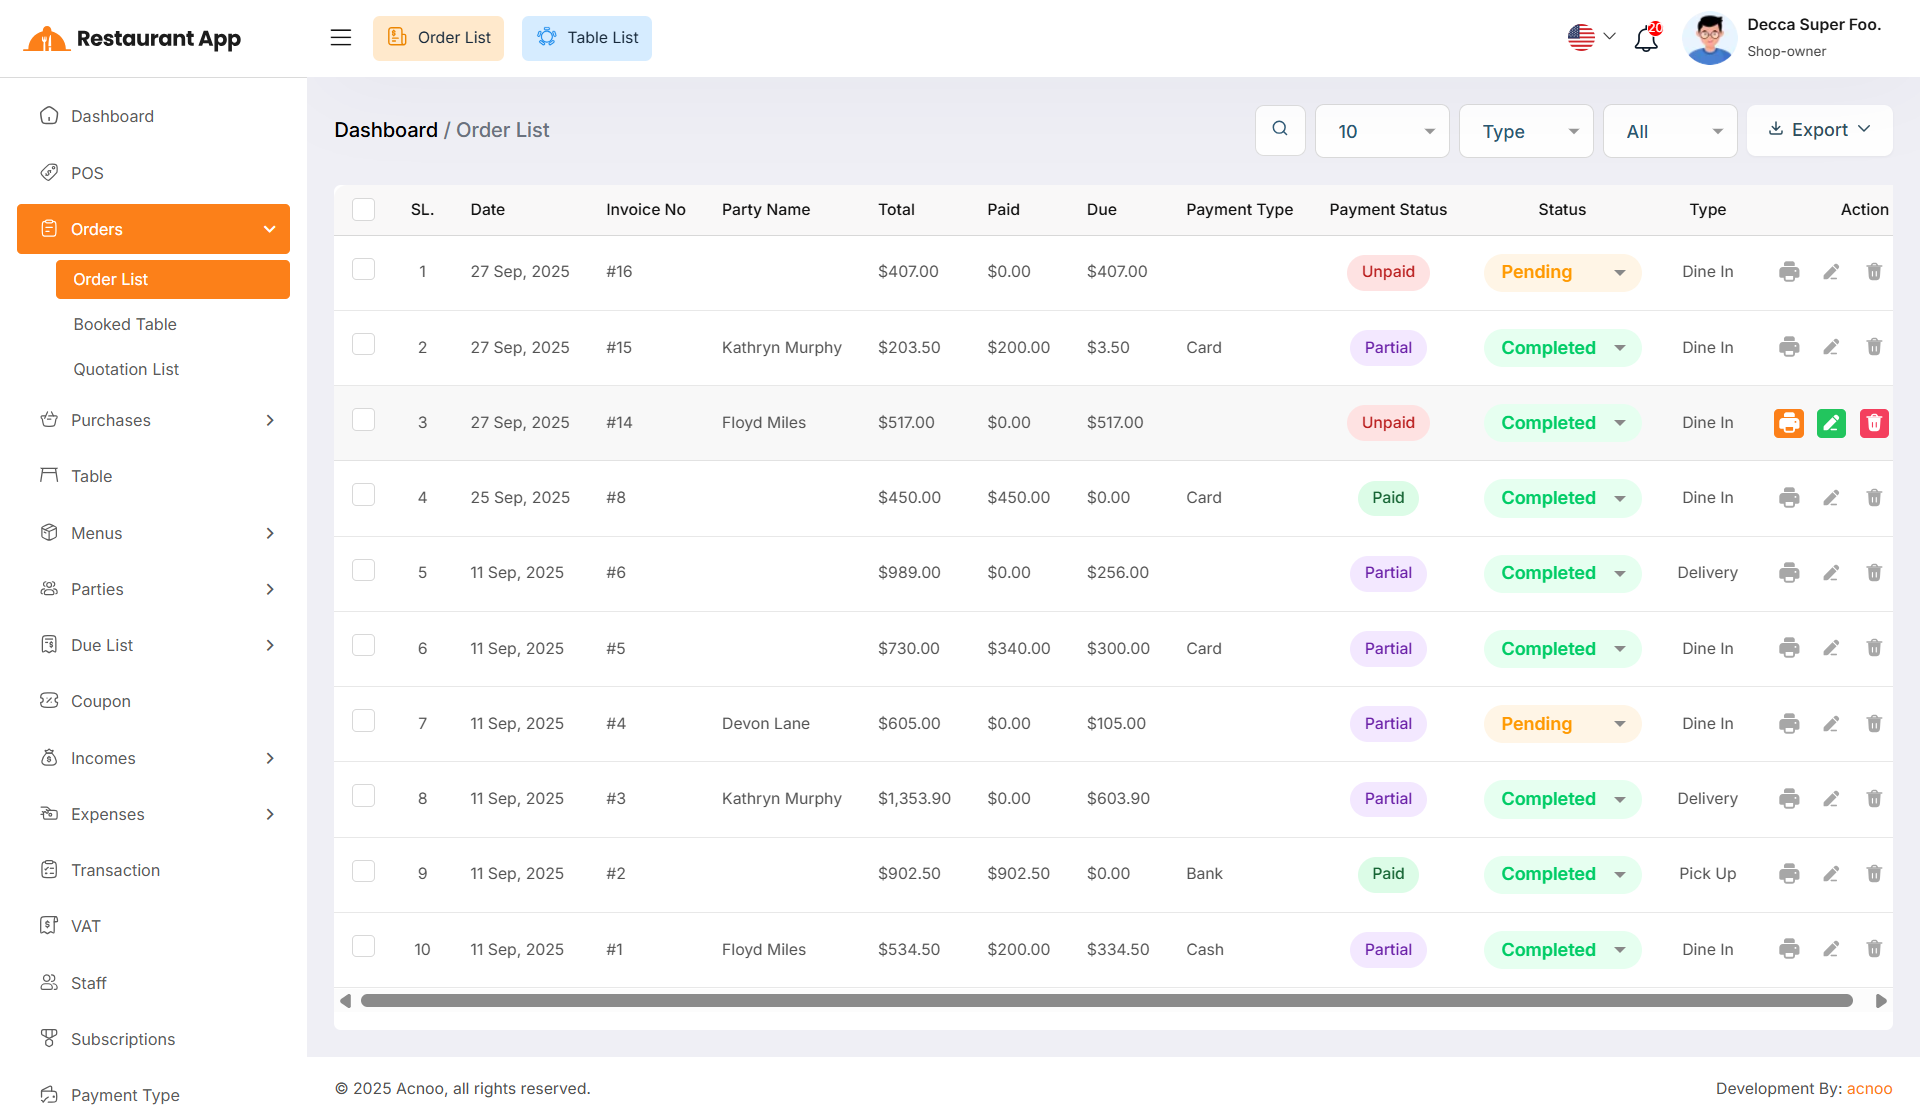
This appears to be a screenshot of the Order list page, where you can filter data using the search function. Additionally, you can view invoices, as well as edit, delete, or use the multi-delete option and exported as Excel, CSV and PDF. Also you can update the KOT order status.
Booked Table List
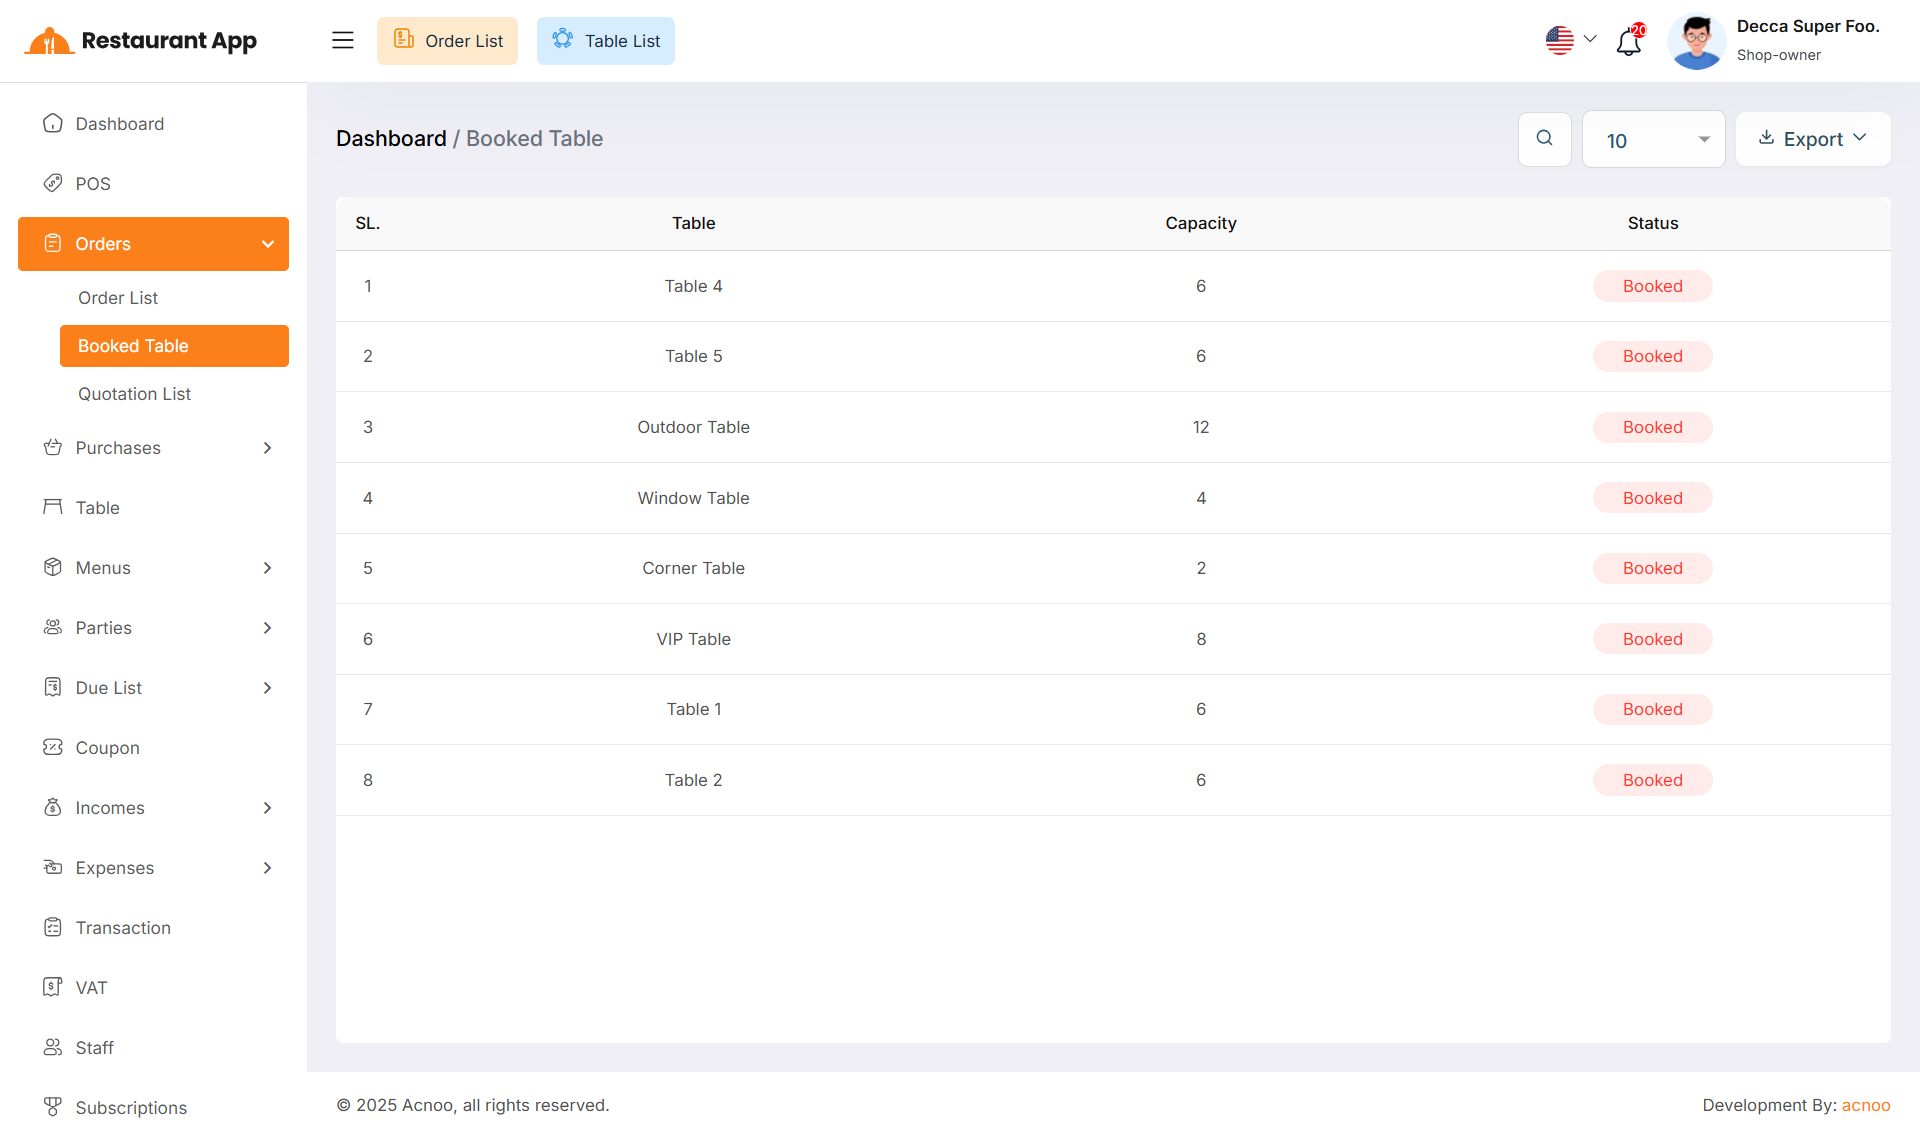
This appears to be a screenshot of the Booked Table list page, where you can filter data using the search function. Additionally, you can see the "Status" and exported as Excel, CSV and PDF.
Quotation List
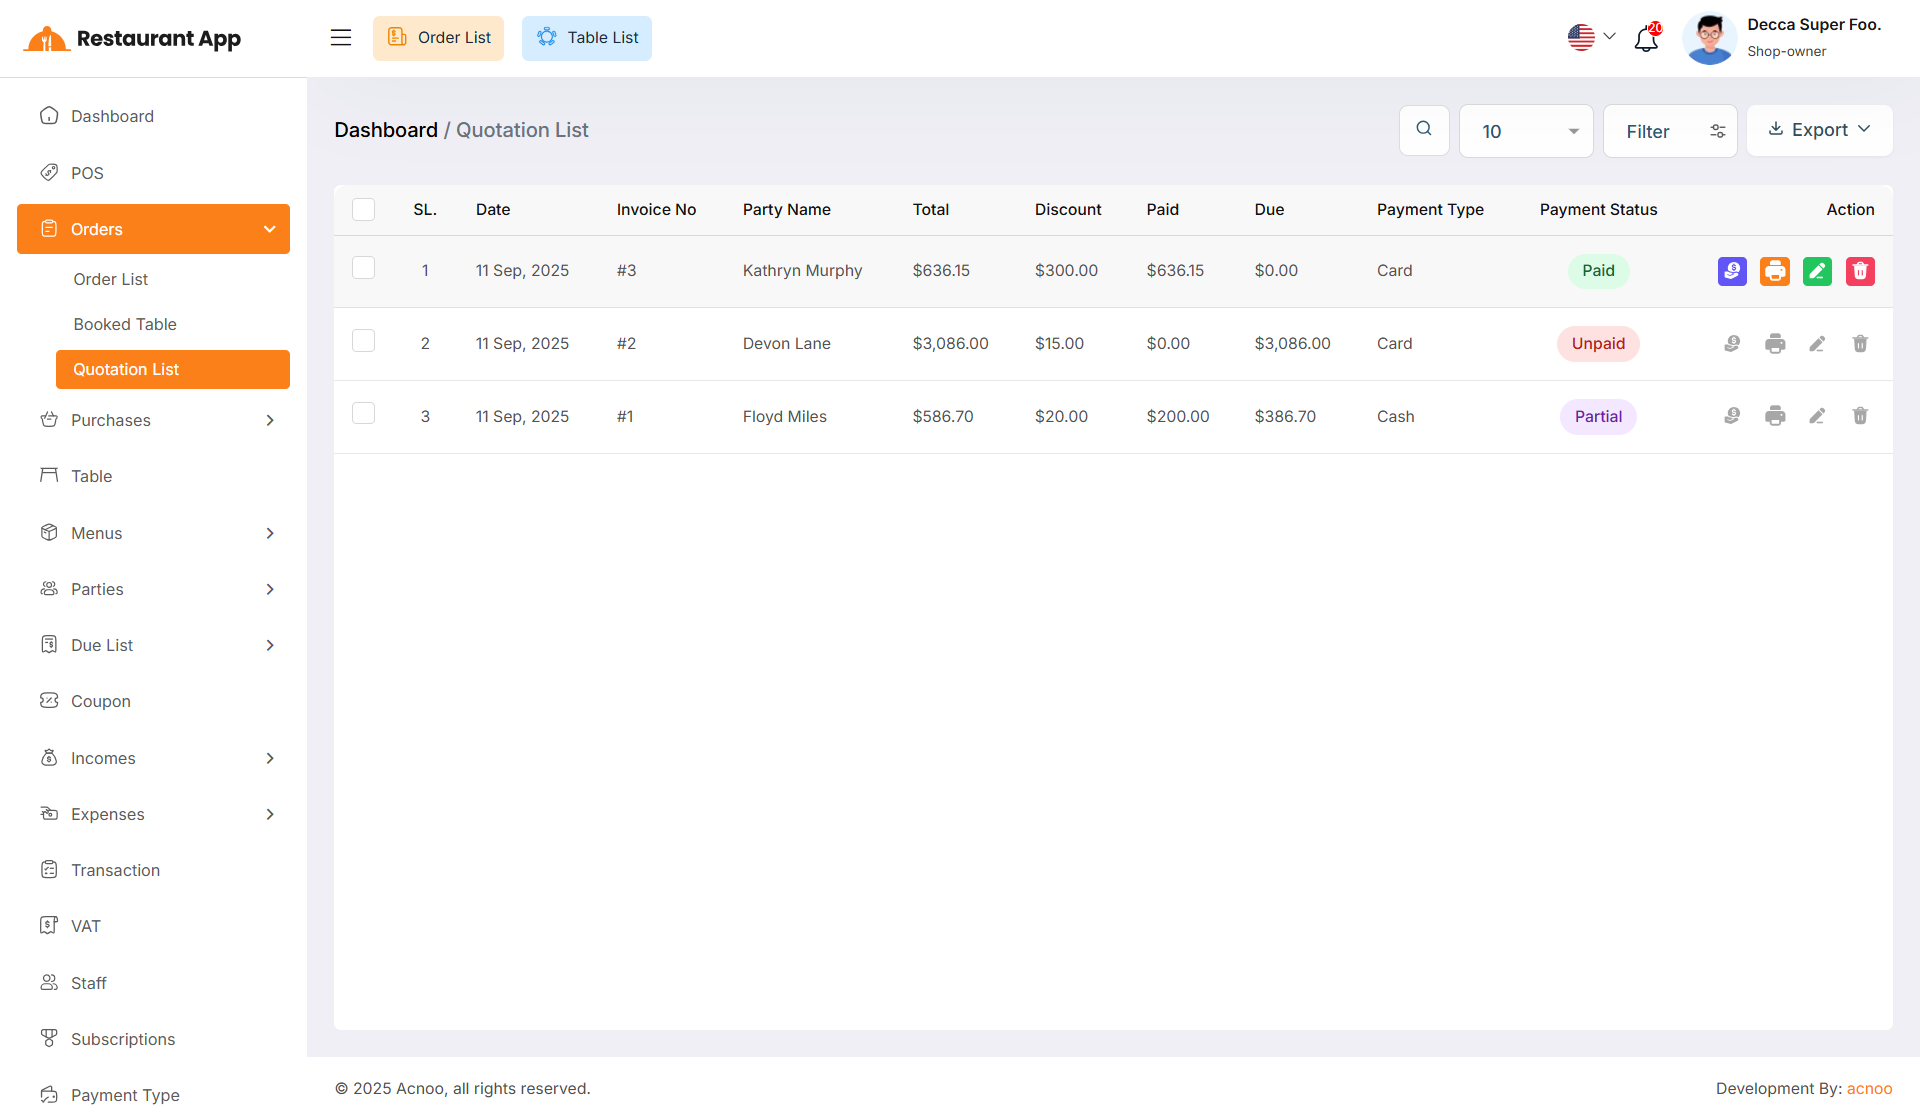
If you select the "Quotation" type while creating an order, it will appear in the Quotations list.
Quotations give you a complete overview of the order, making the process much easier.
Additionally, you can view quotation invoices, as well as edit, delete, or use the multi-delete option and exported as Excel, CSV and PDF.
Another useful feature is that you can easily convert any quotation into an actual order whenever needed.
All Kitchen
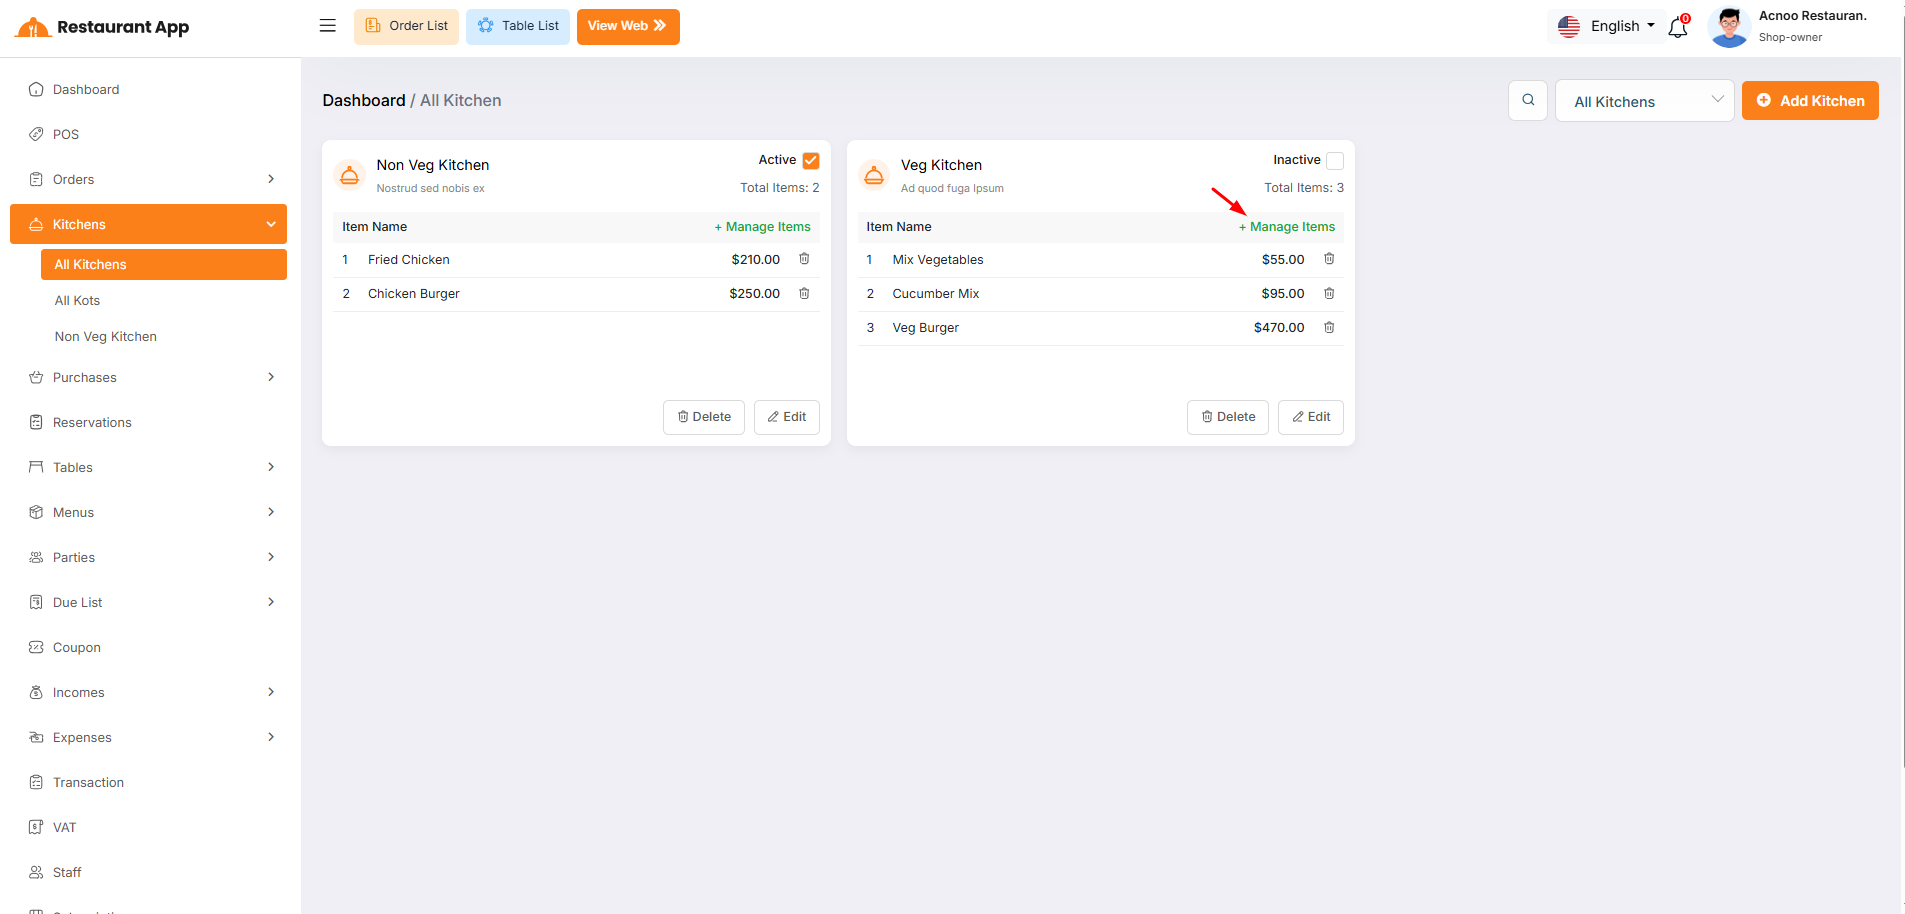
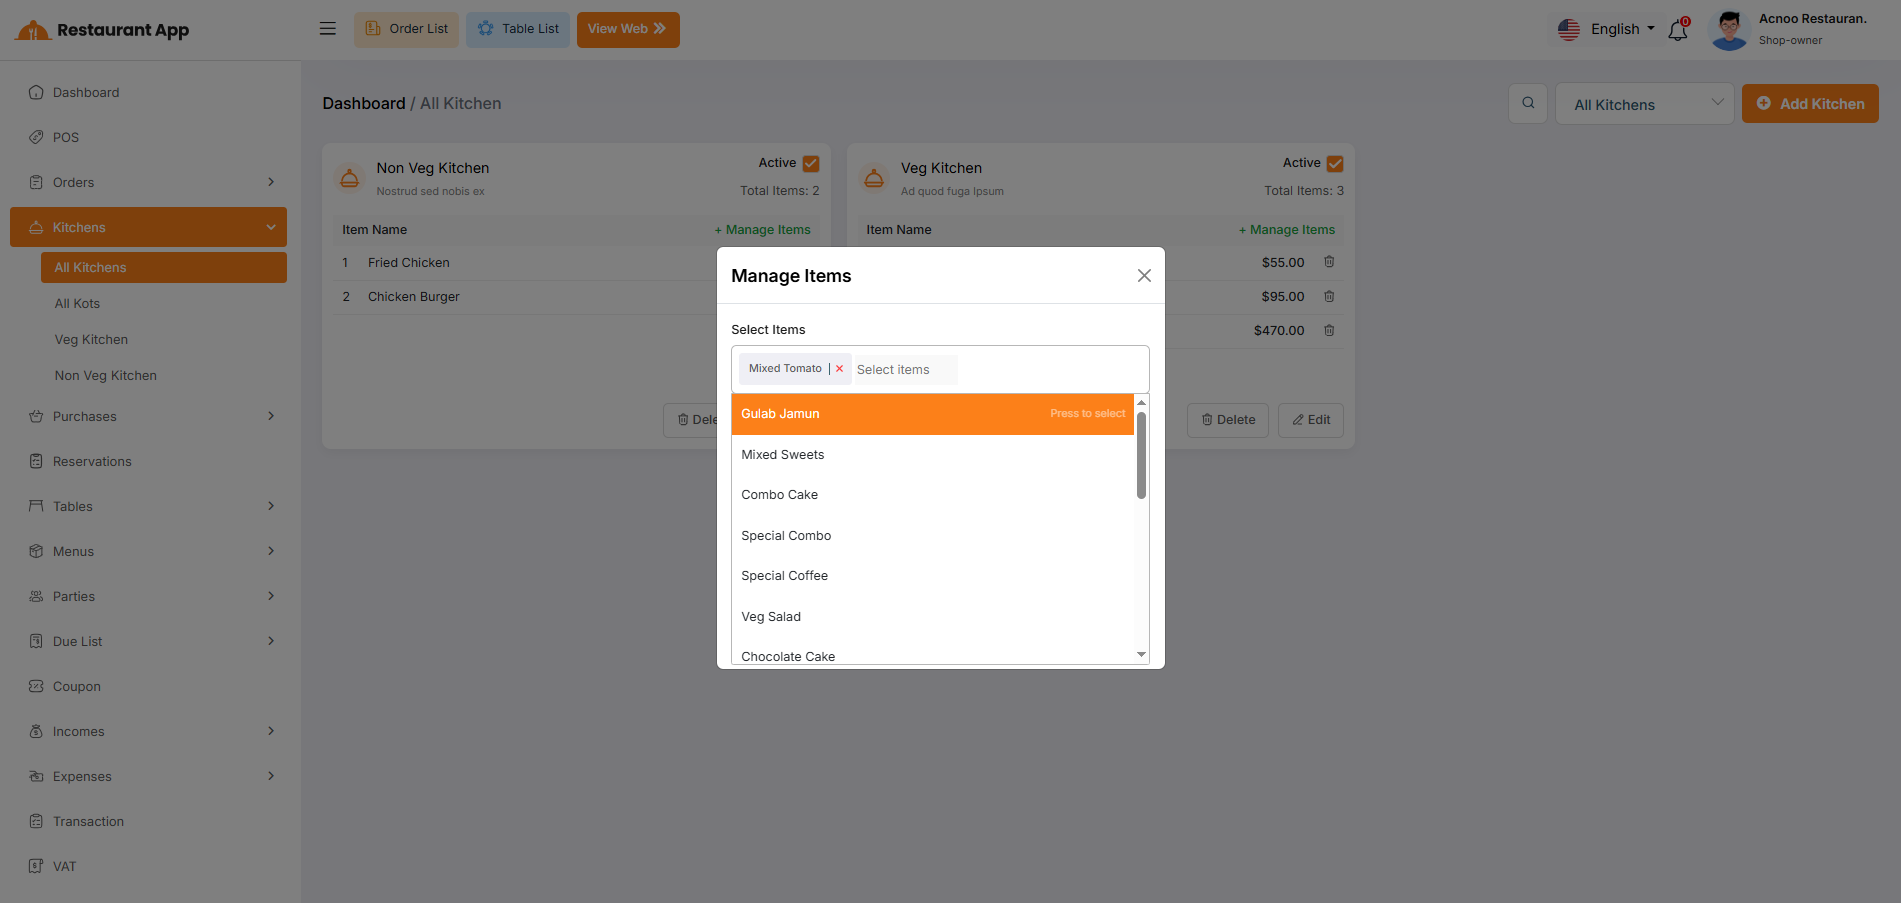
The Kitchens module is designed to streamline restaurant operations by separating food preparation into logical units (e.g., Non-Veg Kitchen, Veg Kitchen). This ensures that orders are routed to the correct staff and inventory is managed efficiently.
Manage Items
Operational Segmentation: It allows a restaurant to split food preparation into specific stations, such as a "Veg Kitchen" and a "Non-Veg Kitchen". Order Routing: By assigning items to specific kitchens, the system ensures that when an order is placed, the ticket is sent to the correct preparation area. Status Control: Owners can quickly toggle a kitchen to "Inactive" if a station is closed for the day, preventing orders from being routed there.
All KOTS
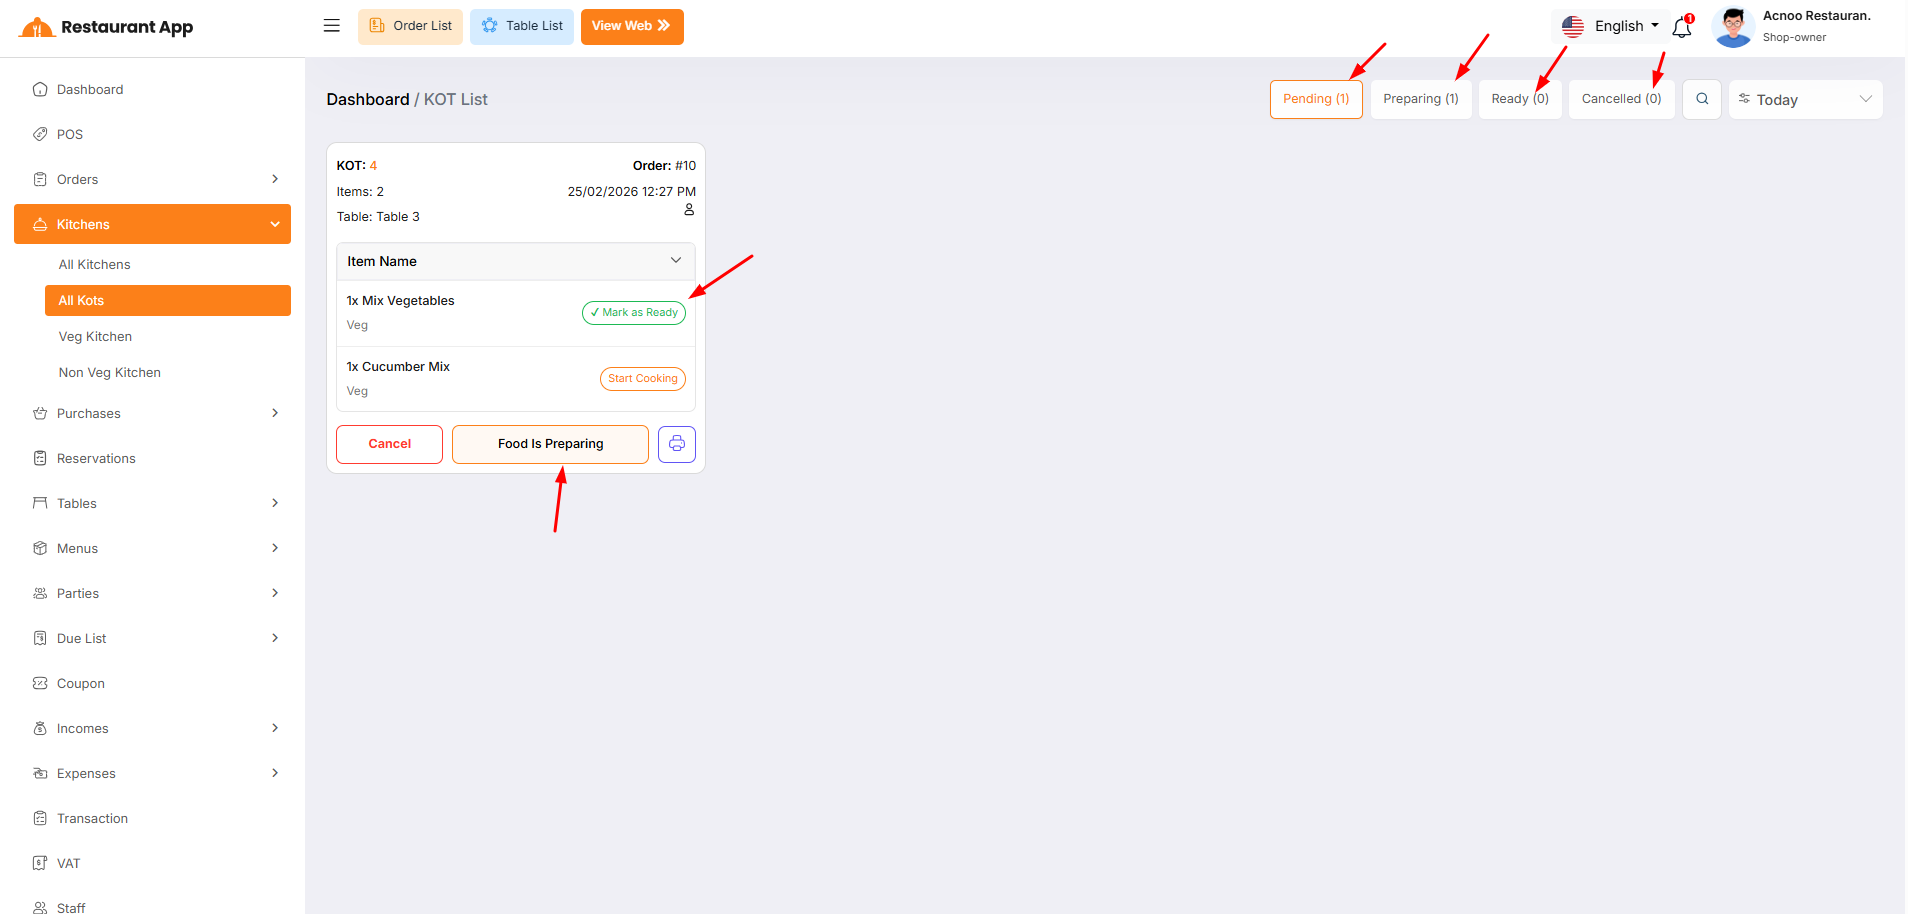
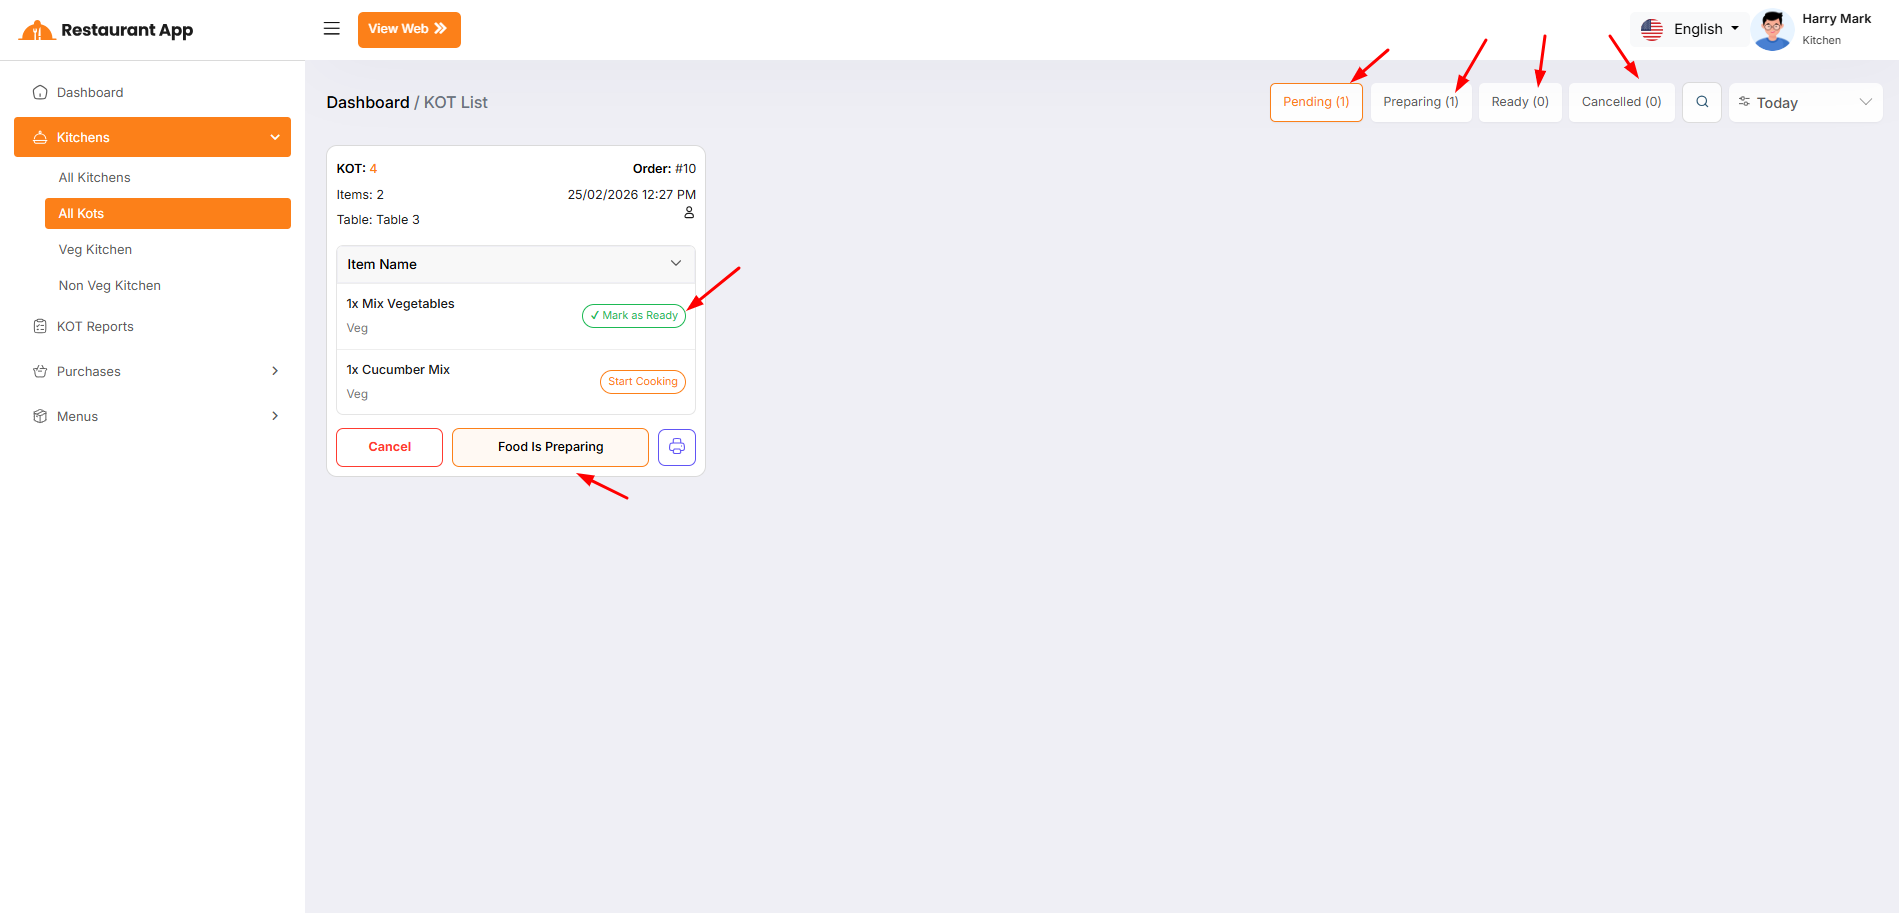
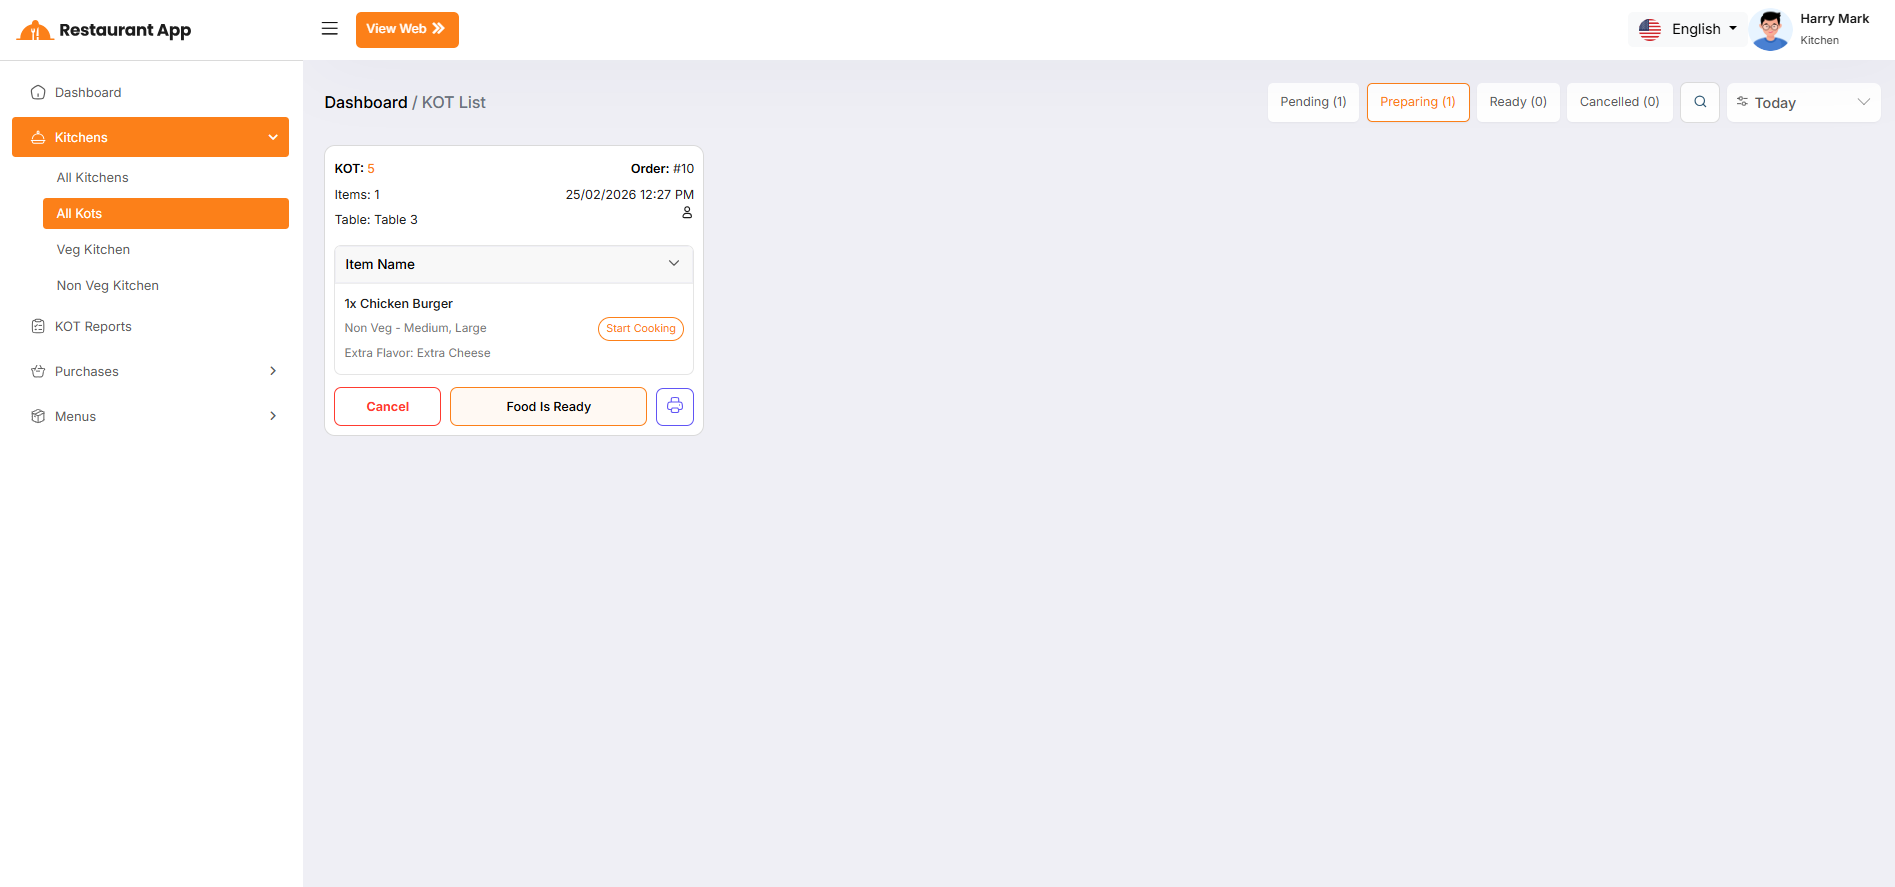
The KOT List page is the central hub for kitchen staff and management to track, manage, and fulfill food and beverage orders. This interface ensures a seamless flow from the point of sale to the kitchen and finally to the customer.
Start Cooking Moves an individual item from "Pending" to "Preparing" status.
Mark as Ready Signals that a specific item is finished and ready for the server.
Food Is Preparing Updates the status of the entire KOT card to the "Preparing" stage.
Cancel Immediately halts the order and moves it to the "Cancelled" tab.
Print (Icon) Generates a physical kitchen ticket for the chefs.
Create Purchase
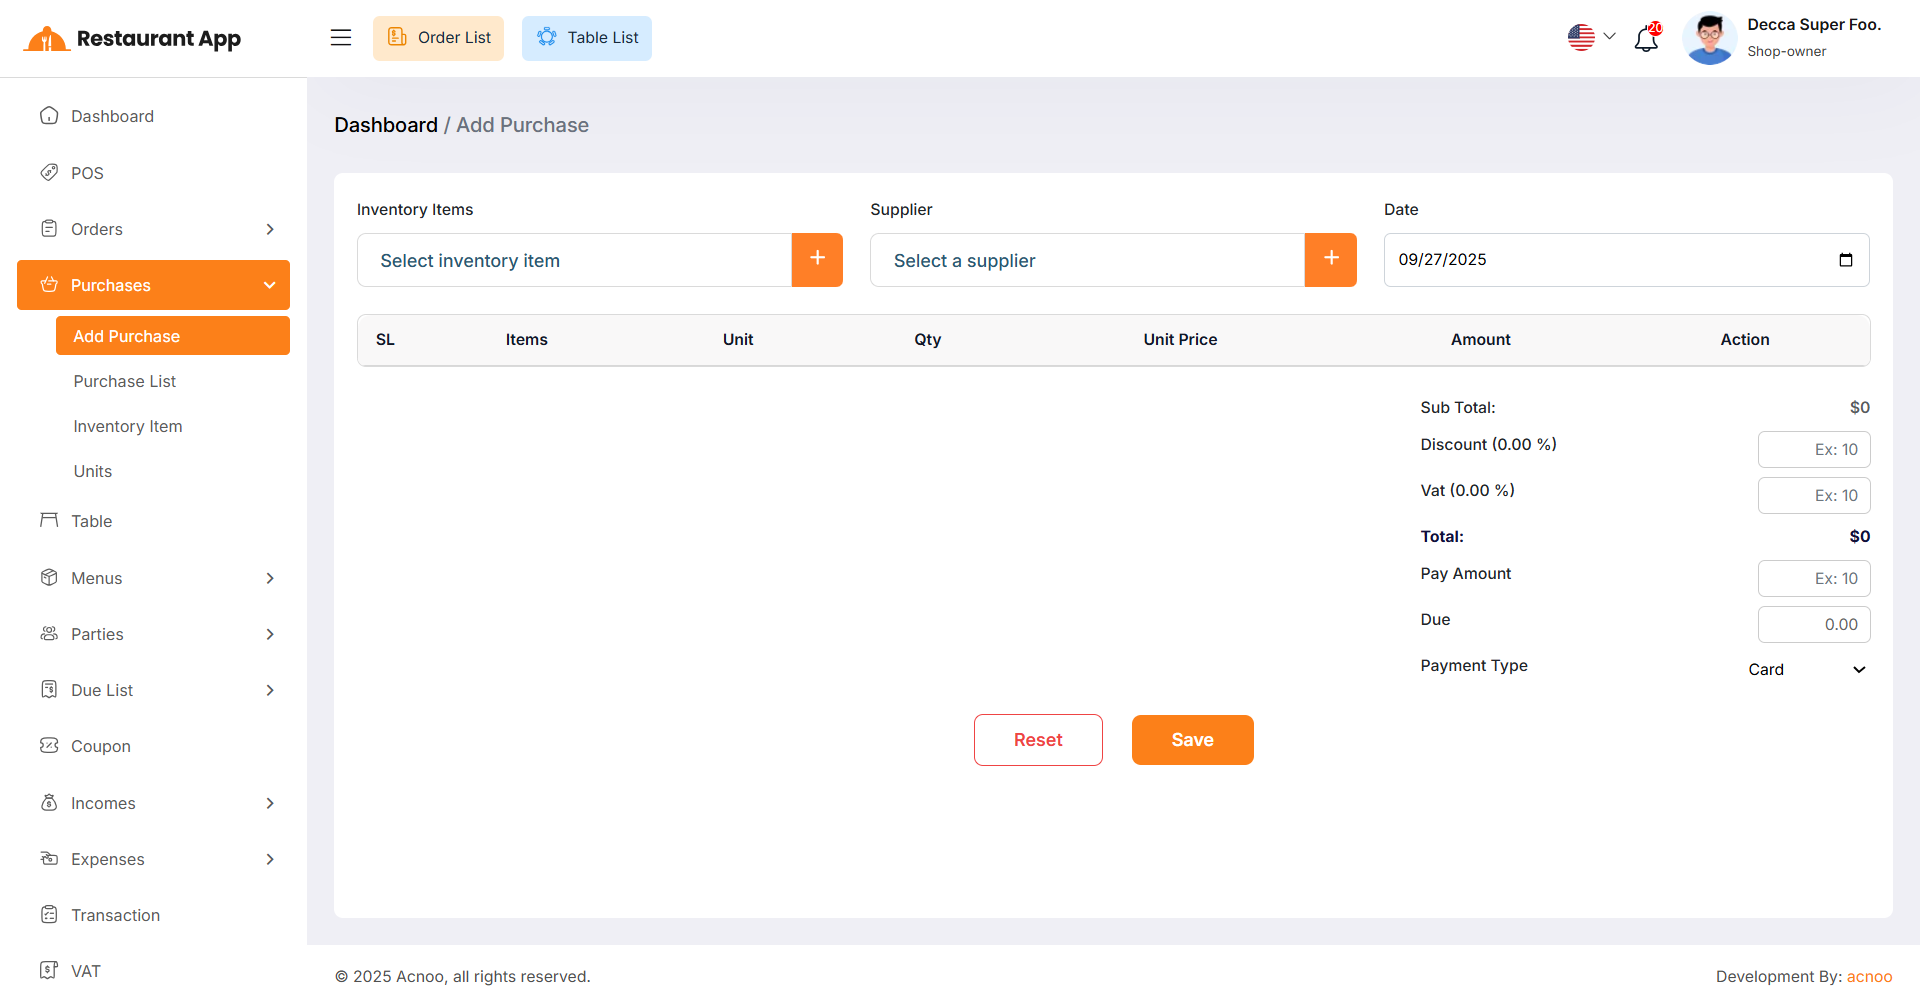
By clicking on "Add Purchase", you can create a new purchase. First, select a supplier, then choose an inventory item for the purchase. Additionally, you can create new items and suppliers instantly by clicking the plus (+) button next to the item and supplier fields.
Add to Cart & Store Purchase
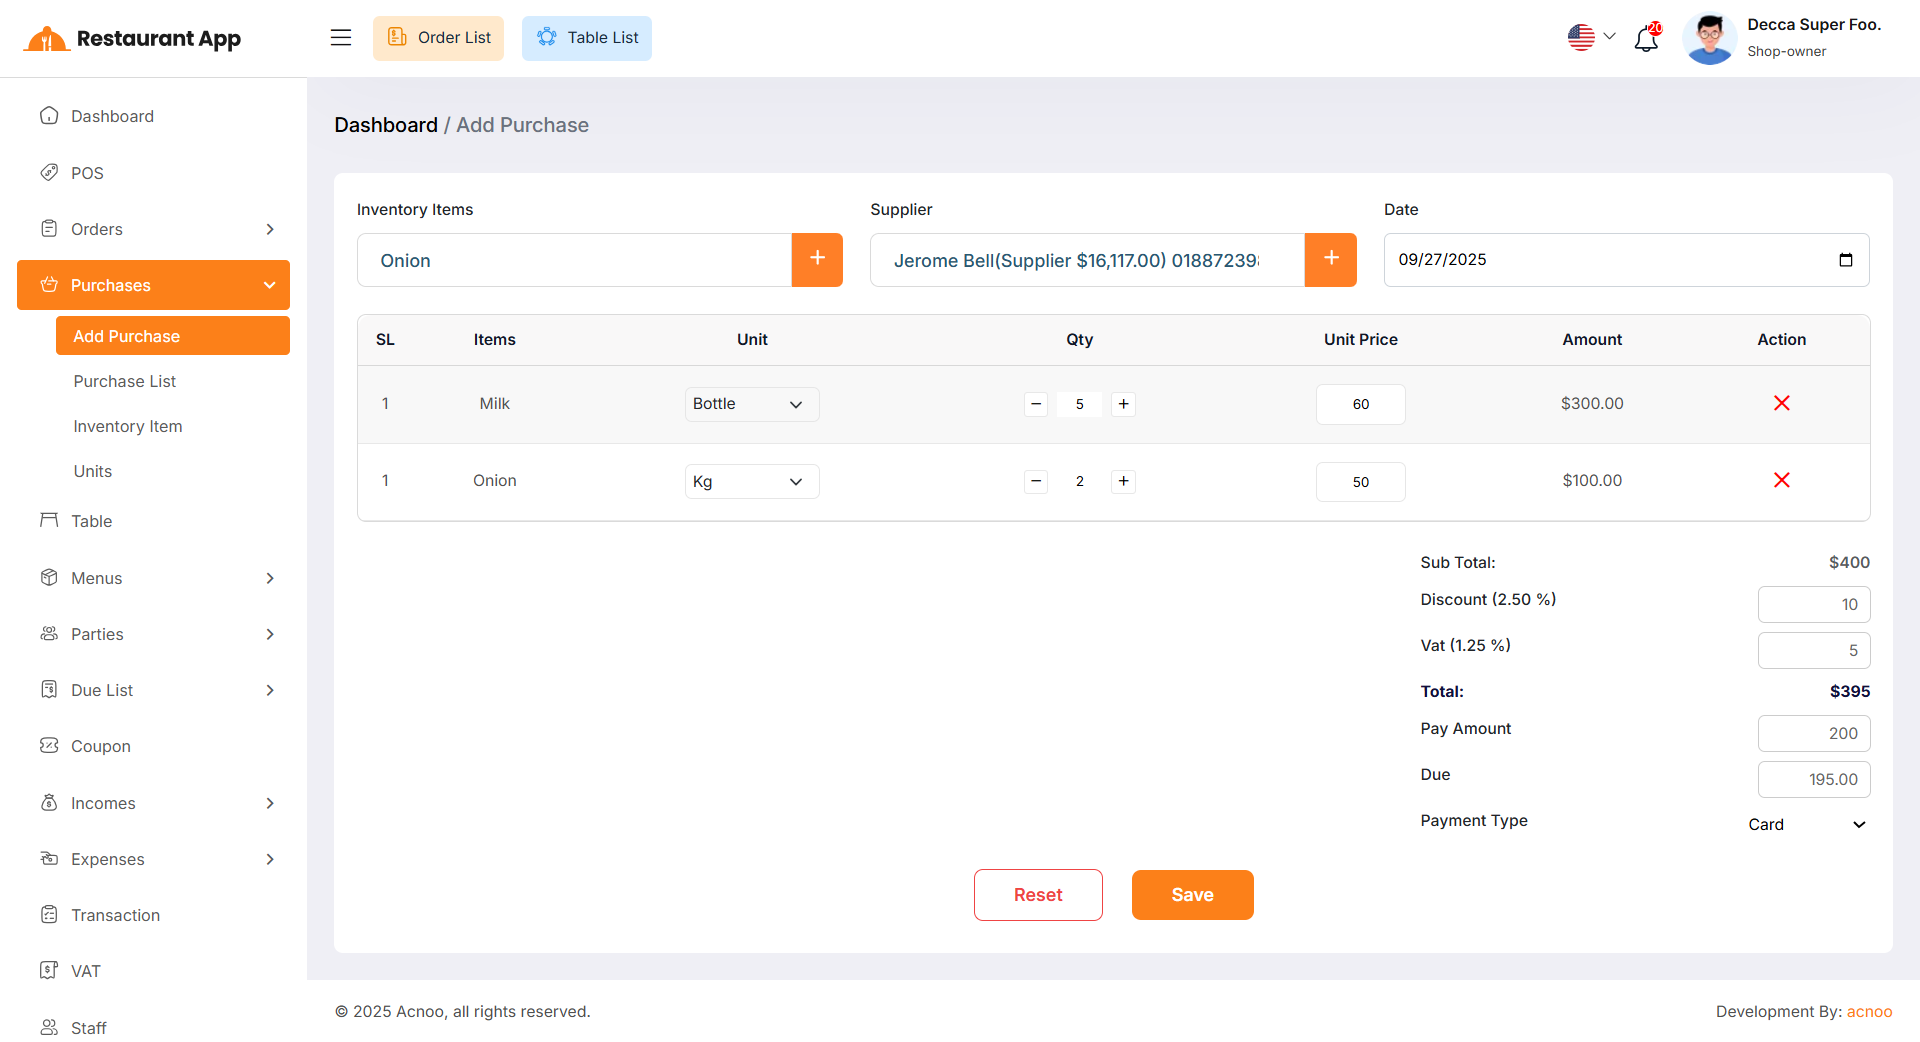
Next, select an item for the purchase. Once selected, the item will automatically appear in the cart list.
You can adjust the quantity using the plus or minus buttons, or update it directly by entering a value.
To remove an item from the cart, click the red cross button.
Below, you will see the subtotal of all items. You can also apply a discount to the subtotal.
After the calculation, the total amount will be displayed. Next, enter the "Pay Amount".
If the Pay Amount is less than the total, the difference will be shown in the "Due" field.
If you want to remove all items from the list, click the reset button.
Once everything is correct, click the save button to complete the purchase.
Purchase List
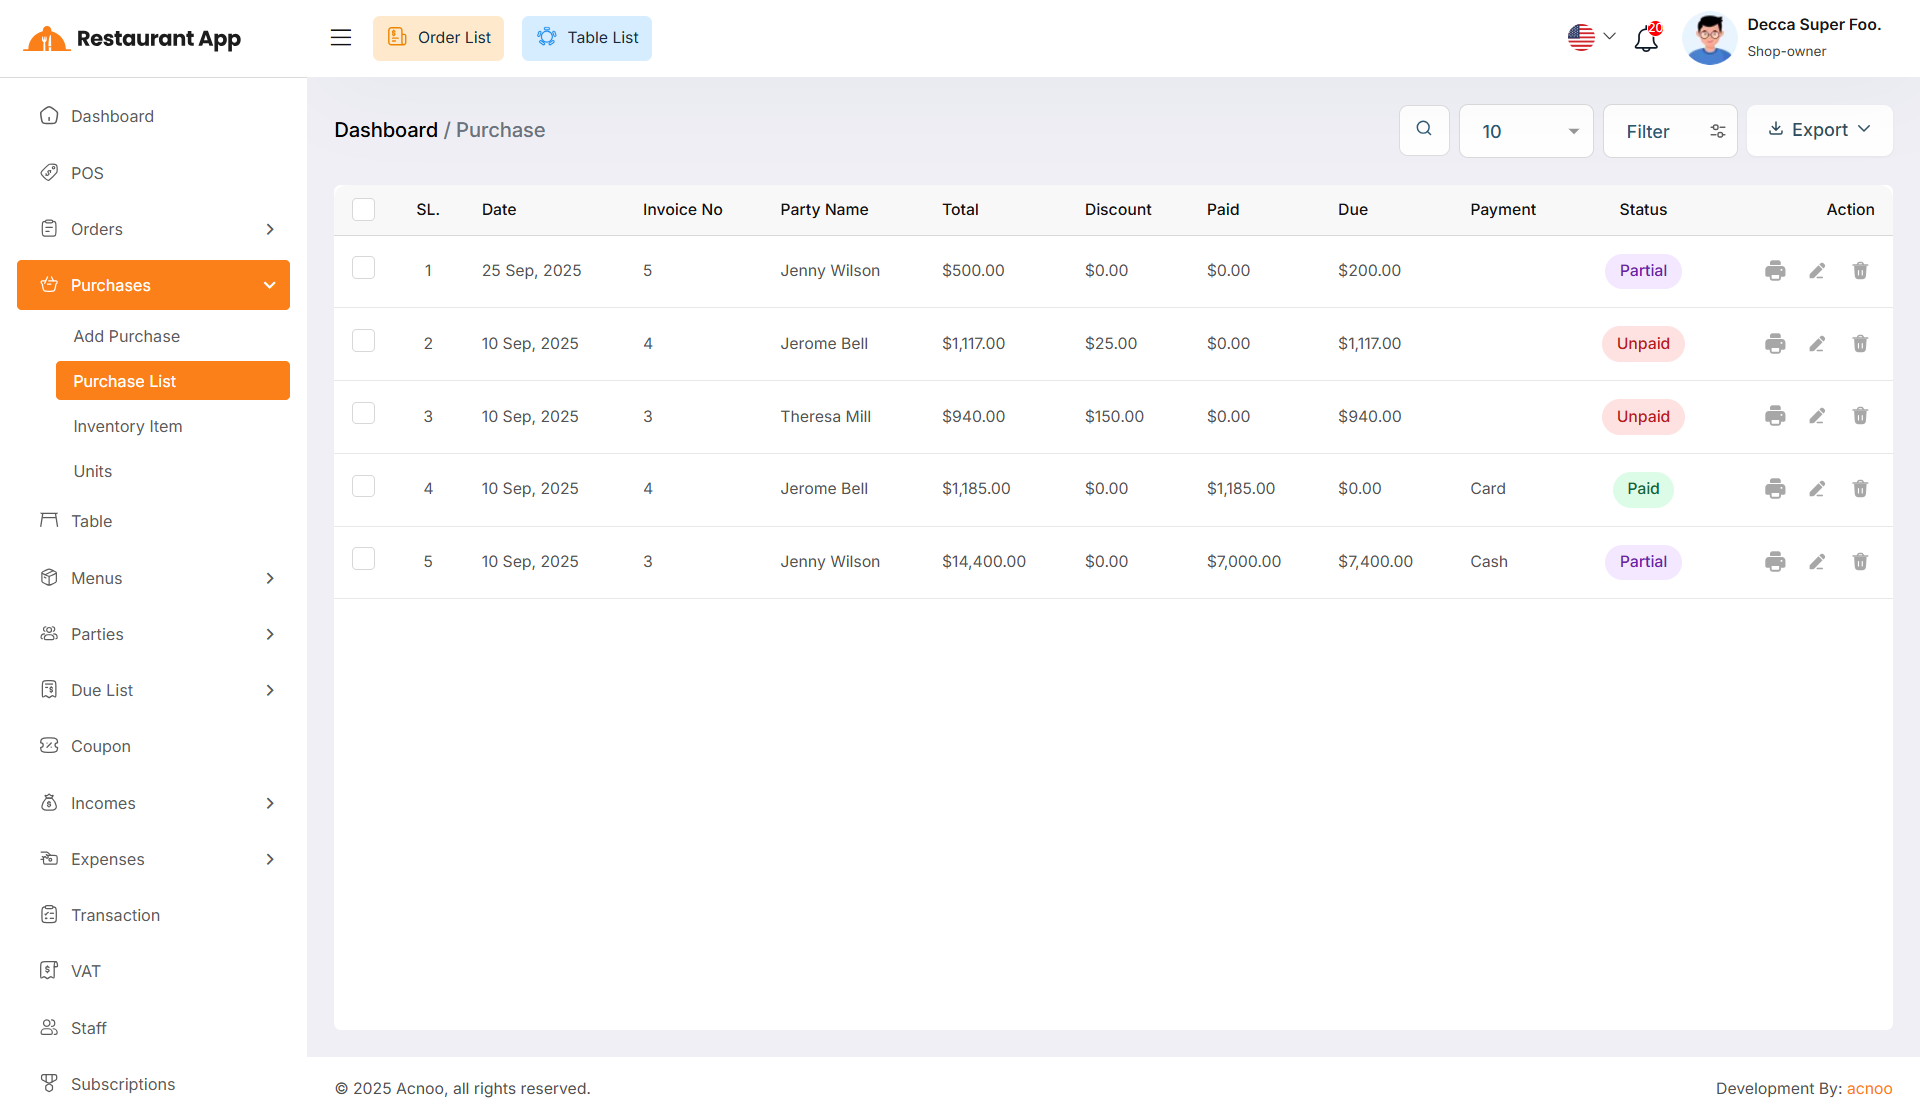
This appears to be a screenshot of the Purchase list page, where you can filter data using the search function. Additionally, you can view invoices, as well as edit, delete, or use the multi-delete option exported as Excel, CSV, and PDF.
Inventory Item List
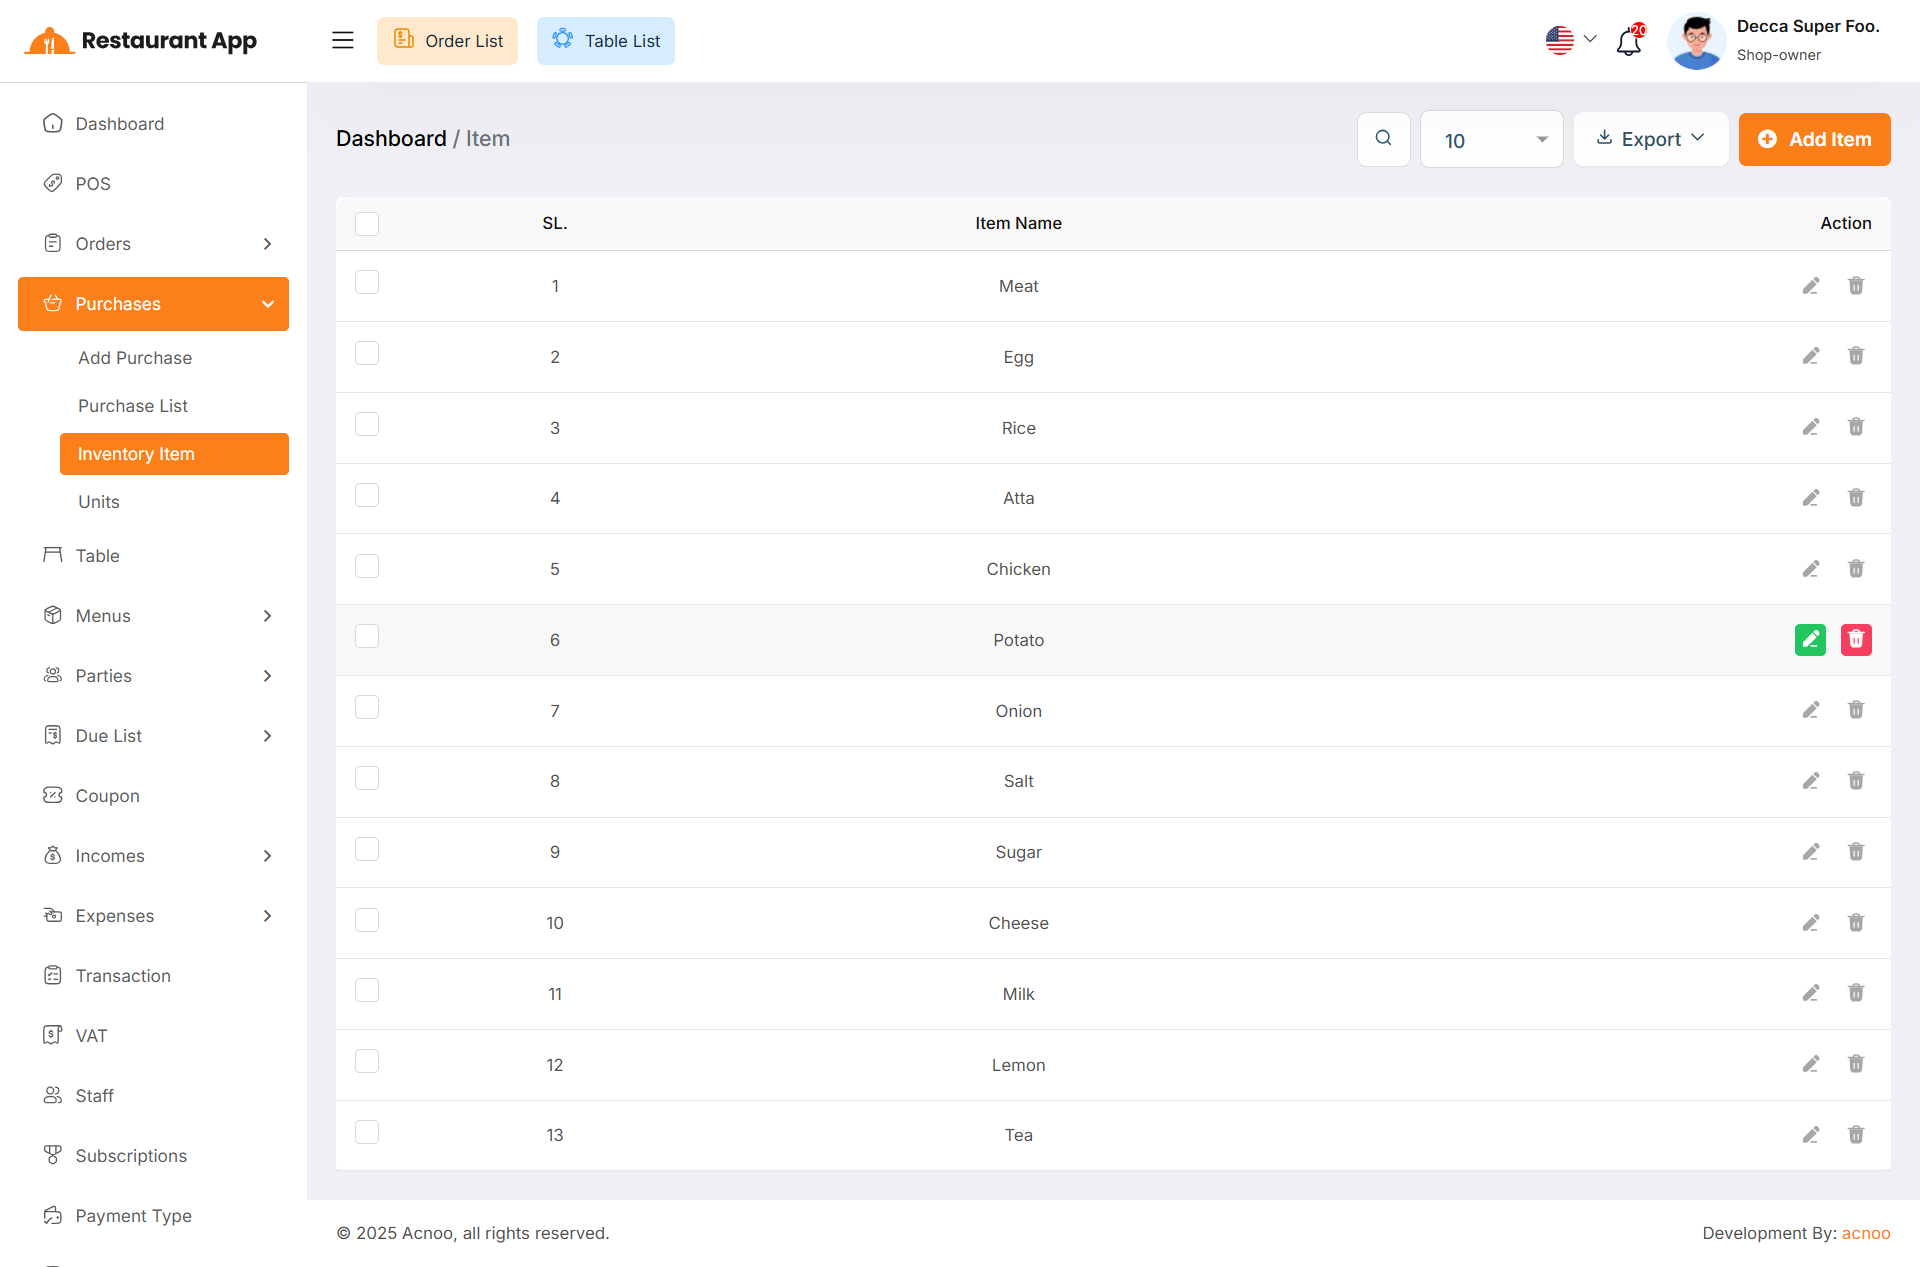
This appears to be a screenshot of the Inventory Item list page, where you can filter
data using the search function. Additionally, you can edit, delete, or use the multi-delete option exported as Excel, CSV and PDF.
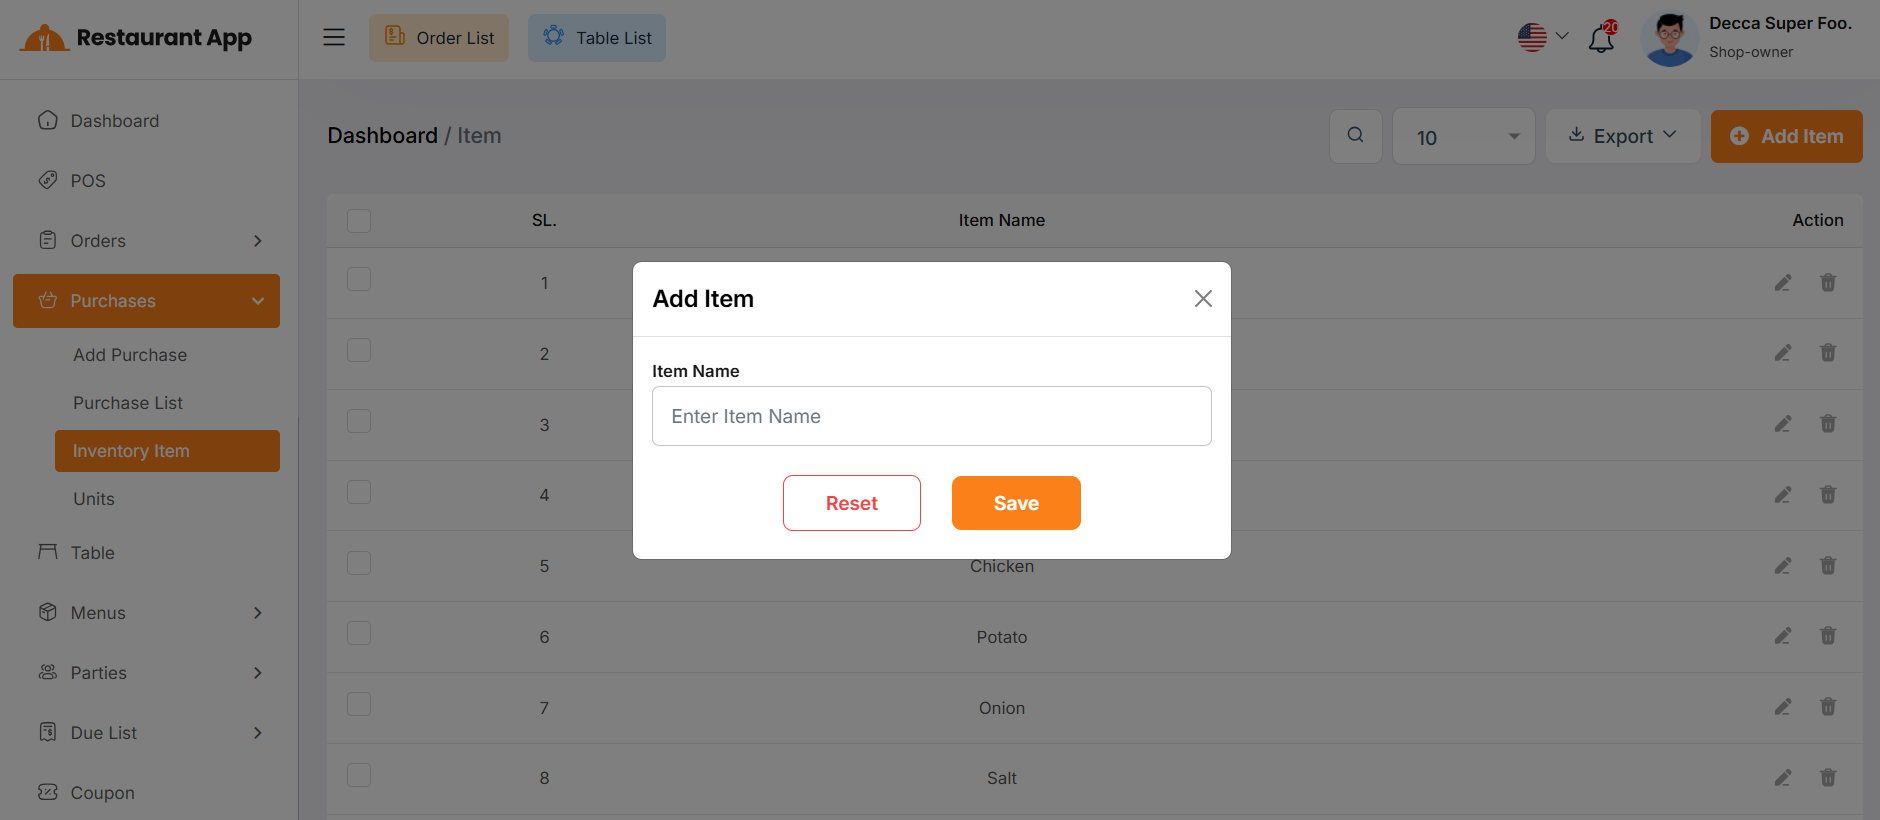
By clicking on the "Add Item" button, you can easily create a new inventory item by filling name field.
Unit List
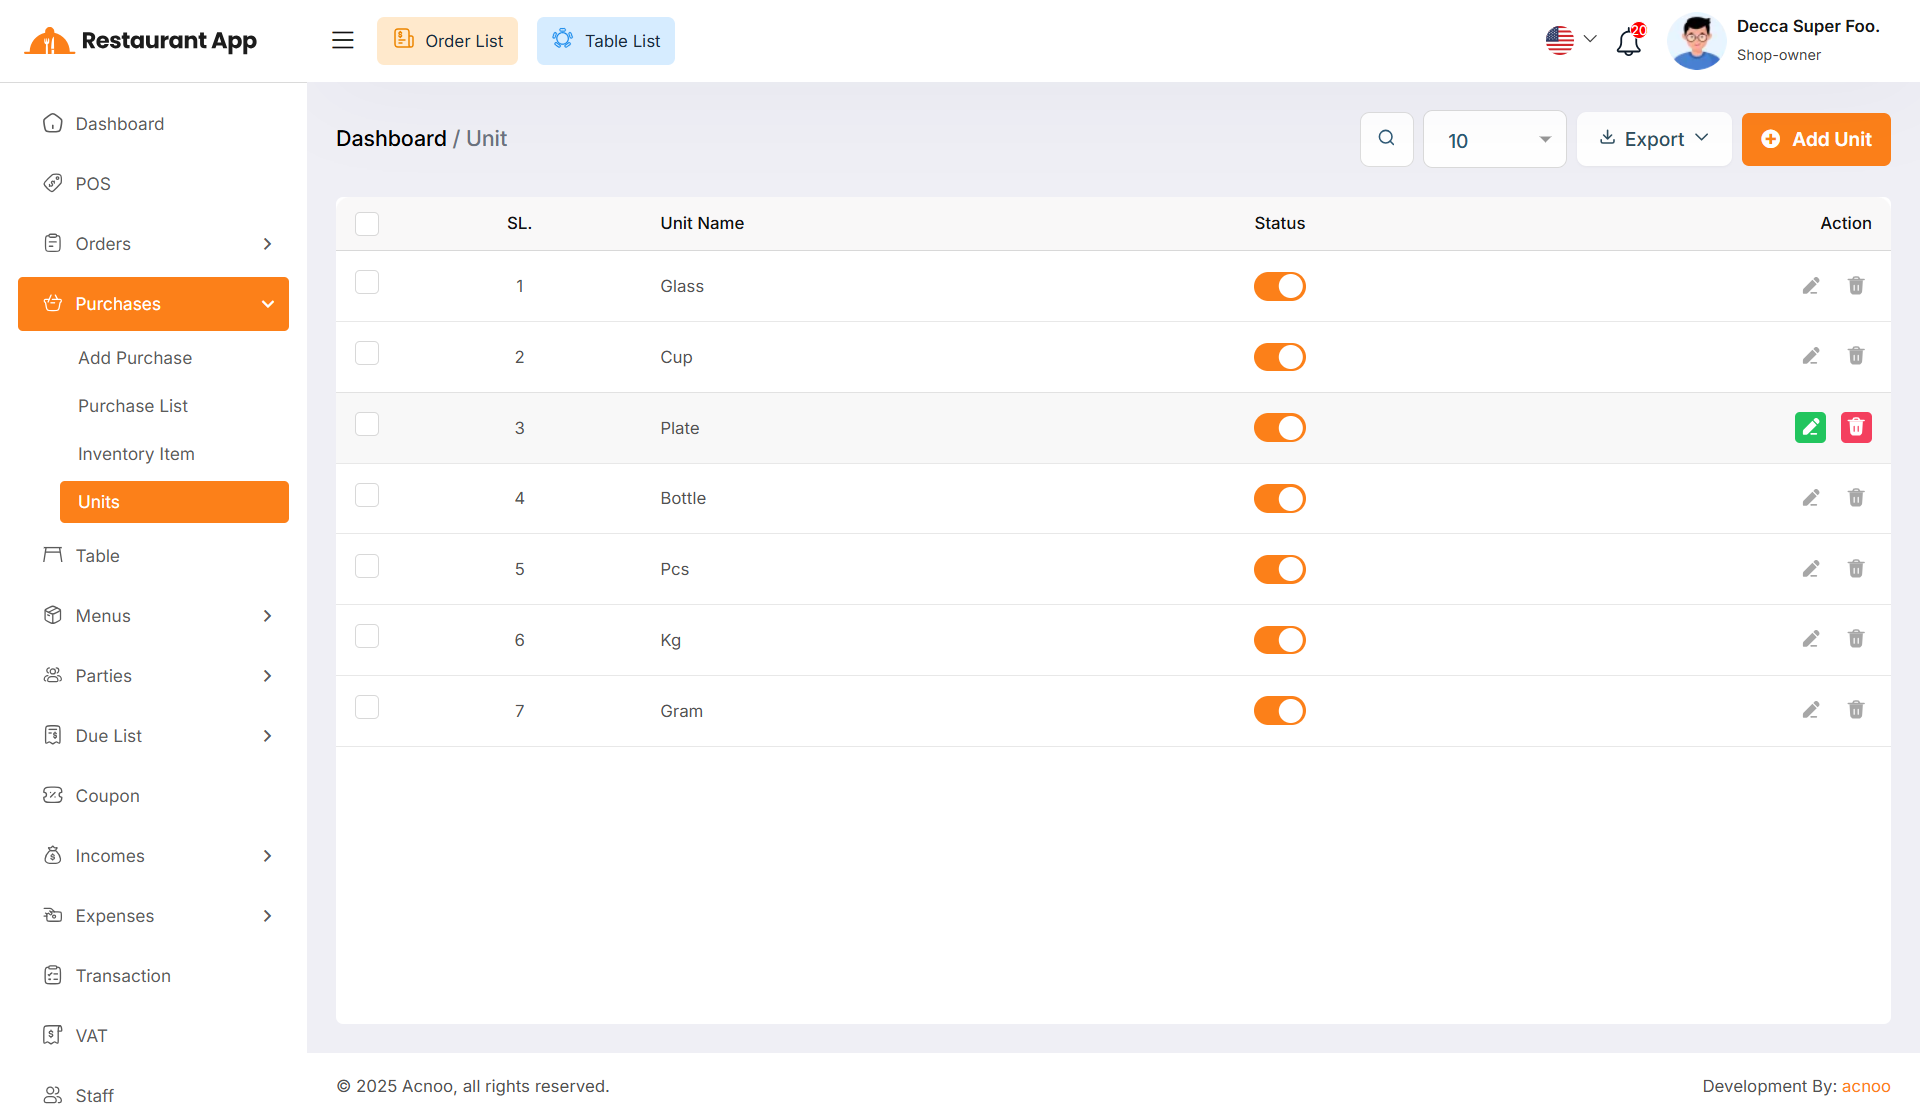
This appears to be a screenshot of the Unit list page, where you can filter
data using the search function. Additionally, you can edit, delete, or use the multi-delete option exported as Excel, CSV and PDF.
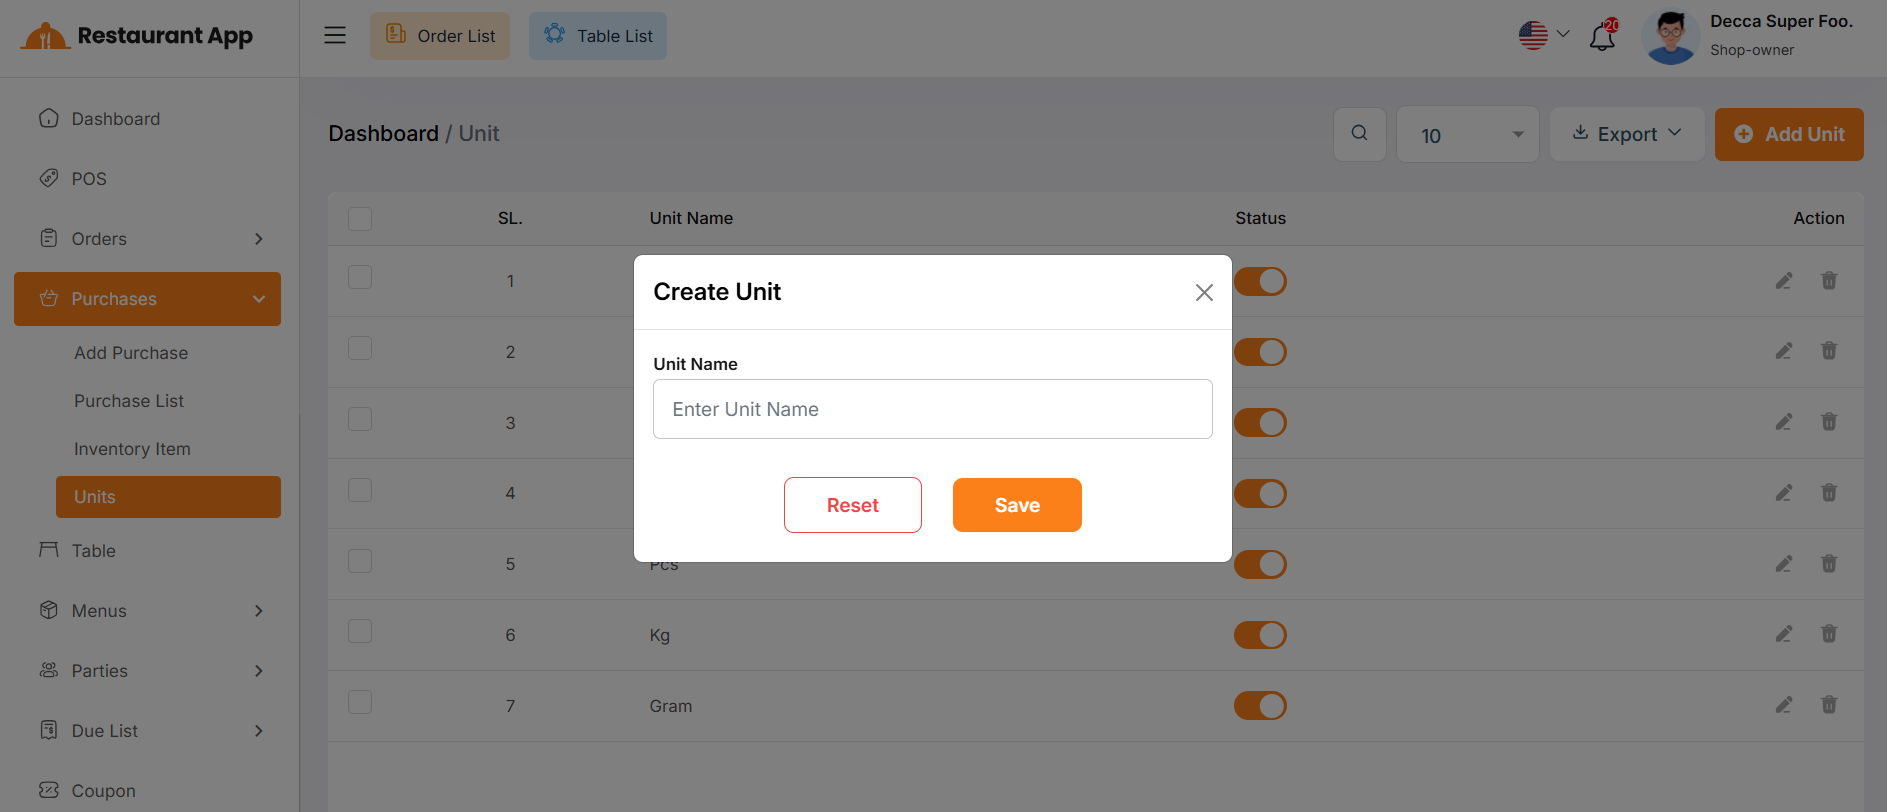
By using the "Status Toggle", you can show or hide the unit during the purchase process.
By clicking on the "Add Unit" button, you can easily create a new unit item by filling name field.
Reservation List
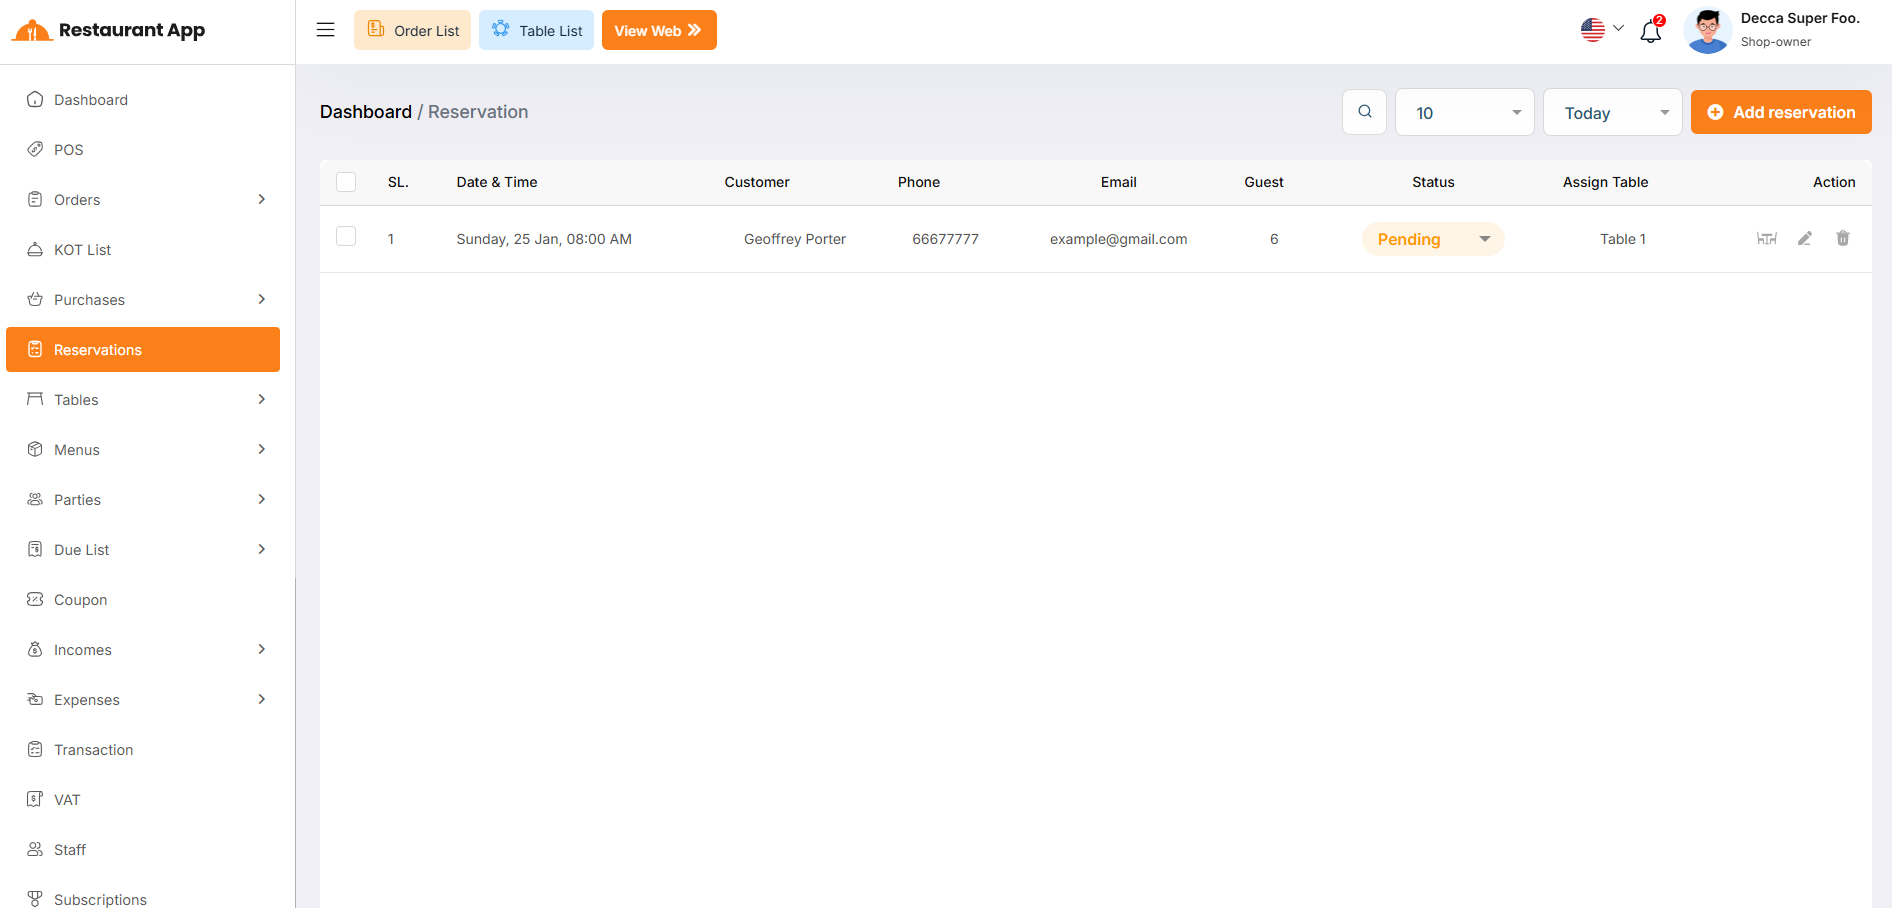
The Reservations page allows restaurant management to organize bookings, assign seating, and track guest details to ensure a smooth dining experience.
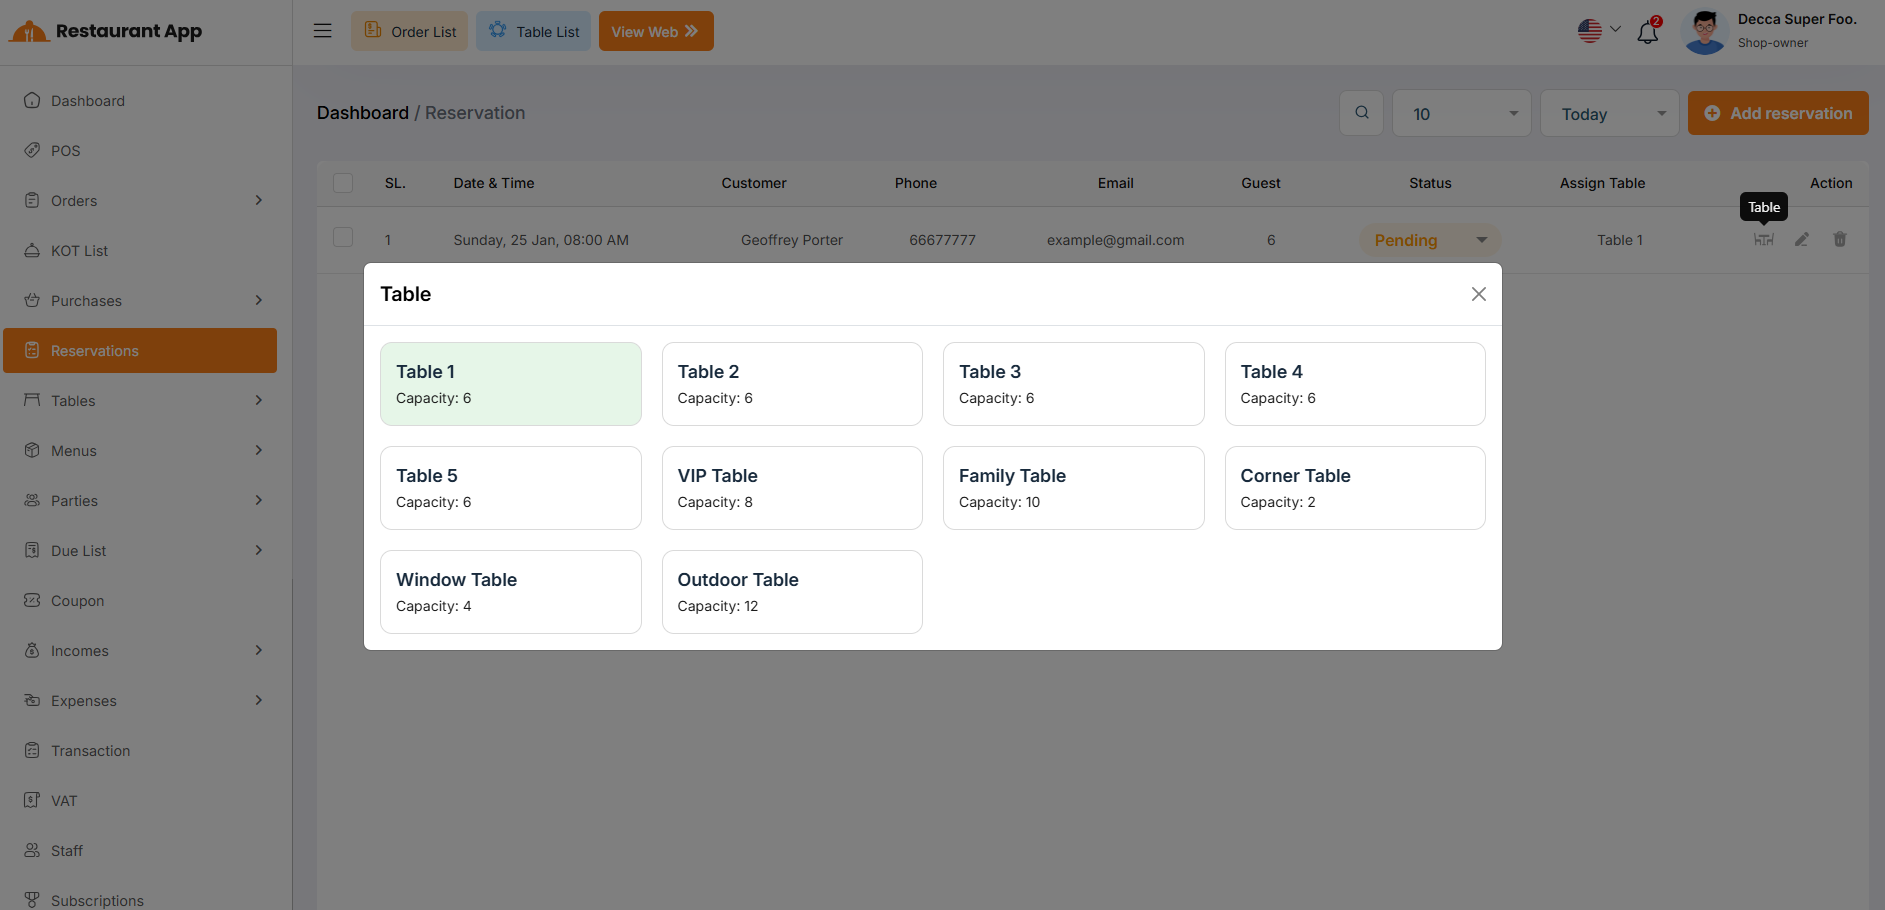
When clicking the Table icon, a pop-up menu appears to help you visualize and select available seating:
Table Variety Choose from various sections such as the VIP Table, Family Table, Outdoor Table, or Window Table.
Capacity Indicators Each table card displays its maximum capacity (e.g., "Capacity: 10") to ensure it fits the guest count.
Selection Status Highlighted cards (in green) indicate the currently assigned table for that specific reservation.
Reservation Create
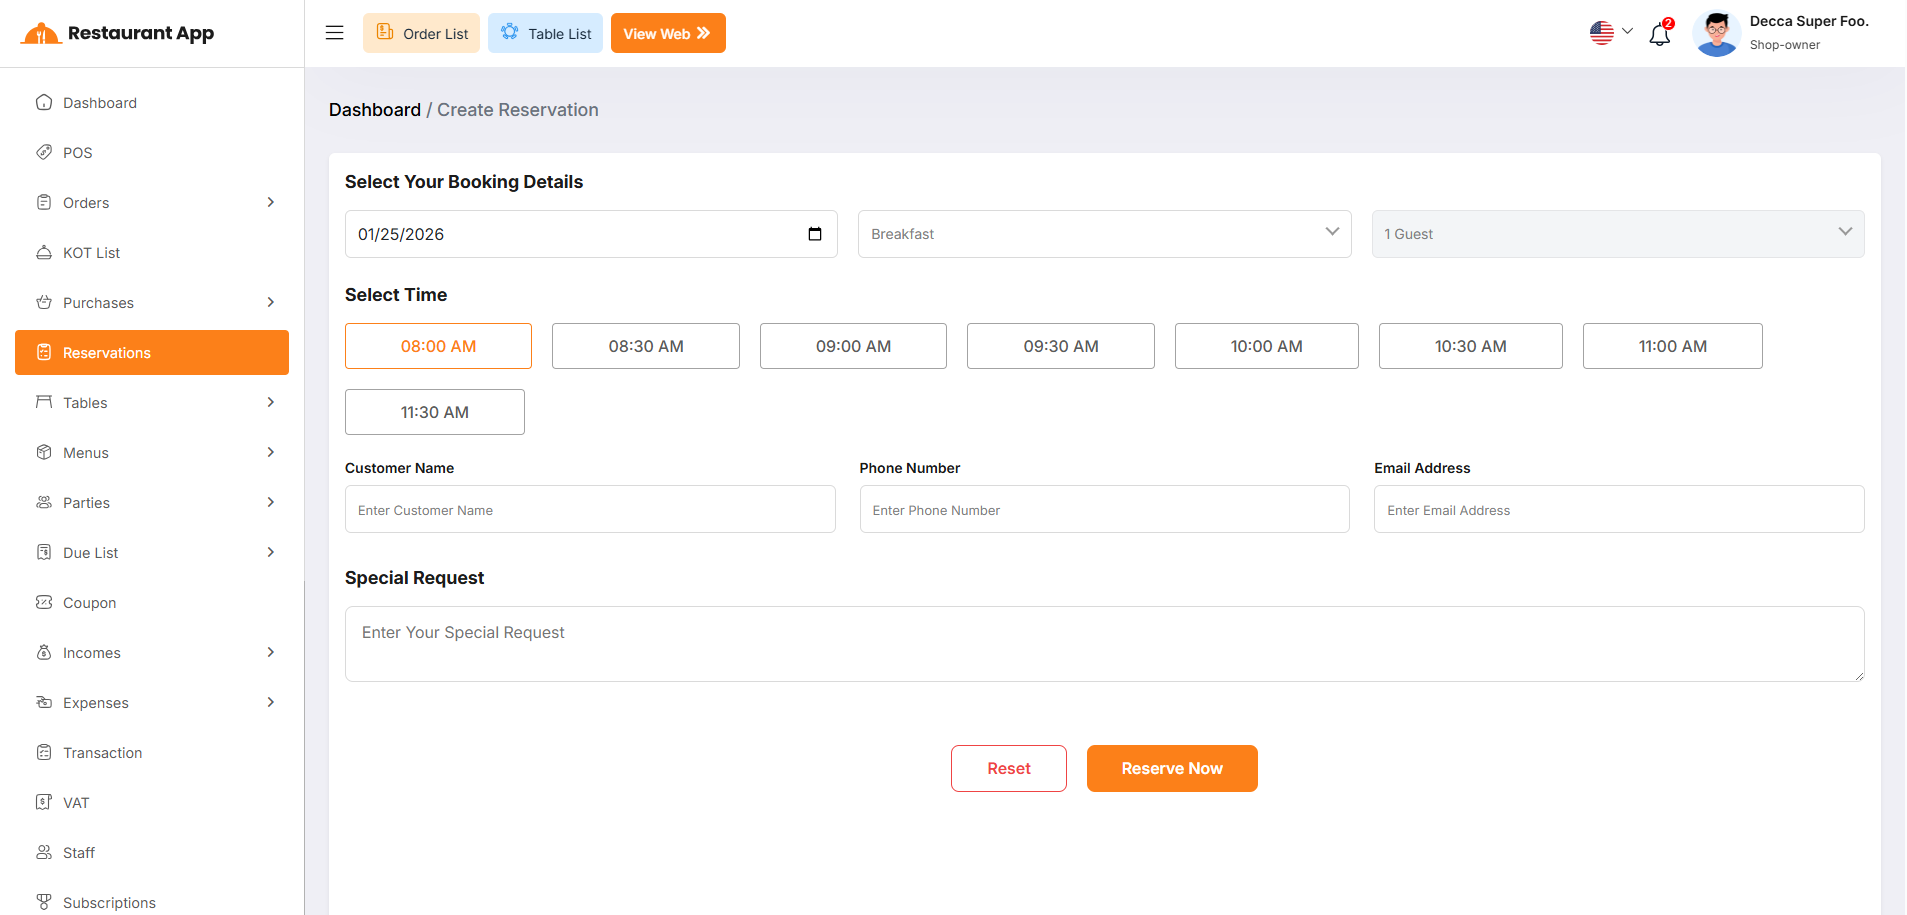
Booking Details Staff can select the calendar date, meal period (e.g., Breakfast), and the total number of guests.
Time Selection Displays available time slots in 30-minute intervals (e.g., 08:00 AM to 11:30 AM) for precise scheduling.
Customer Information Fields for entering the Customer Name, Phone Number, and Email Address.
Special Request A text area for noting specific guest needs, such as high chairs, allergies, or anniversary celebrations.
Action Buttons Use "Reset" to clear the form or "Reserve Now" to finalize the booking.
Areas List
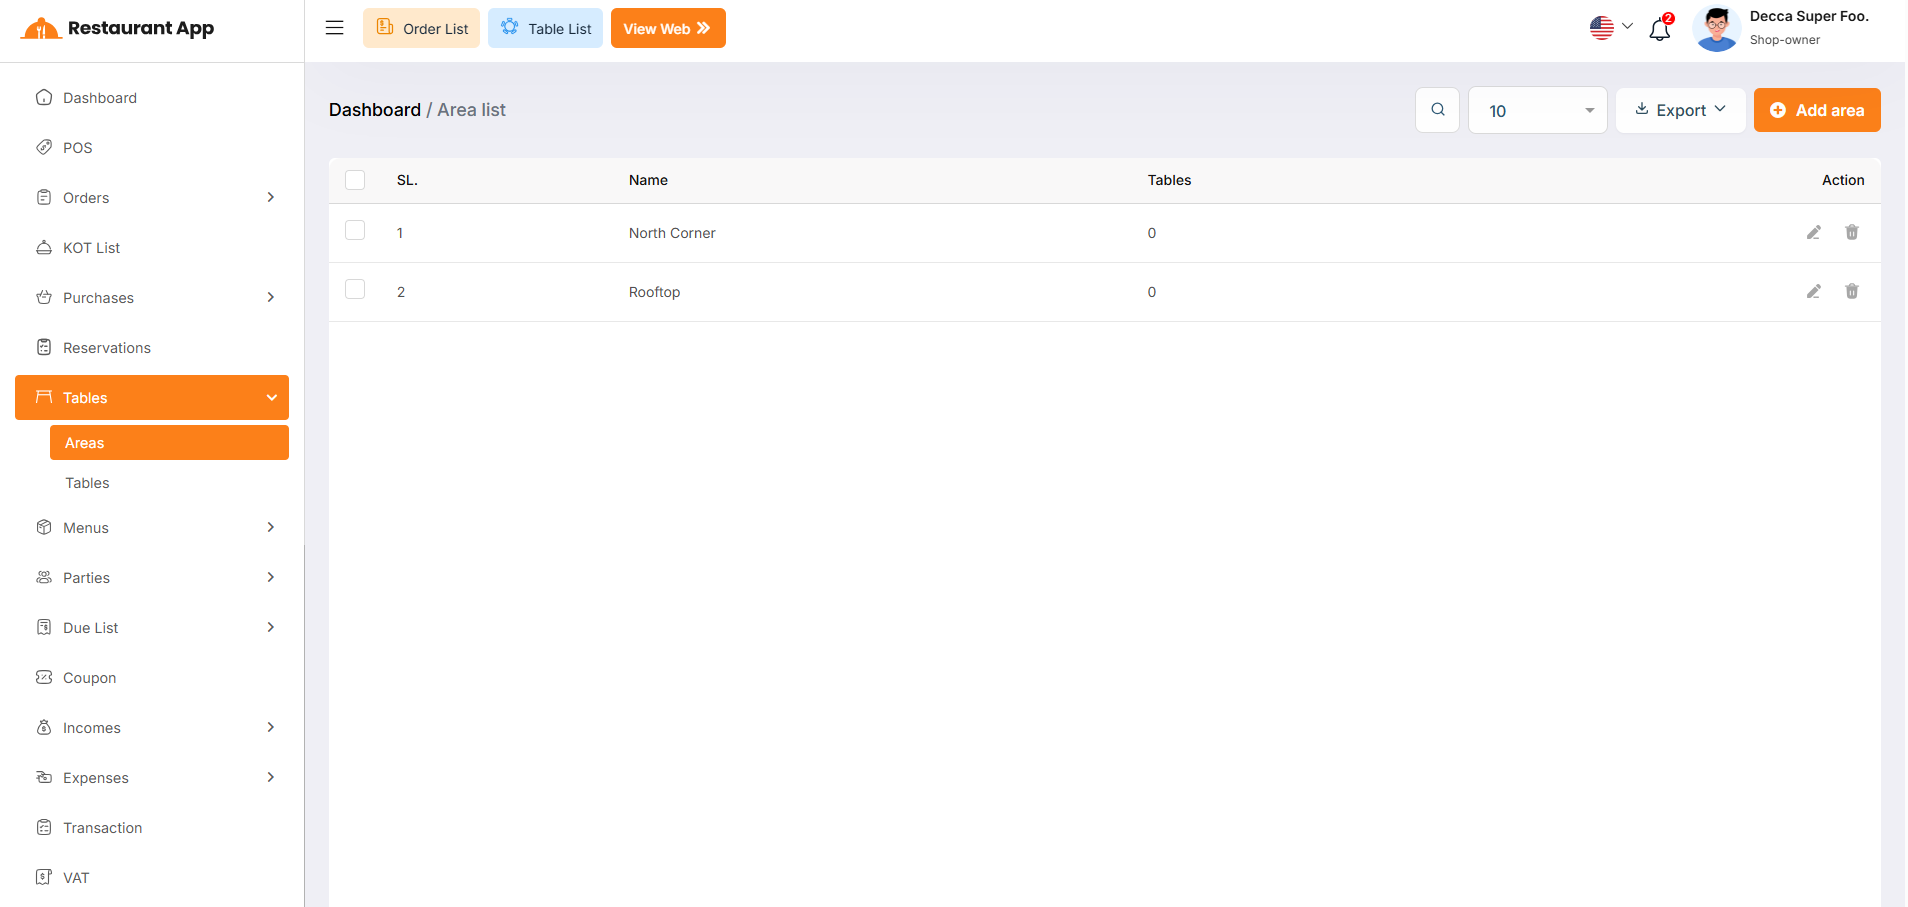
The Area List page allows restaurant administrators to organize the physical layout of the establishment by creating and managing distinct dining zones.
Area Create
Create Area Modal When adding or editing, a pop-up appears requesting the unique Name of the zone (e.g., "south corner").
Save & Reset Use the "Save" button to finalize the zone or "Reset" to clear the input field.
Row Actions Each area in the list features two primary icons: the Pencil Icon for editing existing names and the Trash Icon for deleting a zone from the system.
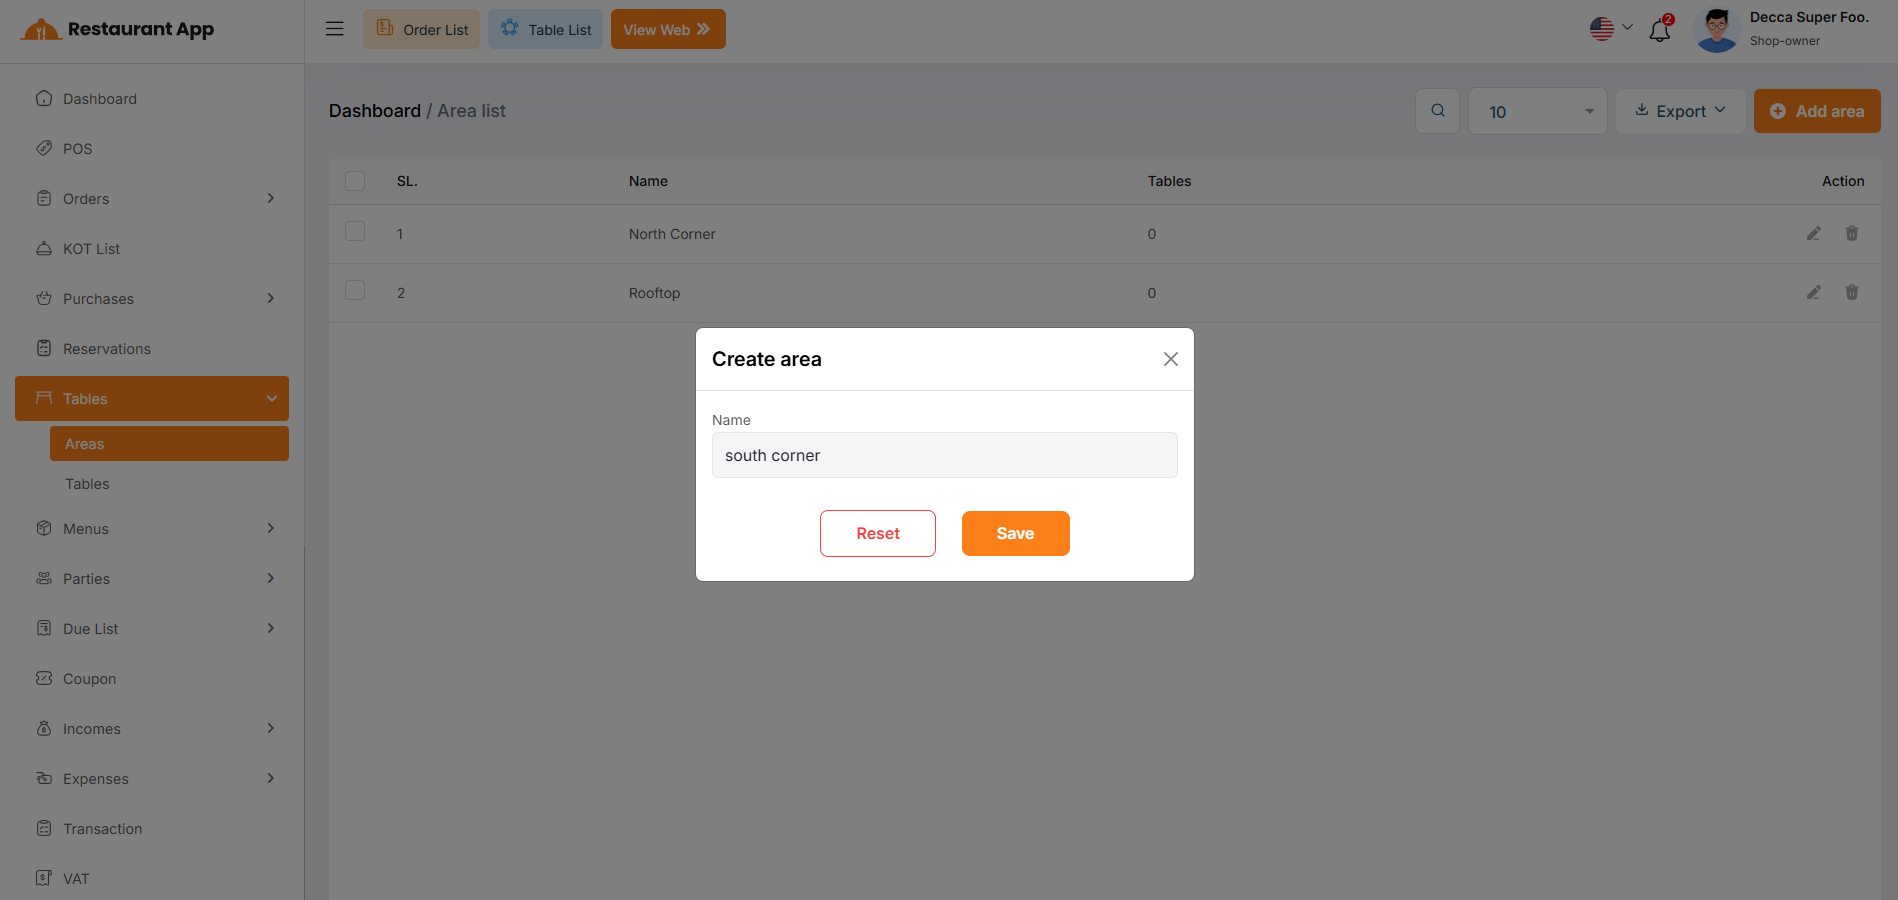
Table List
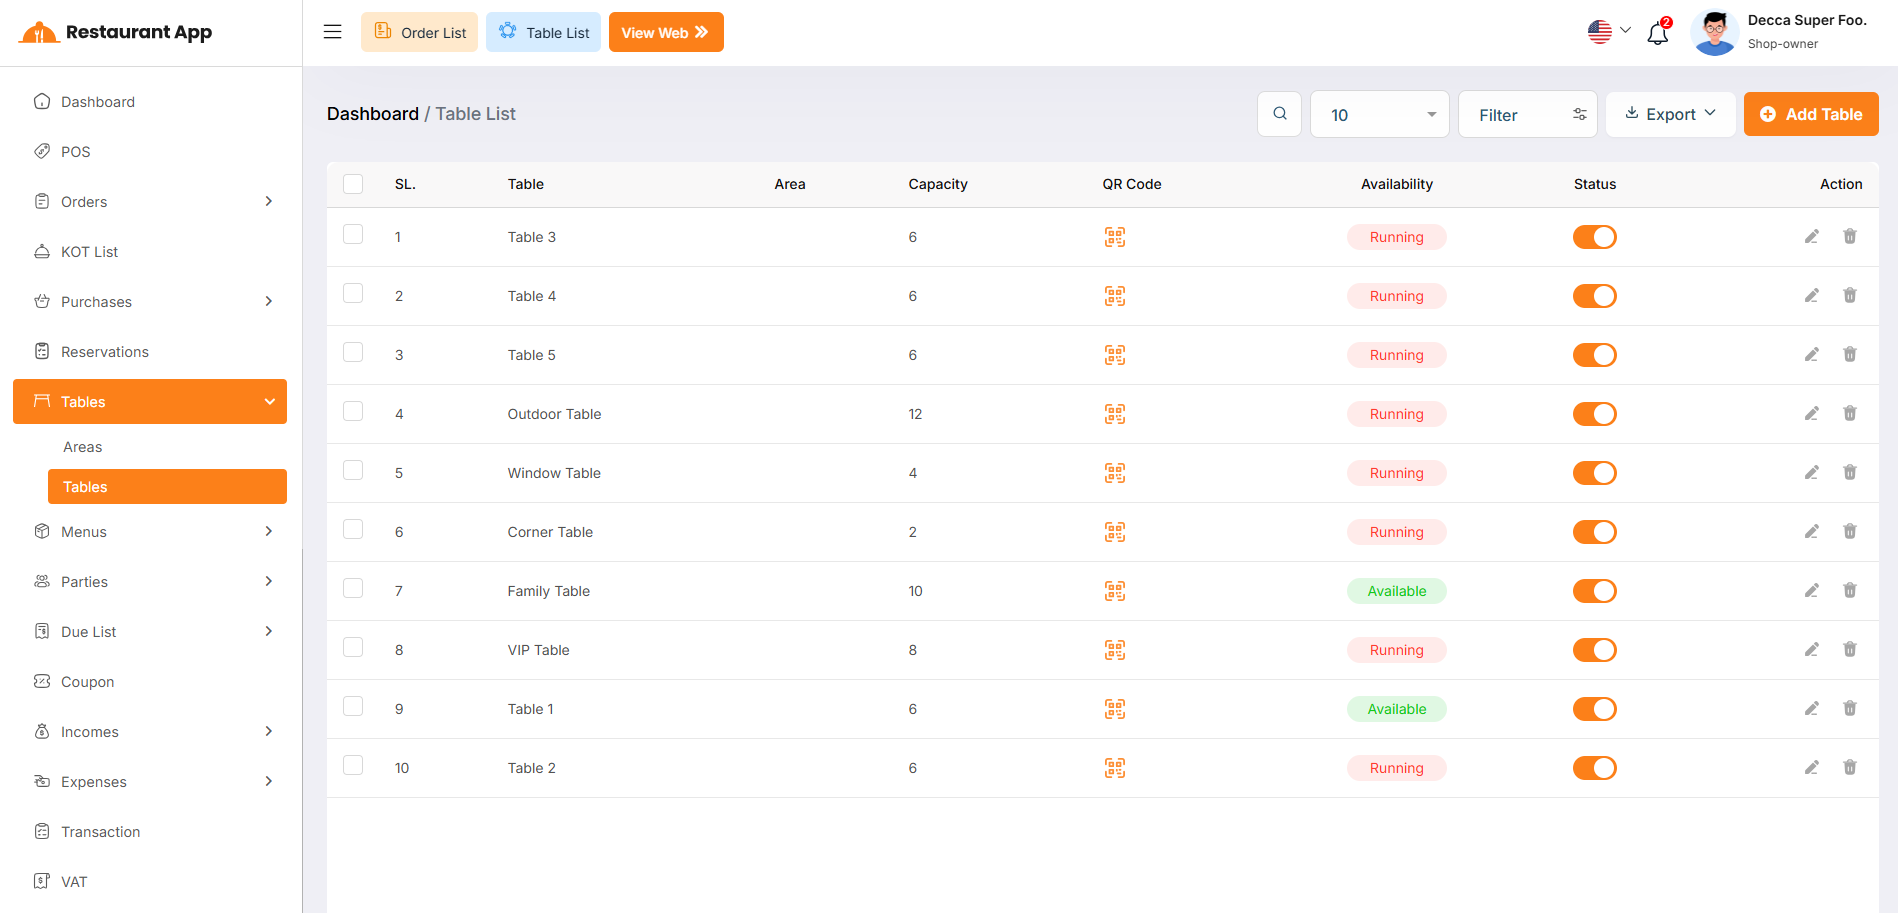
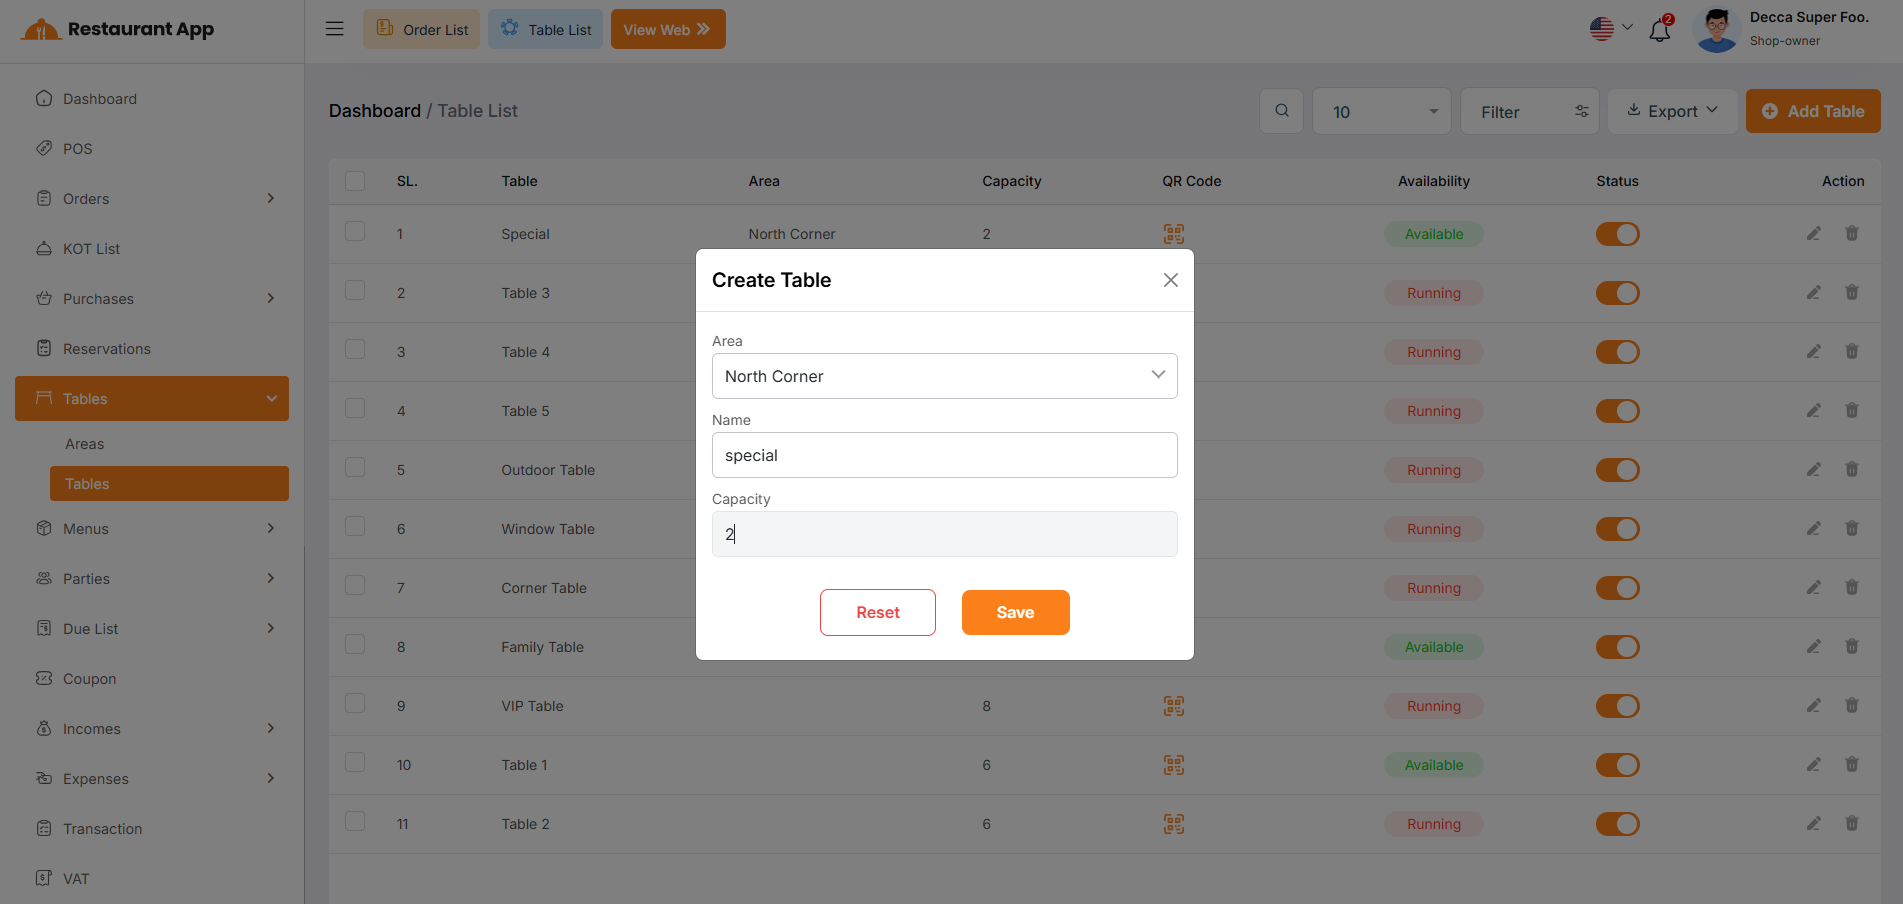
The main table provides a comprehensive list of all dining units within the establishment.Table Identification Displays the unique name of each unit, such as "Table 3," "VIP Table," or "Outdoor Table".
Area Categorization Indicates the specific dining zone (e.g., Rooftop, North Corner) assigned to the table.
Capacity Management Shows the maximum number of guests each table can accommodate (e.g., Capacity: 12).
QR Code Provides access to table-specific digital menus or ordering codes for guest use.
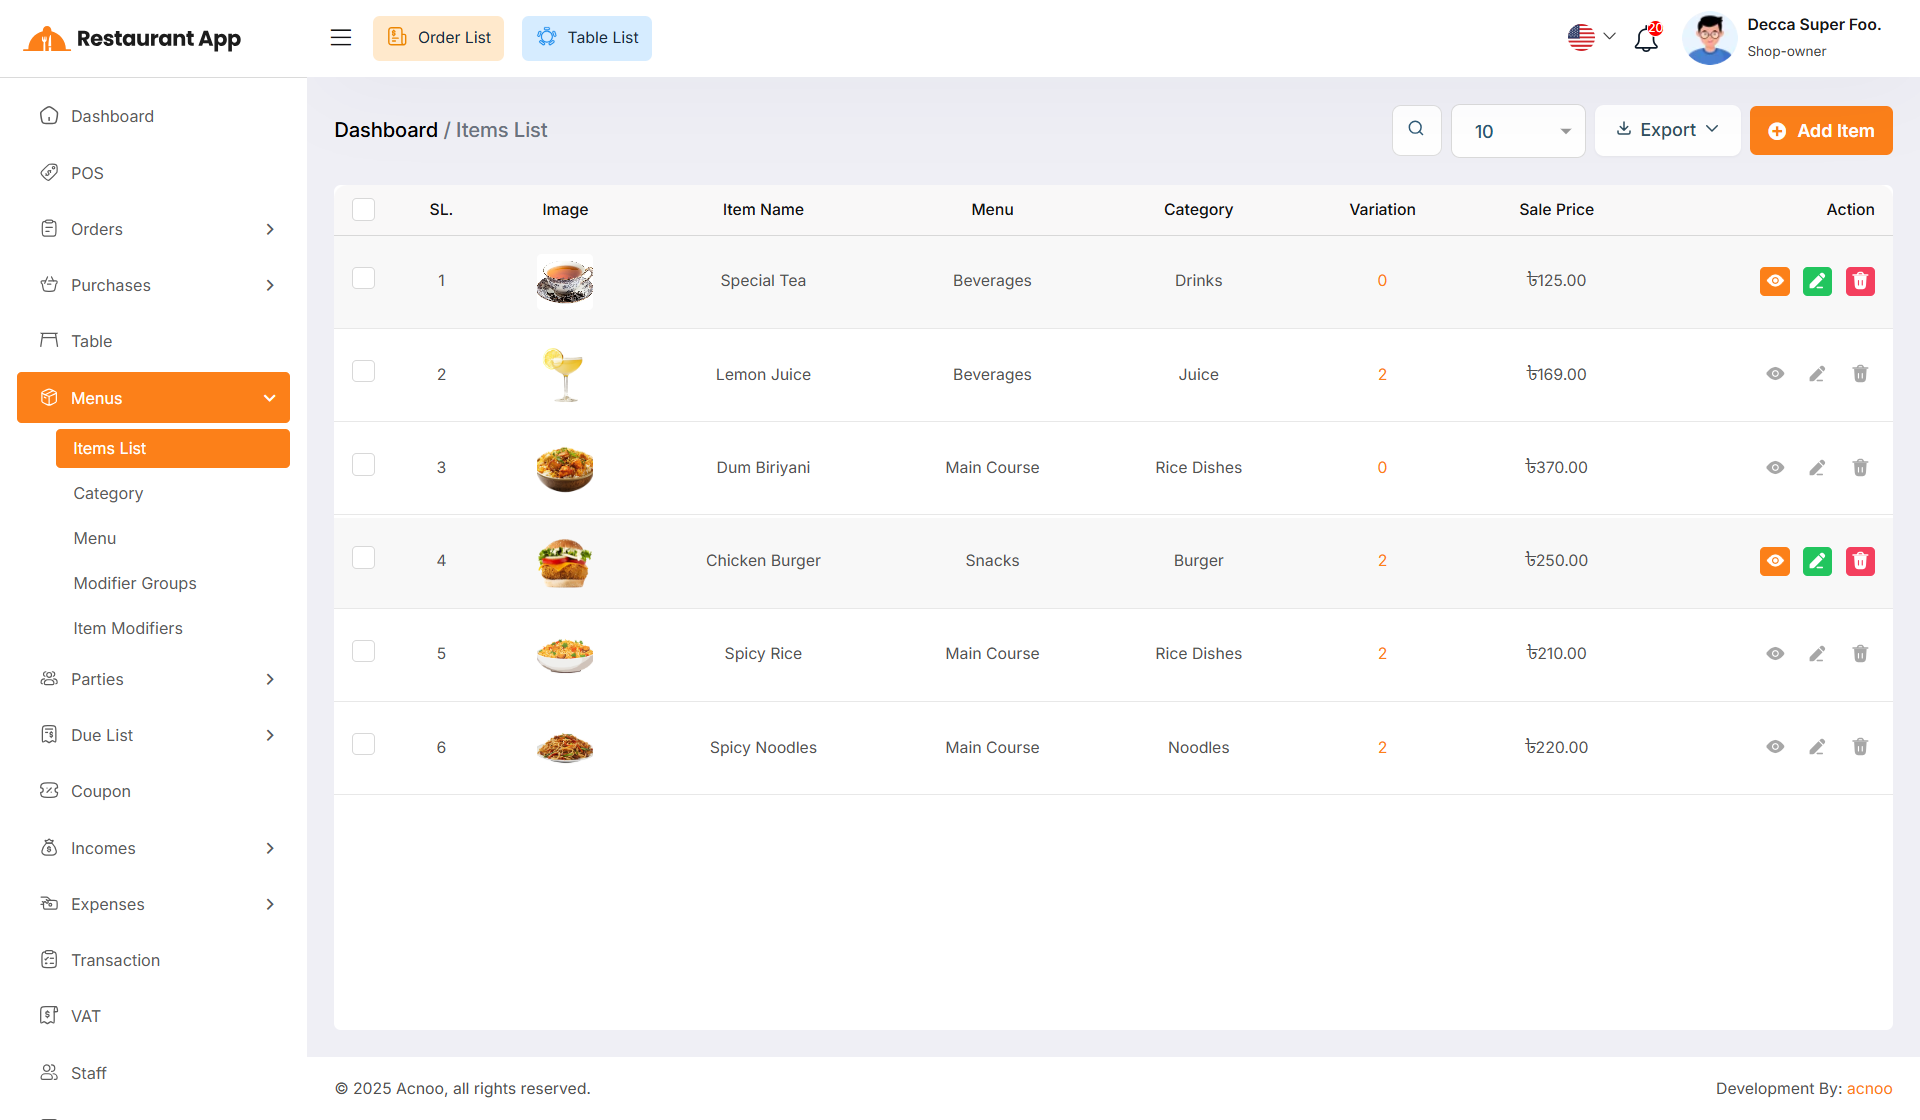
Item List
Here, you can view the item list with filtering options available. The list can be exported as Excel, CSV and PDF. By clicking the "View" button, you can see details in a pop-up window. Additionally, you can edit, delete, or perform multi-delete actions. Furthermore, clicking on the variation number will open a new modal where you can view the item's variation name and price details.
Create Item
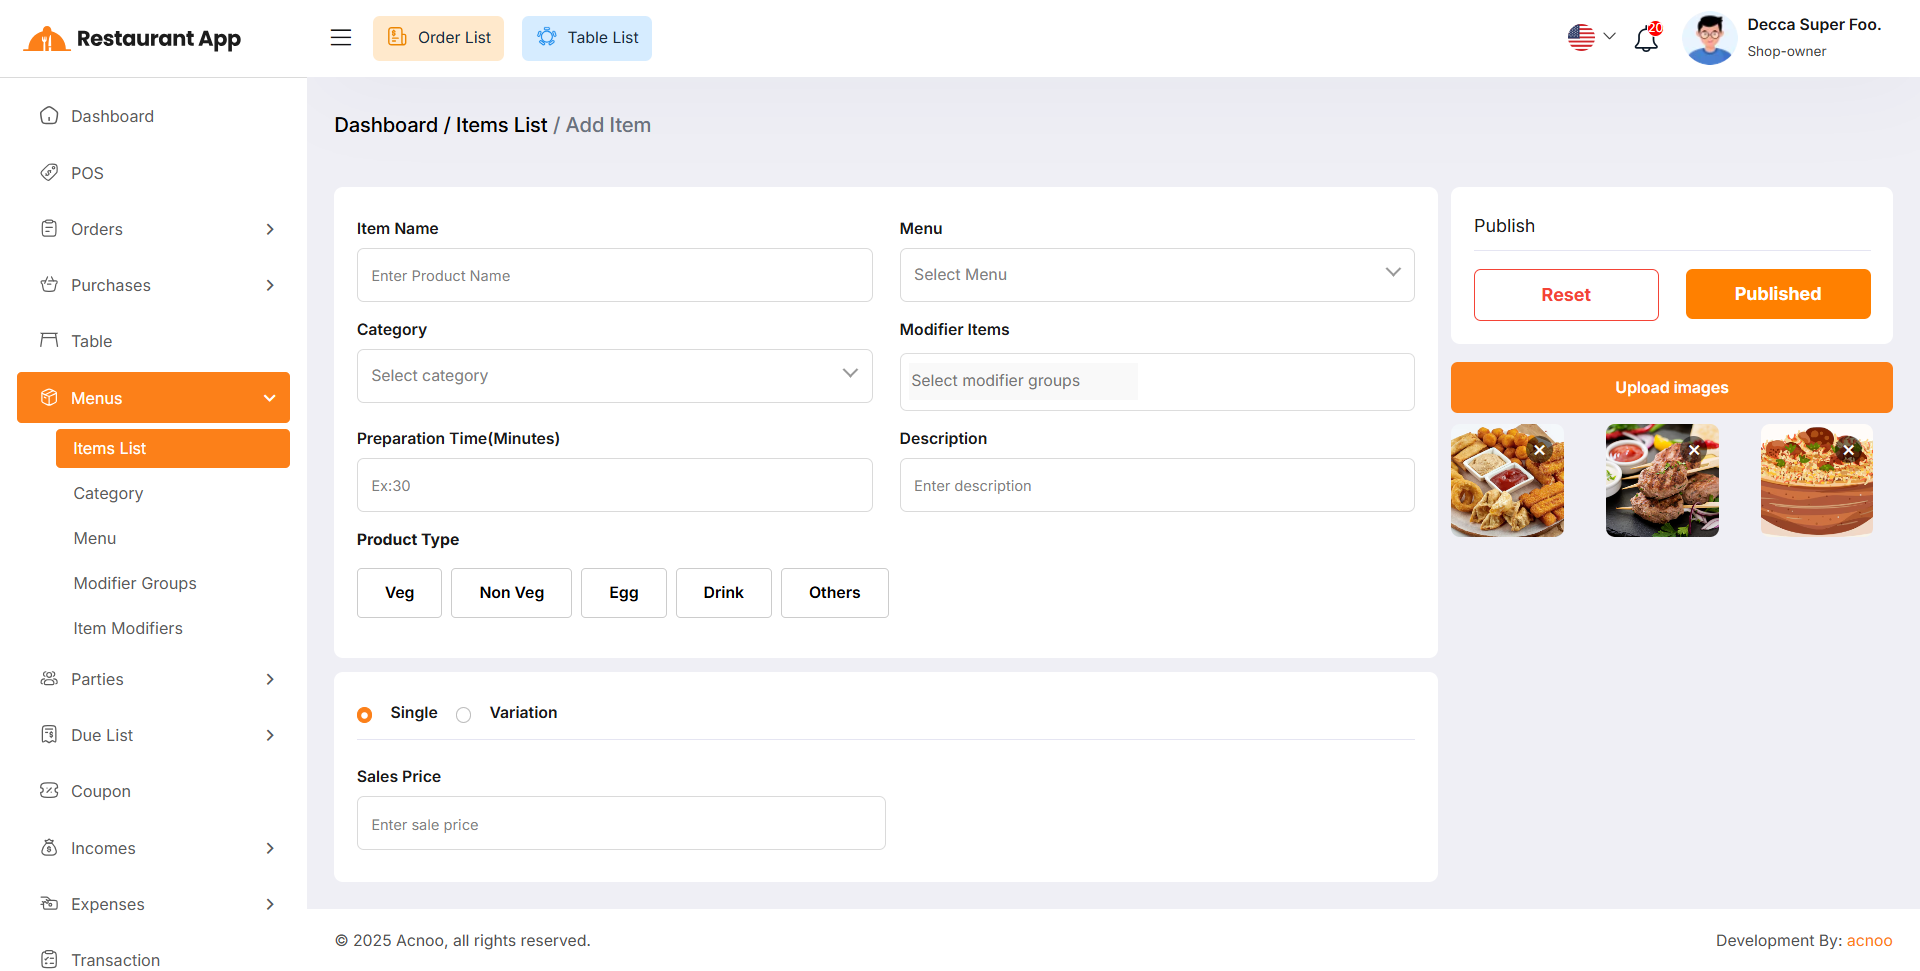
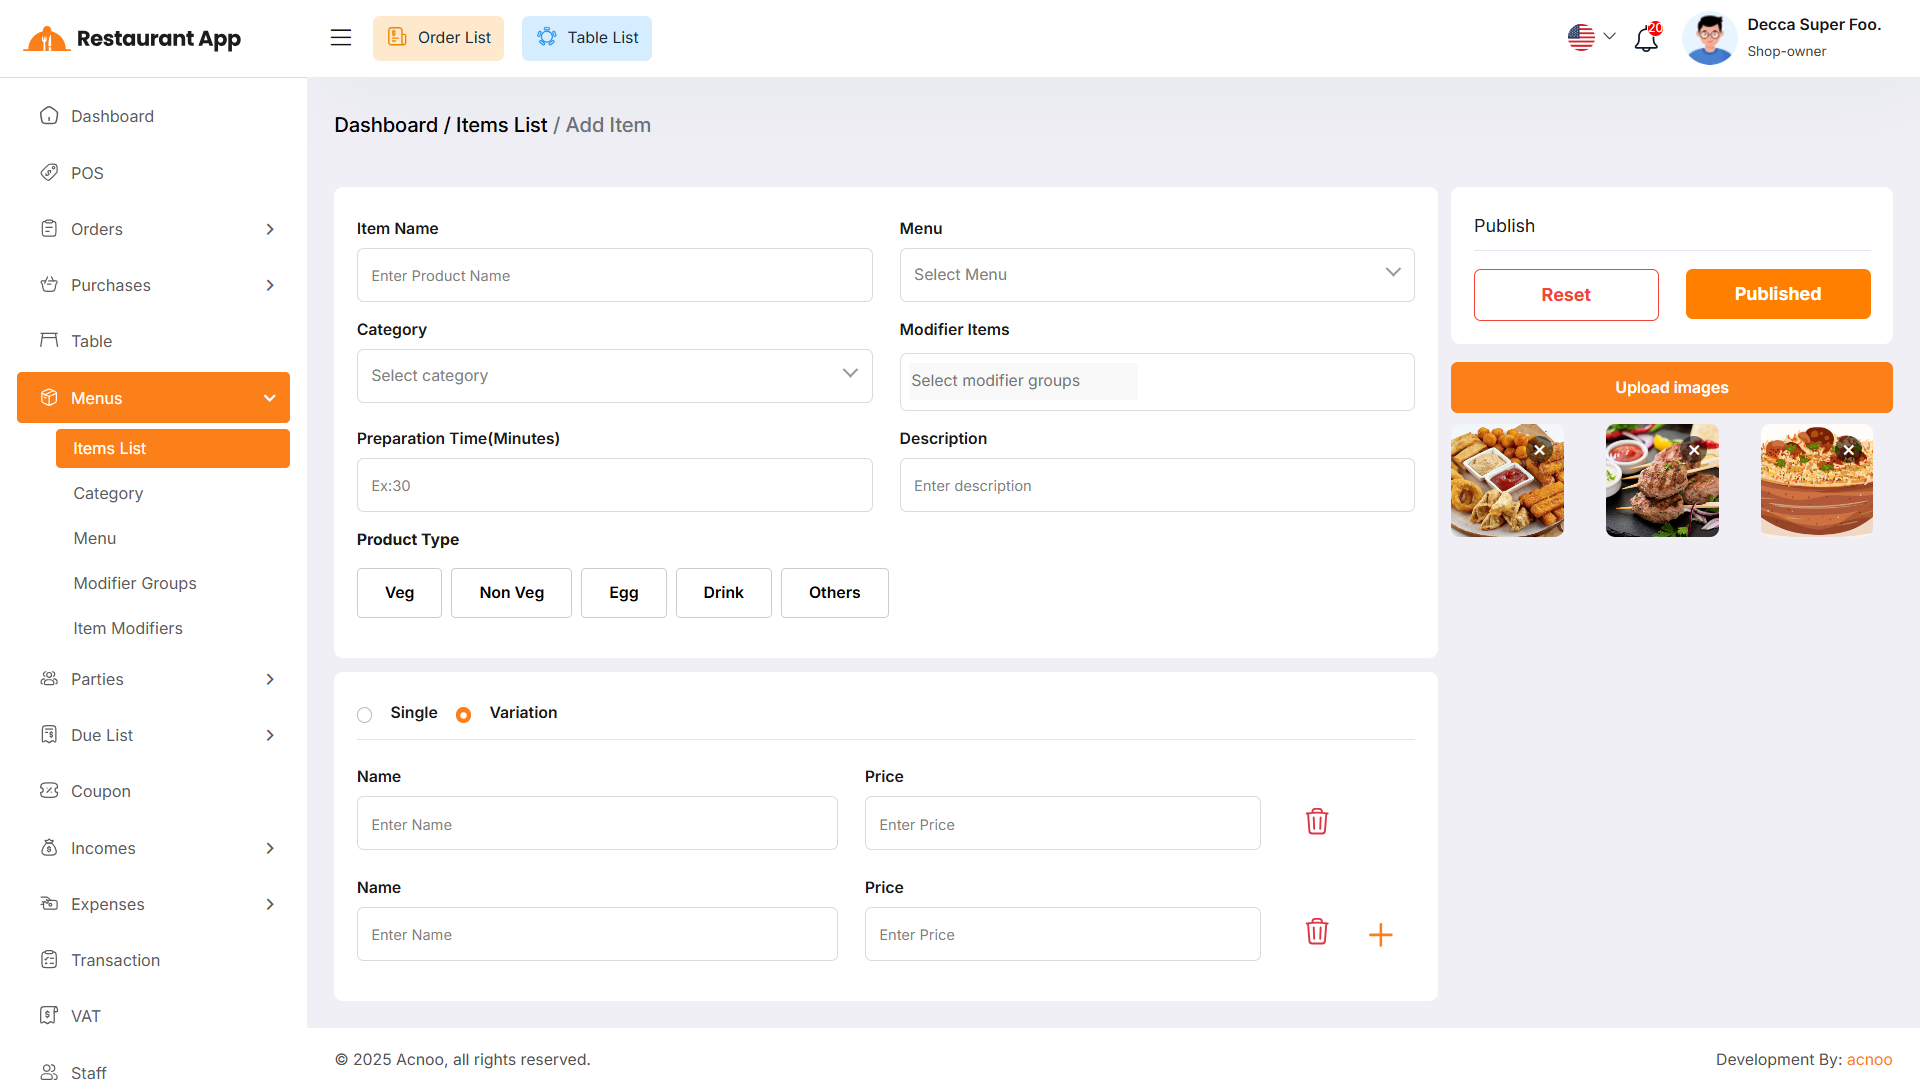
You can create an item by filling some fields such as name, menu, category, product type, etc.
In addition, you can choose the product type as either "Single" or "Variation" and provide the corresponding name and price.
You may also upload multiple images by clicking "Upload Images" button for the item, but only the first image will be displayed on the index and sales pages.
Please make sure to enter the product price carefully.
If everything is correct, click the "Publish" button to save the item. Otherwise, click the "Reset" button to clear all fields.
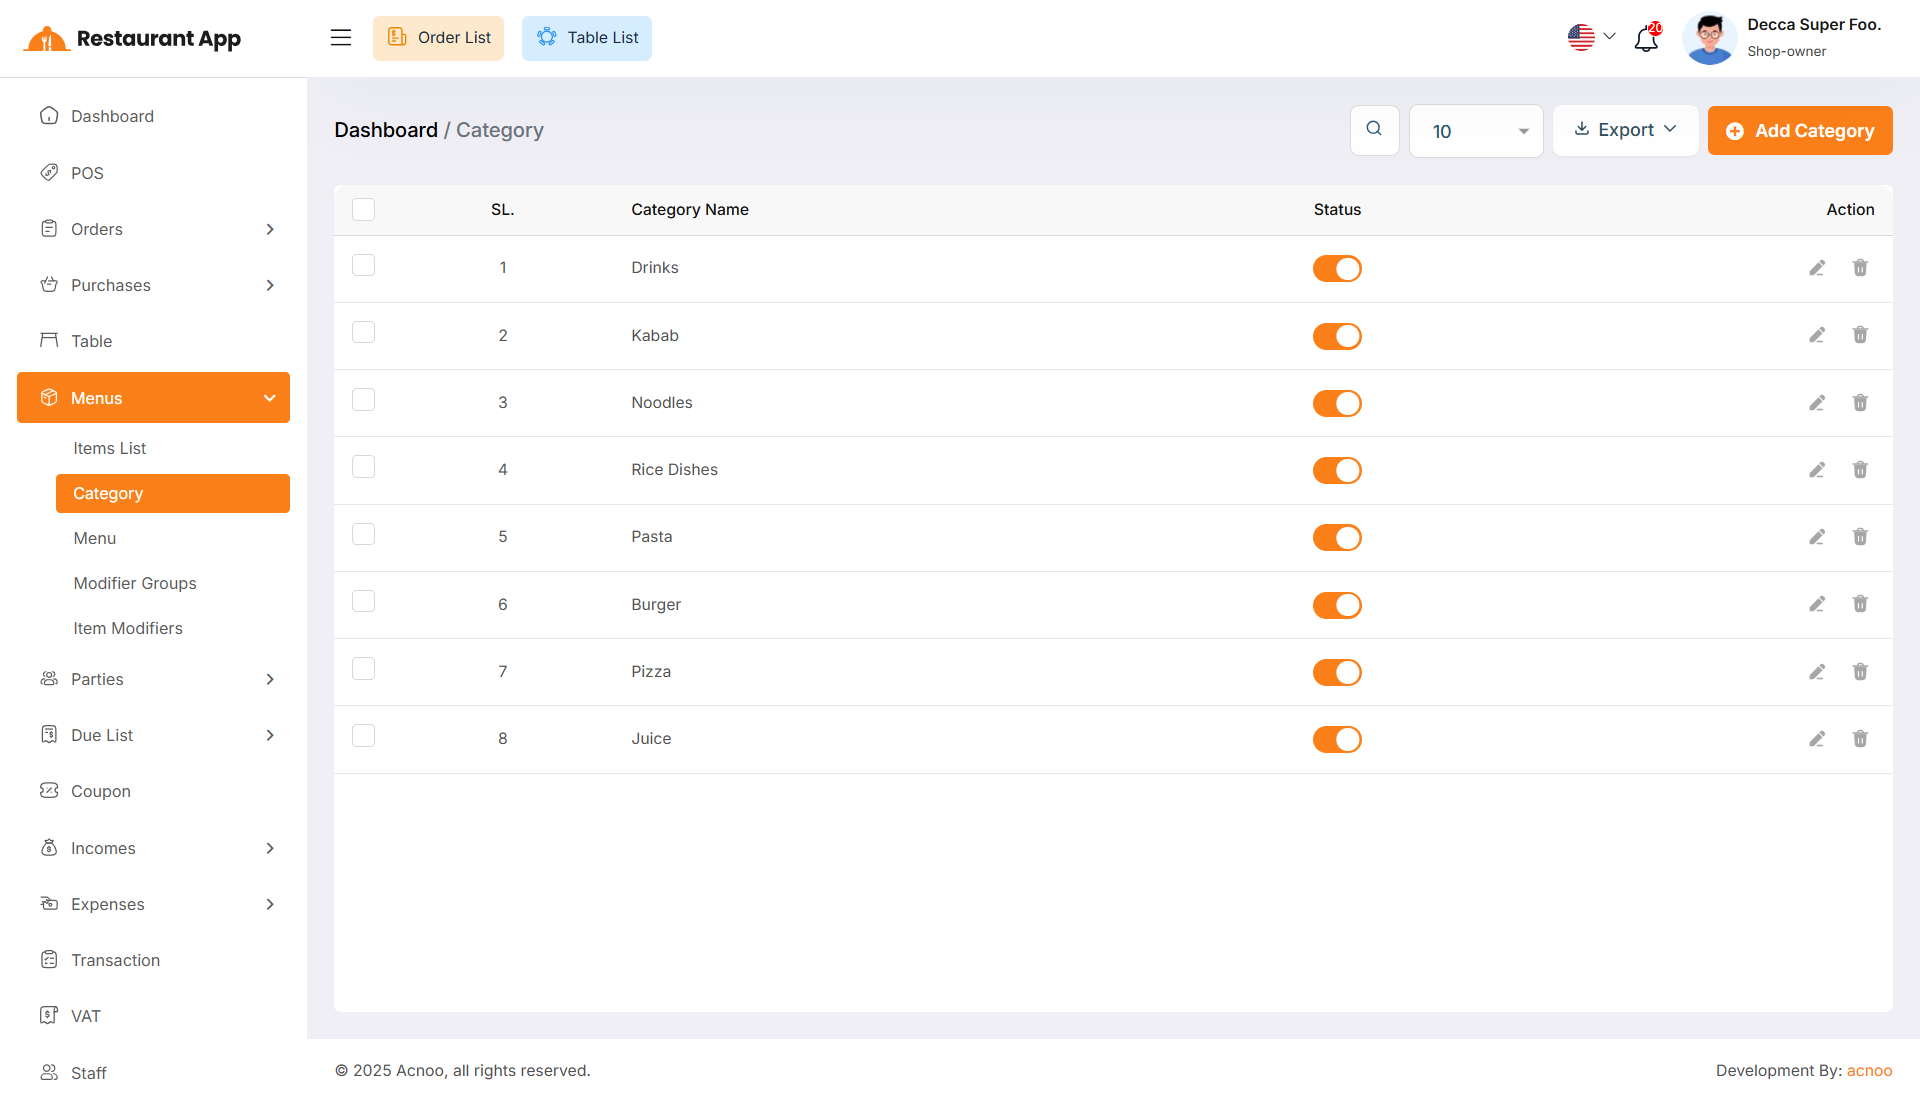
Category List
Here, you can view the category list with filtering options available. The list
can be exported as Excel, CSV and PDF. Additionally, you can edit, delete, or
perform multi-delete actions.
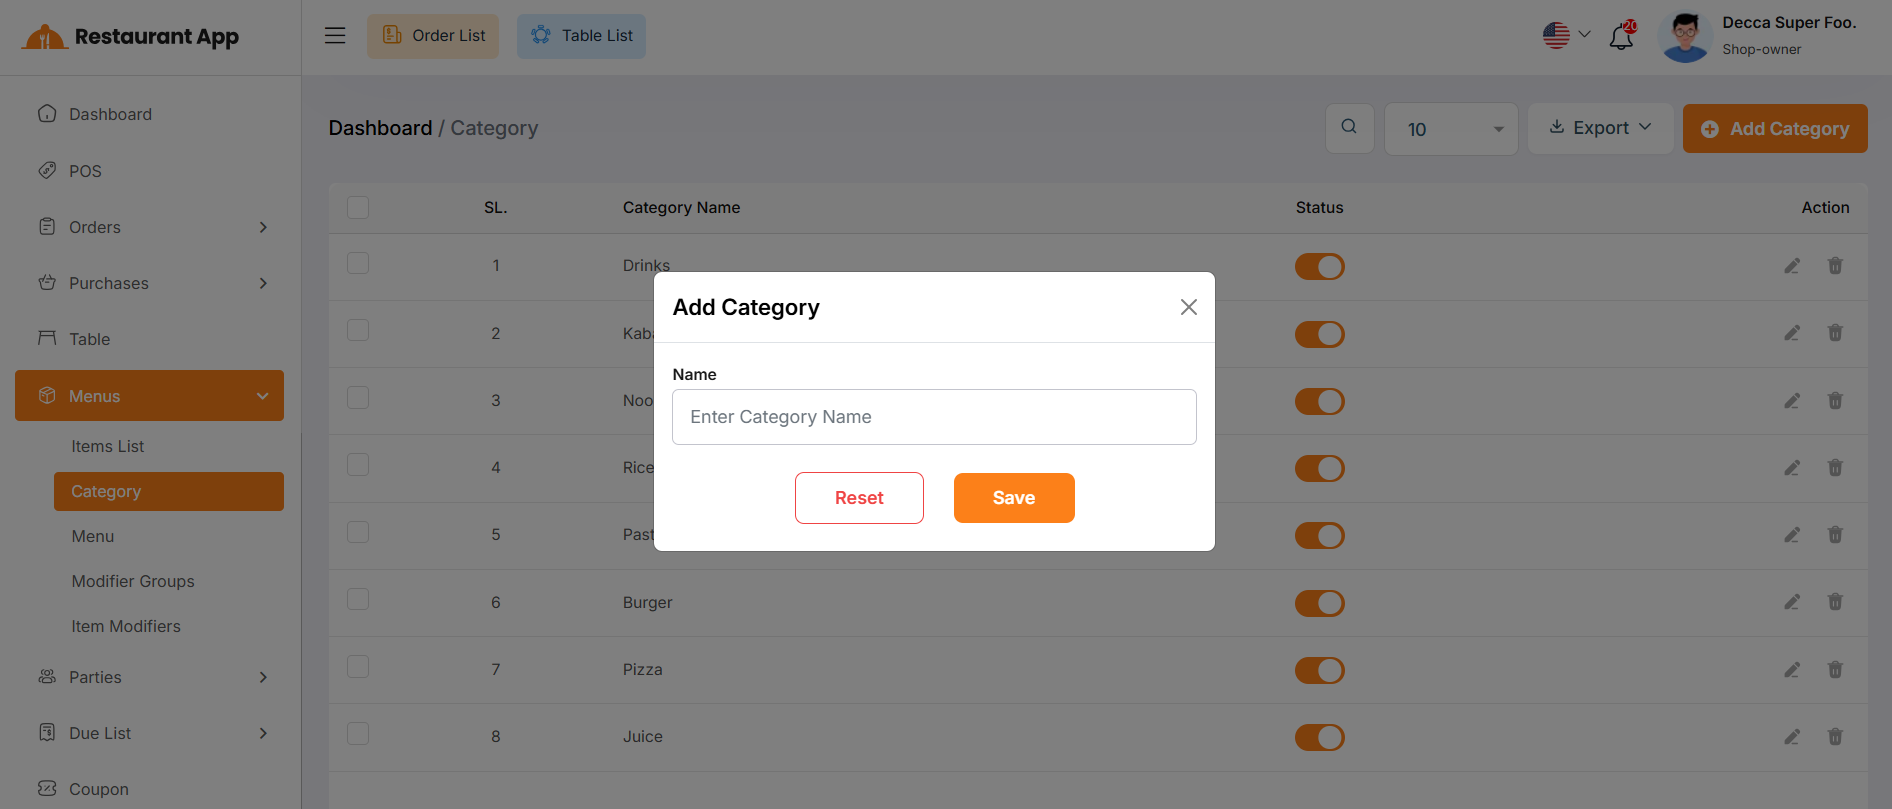
By clicking on the "Add Category" button, you can easily create a new category.
Menu List
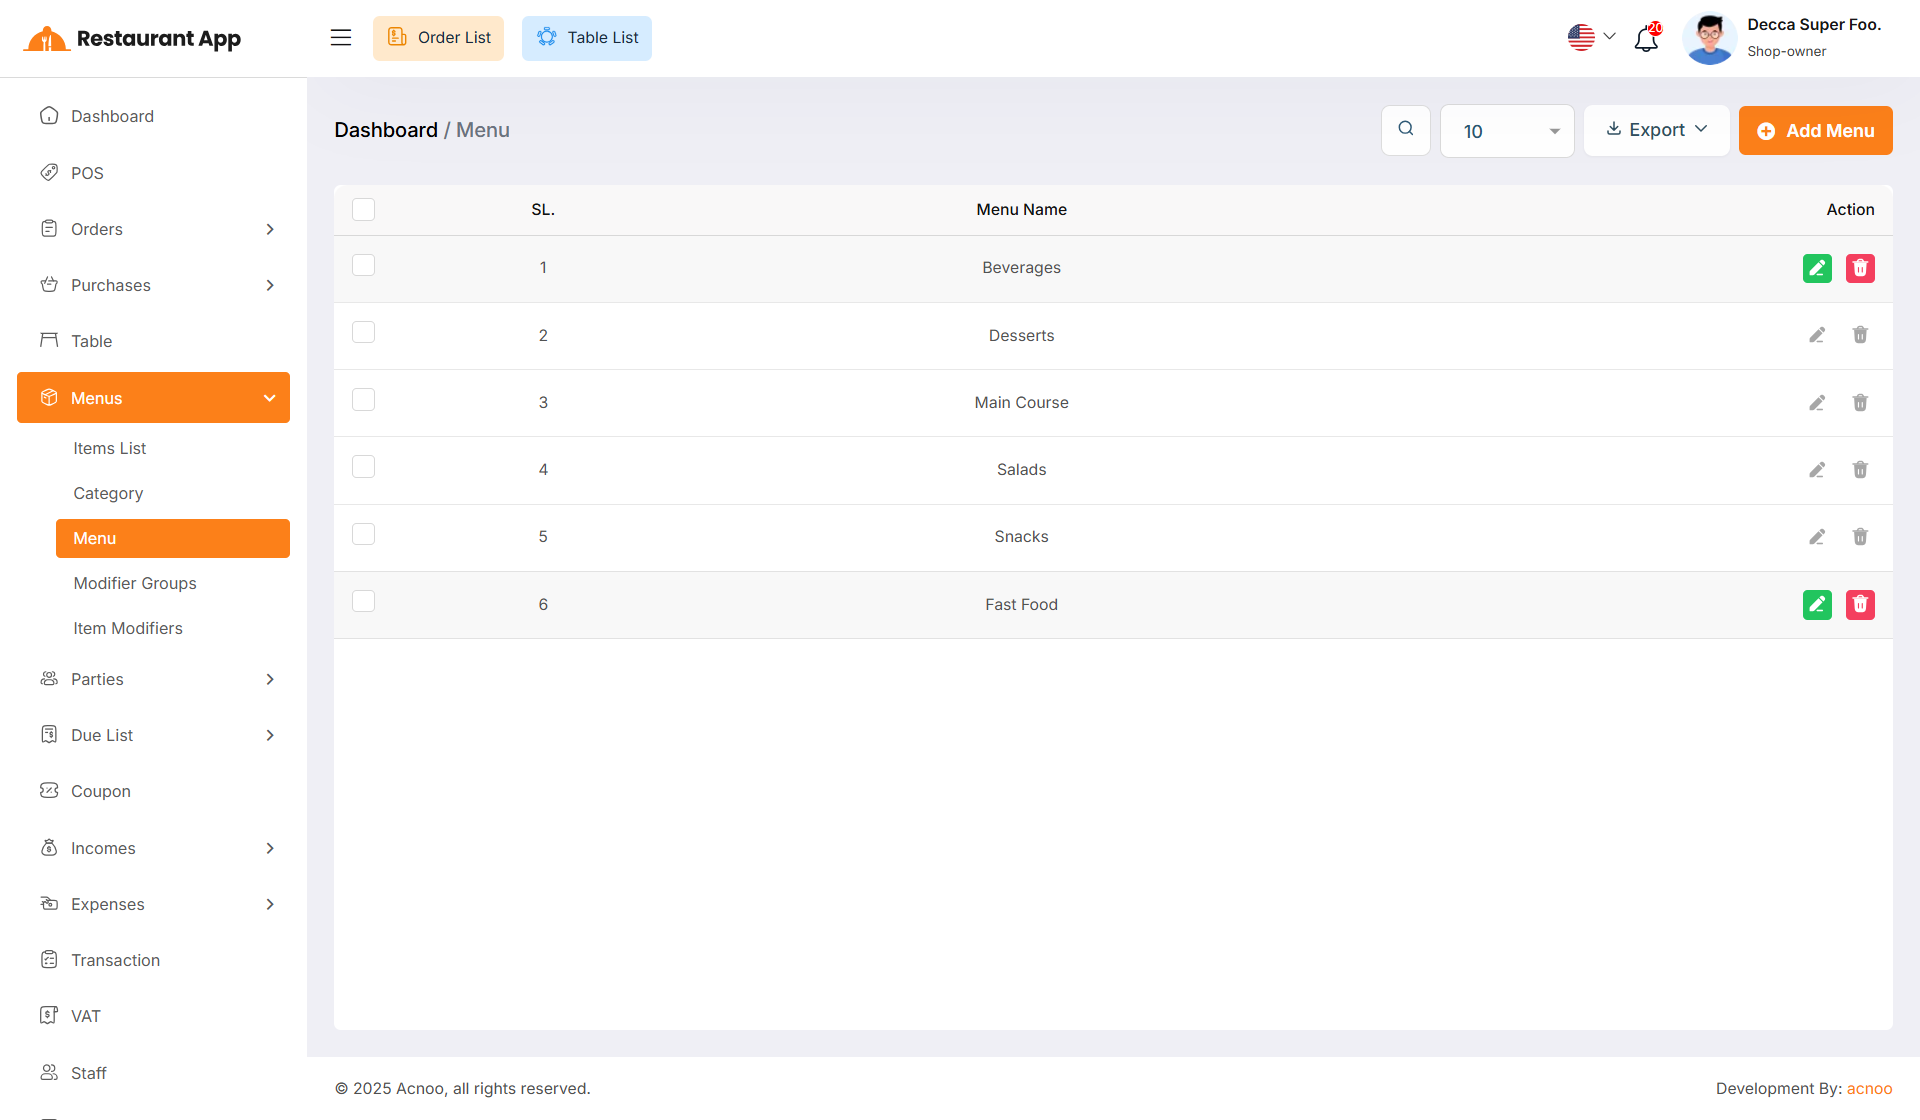
Here, you can view the menu list with filtering options available. The list
can be exported as Excel, CSV and PDF. Additionally, you can edit, delete, or
perform multi-delete actions.
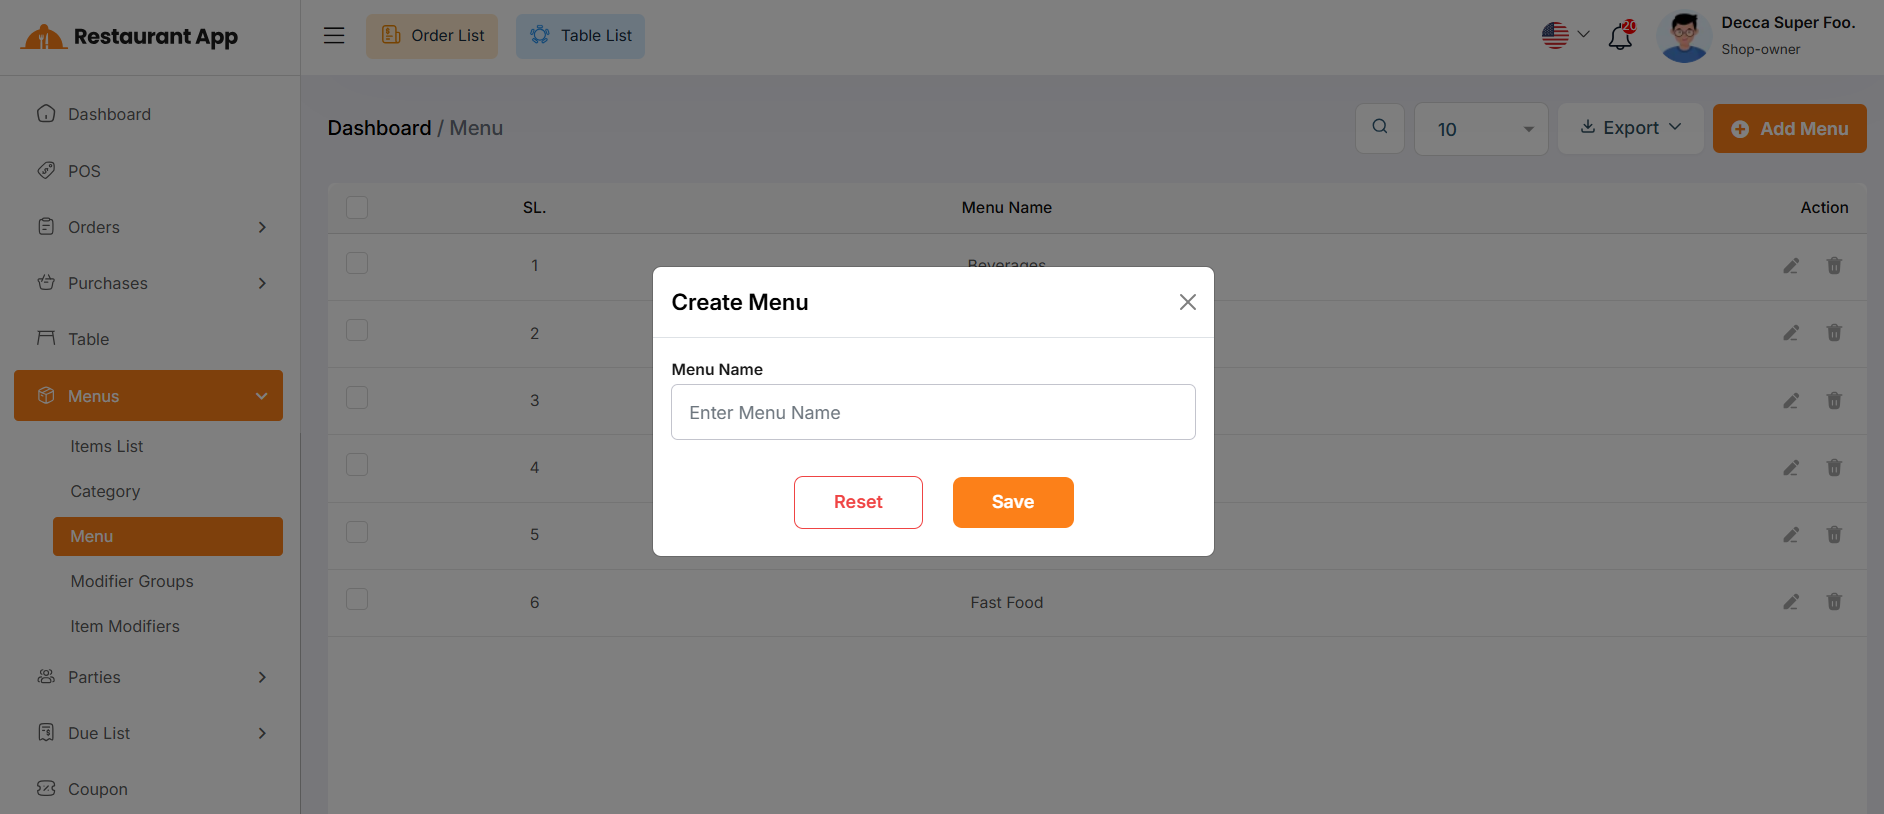
By clicking on the "Add Menu" button, you can easily create a new menu.
Modifier Group List
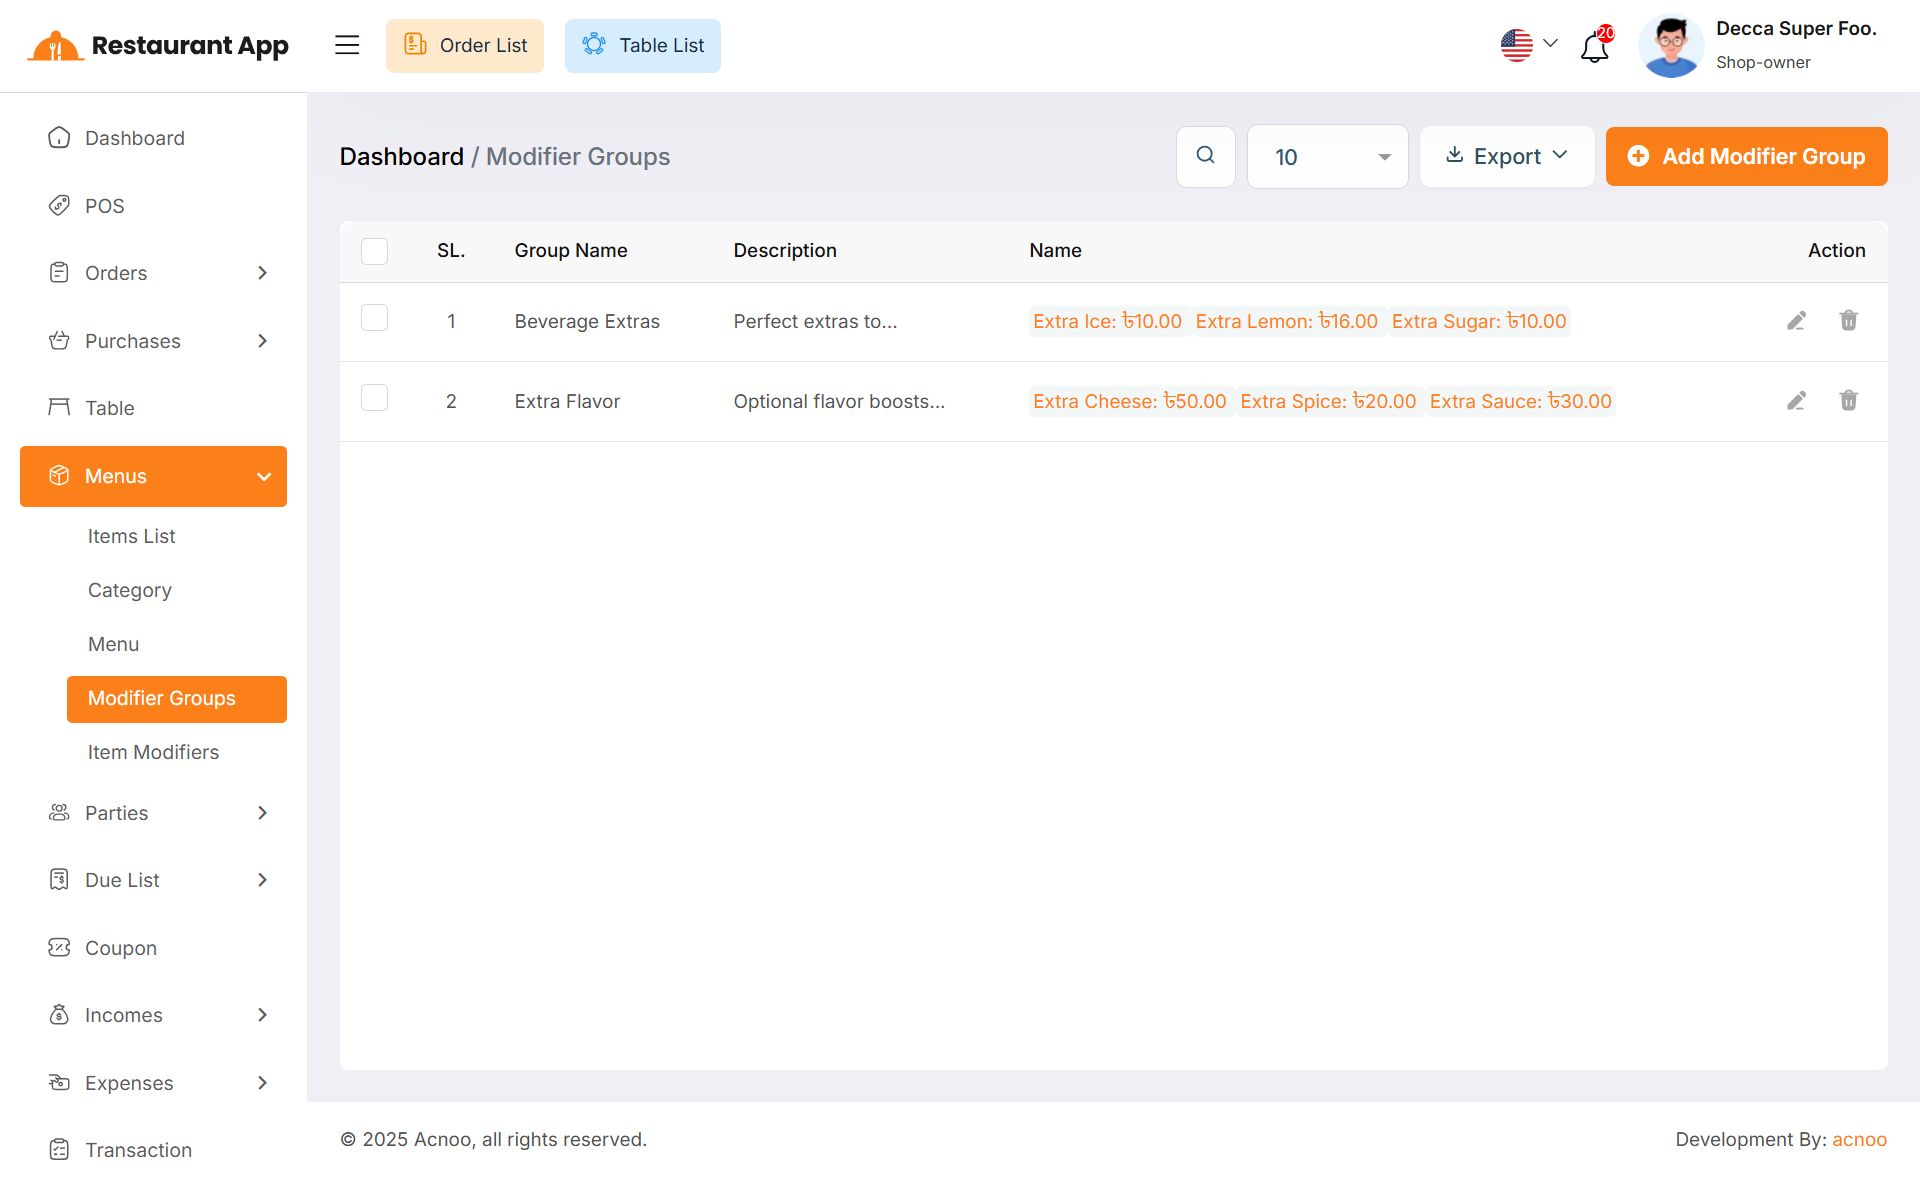
Here, you can view the Modifier Group list with filtering options available. The list can be exported as Excel, CSV and PDF. Additionally, you can edit, delete, or perform multi-delete actions.
Create Modifier Group
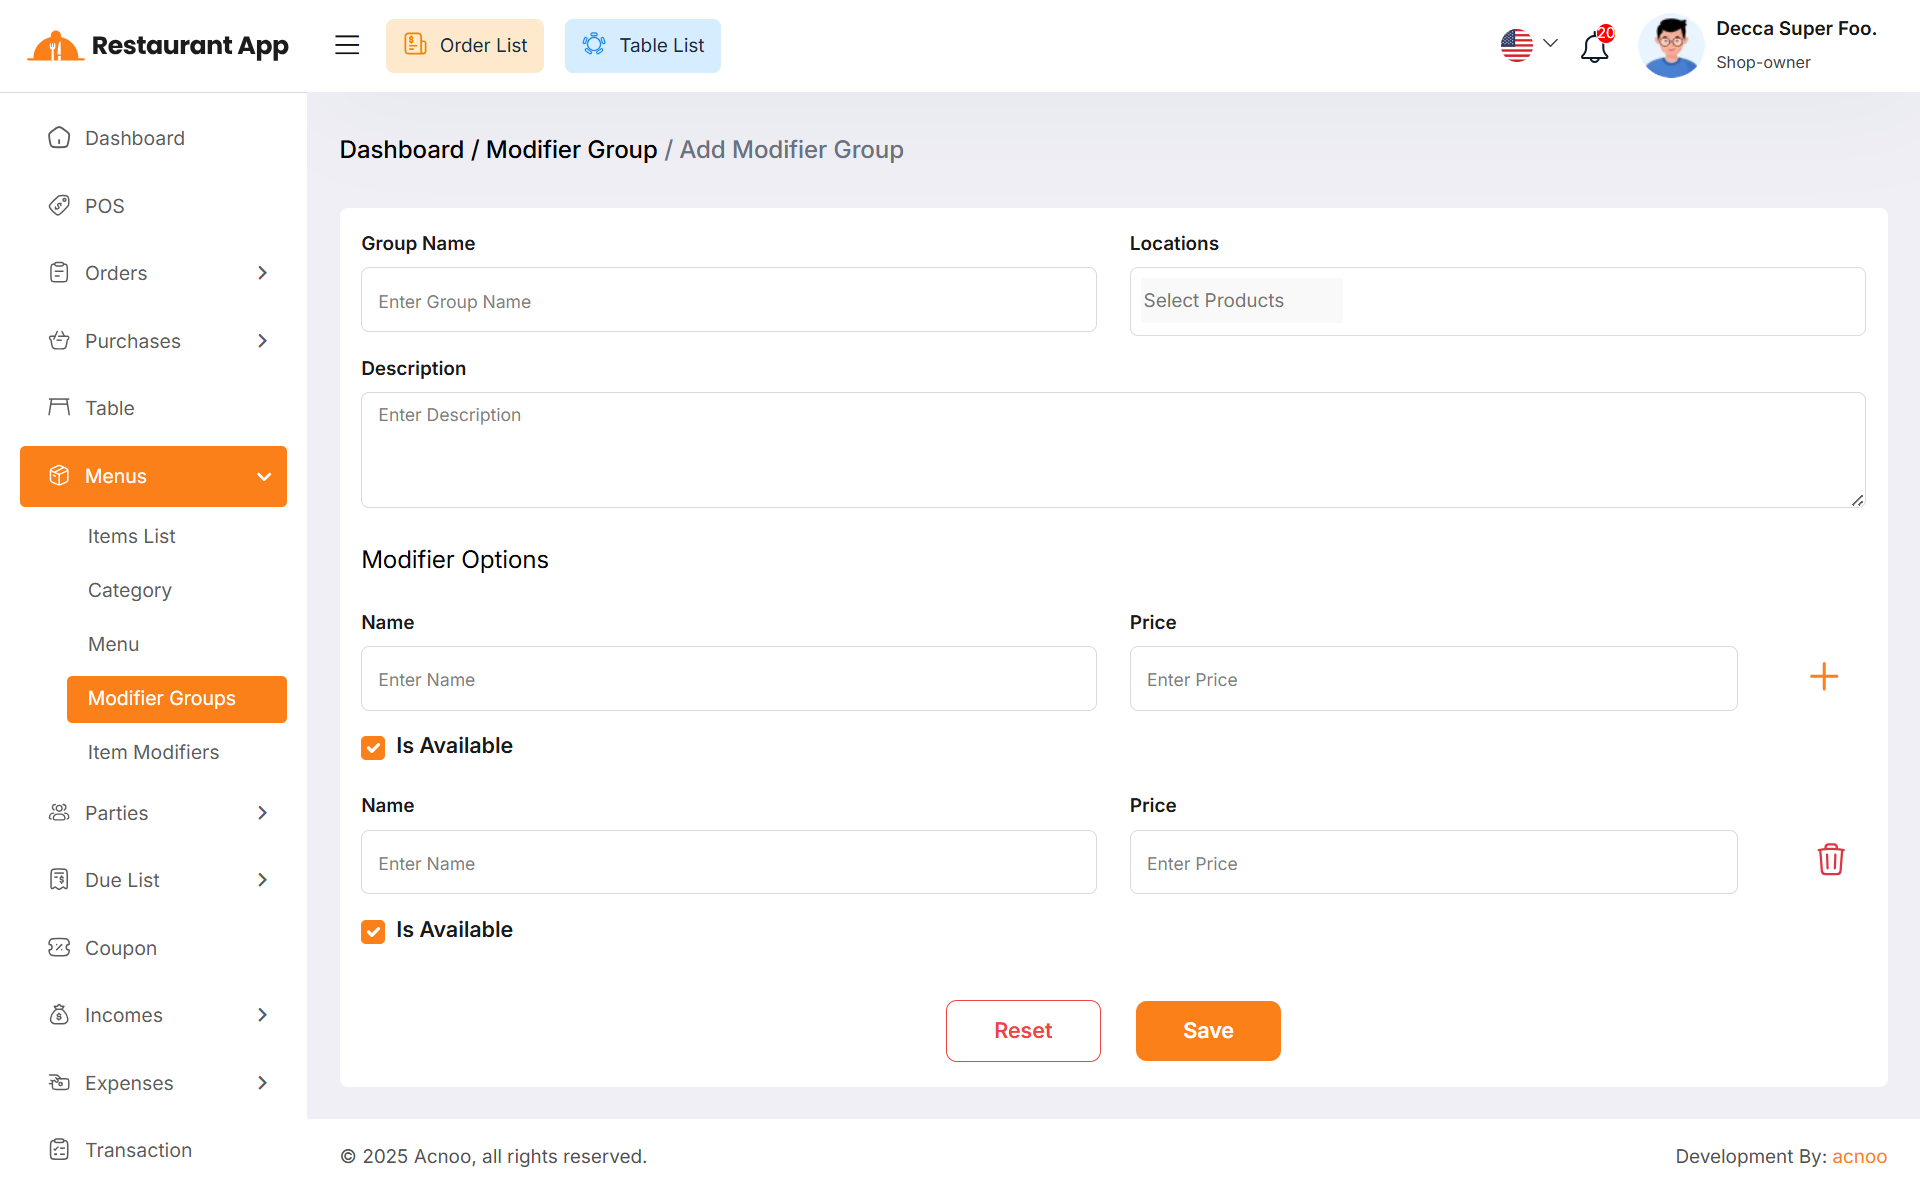
By clicking on the "Add Modifier Group" button, you can easily create a new modifier group by filling in fields such as (name, locations, description, modifier option name, and price). You can add dynamic modifier option fields by clicking the plus (+) button and then enter the name and price. If you no longer need a dynamic field or if there are too many, you can remove it by clicking the red delete button. Additionally, if the "Is Available" option is checked, the modifier option will appear during the sale process. If it is not checked, the option will not be available.
Item Modifier
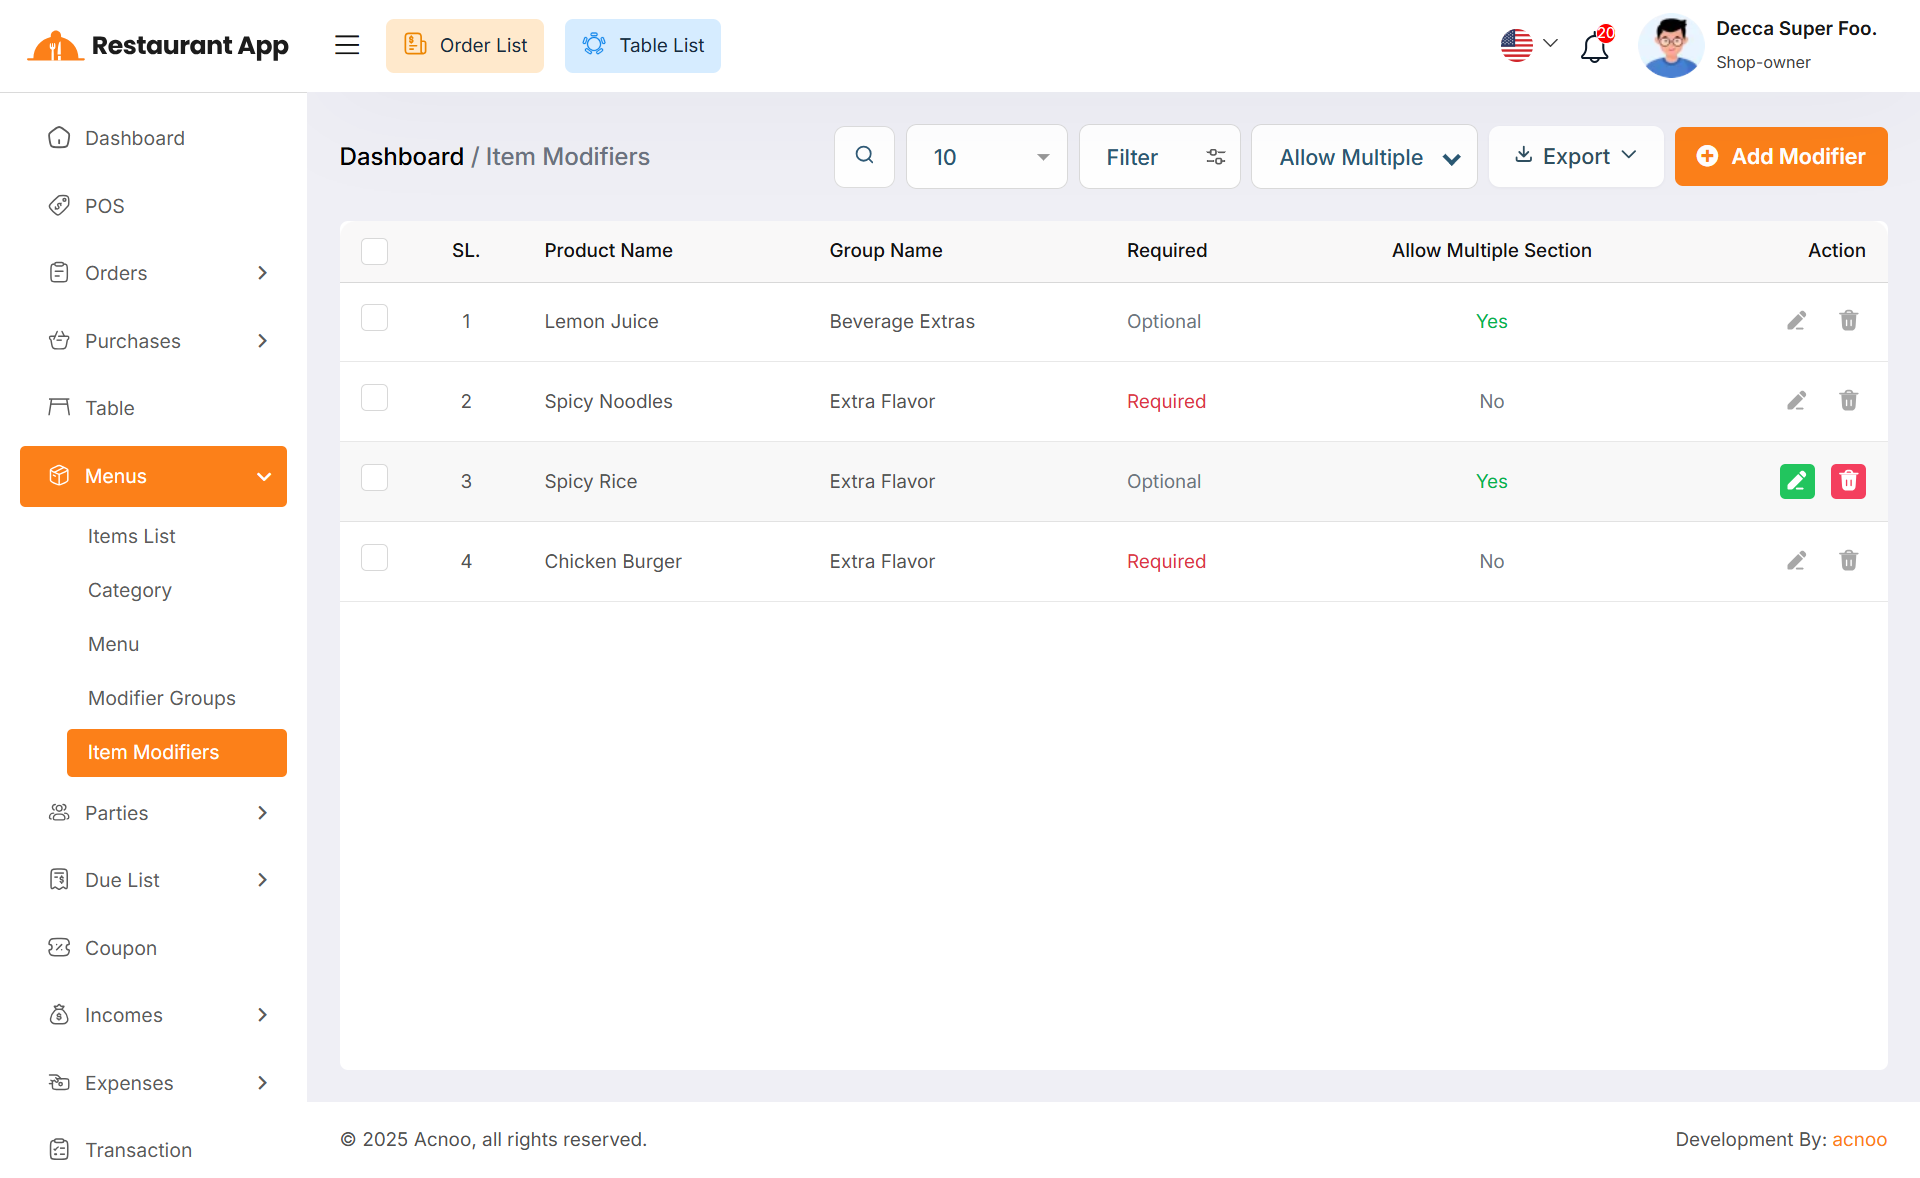
Here, you can view the modifier list with filtering options available. The list
can be exported as Excel, CSV and PDF. Additionally, you can edit, delete, or
perform multi-delete actions.
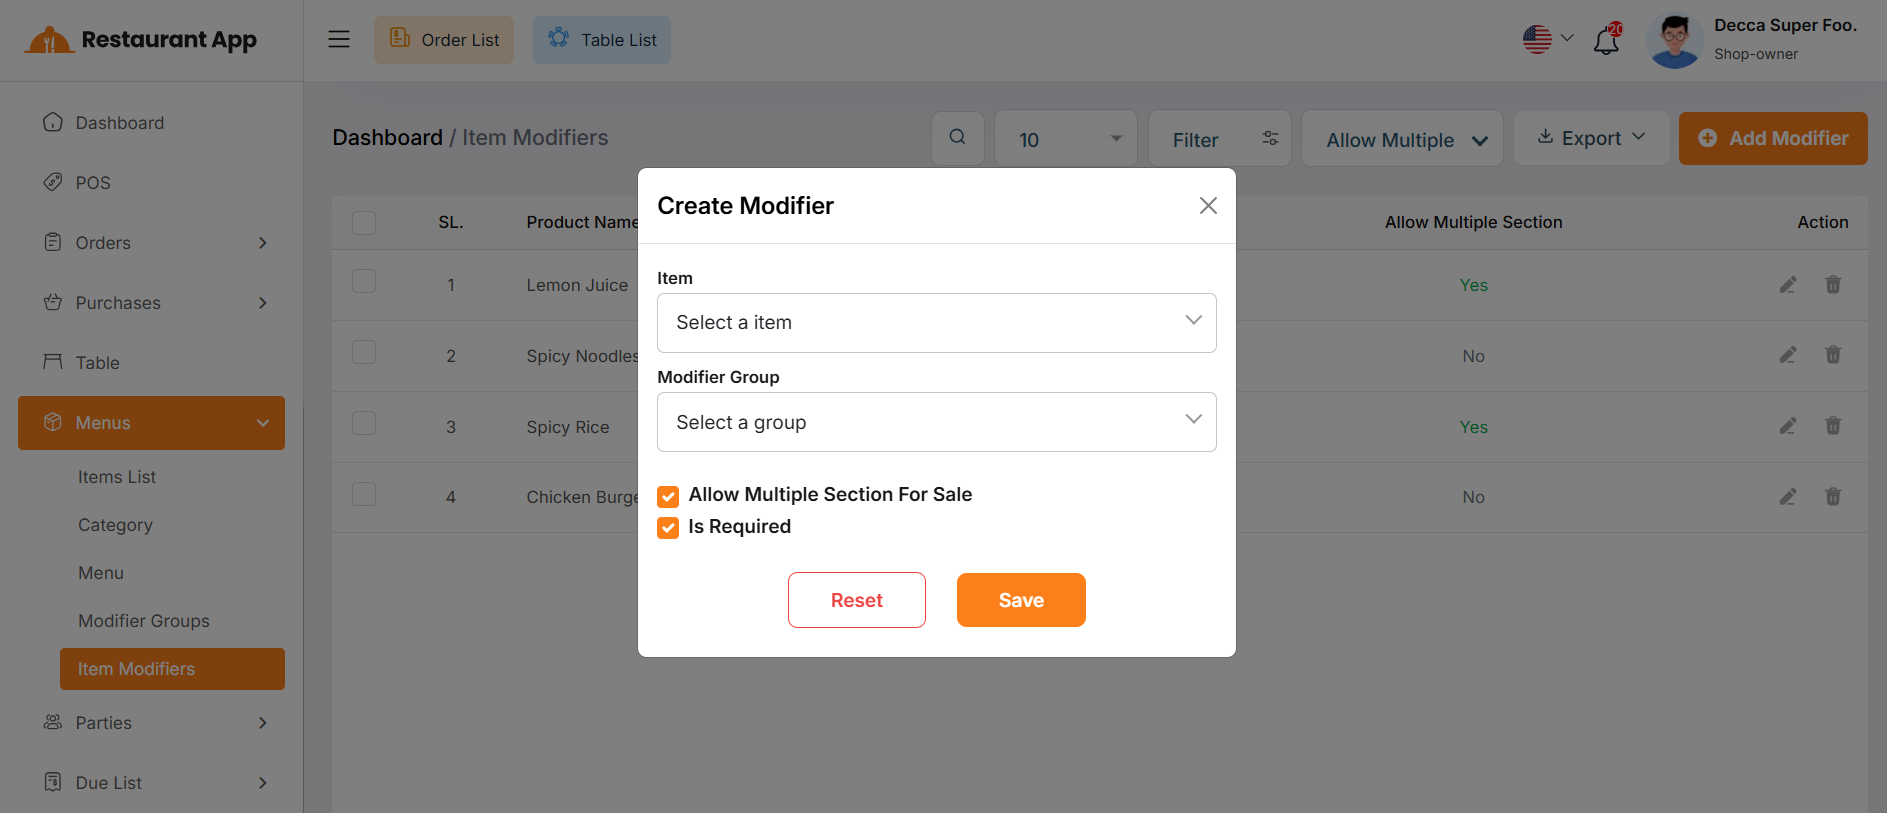
By clicking on the "Add Modifier" button, you can easily create a new modifier after select item & modifier group.
If you check the "Allow Multiple Selection For Sale" option while creating a modifier, then during the item sale, customers will be able to select multiple modifier options. If this option is not checked, only one option can be selected.
Additionally, if you check the "Is Required" option, customers will not be able to add the item to the cart without selecting a modifier option. If this option is not checked, customers can add the item to the cart without selecting any modifier options.
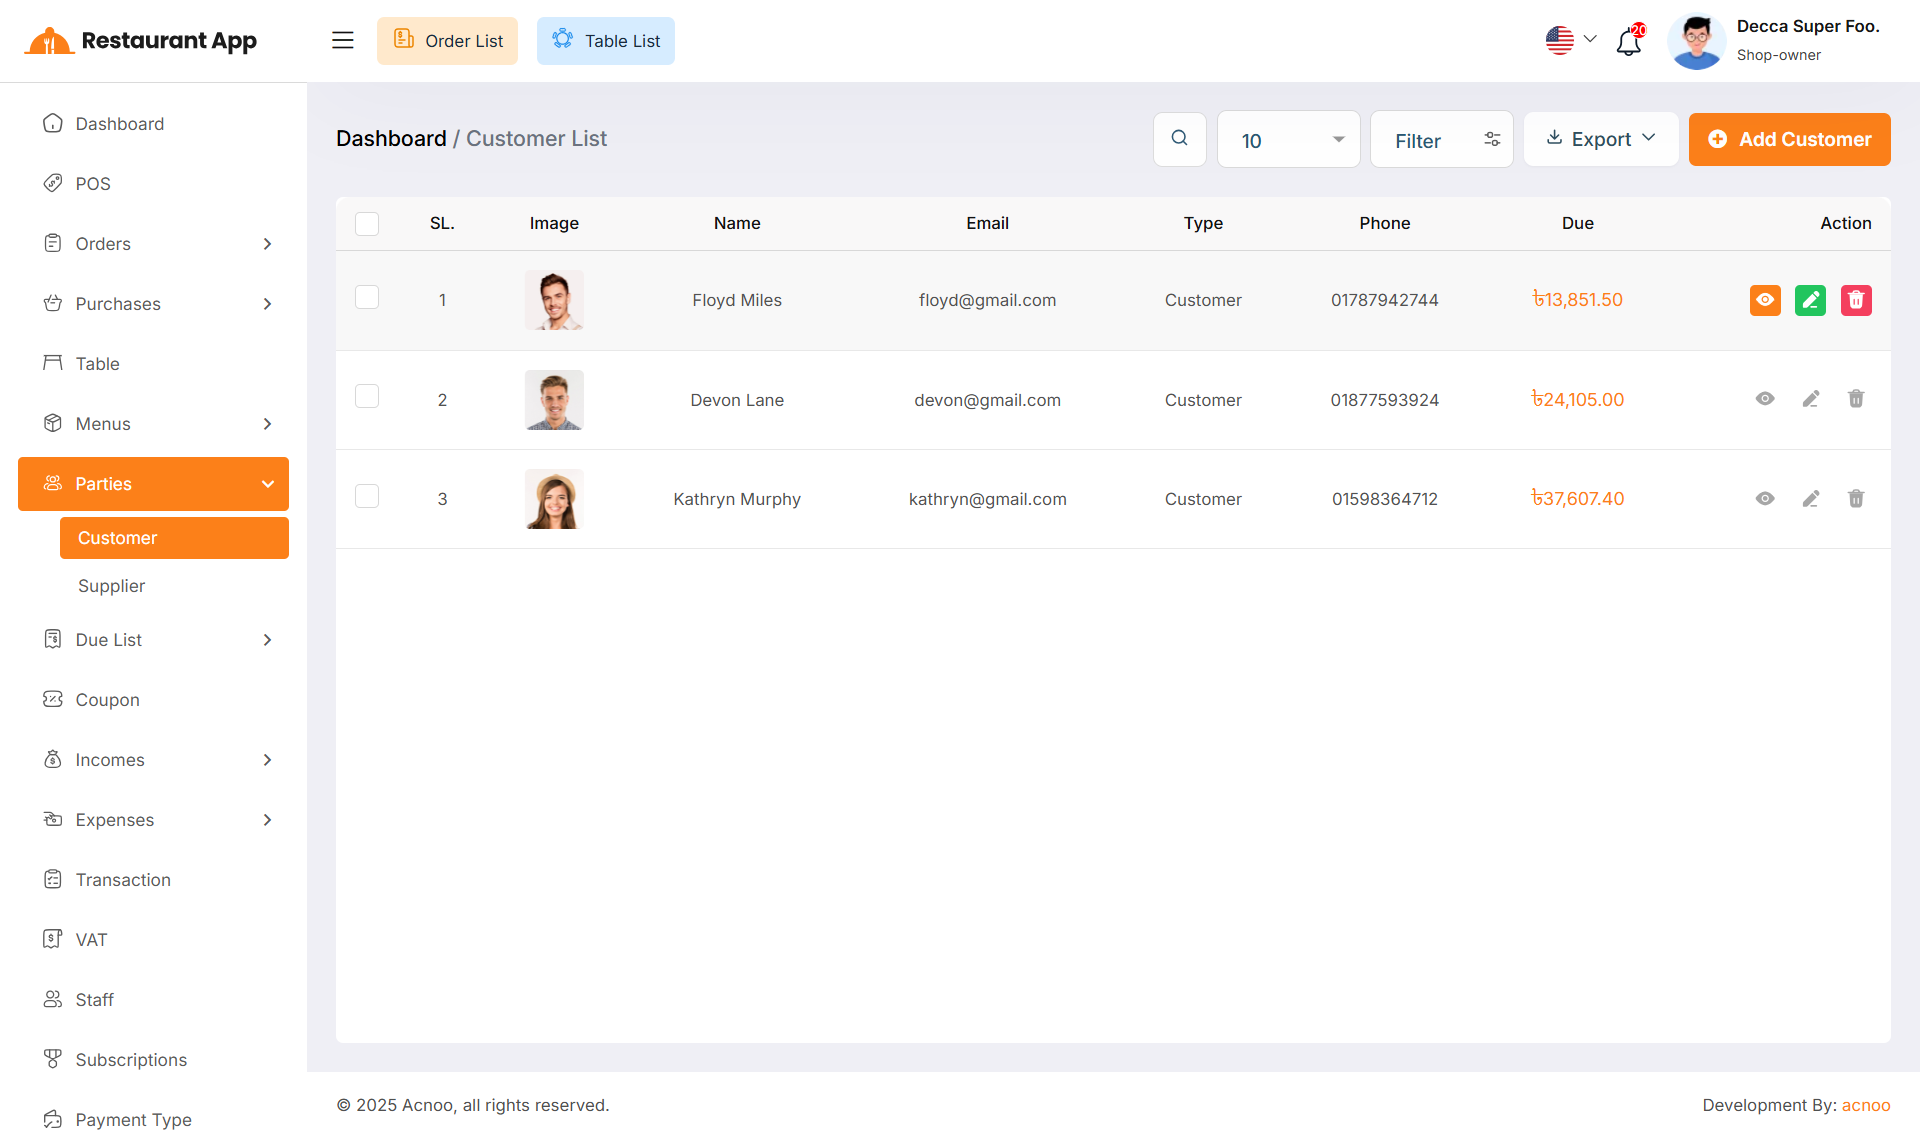
Customer List
Here, you can view the customer list with a search filter. Additionally, you have the option to view, edit, delete, or use the multi-delete function and exported as Excel, CSV and PDF.
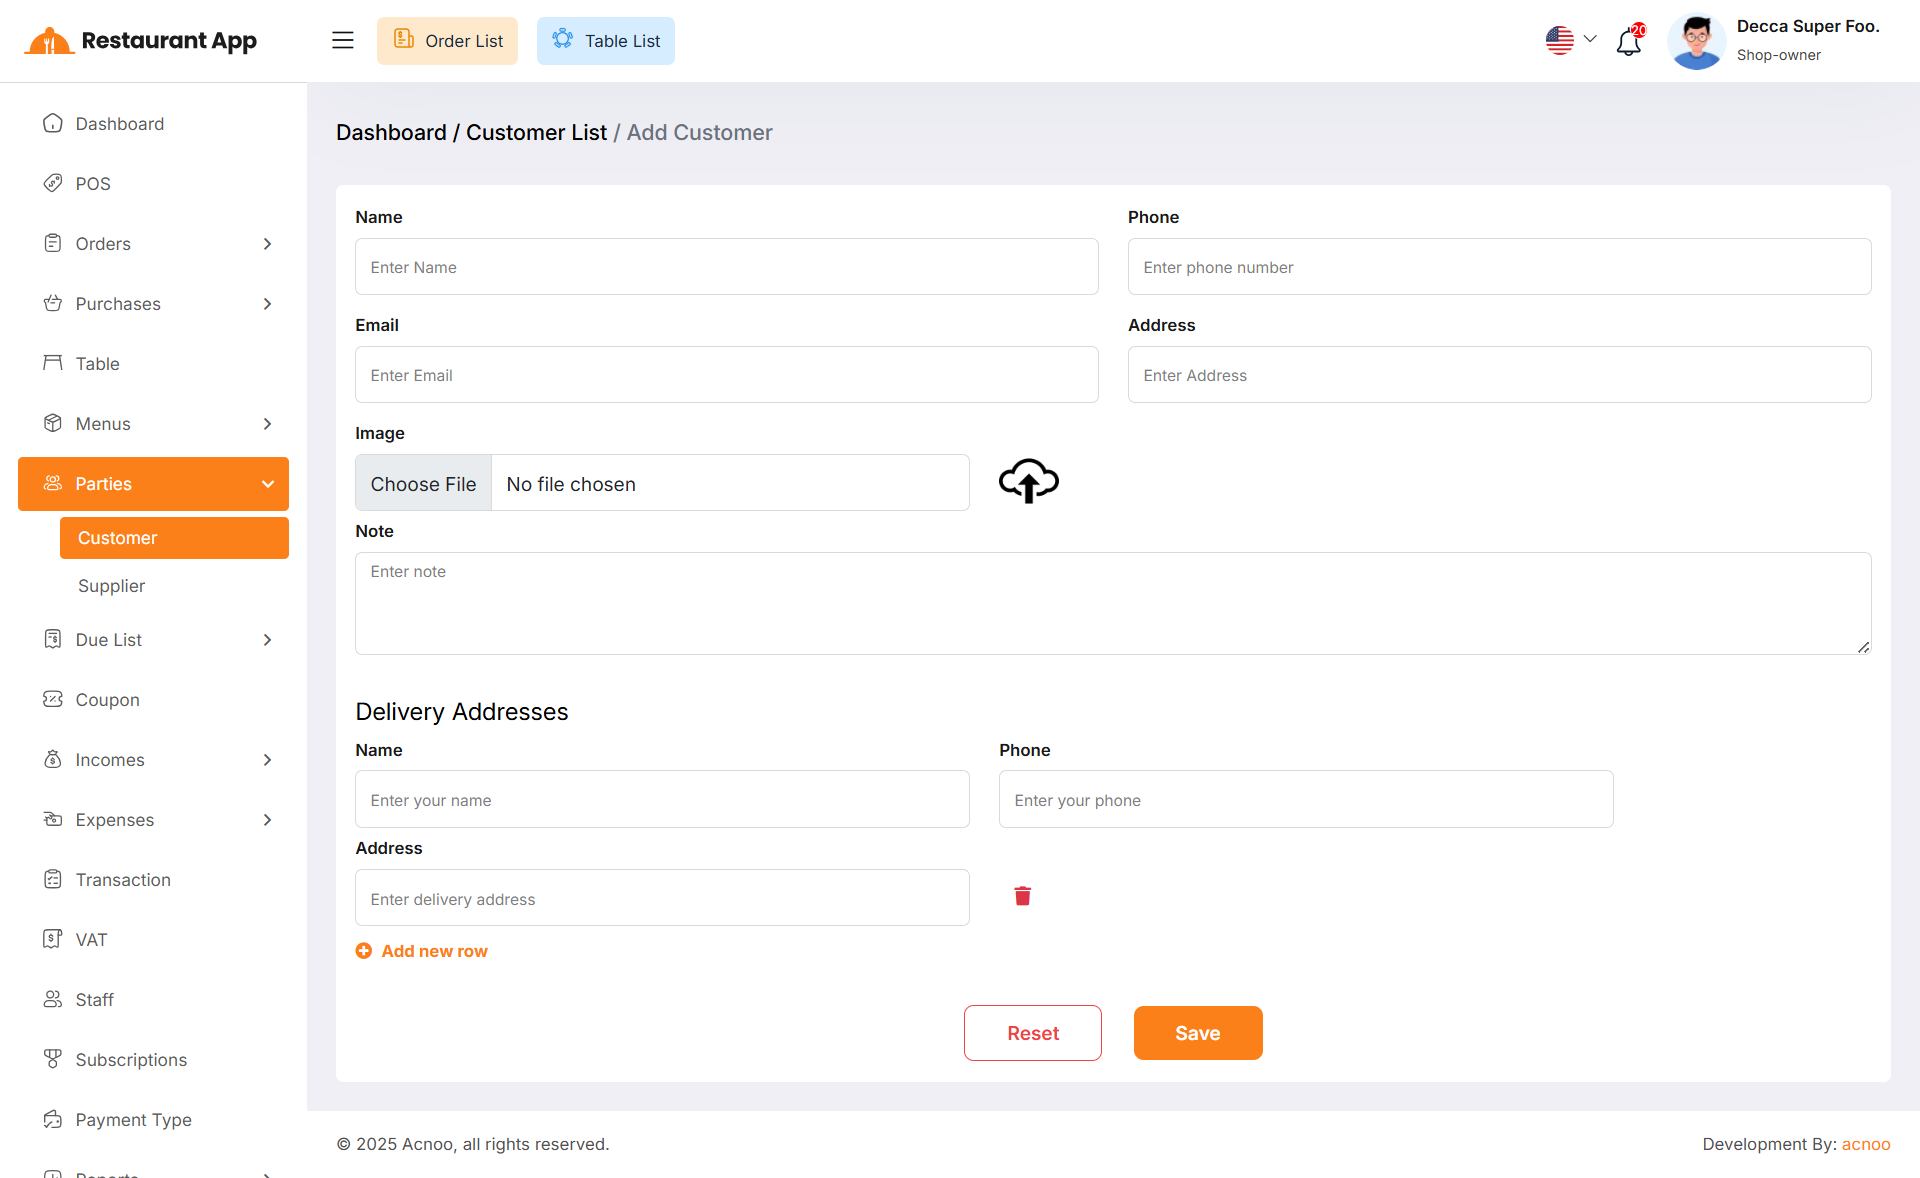
Create Customer
You can create a customer by filling out the required fields. Additionally, by clicking on the "Add new row" button, you can dynamically add fields for name, phone, and address. If you don’t need a dynamic field or if too many have been added, you can remove them by clicking the red "Delete" icon.
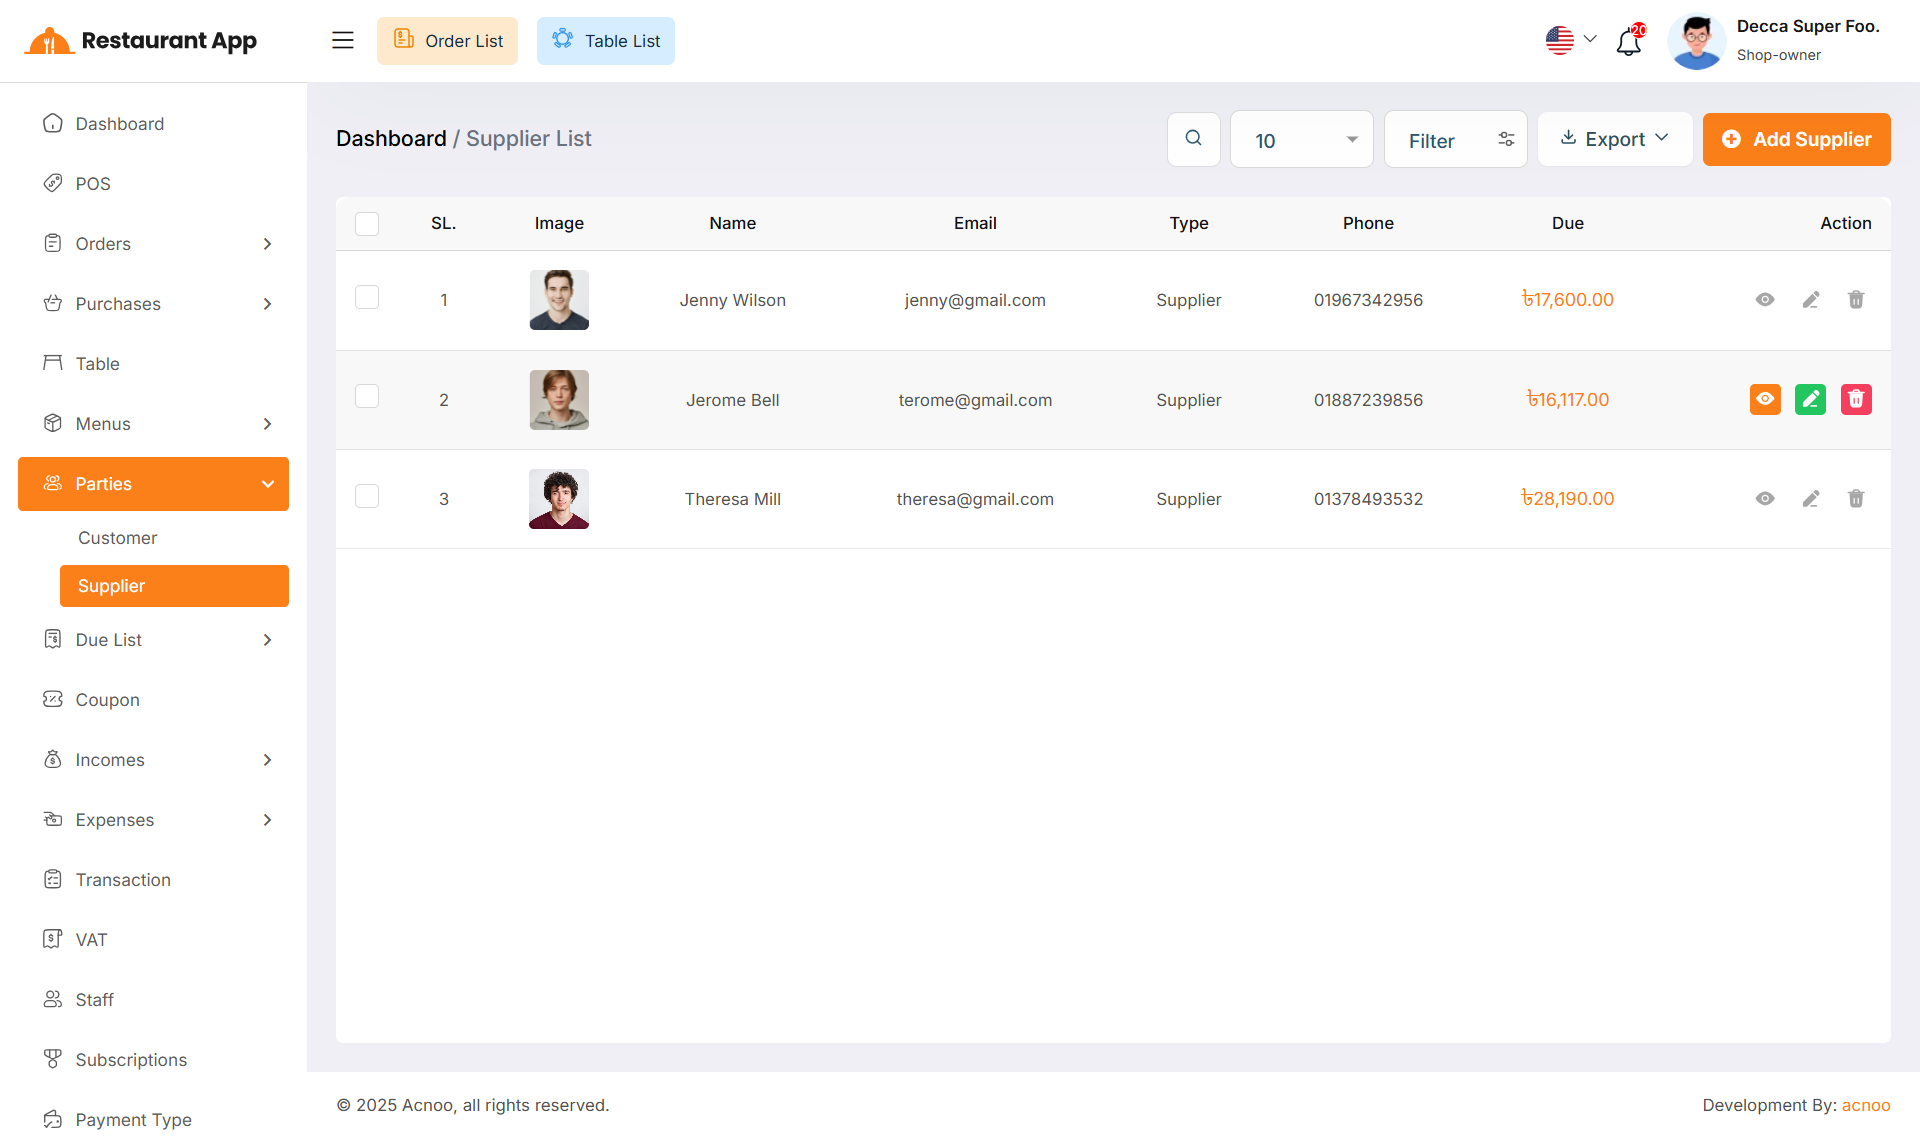
Supplier List
Here, you can view the supplier list with a search filter. Additionally, you have the option to view, edit, delete, or use the multi-delete function and exported as Excel, CSV and PDF.
Create Supplier
You can create a Supplier by filling out the required fields. Additionally, you can add an initial opening to be stored.
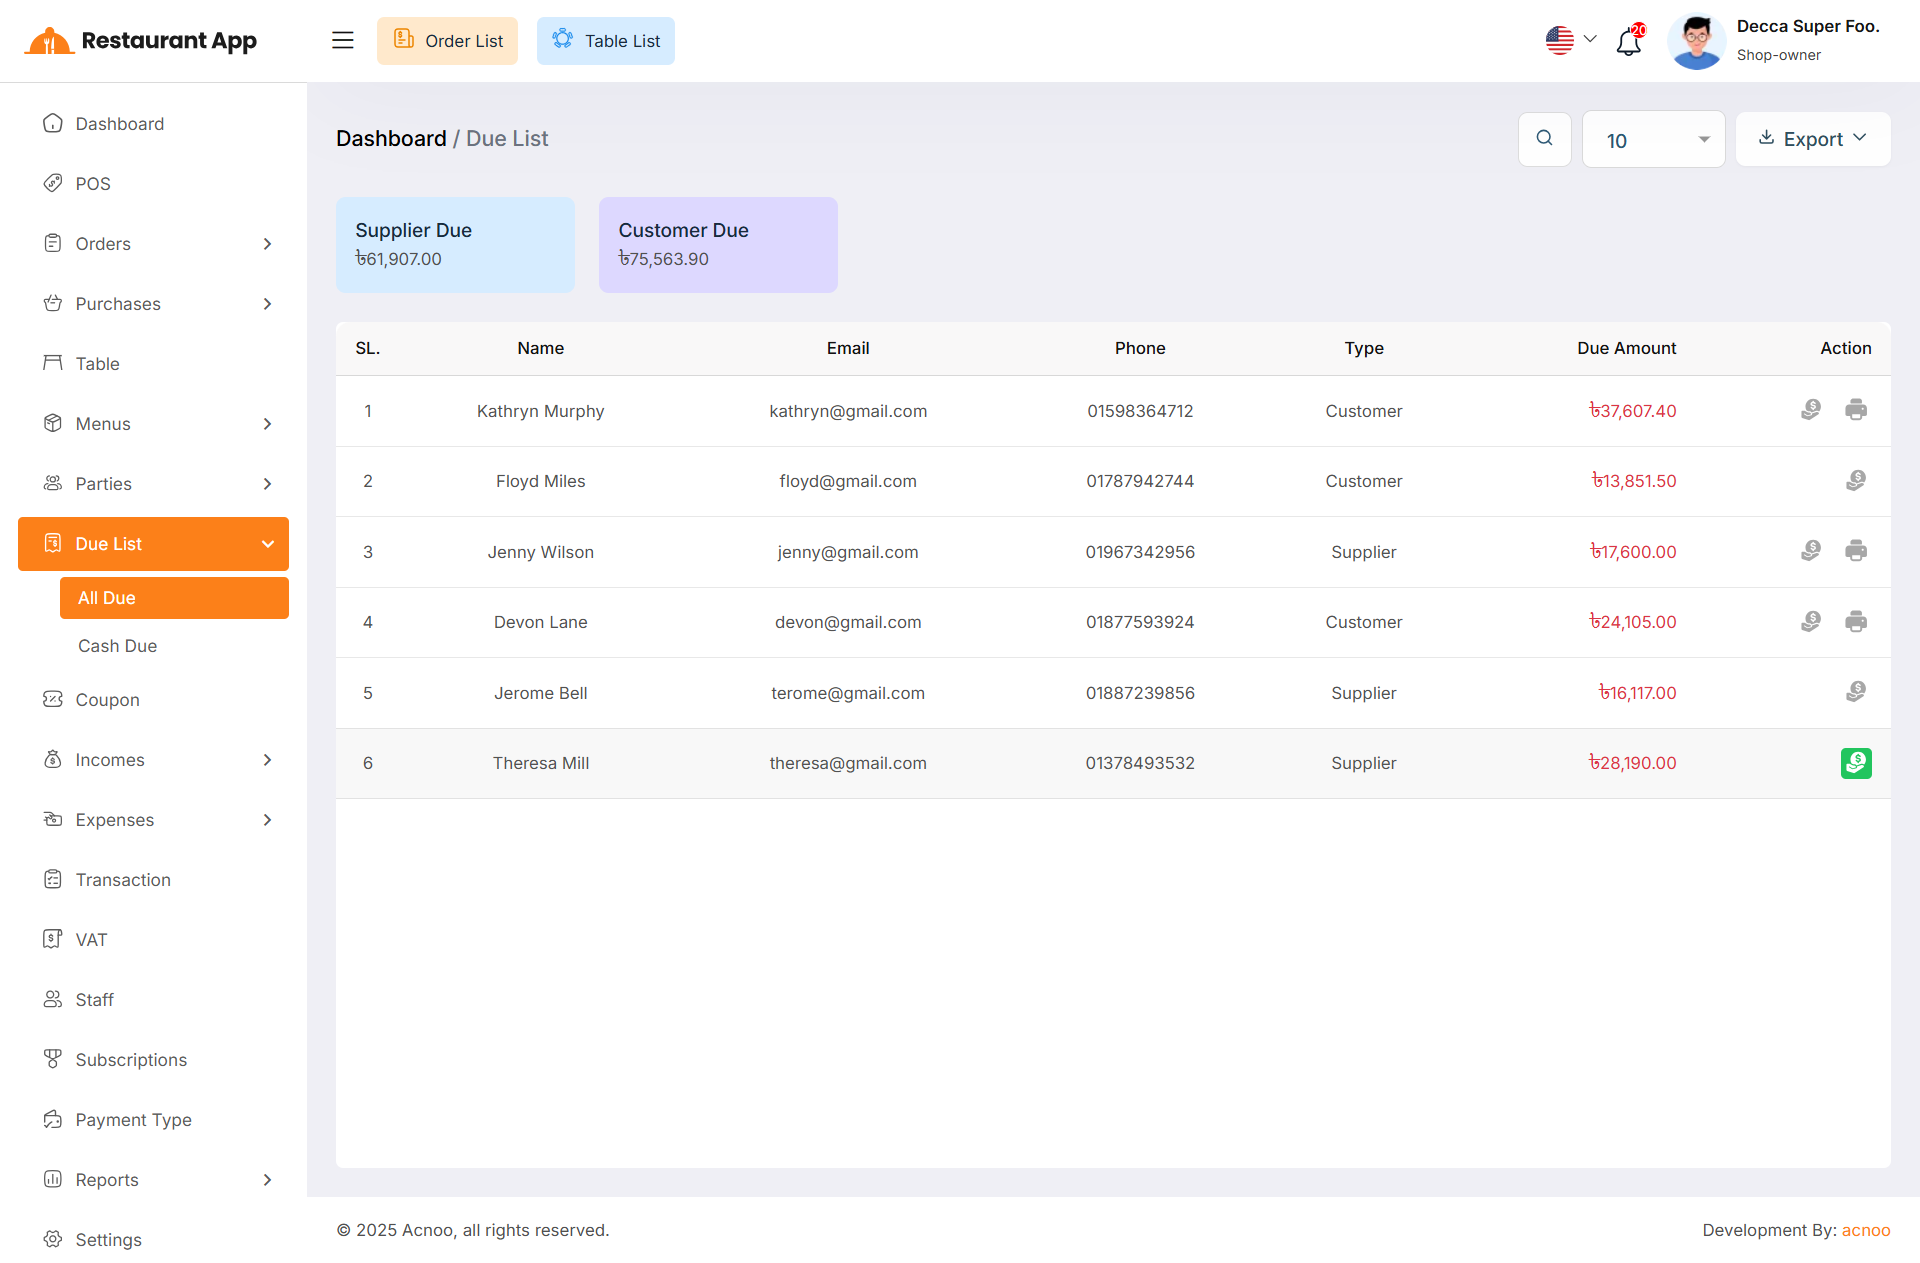
All Due
Here, you can view the list of all dues associated with Customers and Suppliers.
Additionally, you can filter and export the data, as well as view invoices and collect due amounts directly from this page.
If a due amount has already been collected, you will only be able to view the invoice; otherwise, you can't see "Invoice" icon.
In addition, you can also view the Total Suppliers and Customers Due at the top.
Cash Due
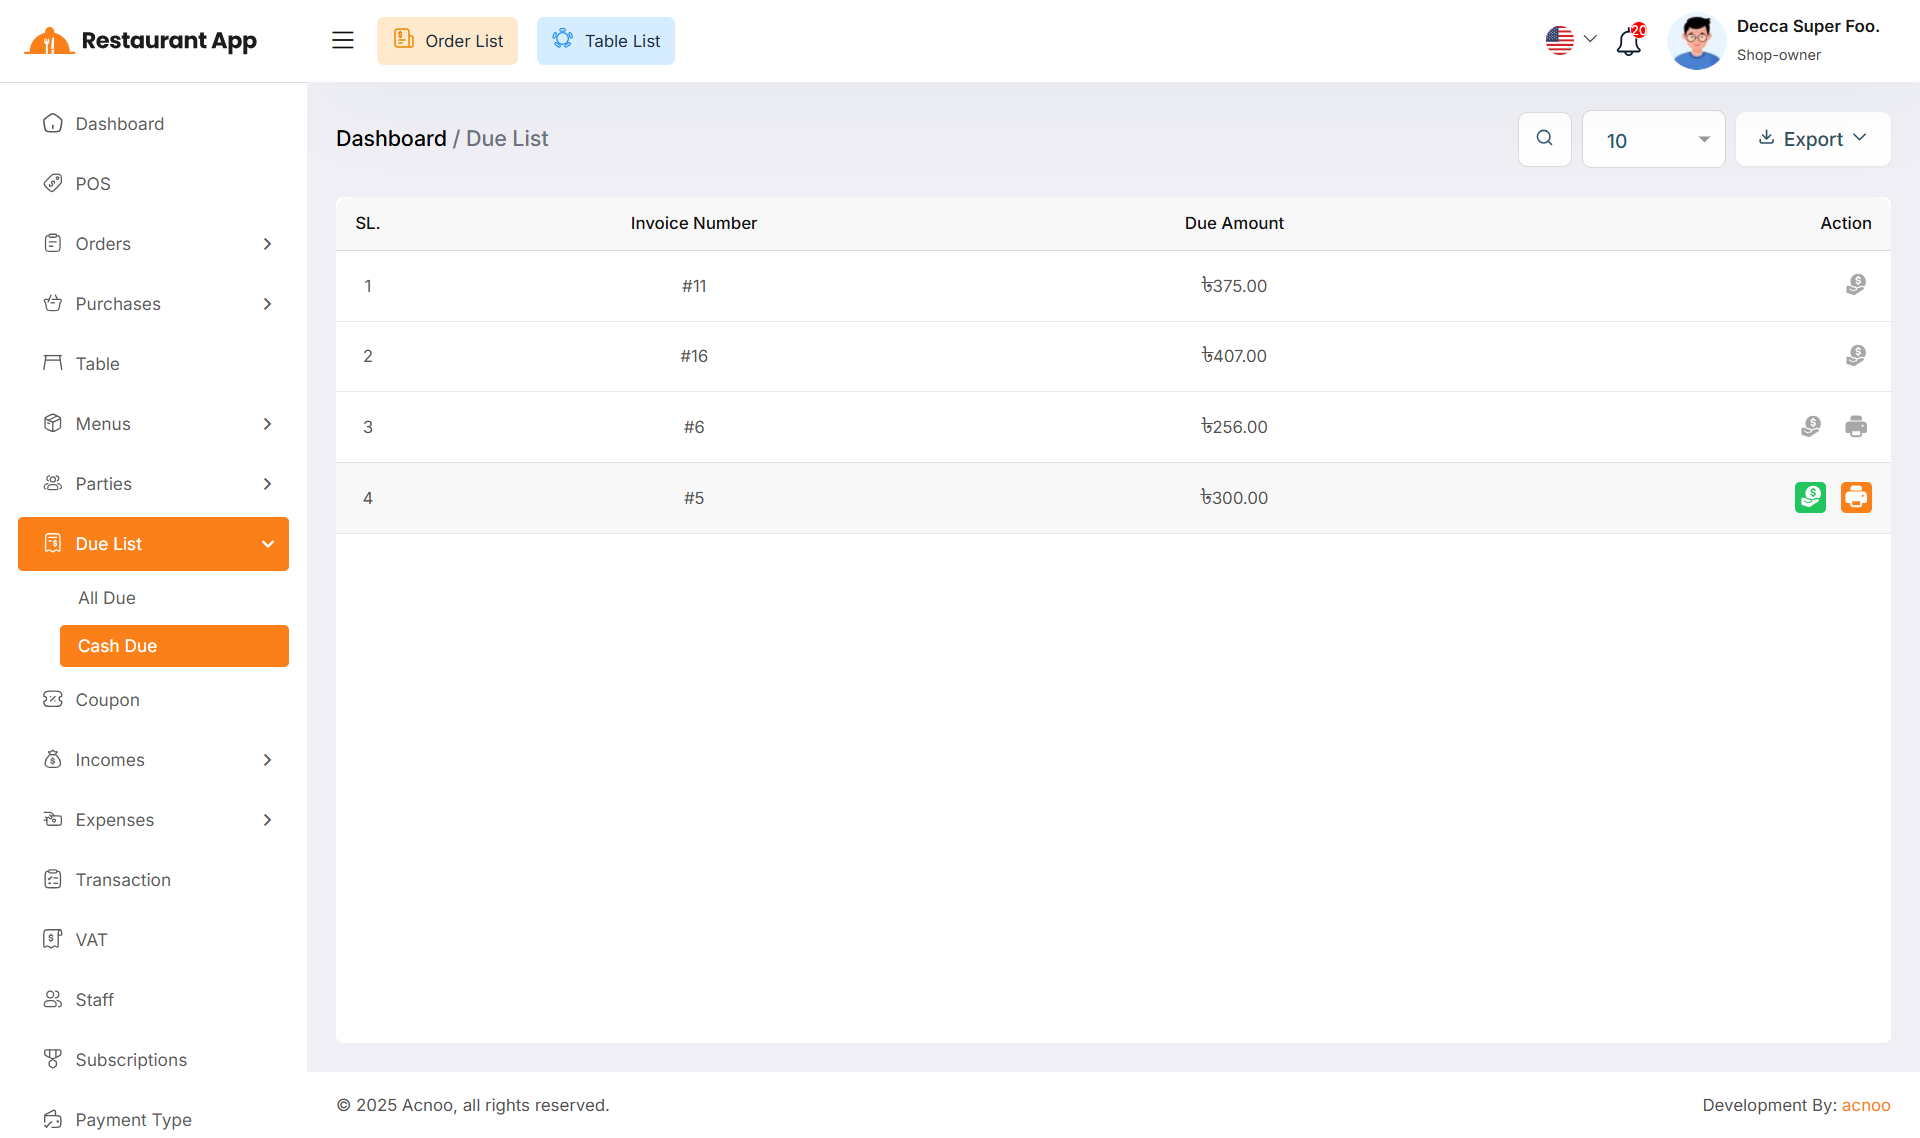
Here, you can view the list of all dues that do not have any associated Customers or Suppliers. Additionally, you can filter and export the data, as well as view invoices and collect due amounts directly from this page. If a due amount has already been collected, you will only be able to view the invoice; otherwise, you can't see "Invoice" icon.
Collect Due
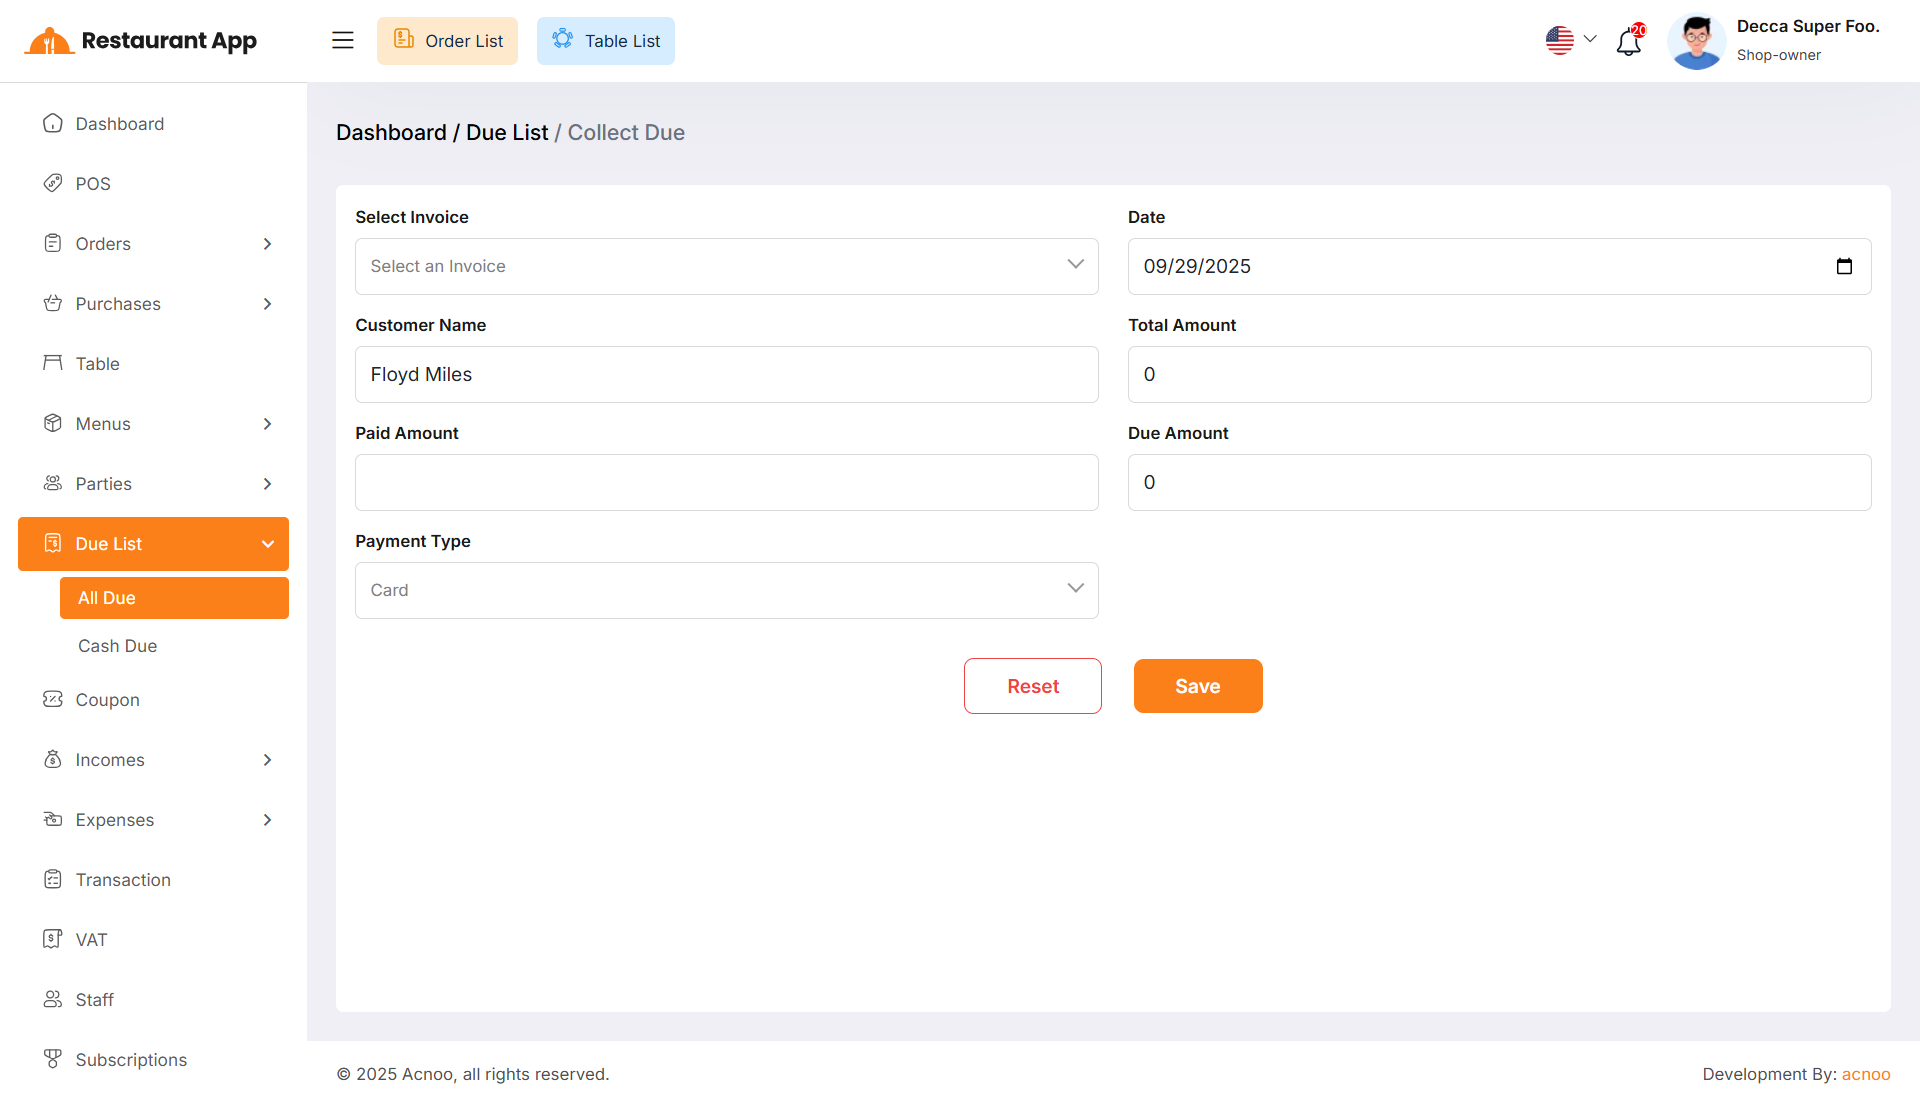
When you click "Collect Invoice", this page will appear. Here, you can collect the due amount either by invoice or without an invoice if there is any initial due.
Coupon List
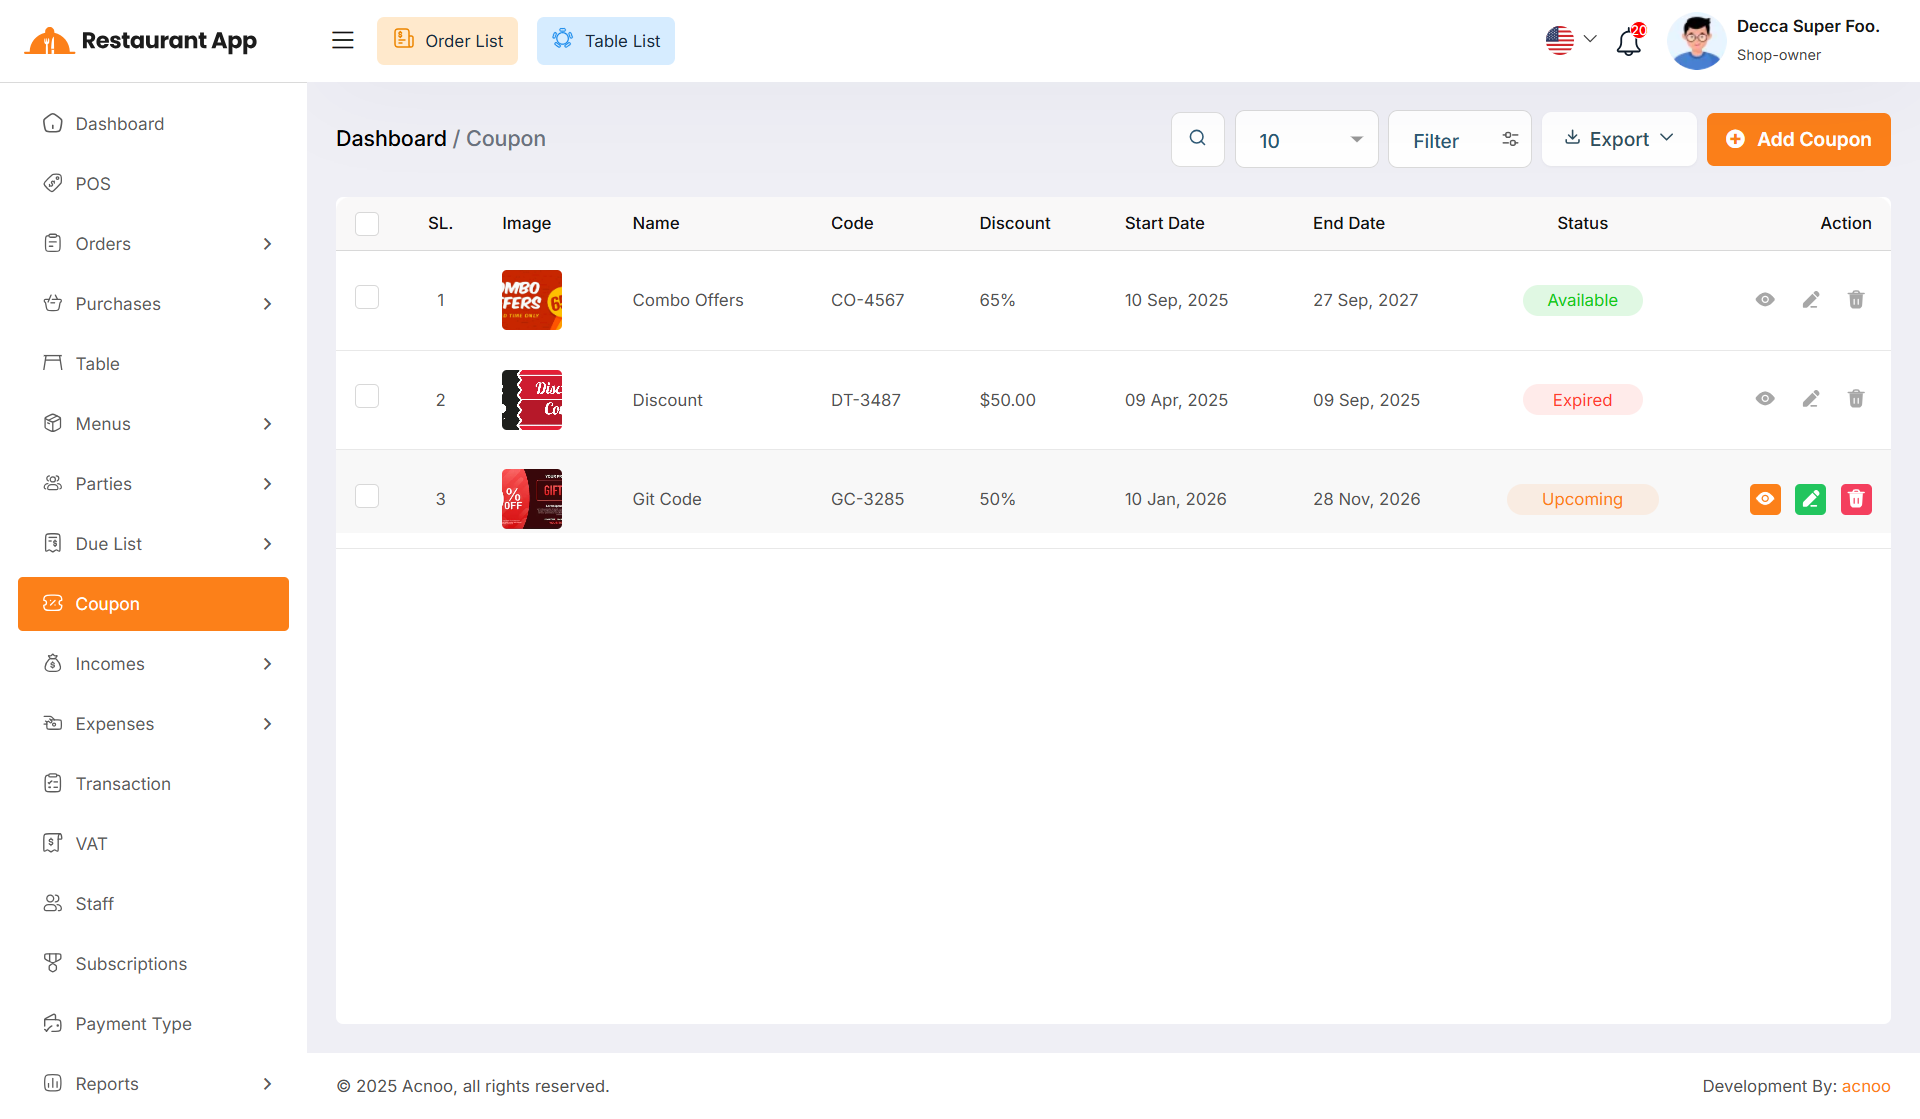
Here, you can view the Coupon list with a search filter. Additionally, you have the option to edit, delete, or use the multi-delete function and exported as Excel, CSV and PDF.
Create Coupon
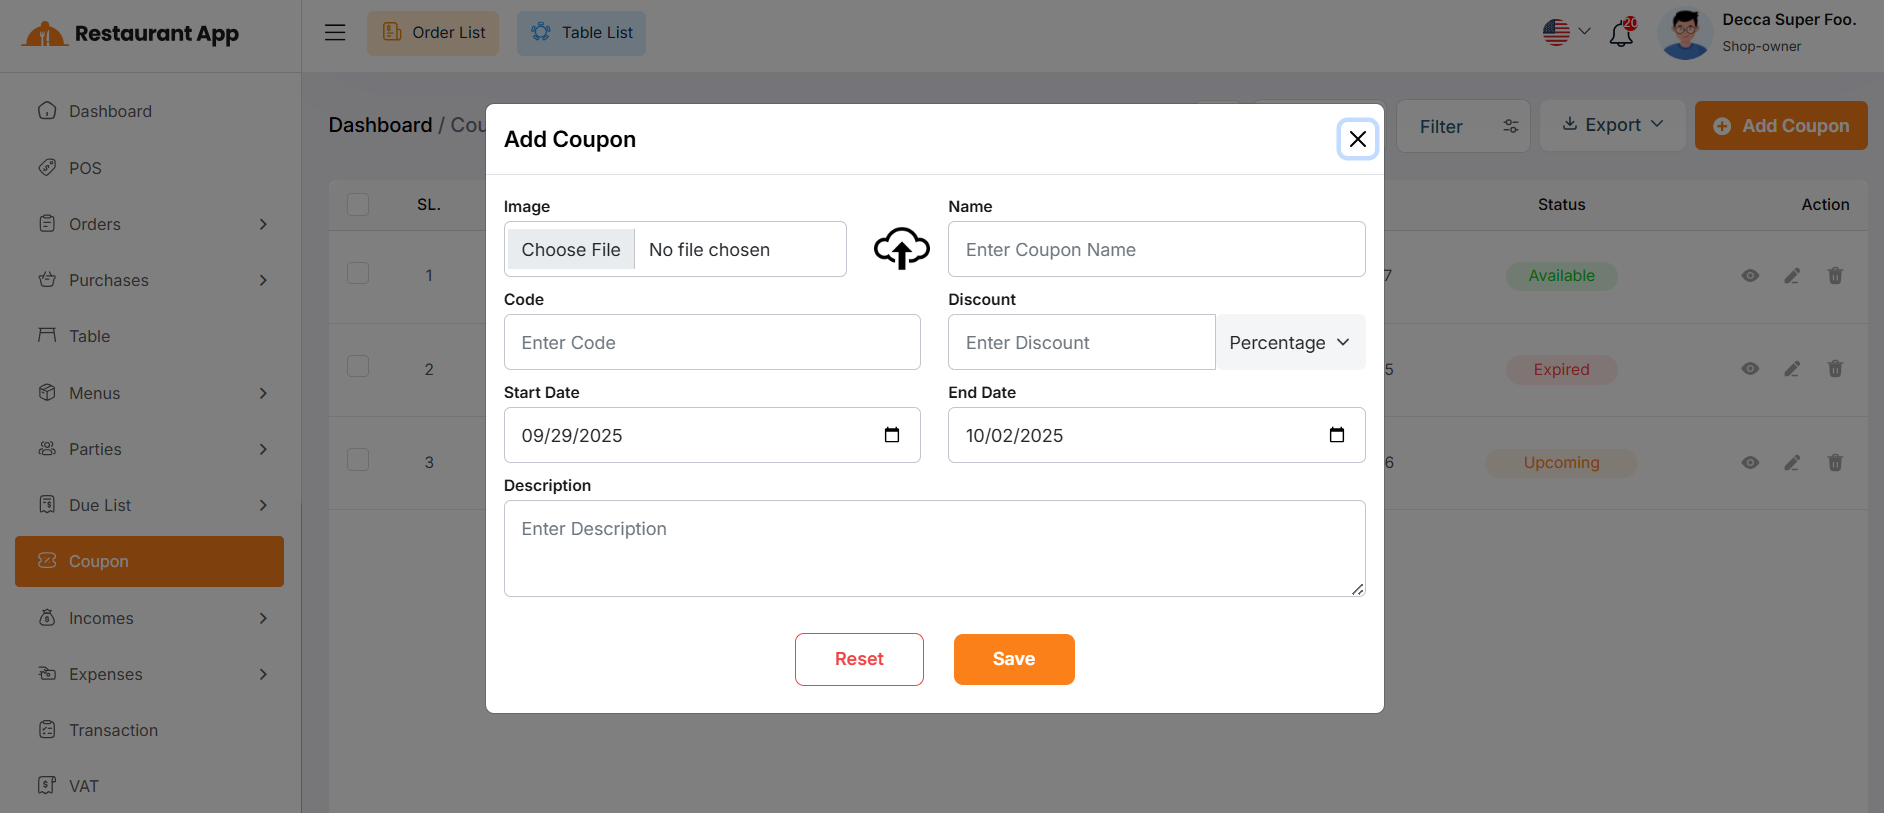
You can create an coupon by filling out the required fields.Here You can also select discount type and discount.
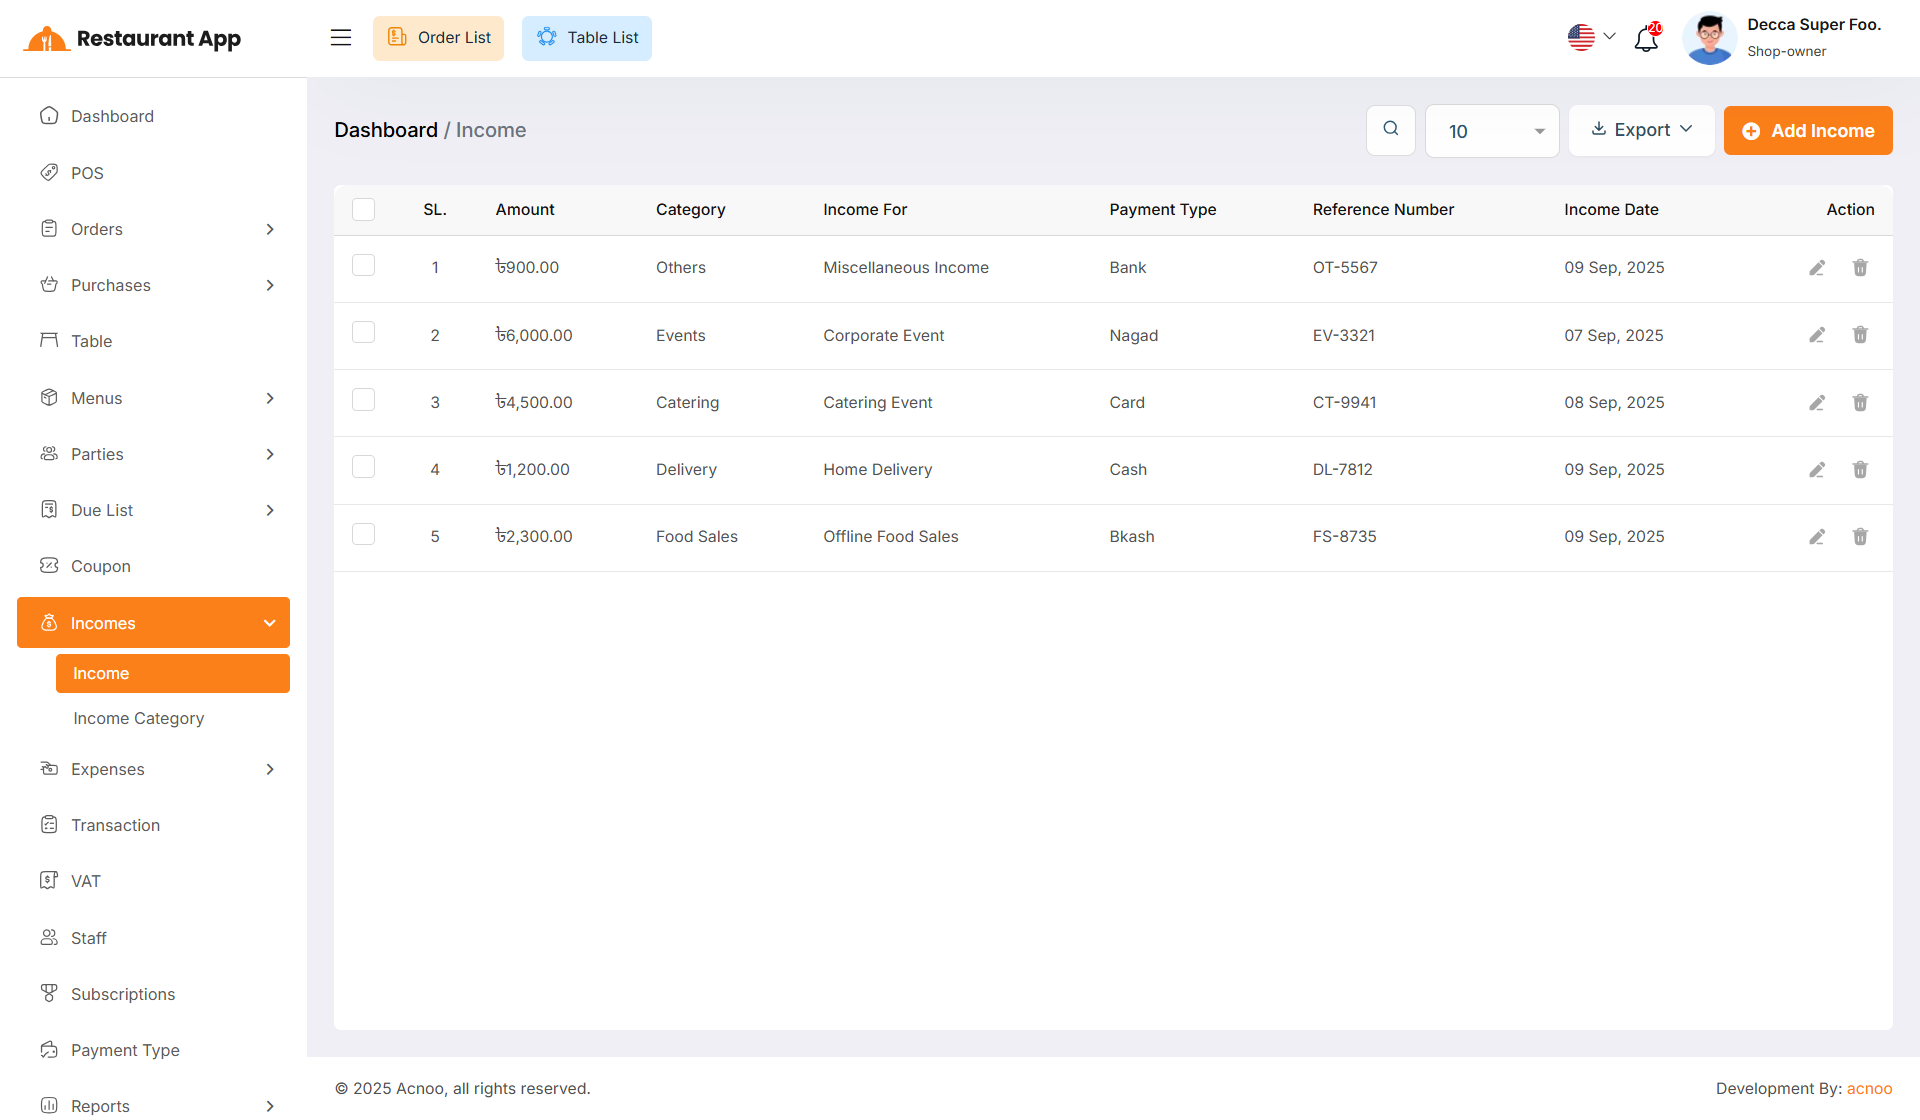
Income List
Here, you can view the Income list with a search filter. Additionally, you have the option to edit, delete, or use the multi-delete function and exported as Excel, CSV and PDF.
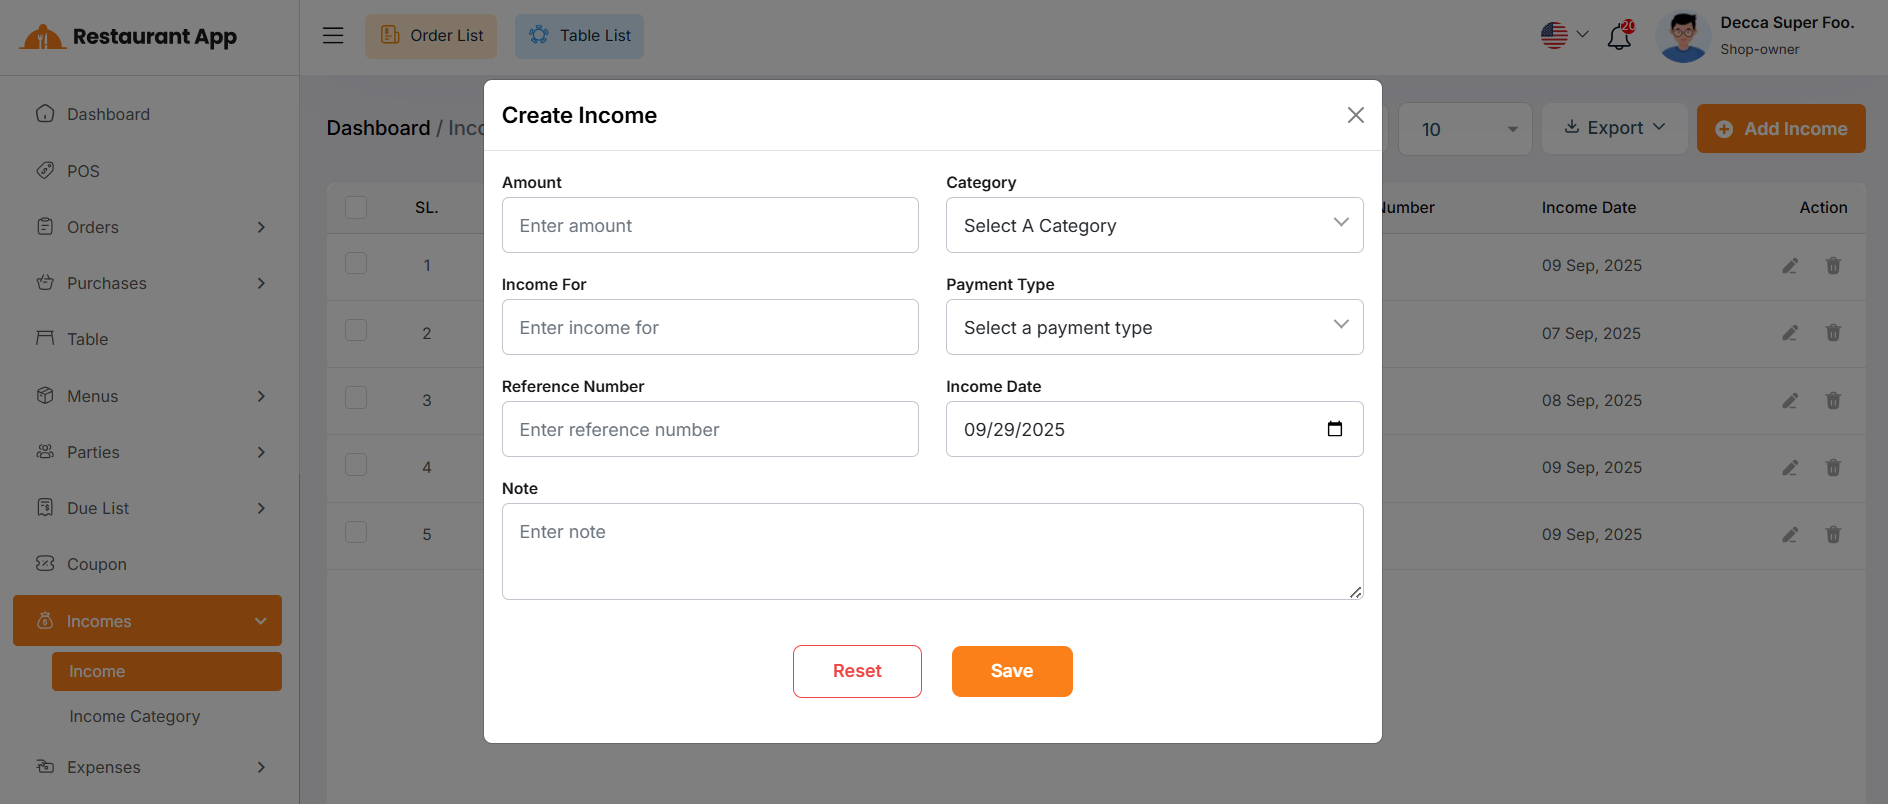
Create Income
You can create an income by filling out the required fields.Here You can also select category and payment type.
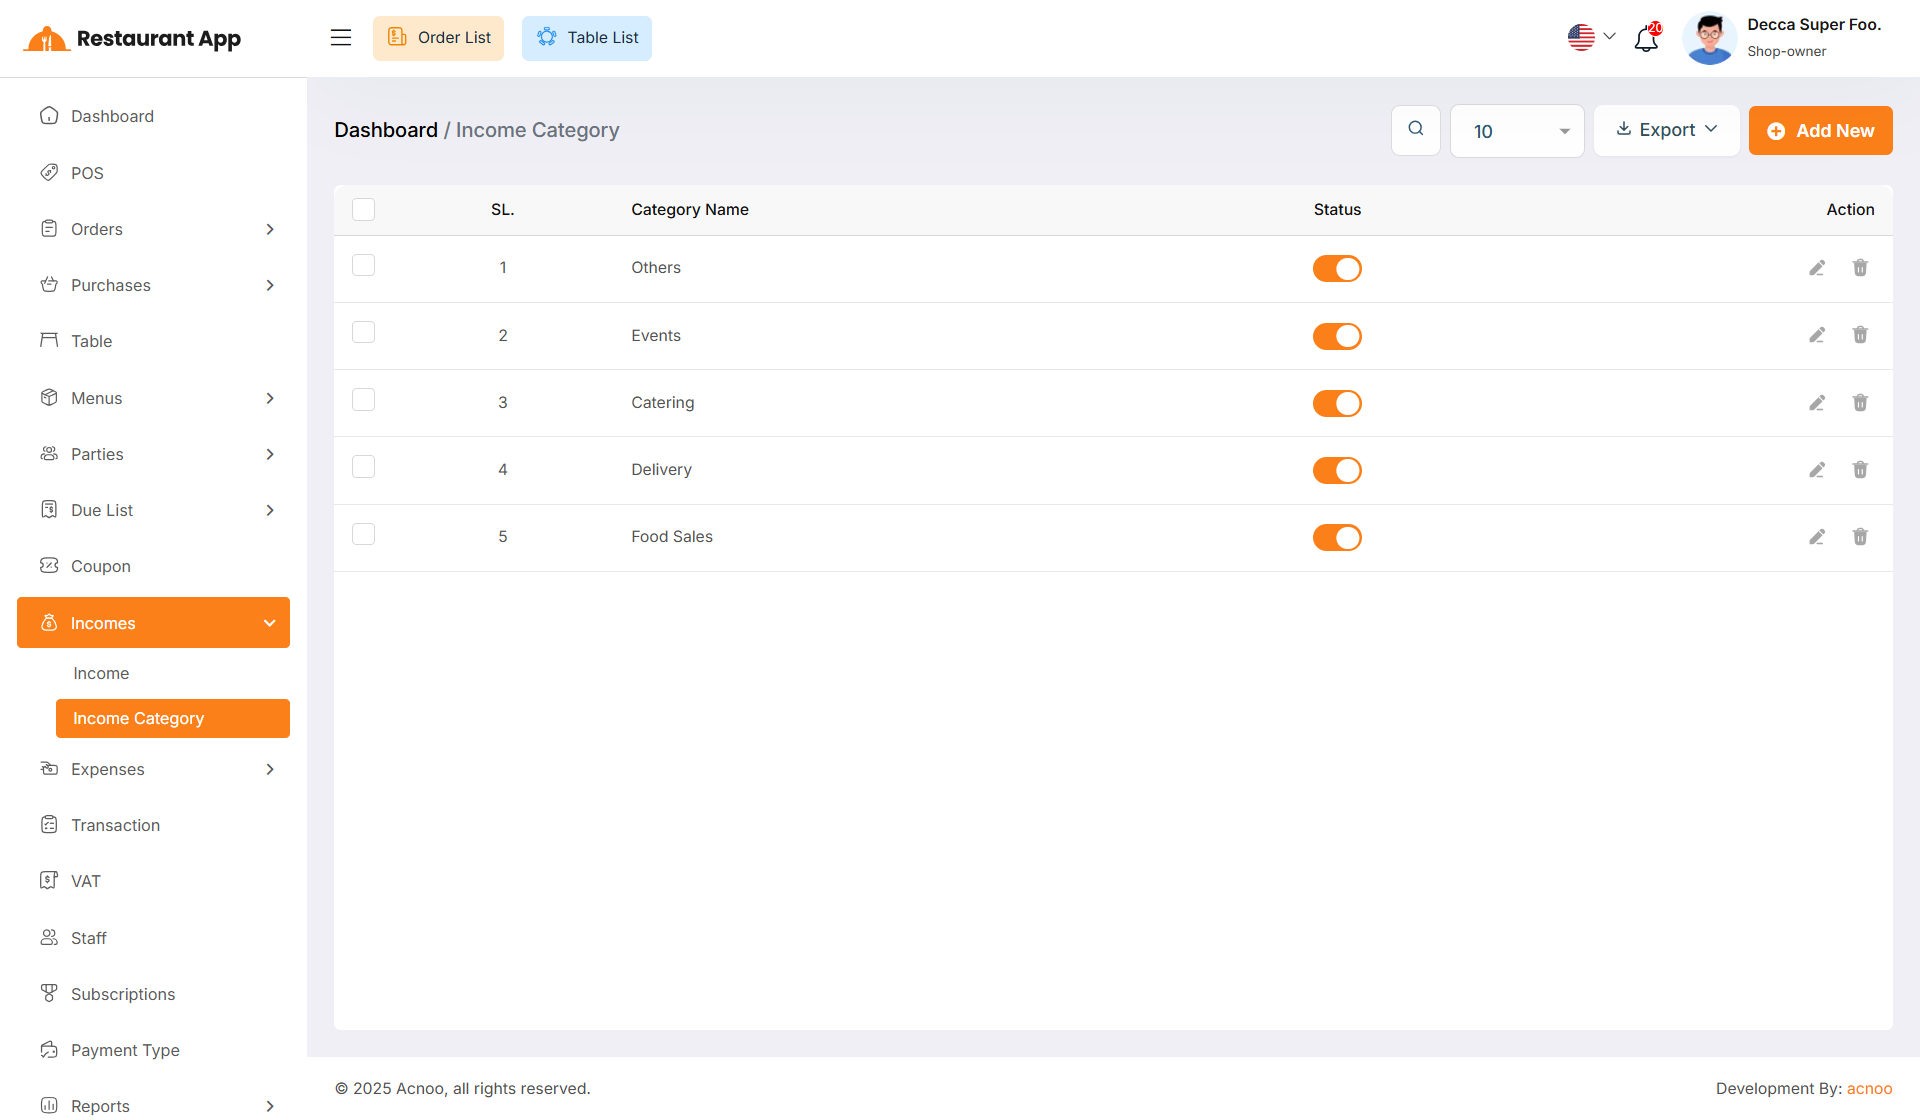
Income Category
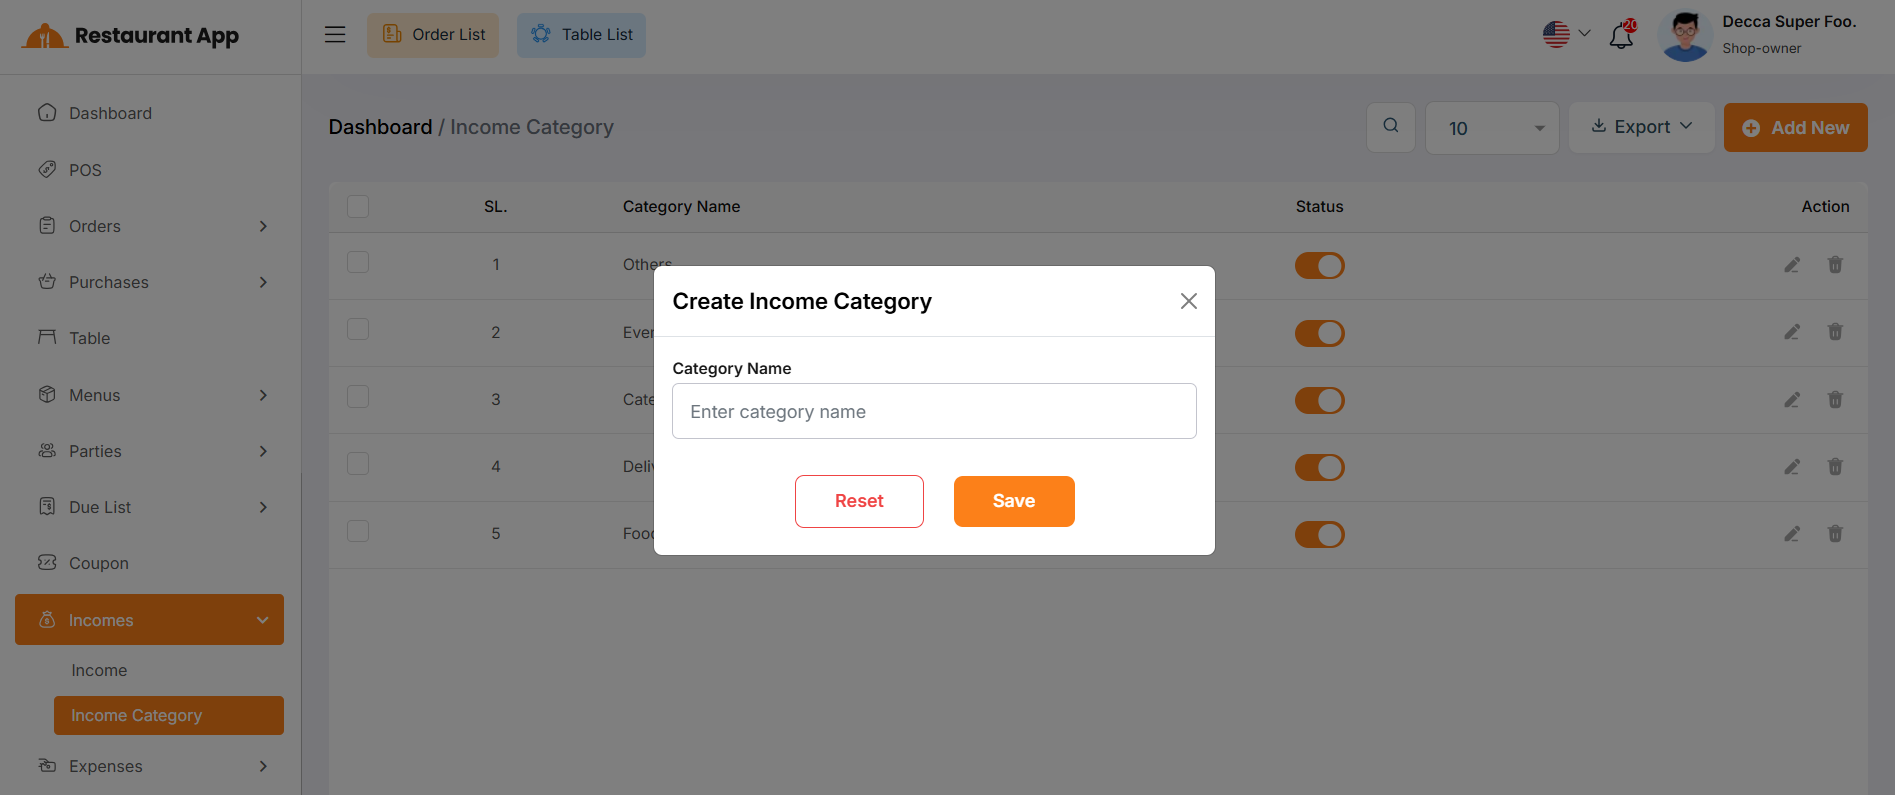
Here, you can view the Income Category with a search filter. Additionally, you have the option to edit, delete, or use the multi-delete function and exported as Excel, CSV and PDF. Just put category name for create Income Category
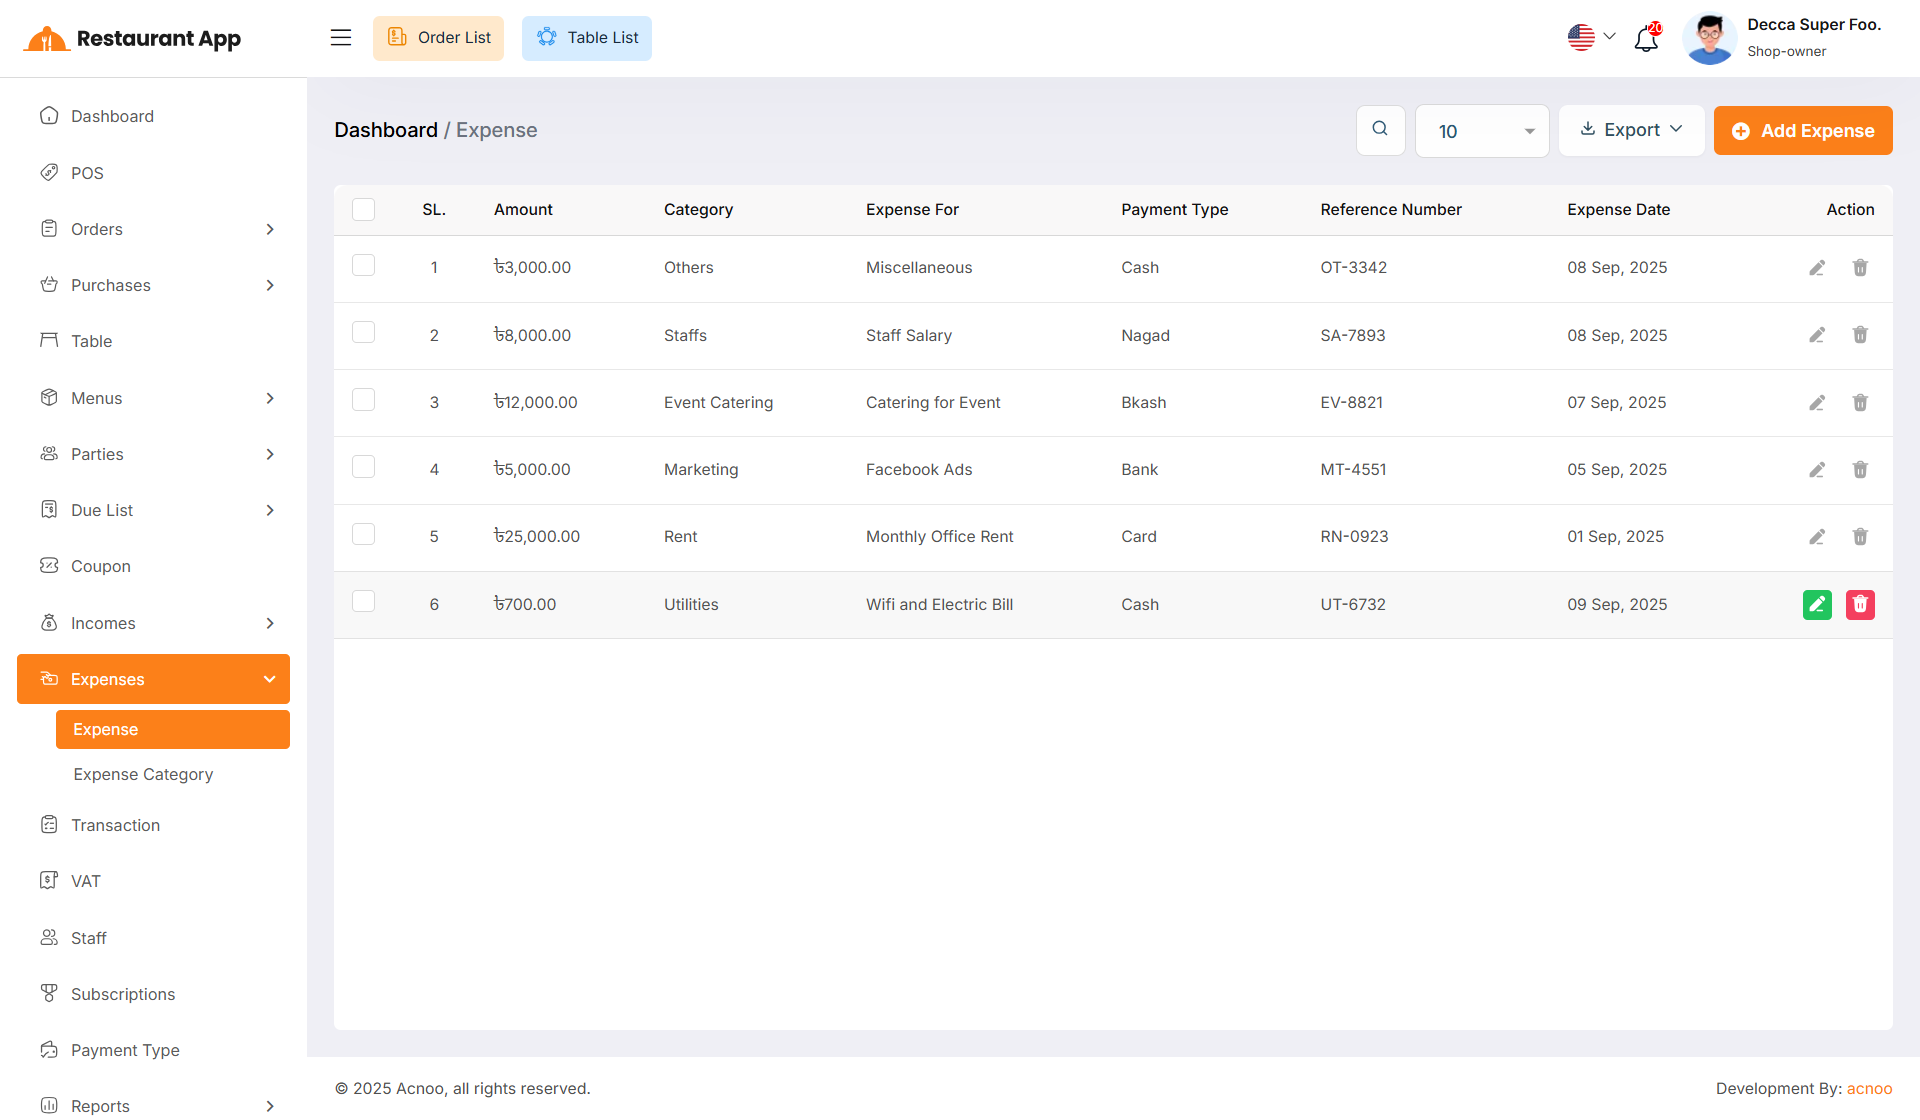
Expense List
Here, you can view the Expense list with a search filter. Additionally, you have the option to edit, delete, or use the multi-delete function and exported as Excel, CSV and PDF.
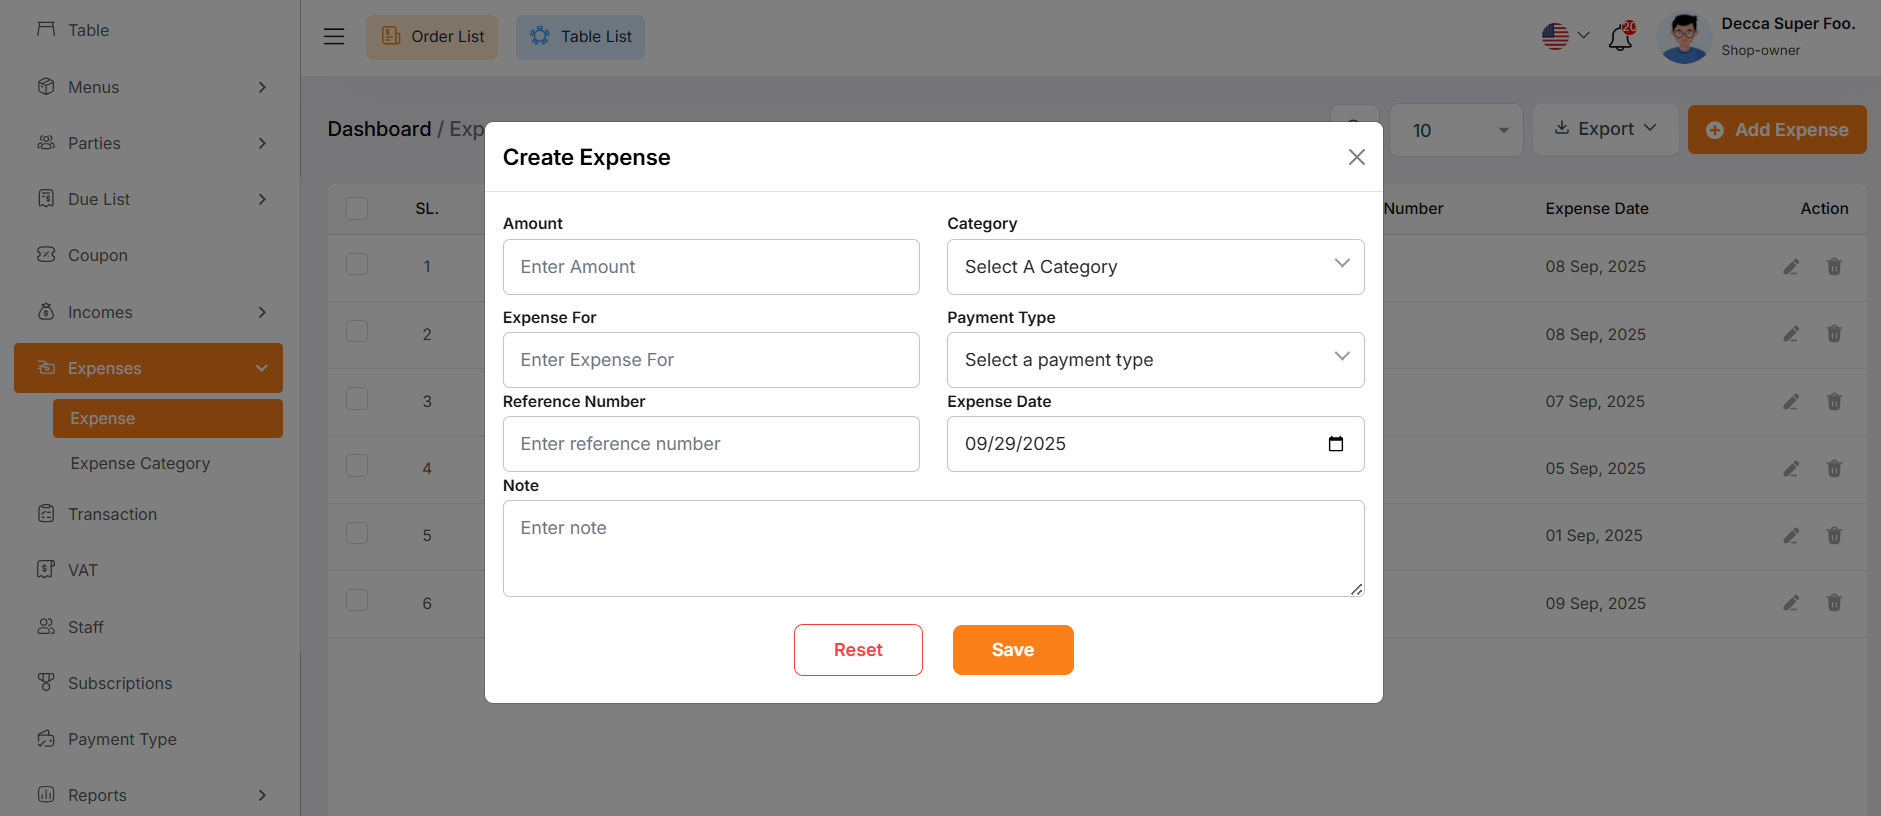
Create Expense
You can create an expense by filling out the required fields.Here You can also select category and payment type.
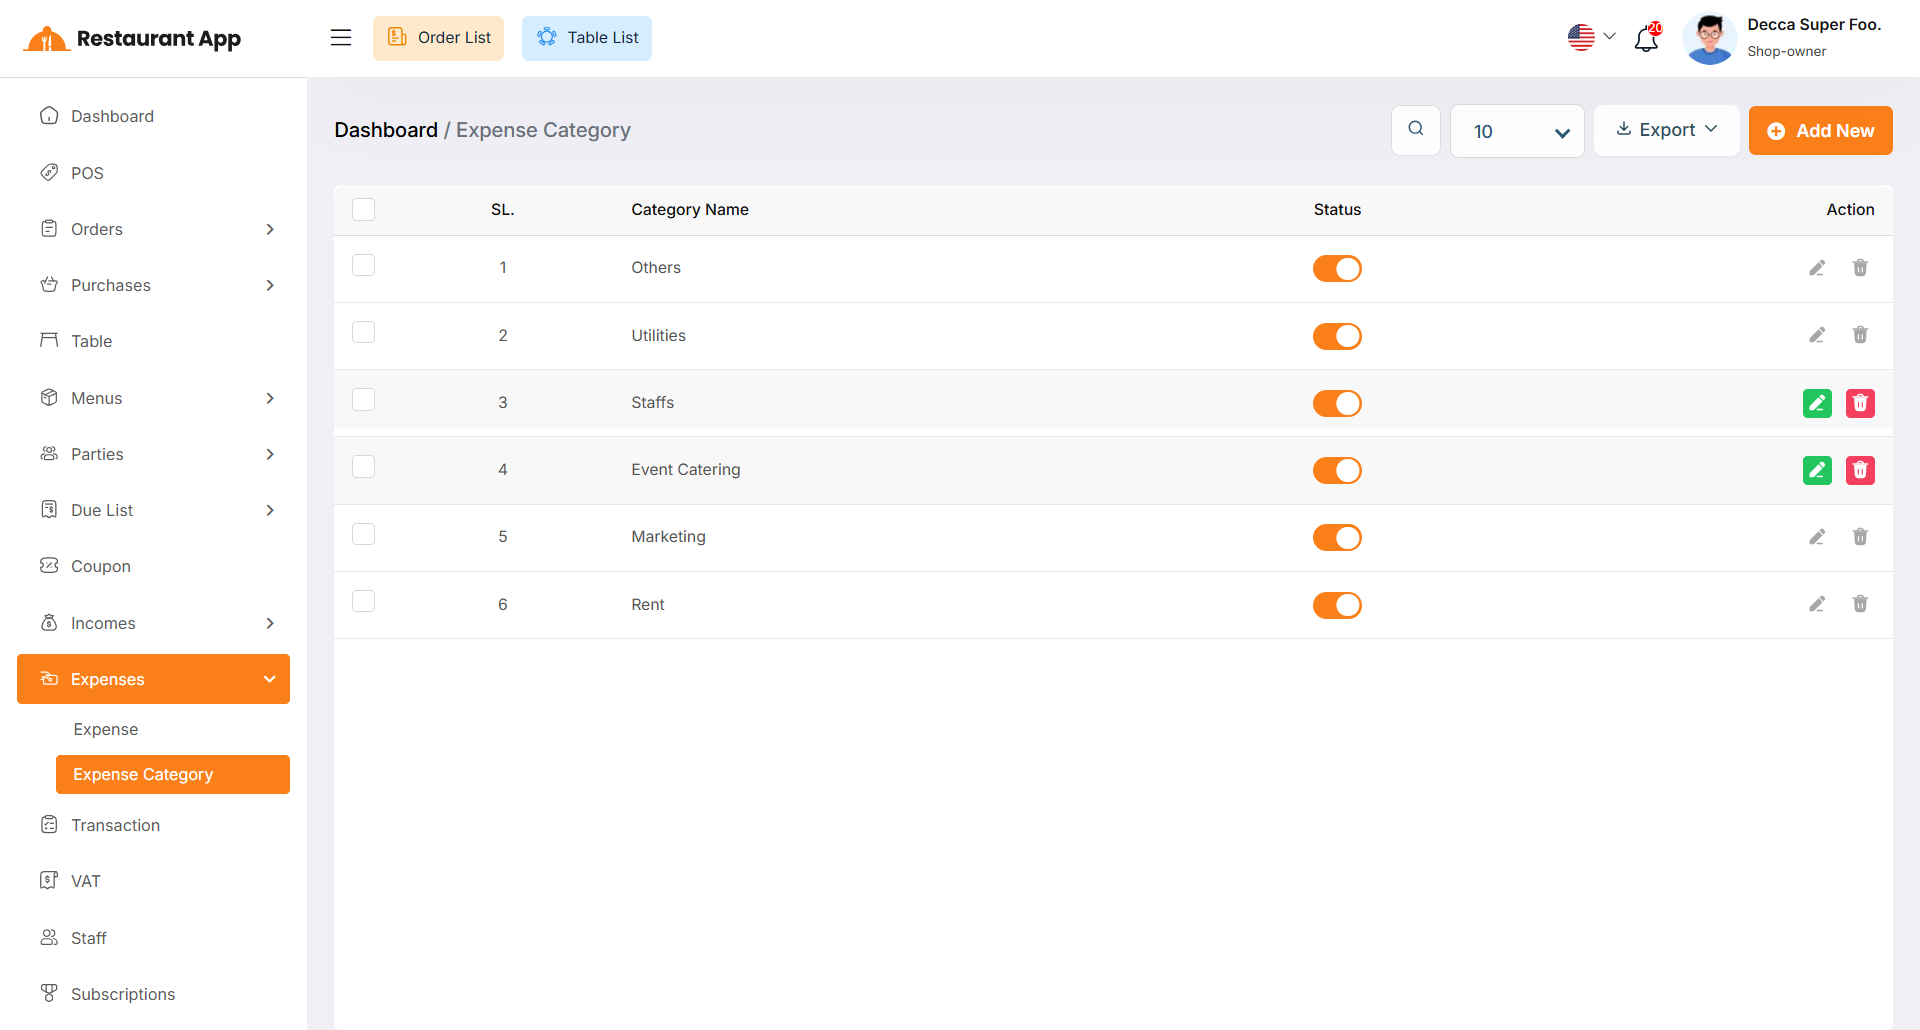
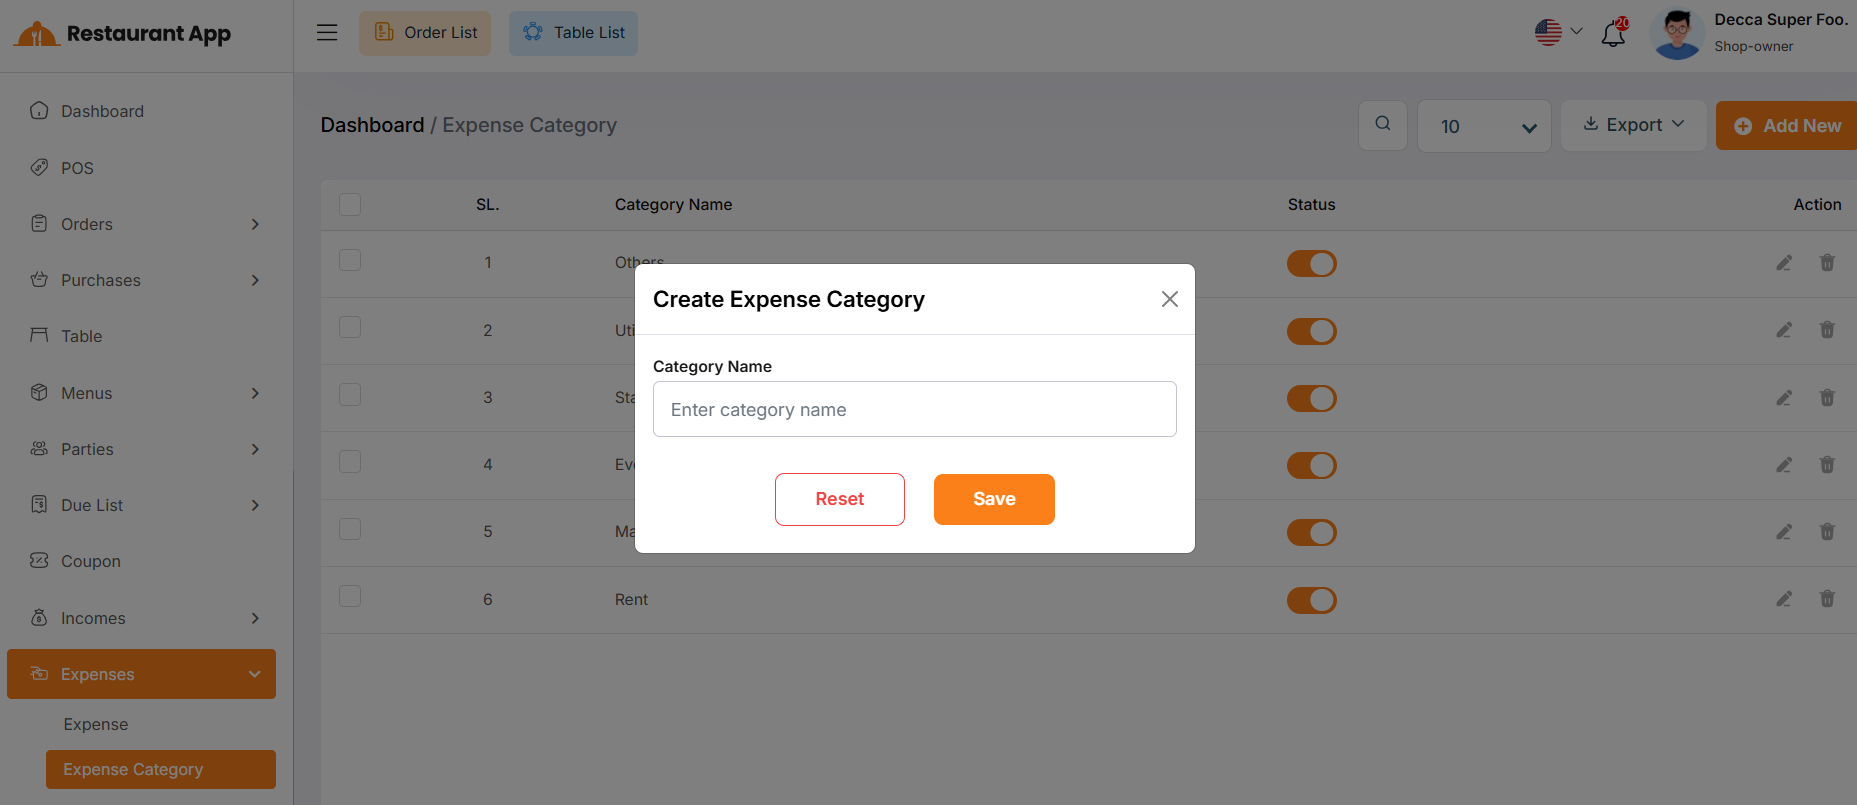
Expense Category
Here, you can view the Expense Category with a search filter. Additionally, you have the option to edit, delete, or use the multi-delete function and exported as Excel, CSV and PDF. Just put category name for create Expense Category
Transaction List
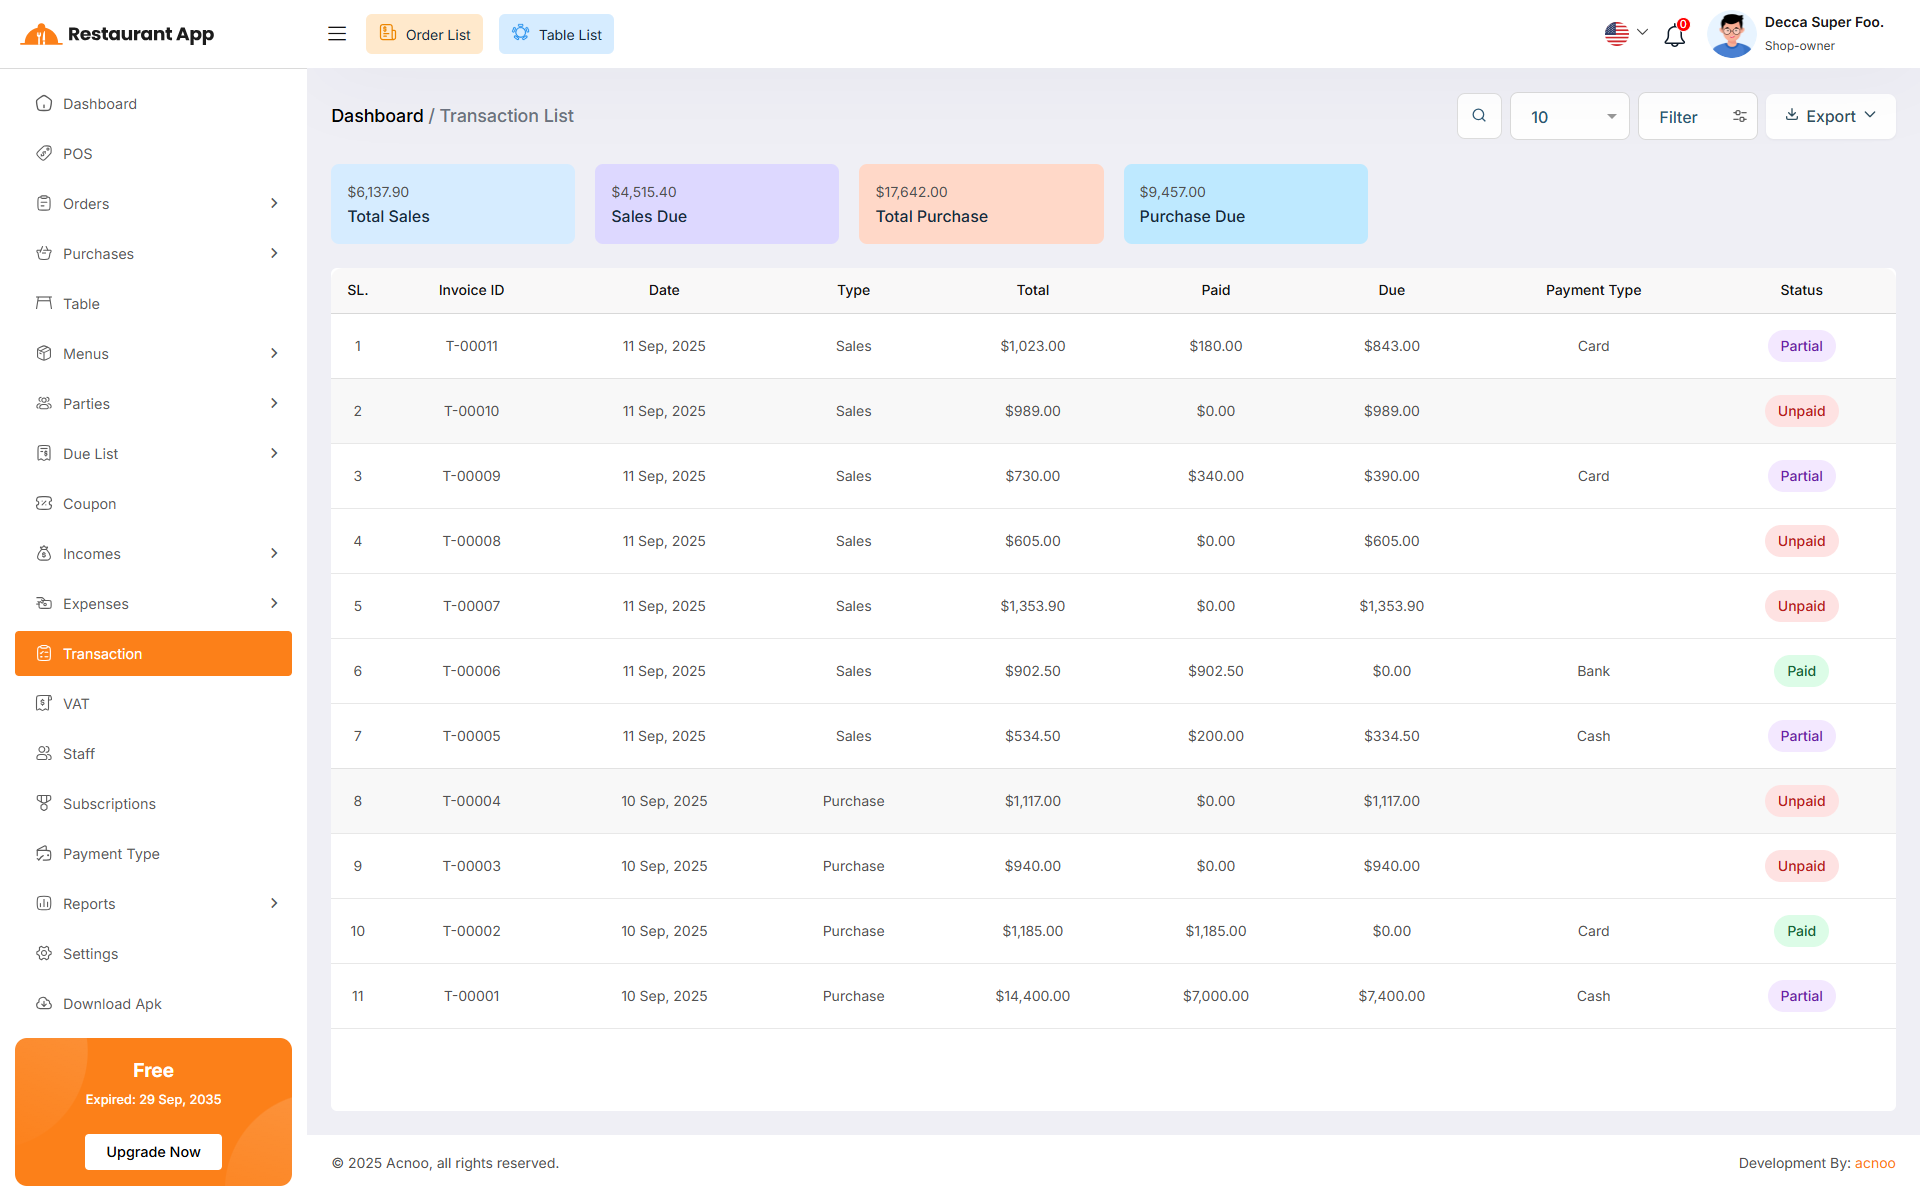
Here, you can view the Transaction list with a search filter. Additionally, you have the option to exported as Excel, CSV and PDF. In addition, you can also view the Total Sales, Sales Due, Total Purchase and Purchase Due at the top.
Vat Setting
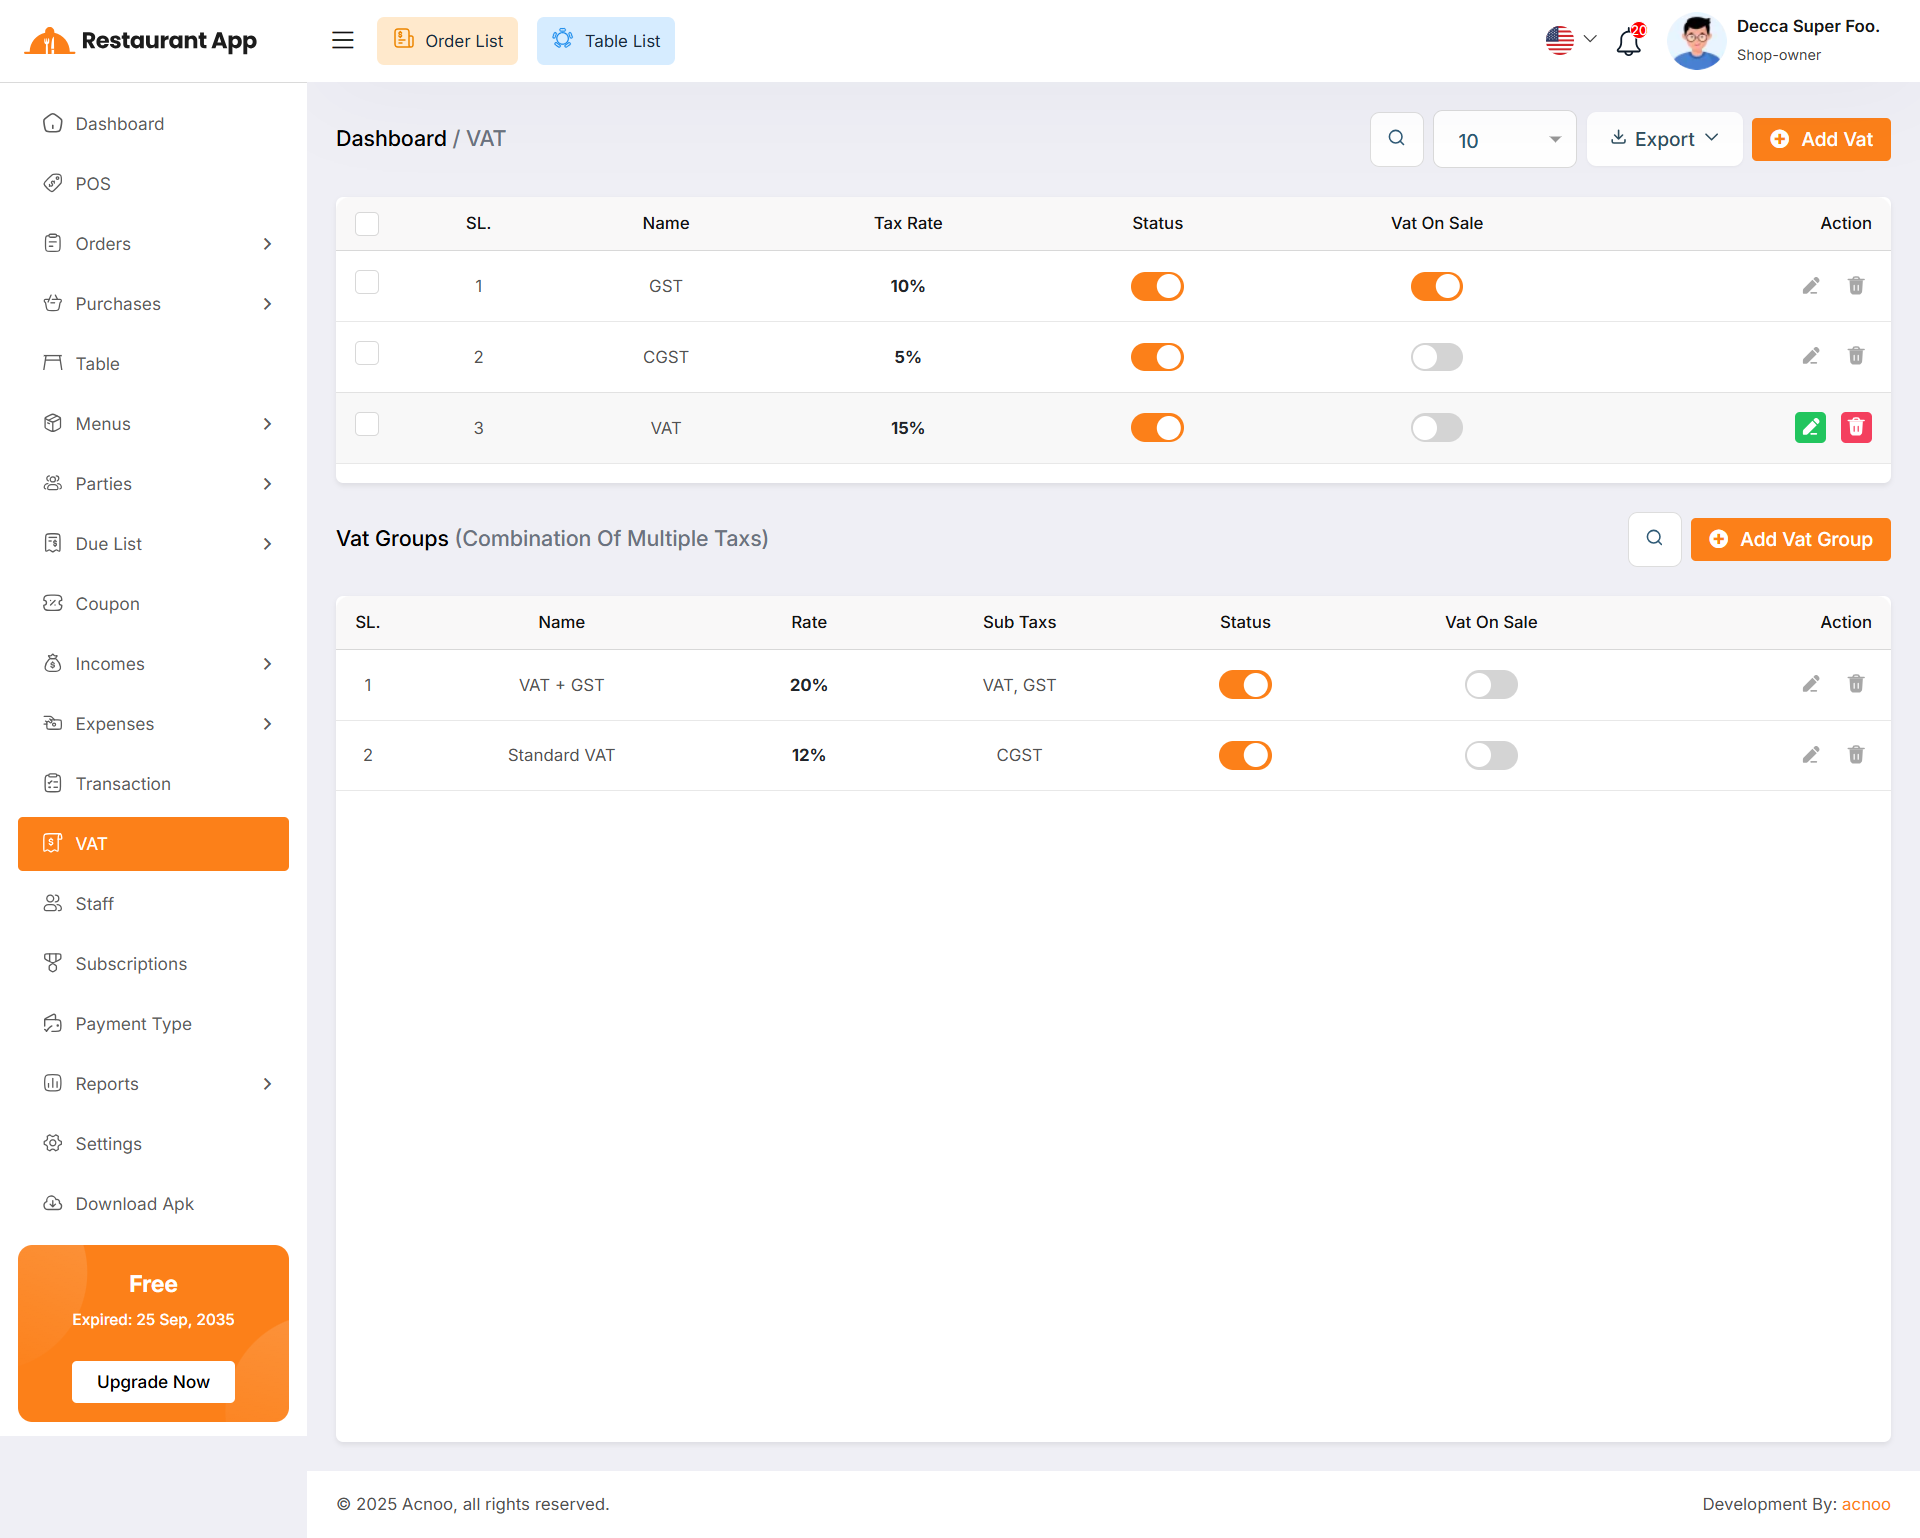
Here, you can view VAT settings and VAT groups. Two tables are available: one for the list of VAT rates and another for the list of VAT groups. You can exported VAT as Excel, CSV and PDF and apply filtering separately in both tables. Additionally, you can use the VAT On Sale toggle to activate any VAT during item sales. When one VAT is activated, all other VATs will be automatically deactivated.
Create Vat
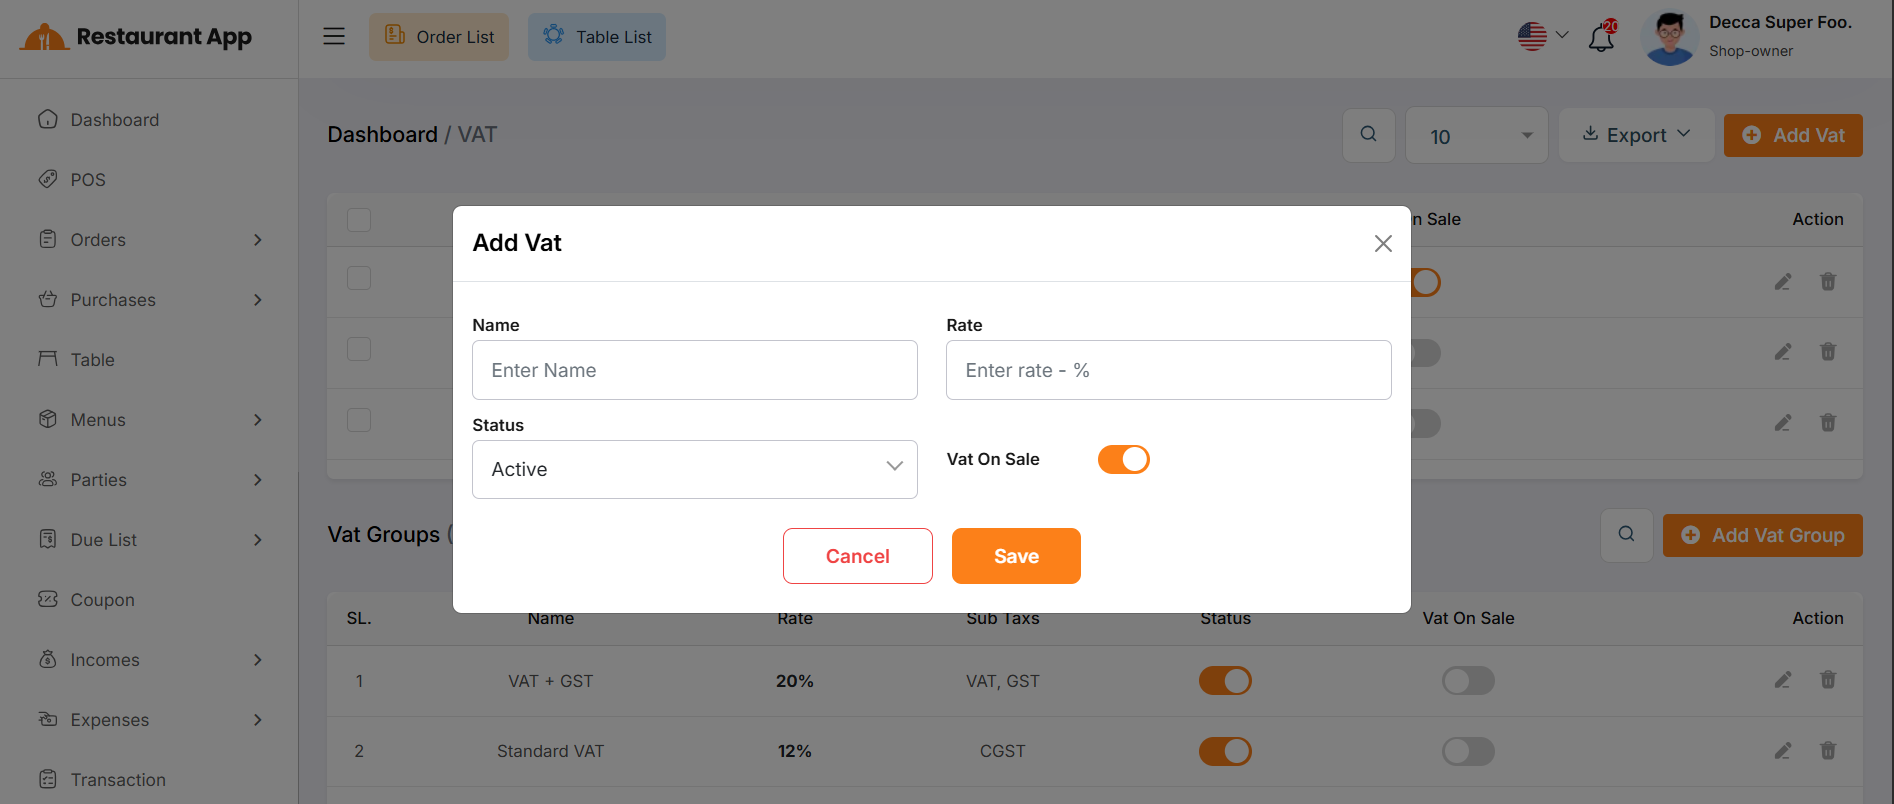
By clicking the Add VAT button, a modal will appear. Fill in the required input fields and then click the Save button to add a new VAT entry.
Create Vat Group
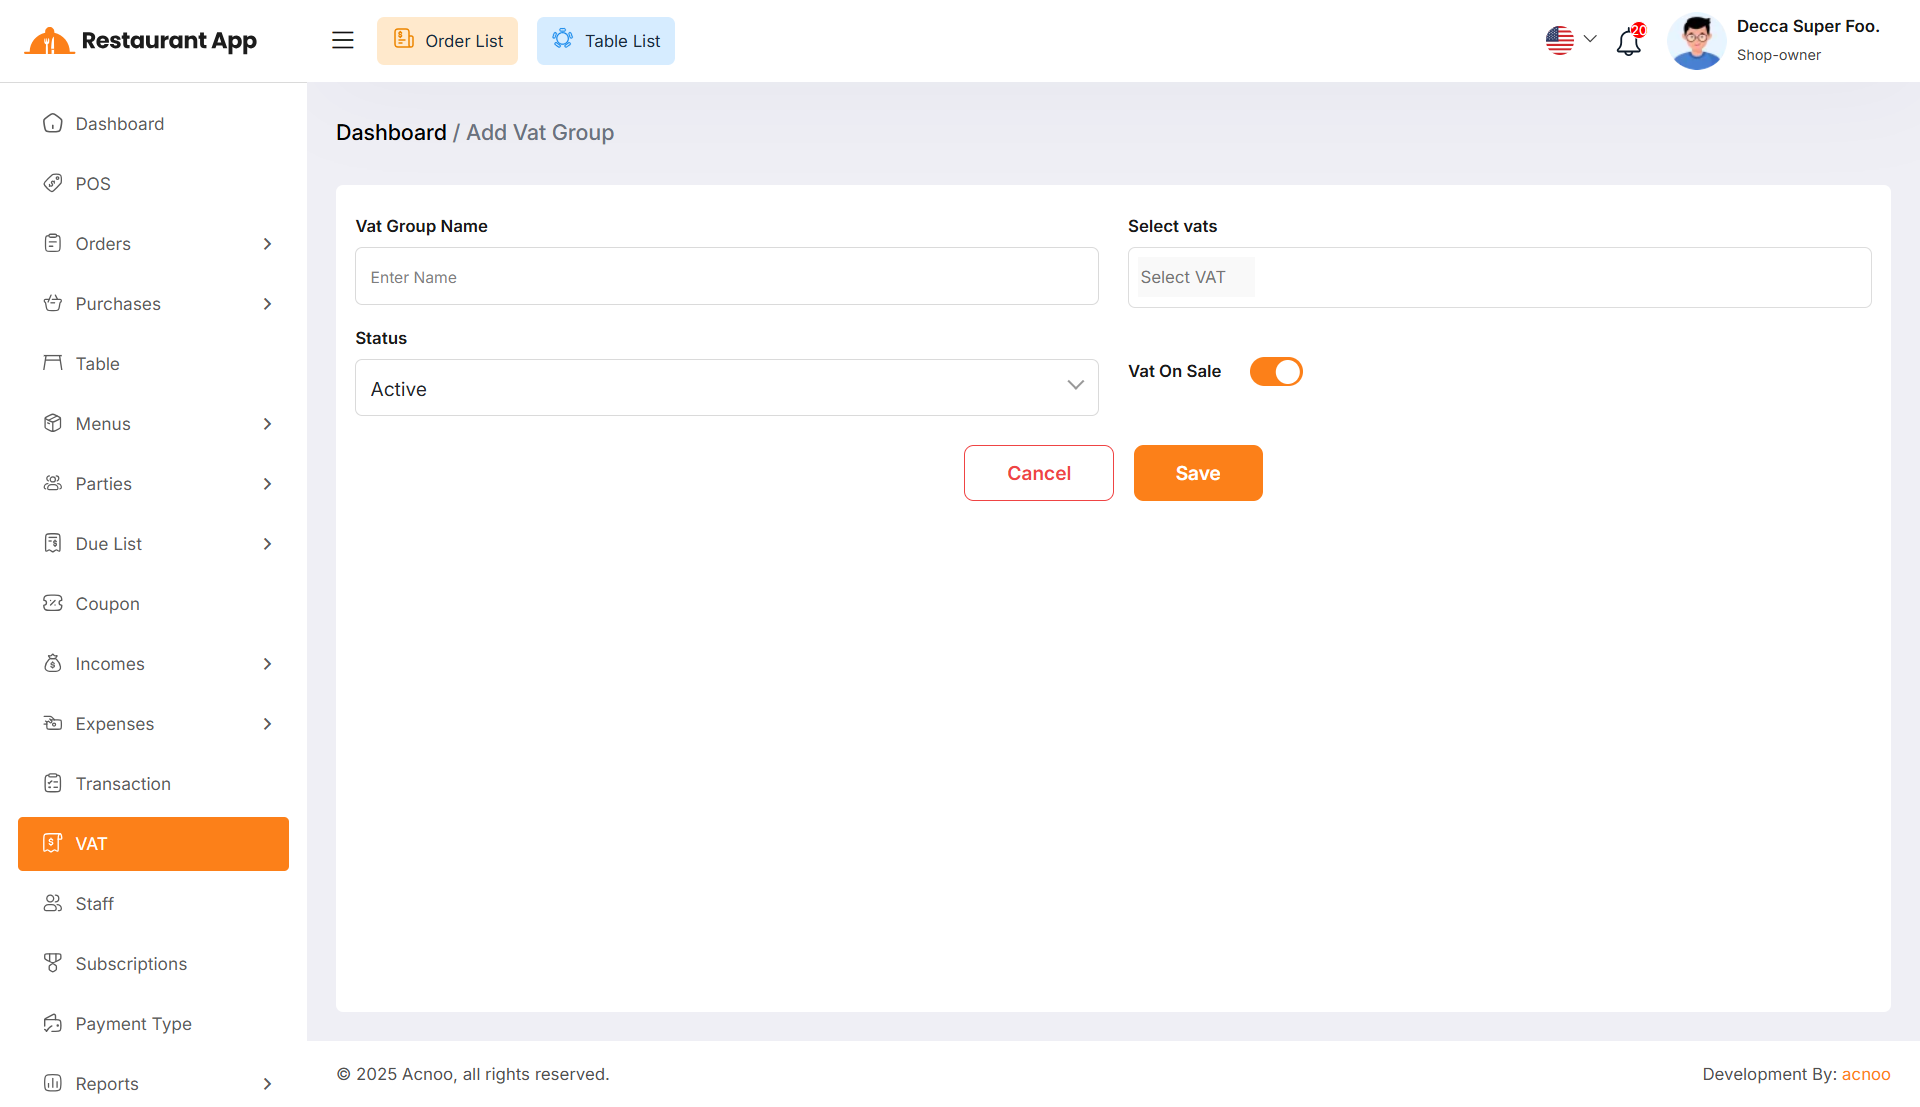
By clicking the Add New button, you will be redirected to the VAT Group creation page. Fill in the required input fields and then click the Save button to add a new VAT group.
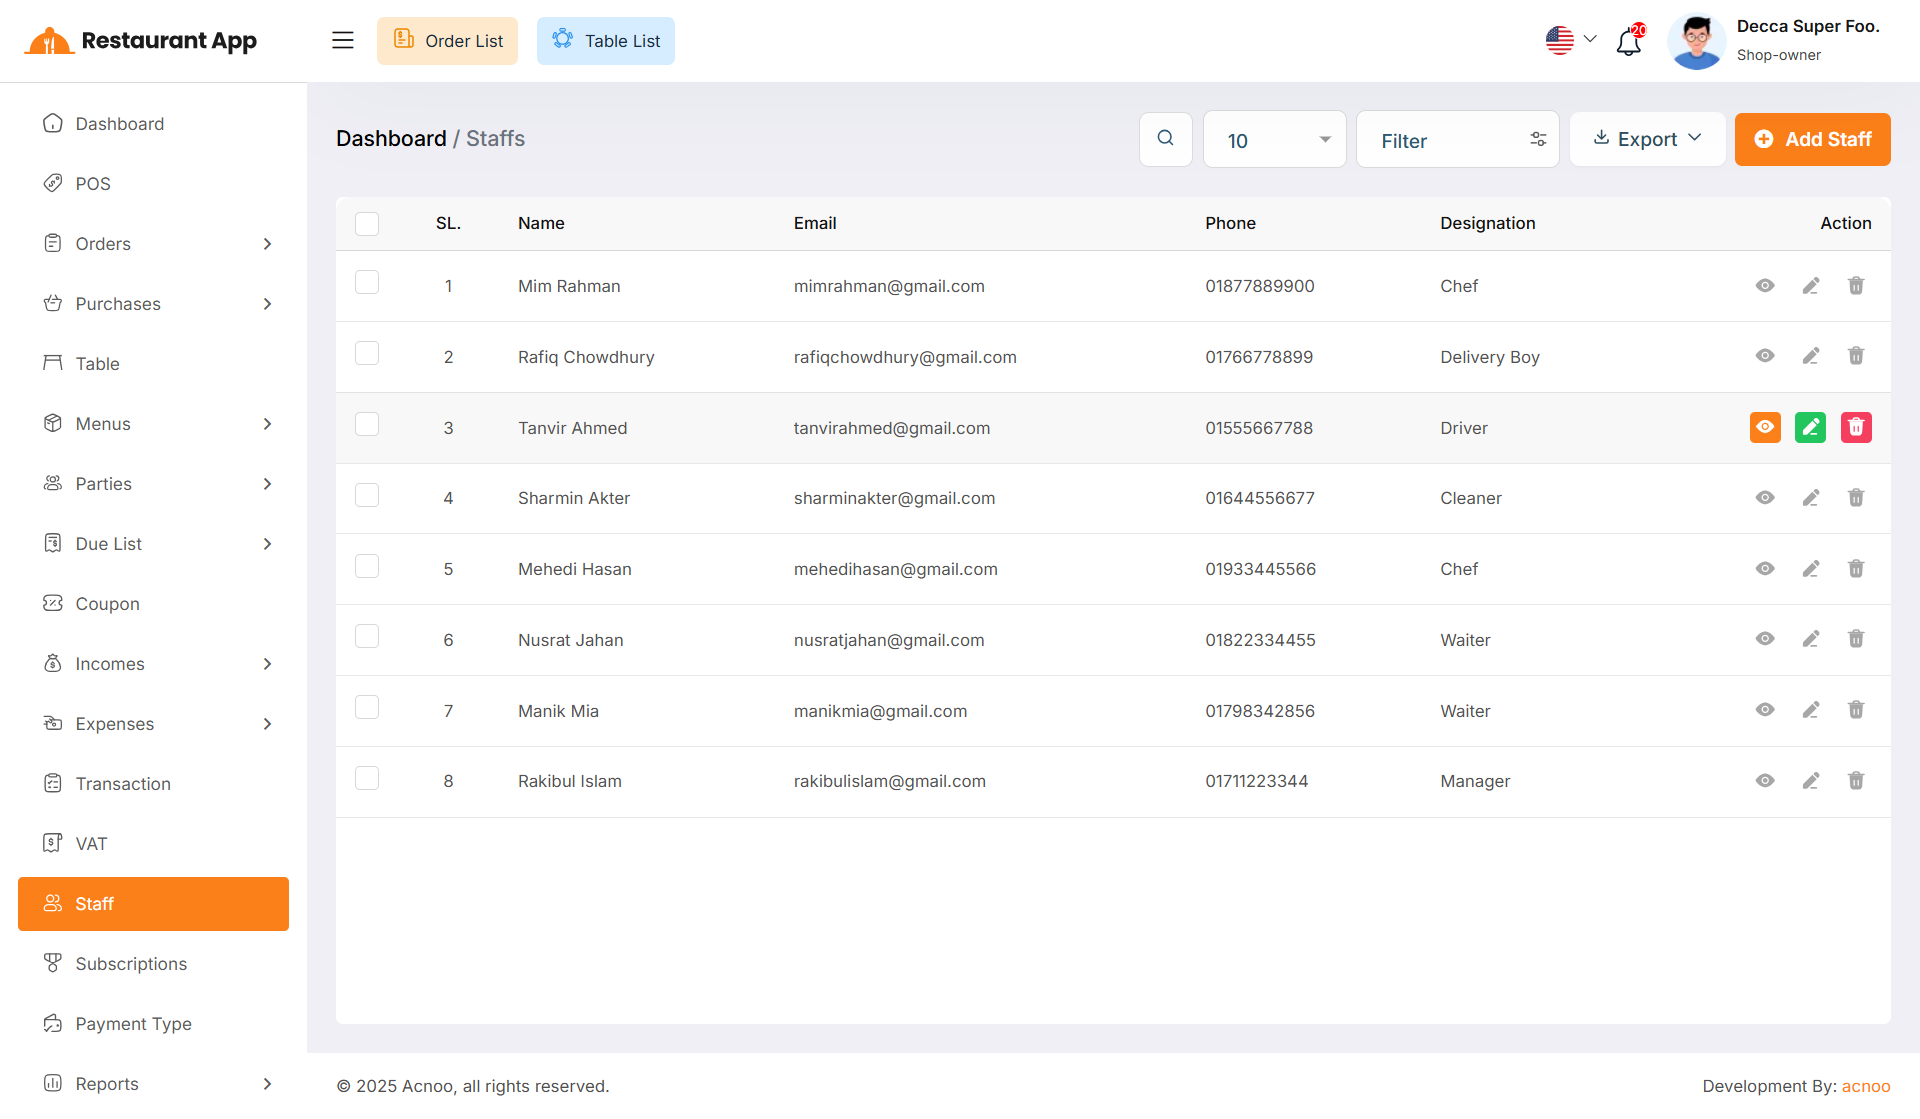
Staff List
Here, you can view the Staff list with a search filter. Additionally, you have the option to edit, delete, or use the multi-delete function and exported as Excel, CSV and PDF.
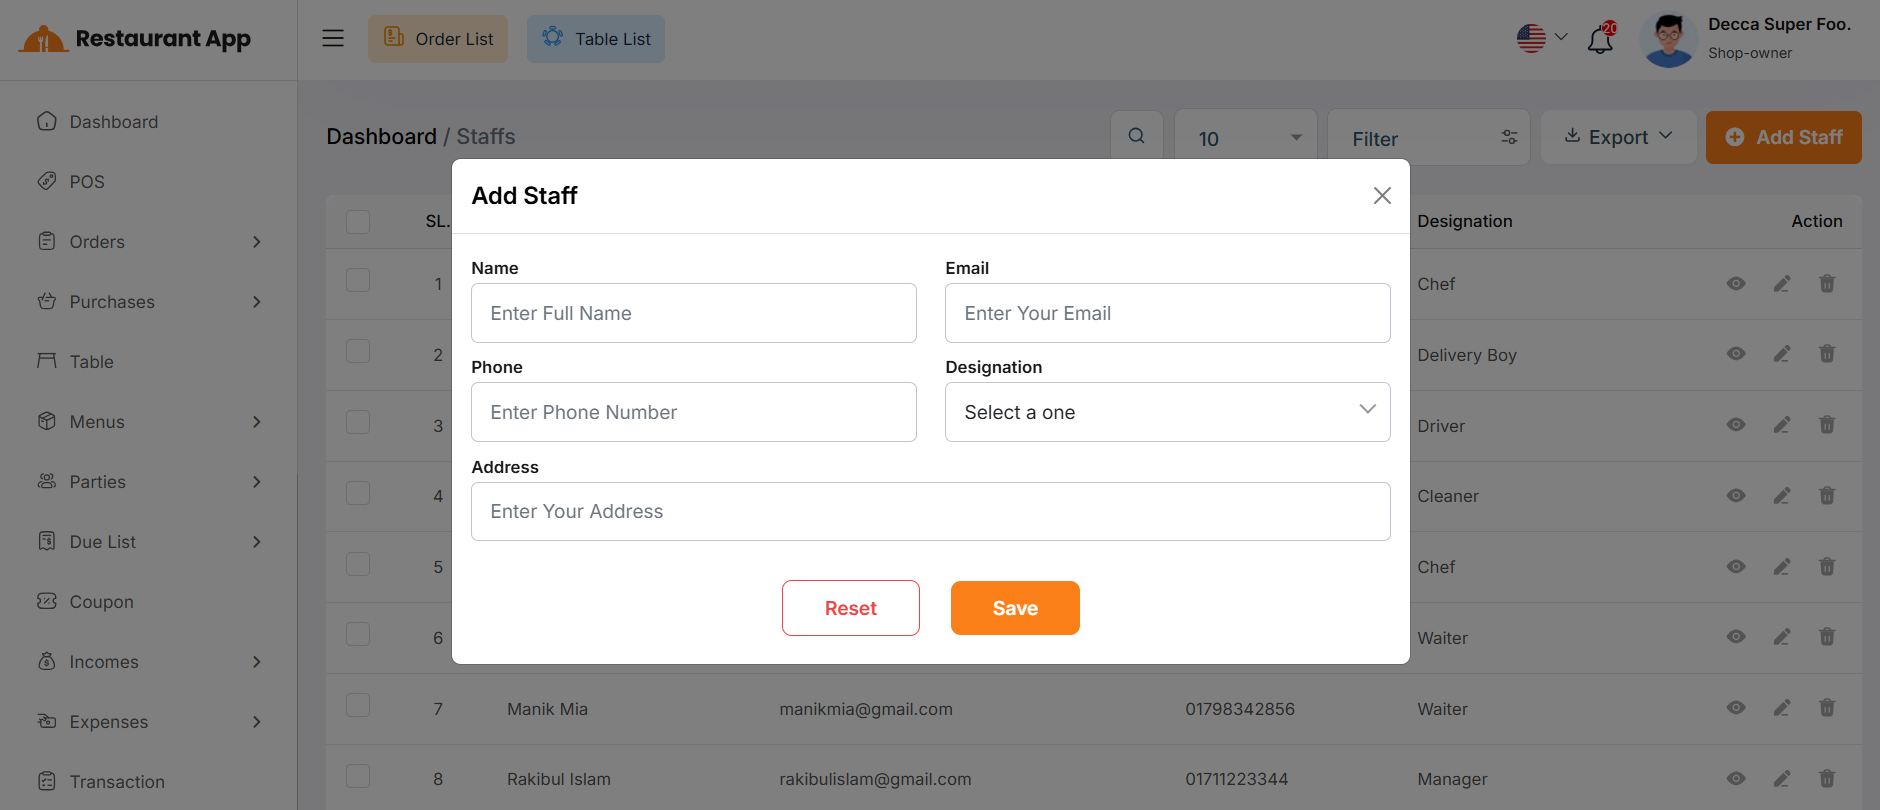
Create Staff
You can create a staff by filling out the required input fields and then click the Save button to add a new Staff.
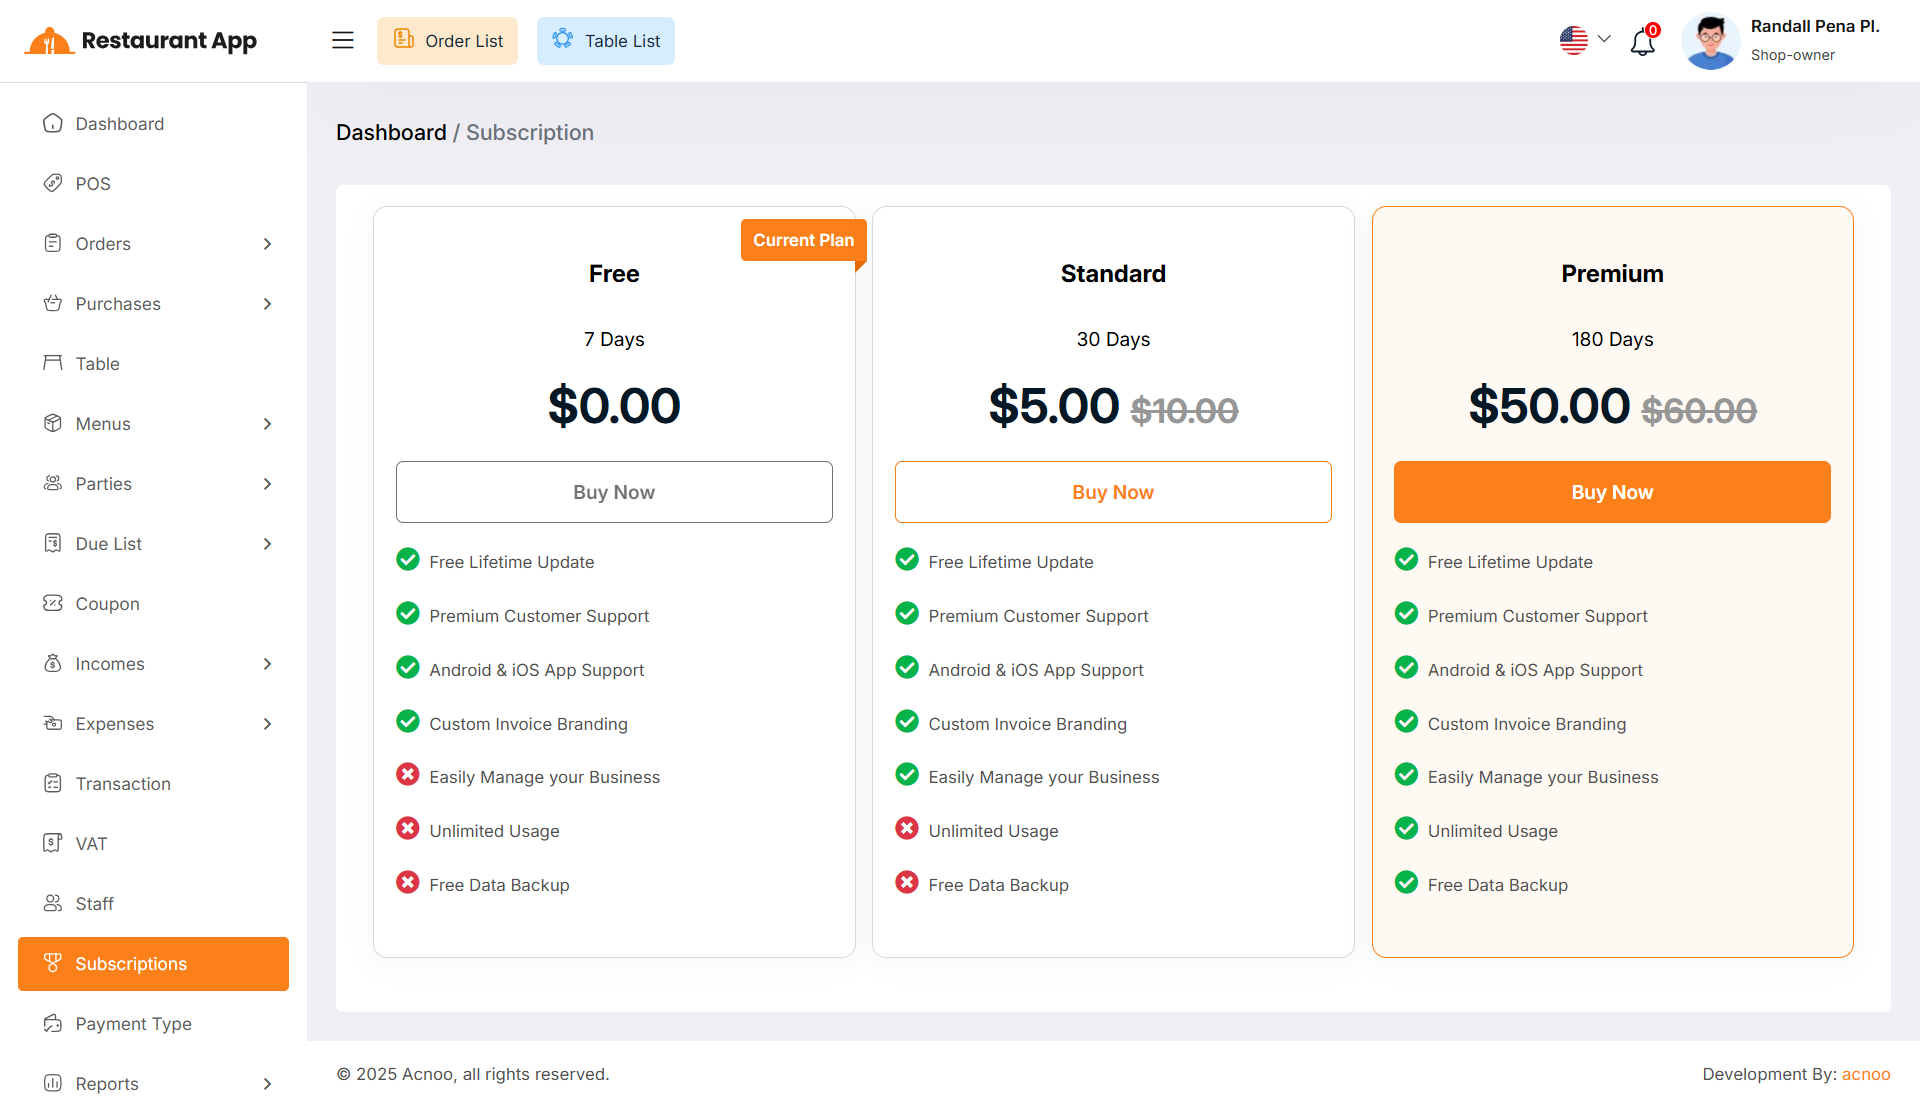
Subscriptions
Here, you can view your current plan status along with all other available plans. You can also upgrade your plan from this page.
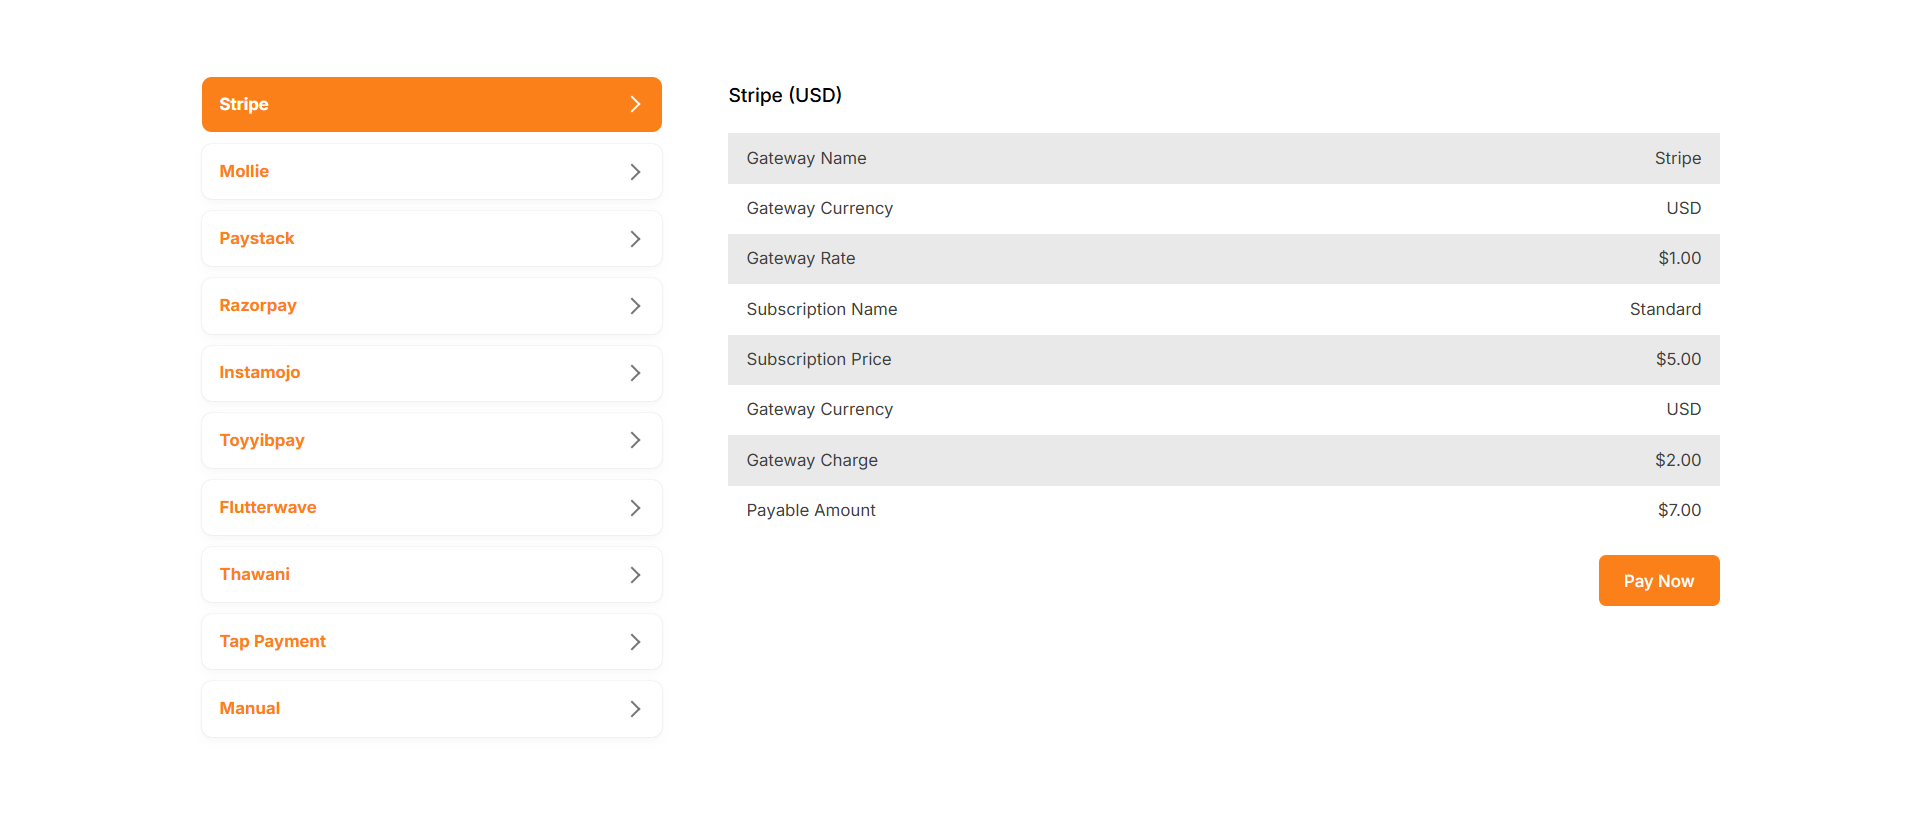
Payment
After choosing your desired plan, just click to view the available payment options. Once you complete your payment, you can upgrade your plan.
Payment Type List
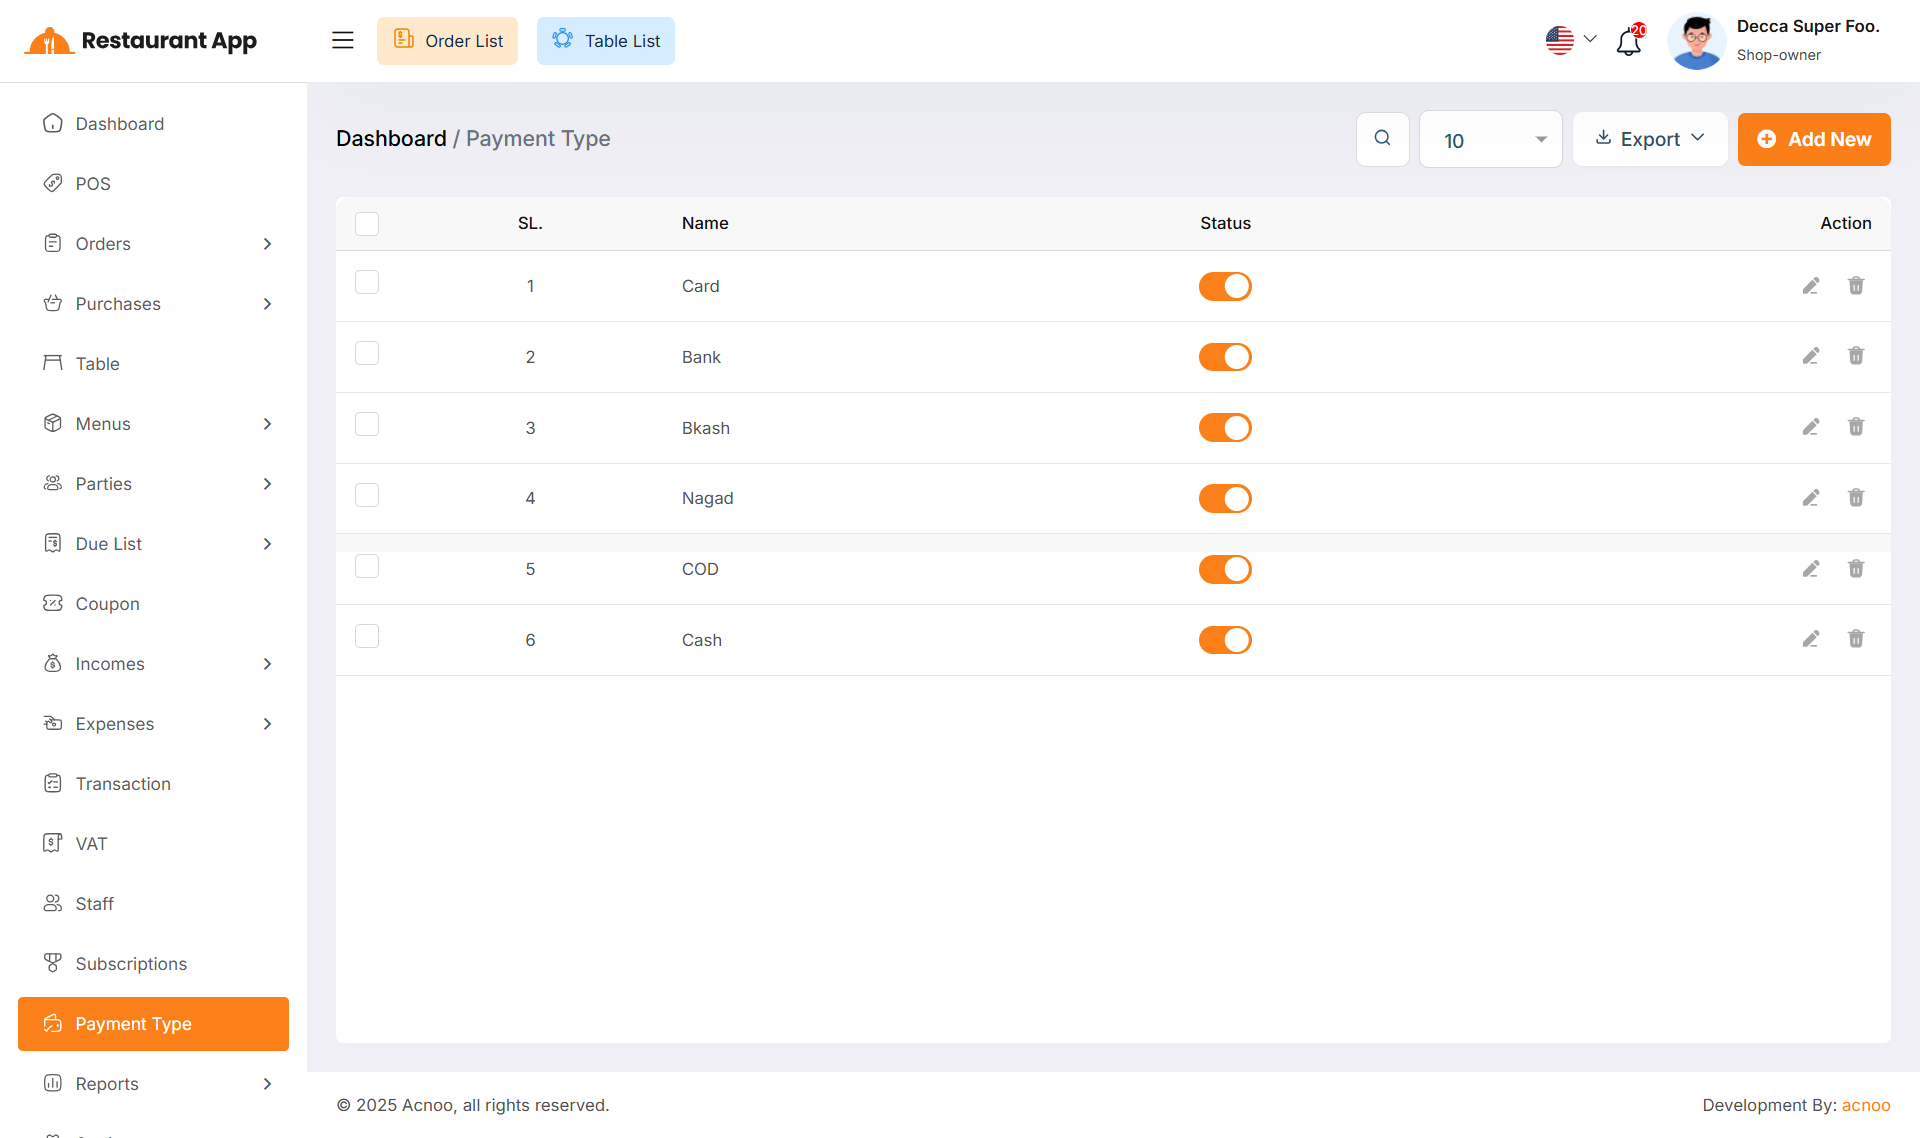
Here, you can view the Payment Type list with a search filter. Additionally, you have the option to edit, delete, or use the multi-delete function and exported as Excel, CSV and PDF. You can also update the status (Active or Inactive) by toggling the switch.
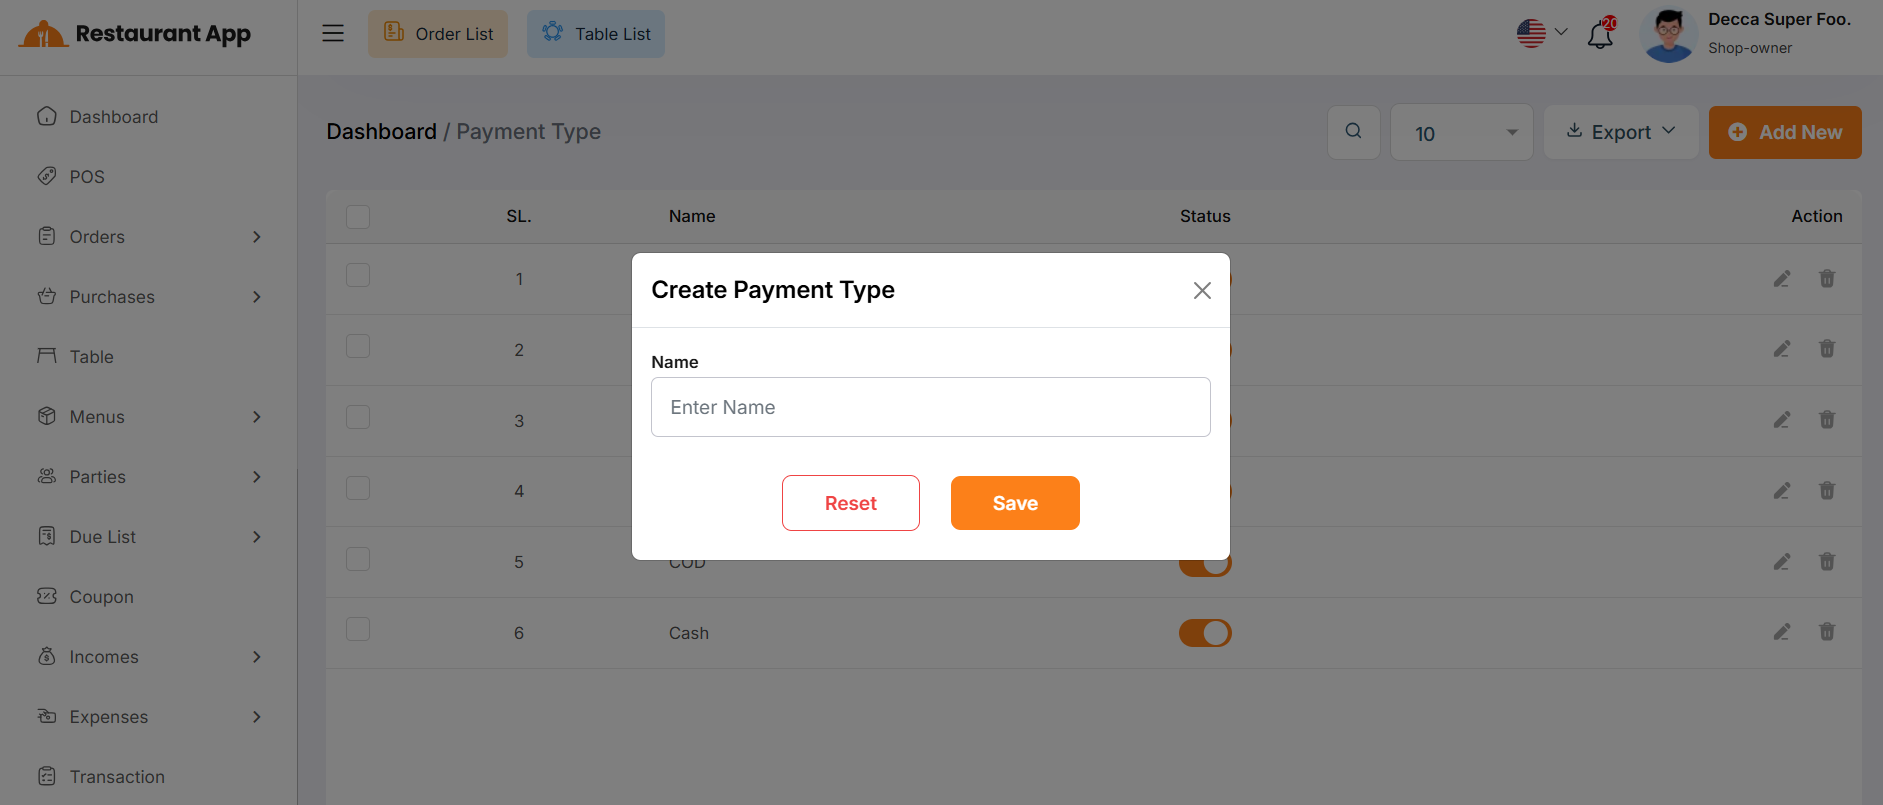
Create Payment Type
You can create a payment type by filling out the fields and then click the Save button to add a new Payment Type.
Manage Pages
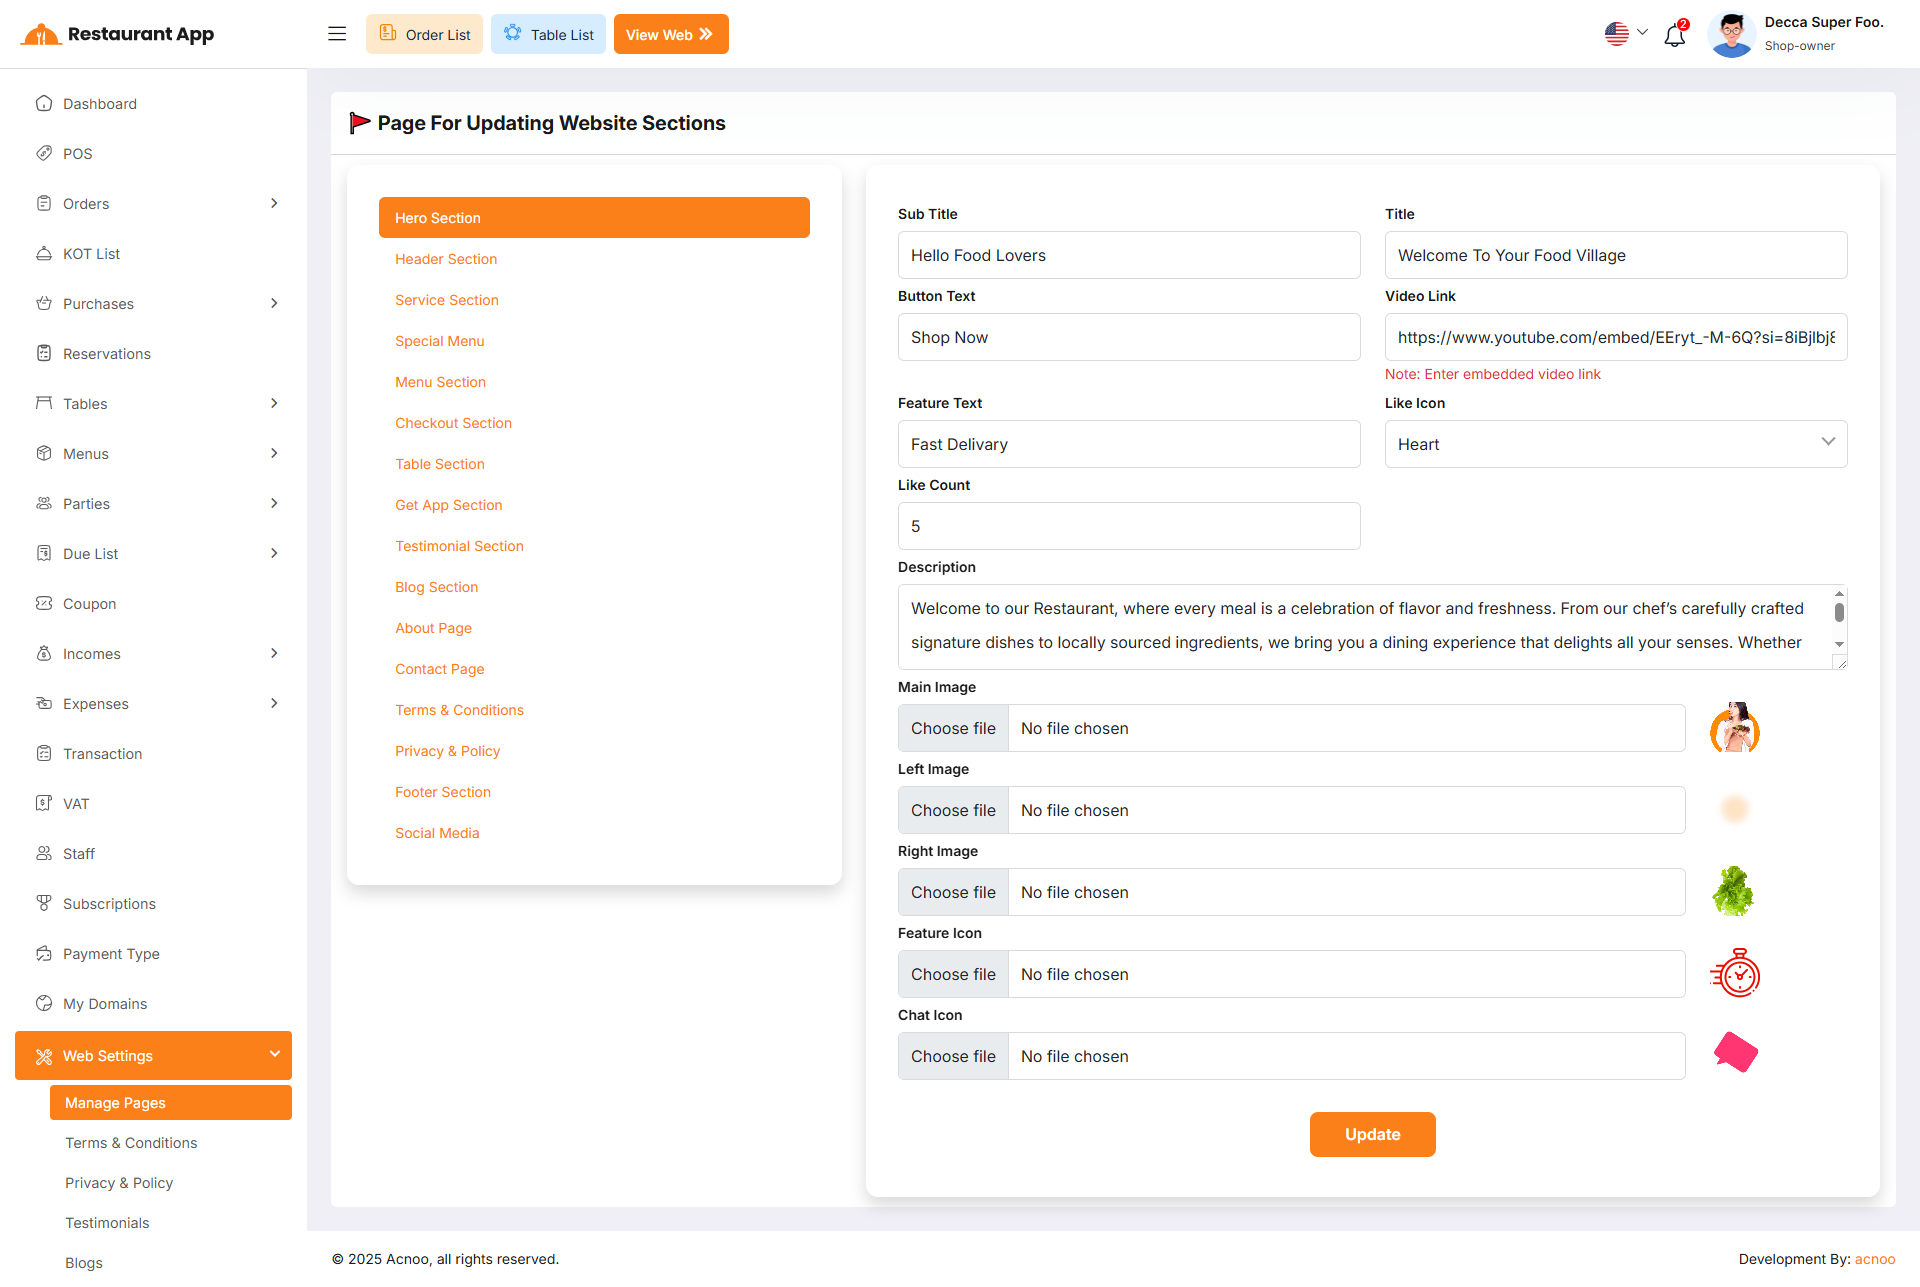
The Manage Pages section under Web Settings provides a comprehensive Content Management System (CMS) for the restaurant's online storefront. It allows administrators to update text, images, and links for every section of the website without requiring technical coding knowledge.
The left-hand sidebar lists all editable modules of the online store. Clicking a section updates the main form on the right.Hero Section The first part of the website users see, containing the main greeting and featured call-to-action.
Informational Pages Includes detailed content areas such as the About Page, Contact Page, Terms & Conditions, and Privacy Policy.
Fulfillment Sections Content blocks related to Service (delivery/pickup), Menu previews, Table information, and Mobile App promotion.
Engagement Sections Areas for social proof and dynamic content, including Testimonials, Blog posts, and Social Media links.
Term and Conditions
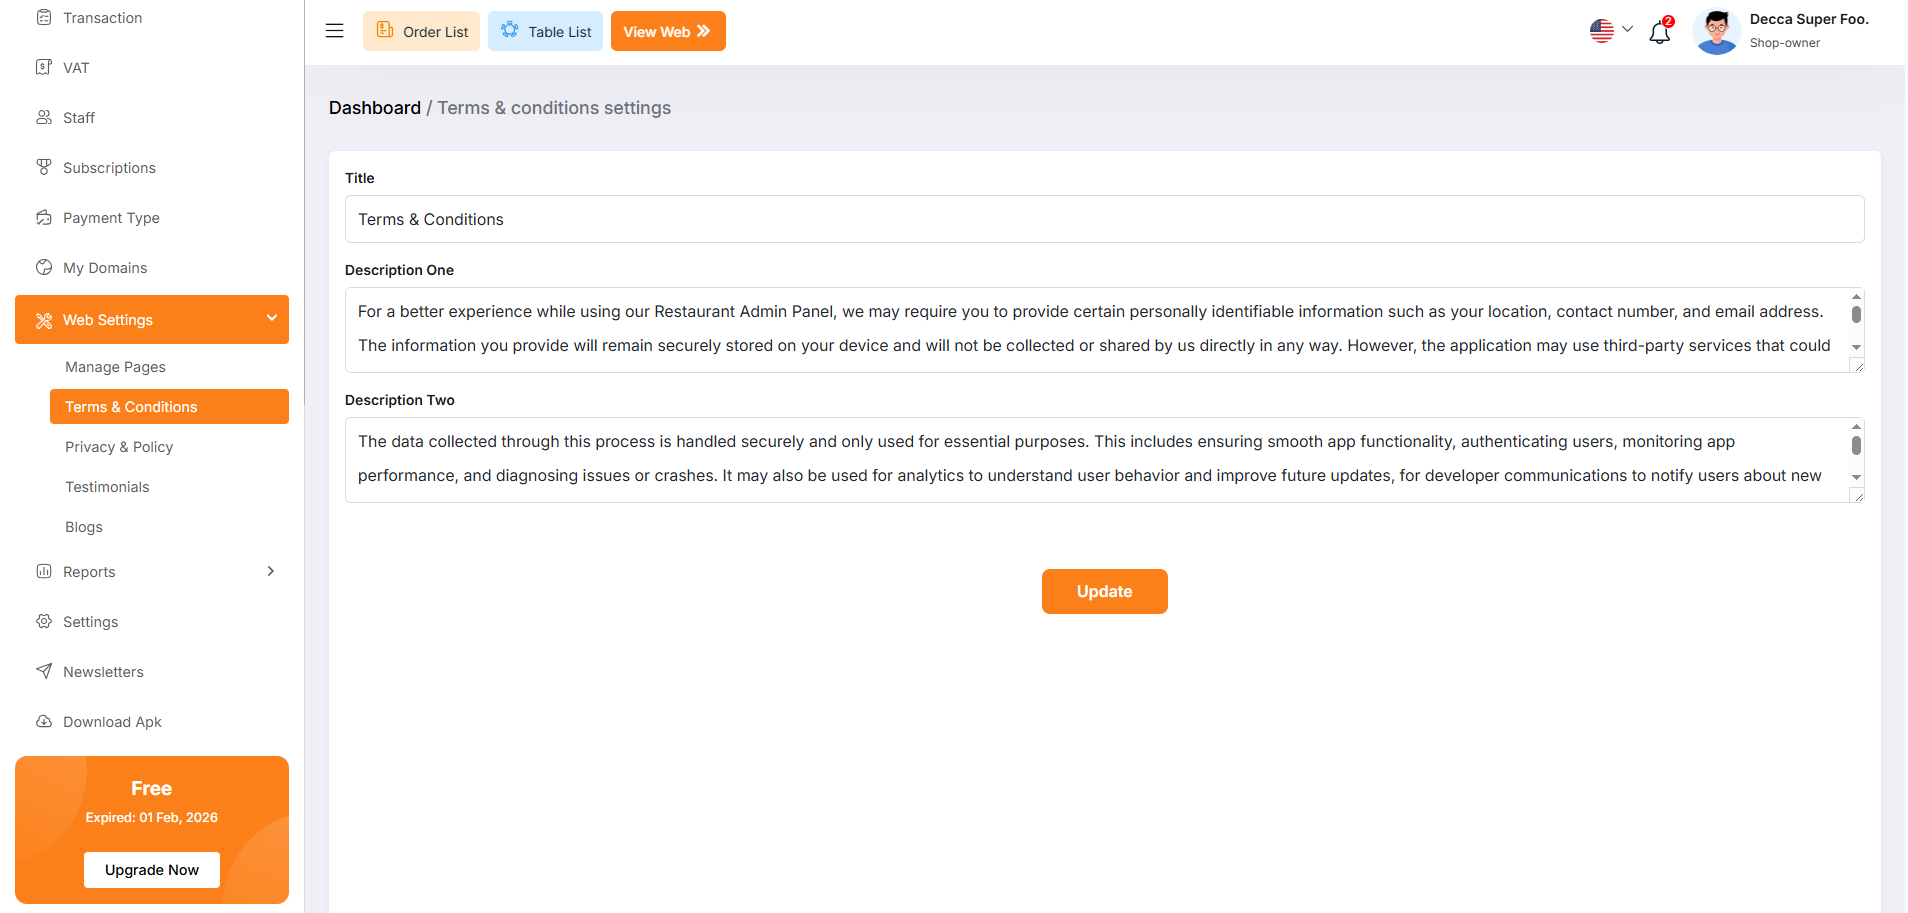
The Terms & Conditions Settings page, located under the Web Settings menu, allows administrators to define the legal framework and usage policies for the restaurant’s digital platforms. This content is vital for establishing transparency regarding user data, app functionality, and service agreements.
Privacy and Policy
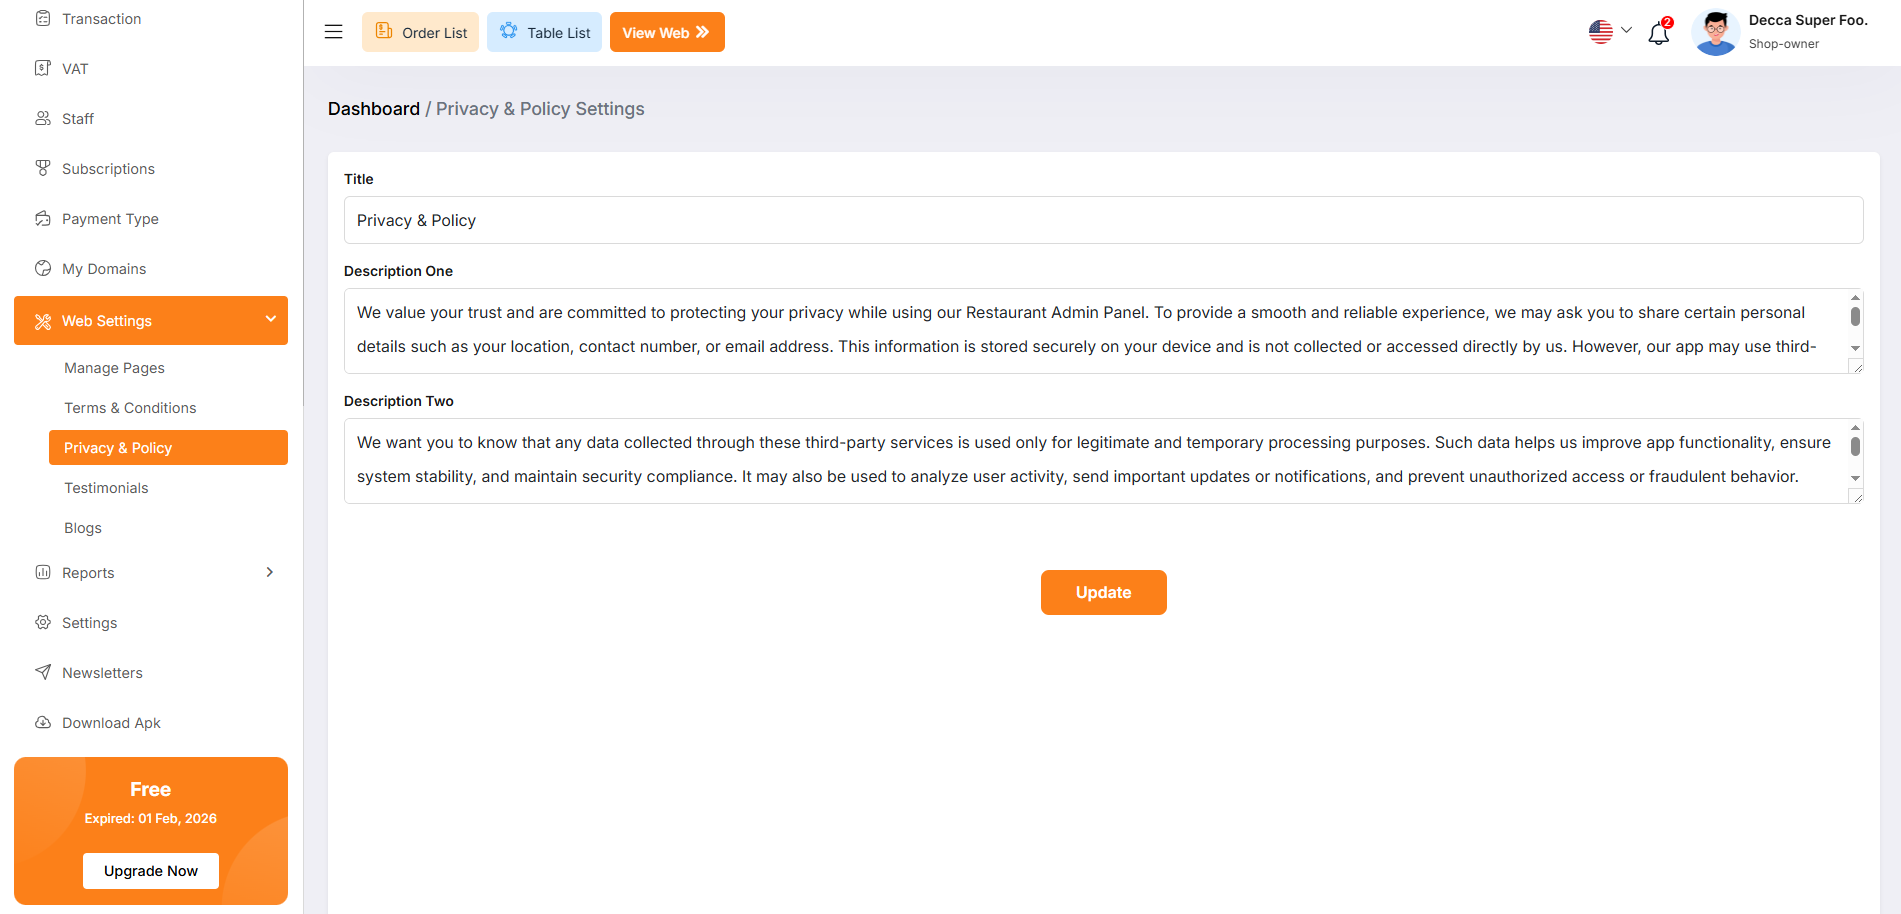
The Privacy & Policy Settings page, found under the Web Settings menu, allows administrators to configure the legal privacy disclosures for the restaurant's digital platforms. This content is essential for informing users about how their data is collected, stored, and utilized.
Testimonials
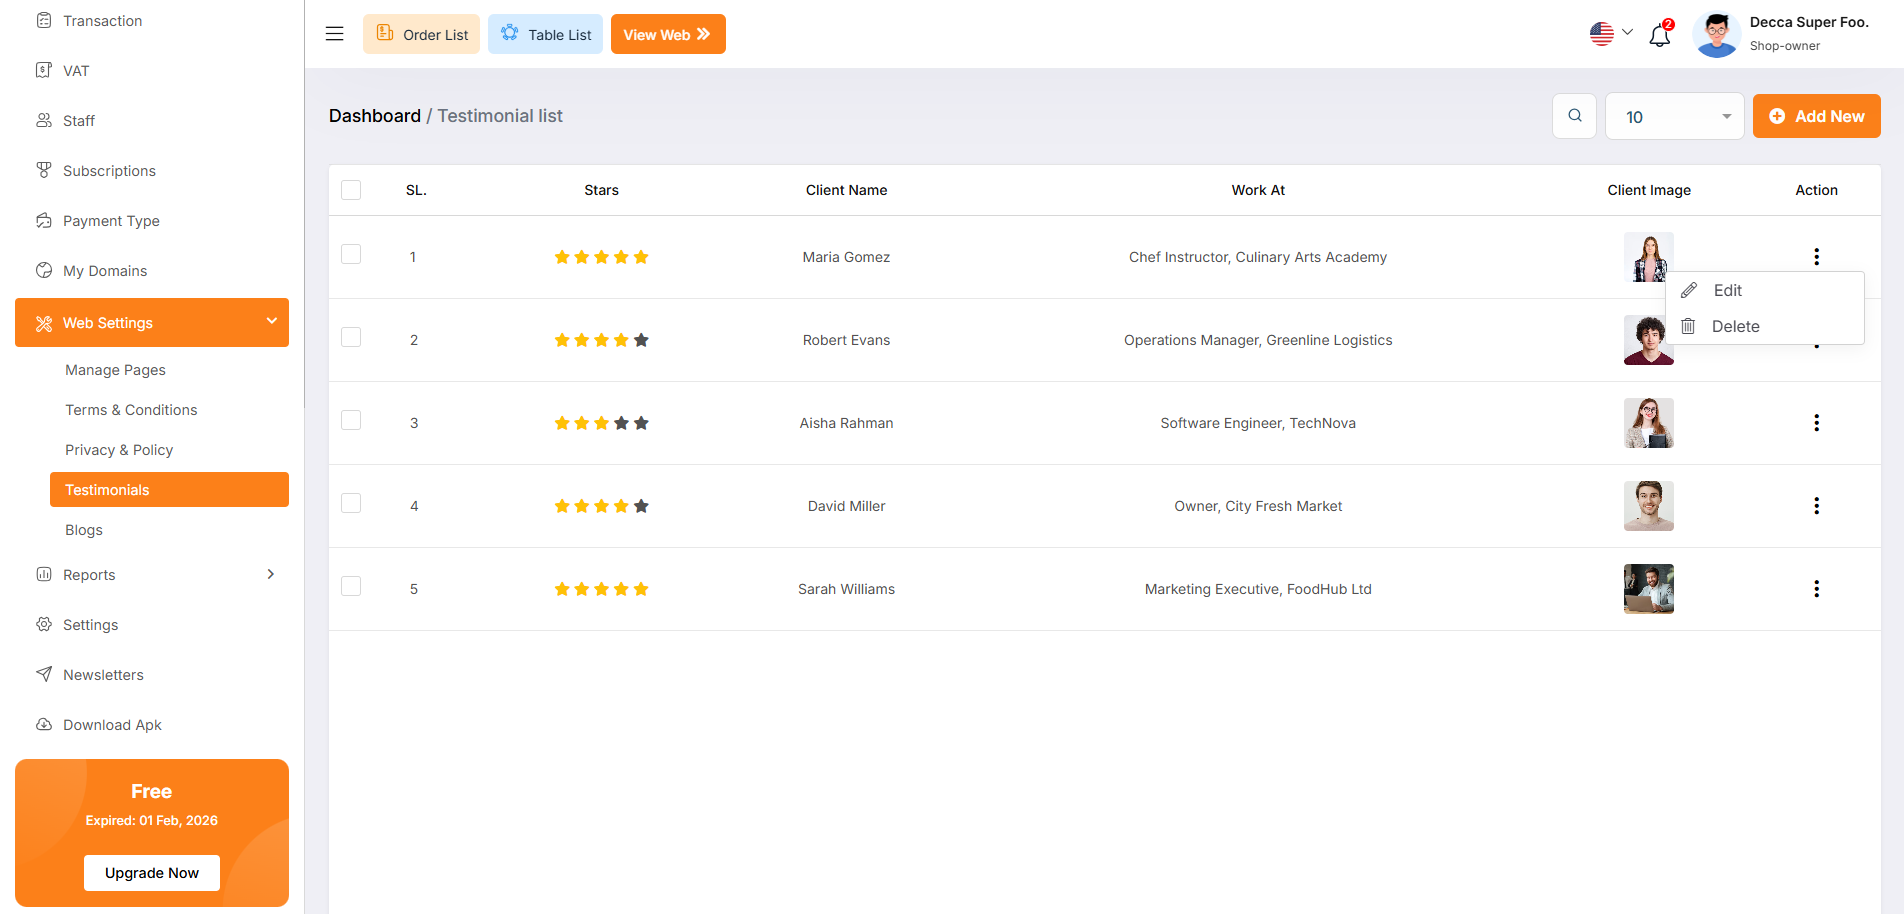
The Testimonial List page, located under the Web Settings menu, allows administrators to manage customer feedback and social proof displayed on the restaurant's website. This section is vital for building trust with potential diners by showcasing positive experiences from previous clients.
Each testimonial entry features a three-dot menu icon to access management options.Edit Opens a modal or page to update the client's information, rating, or testimonial text.
Delete Permanently removes the testimonial from the database and the website.
Testimonial Create
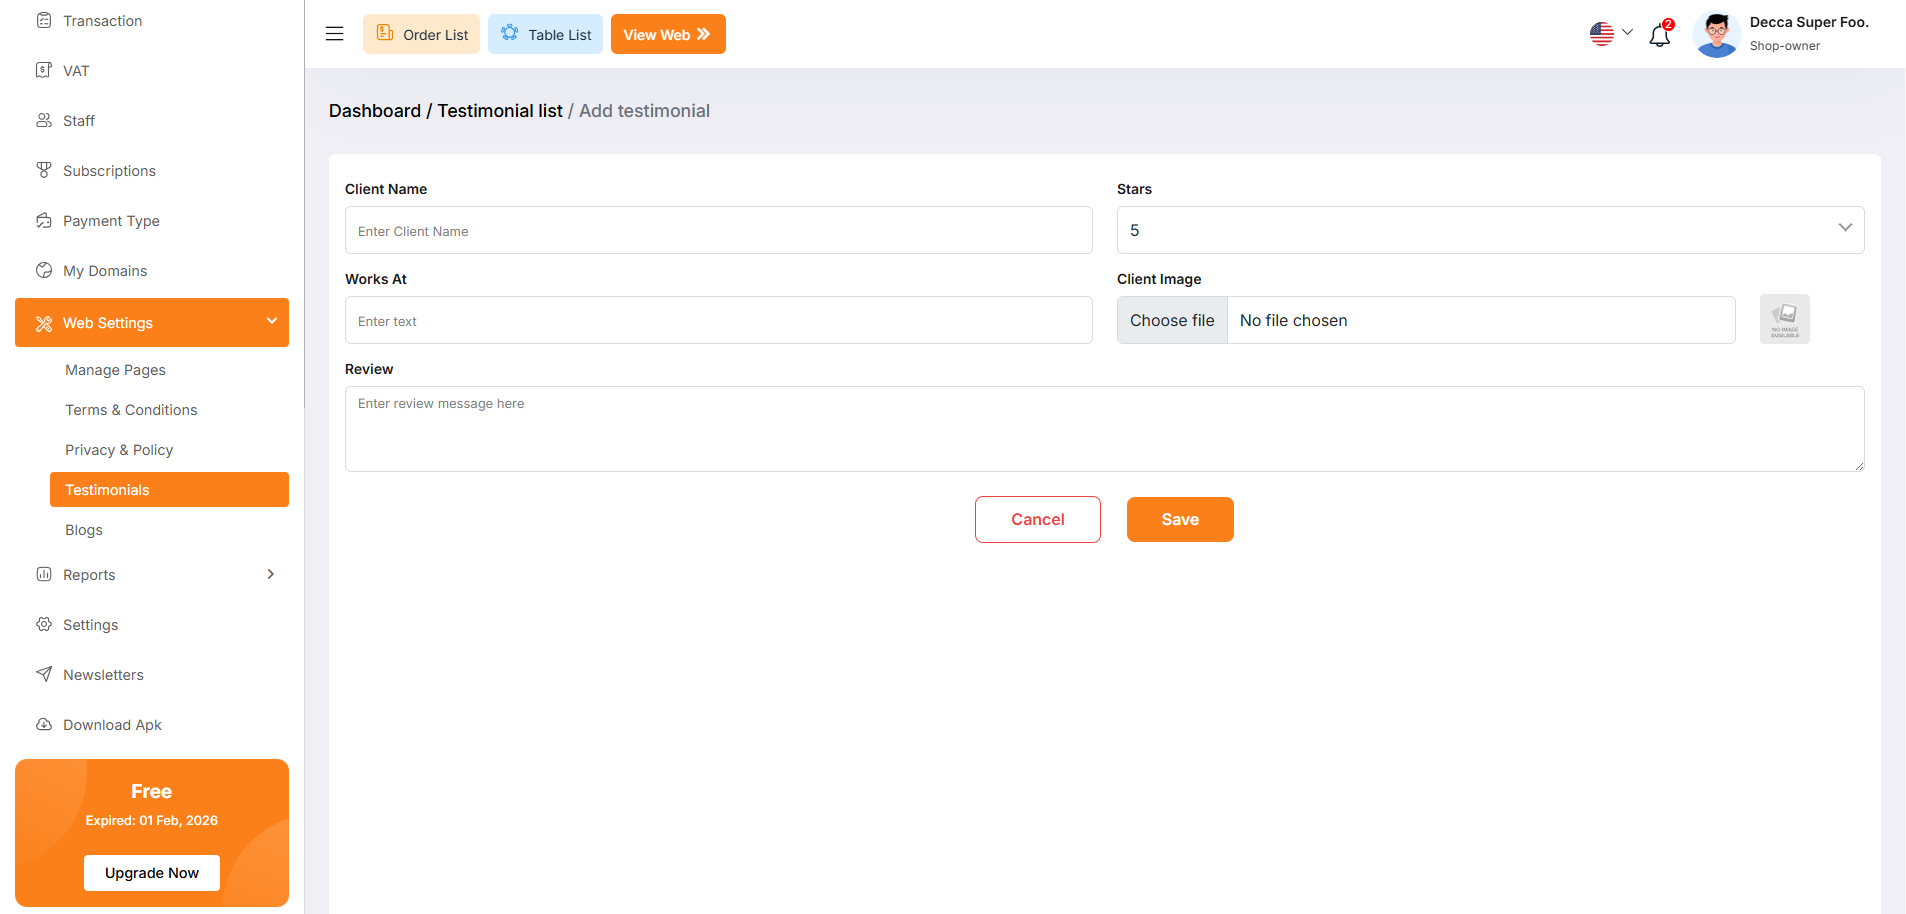
The Add Testimonial page, located under Web Settings > Testimonials, provides a dedicated interface for administrators to manually enter customer feedback. This information is used to populate the social proof section of the restaurant's online storefront.
Blog List
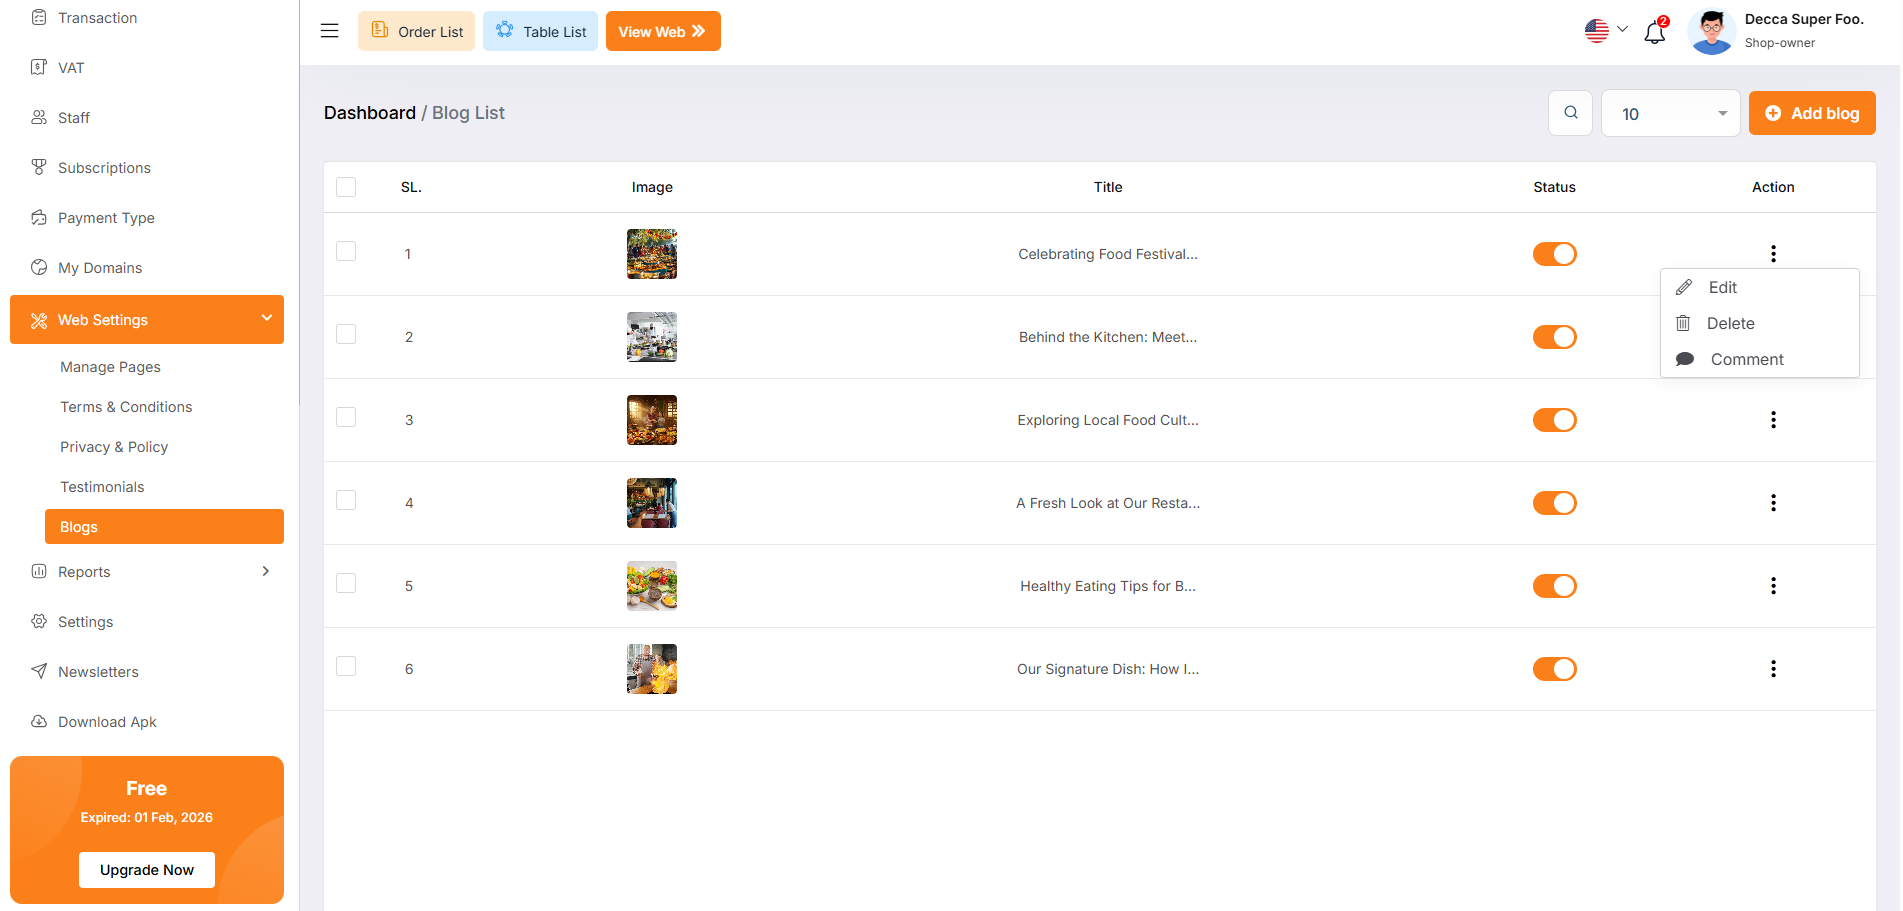
The Blog List page, located under the Web Settings menu, serves as the content management hub for the restaurant's website articles. This section allows administrators to share news, culinary tips, and behind-the-scenes updates to engage customers and improve the site's search engine visibility.
Blog Create
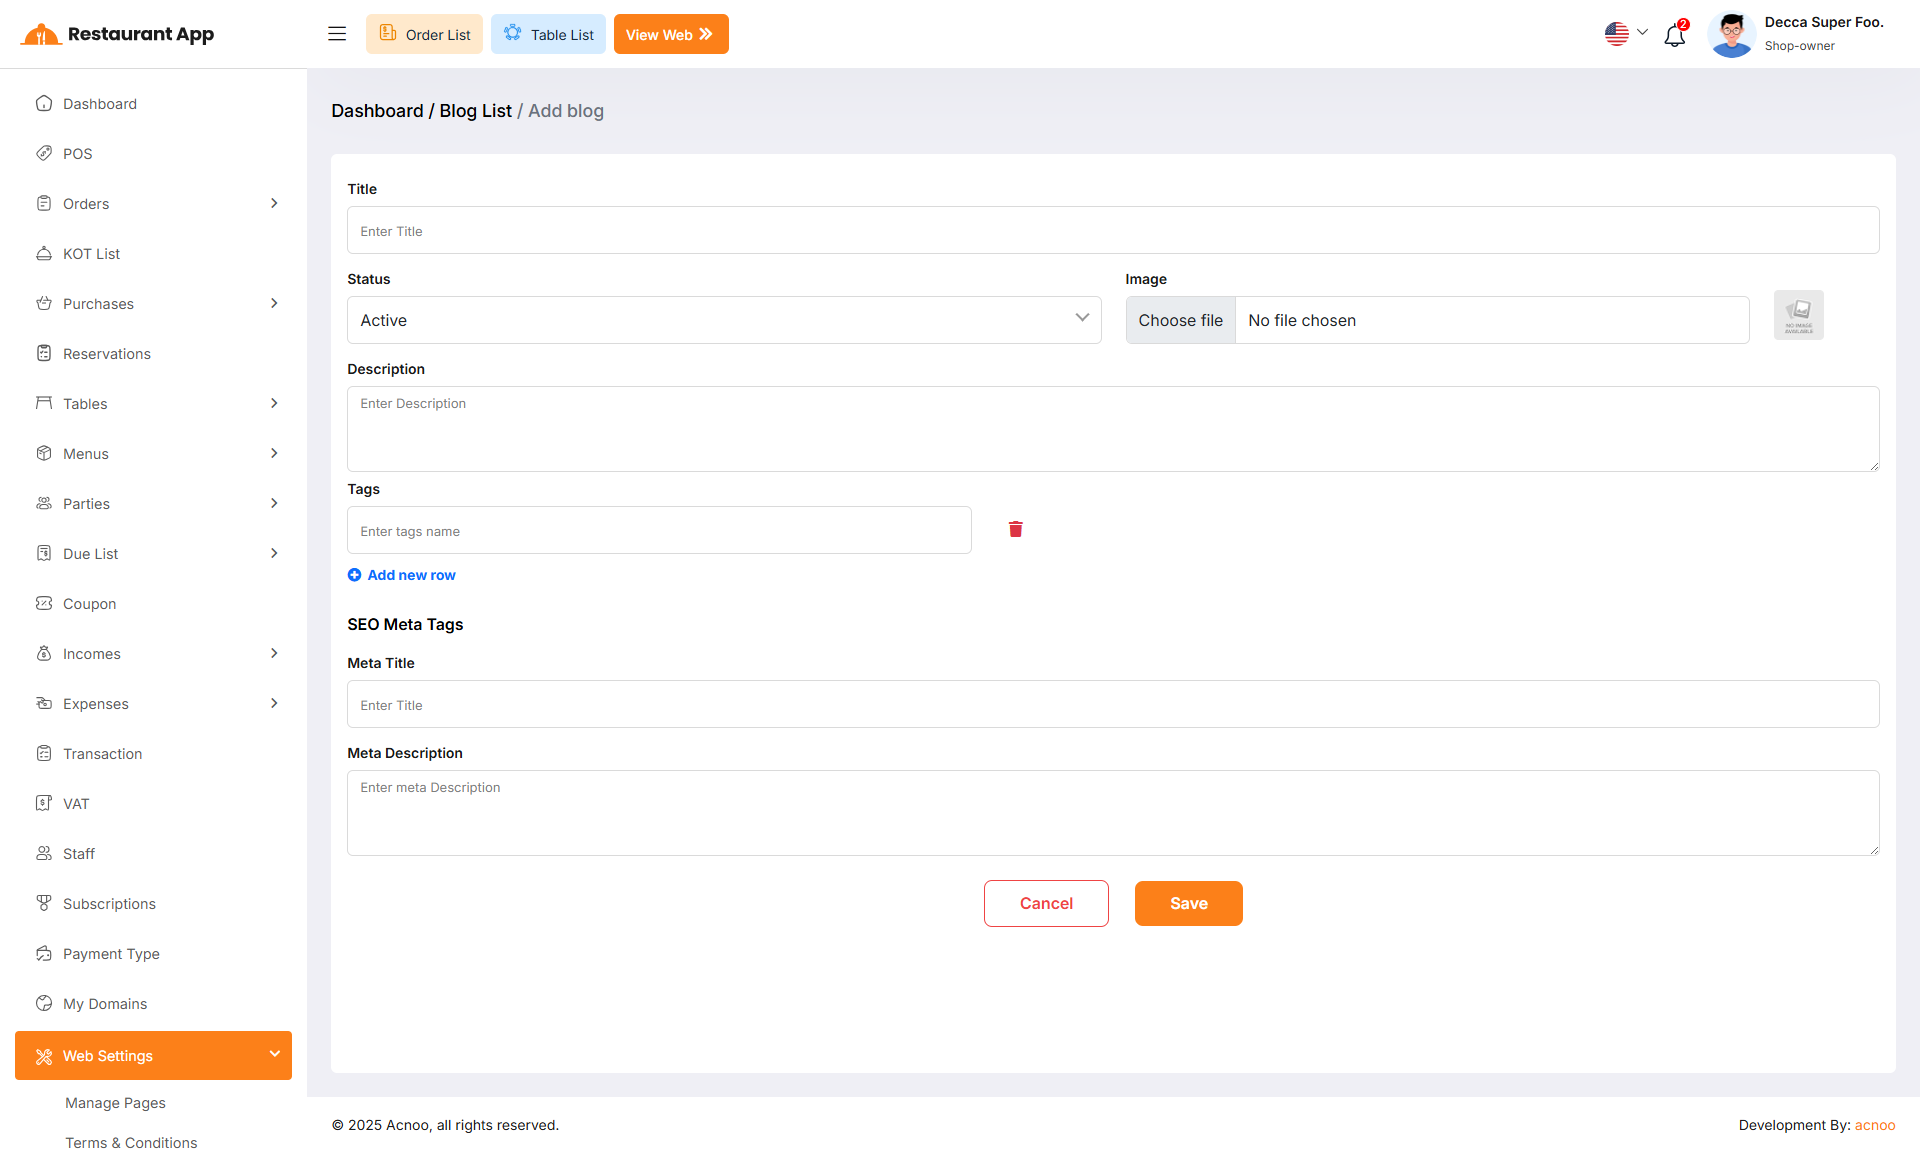
The Add Blog page, located under Web Settings > Blogs, provides a comprehensive interface for administrators to create and optimize articles for the restaurant's website. This tool is designed to manage both the visual content and the underlying metadata for search engine optimization (SEO).
Reports
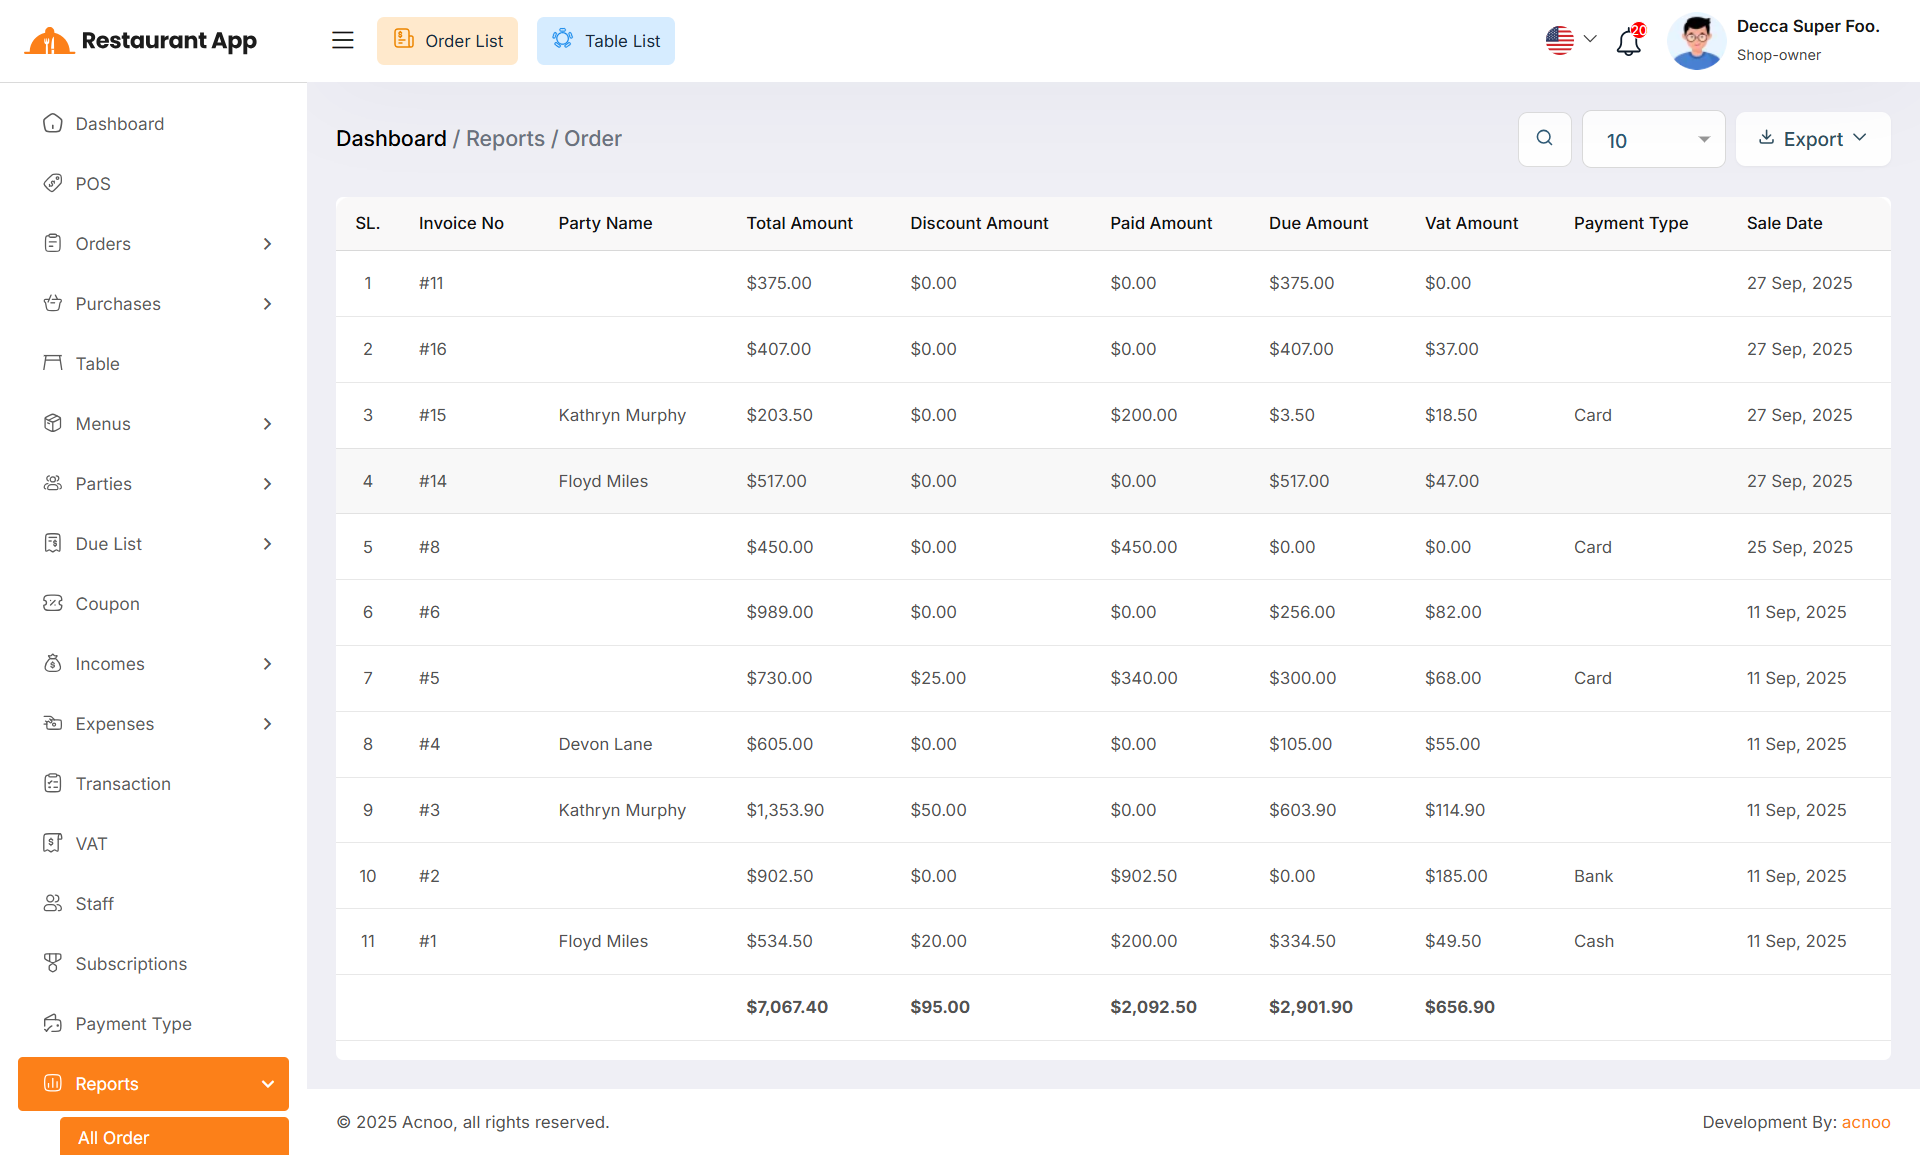
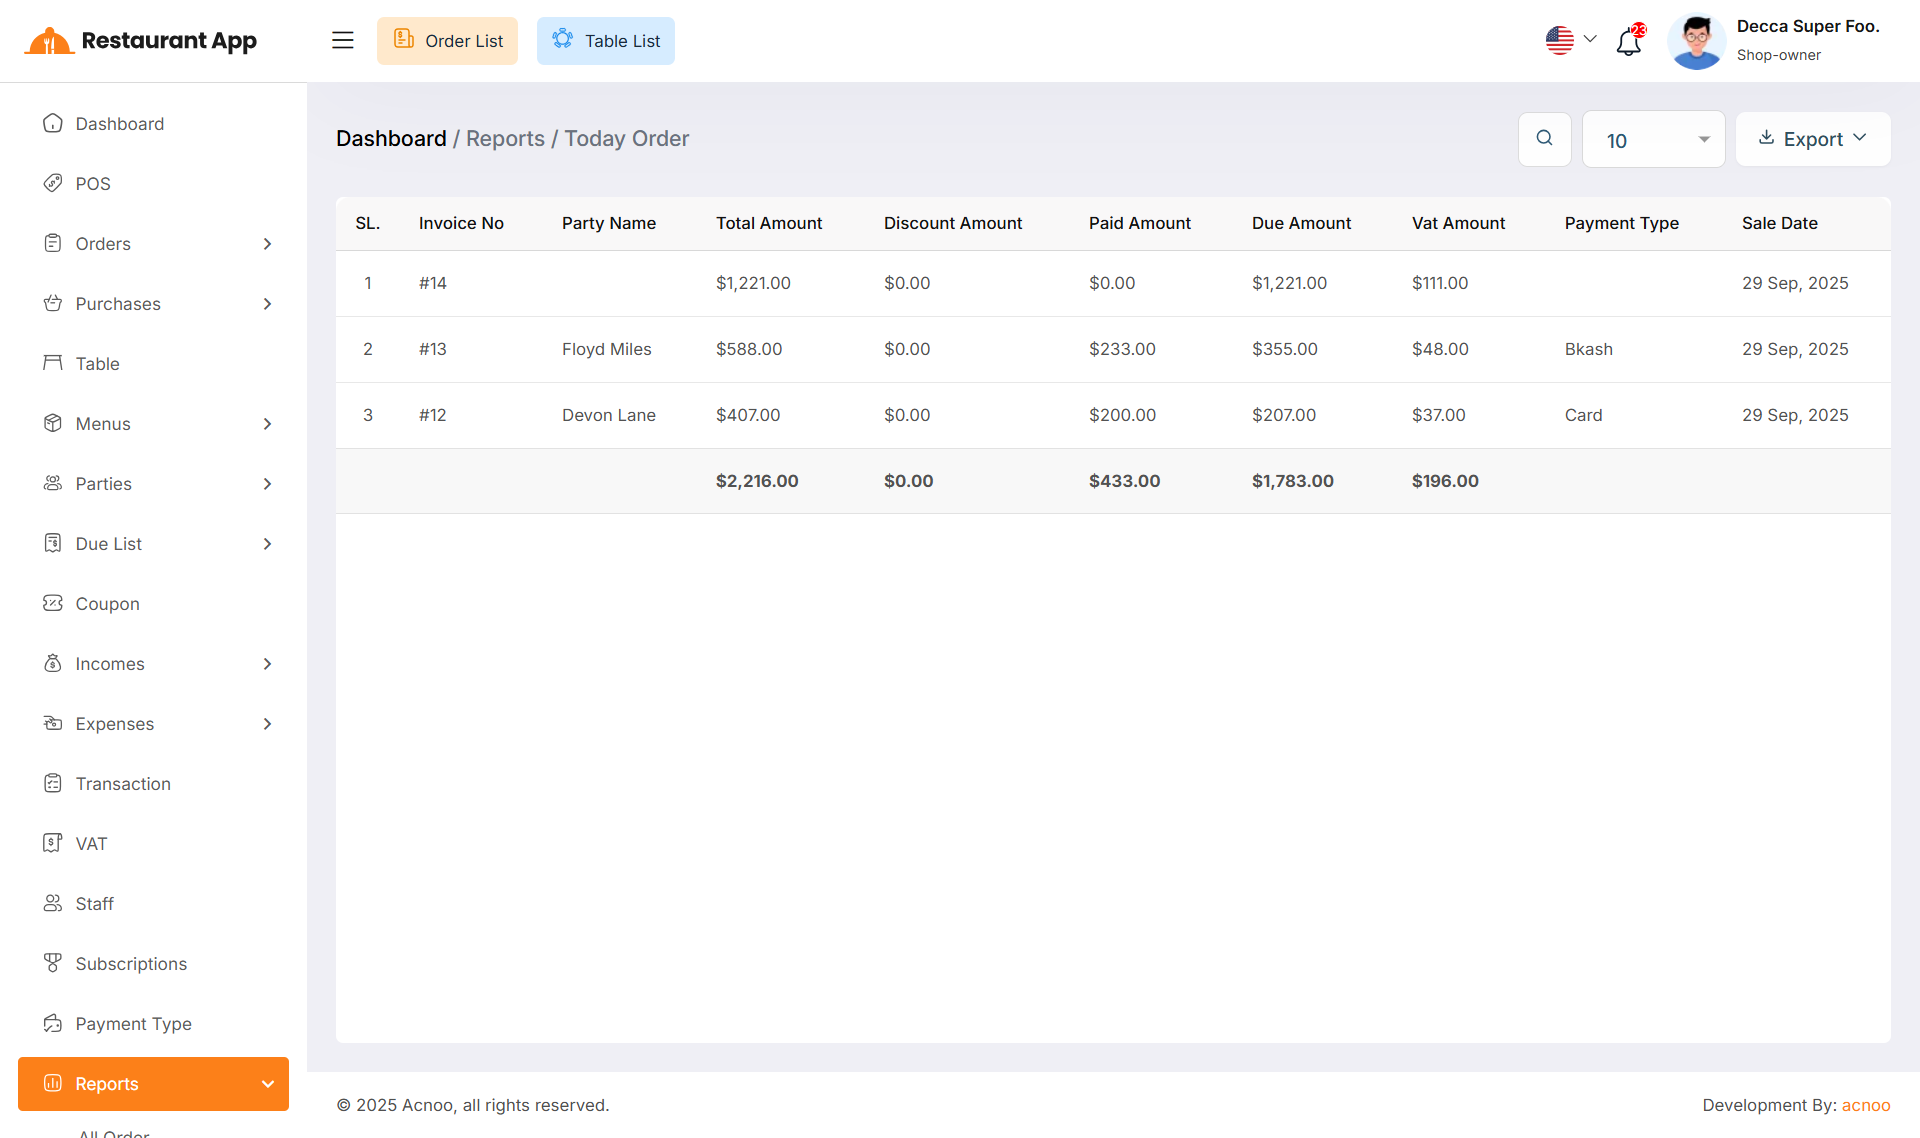
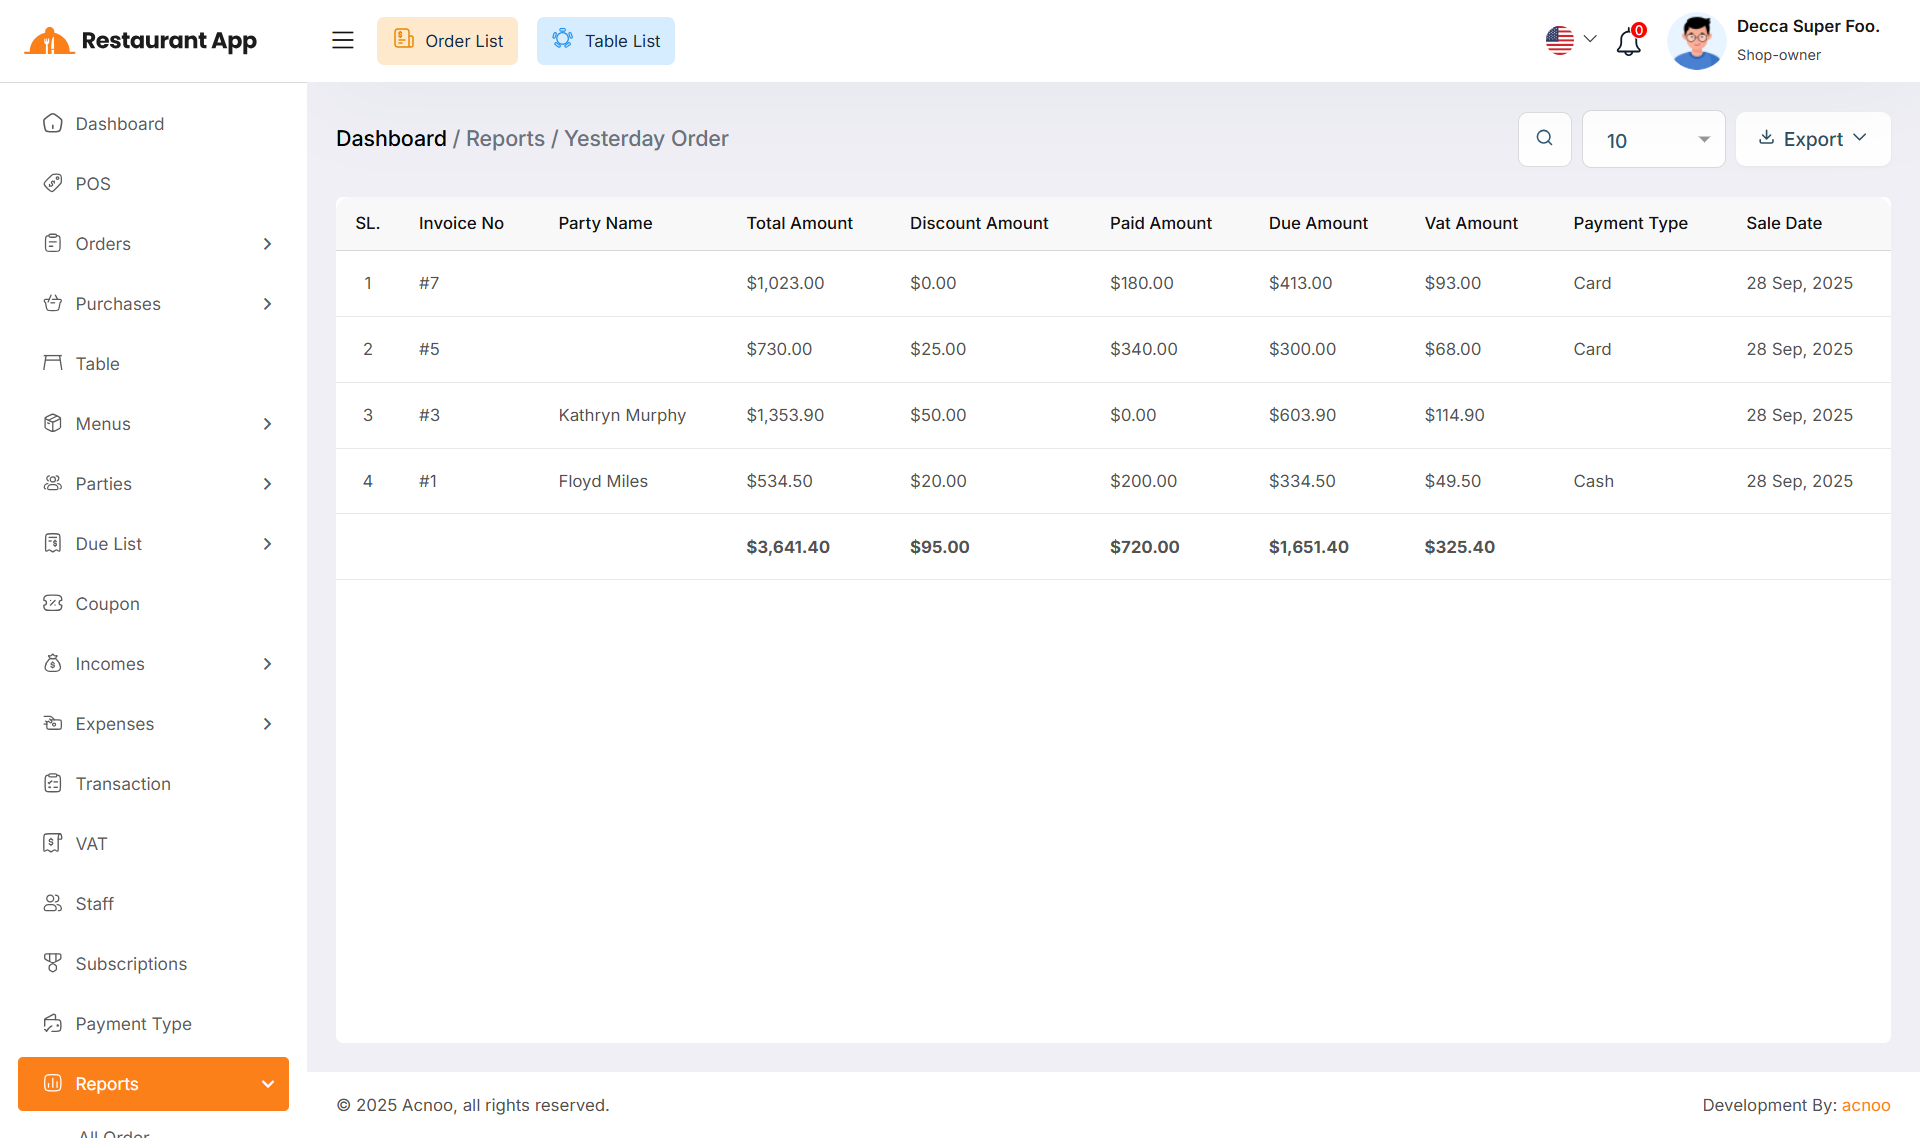
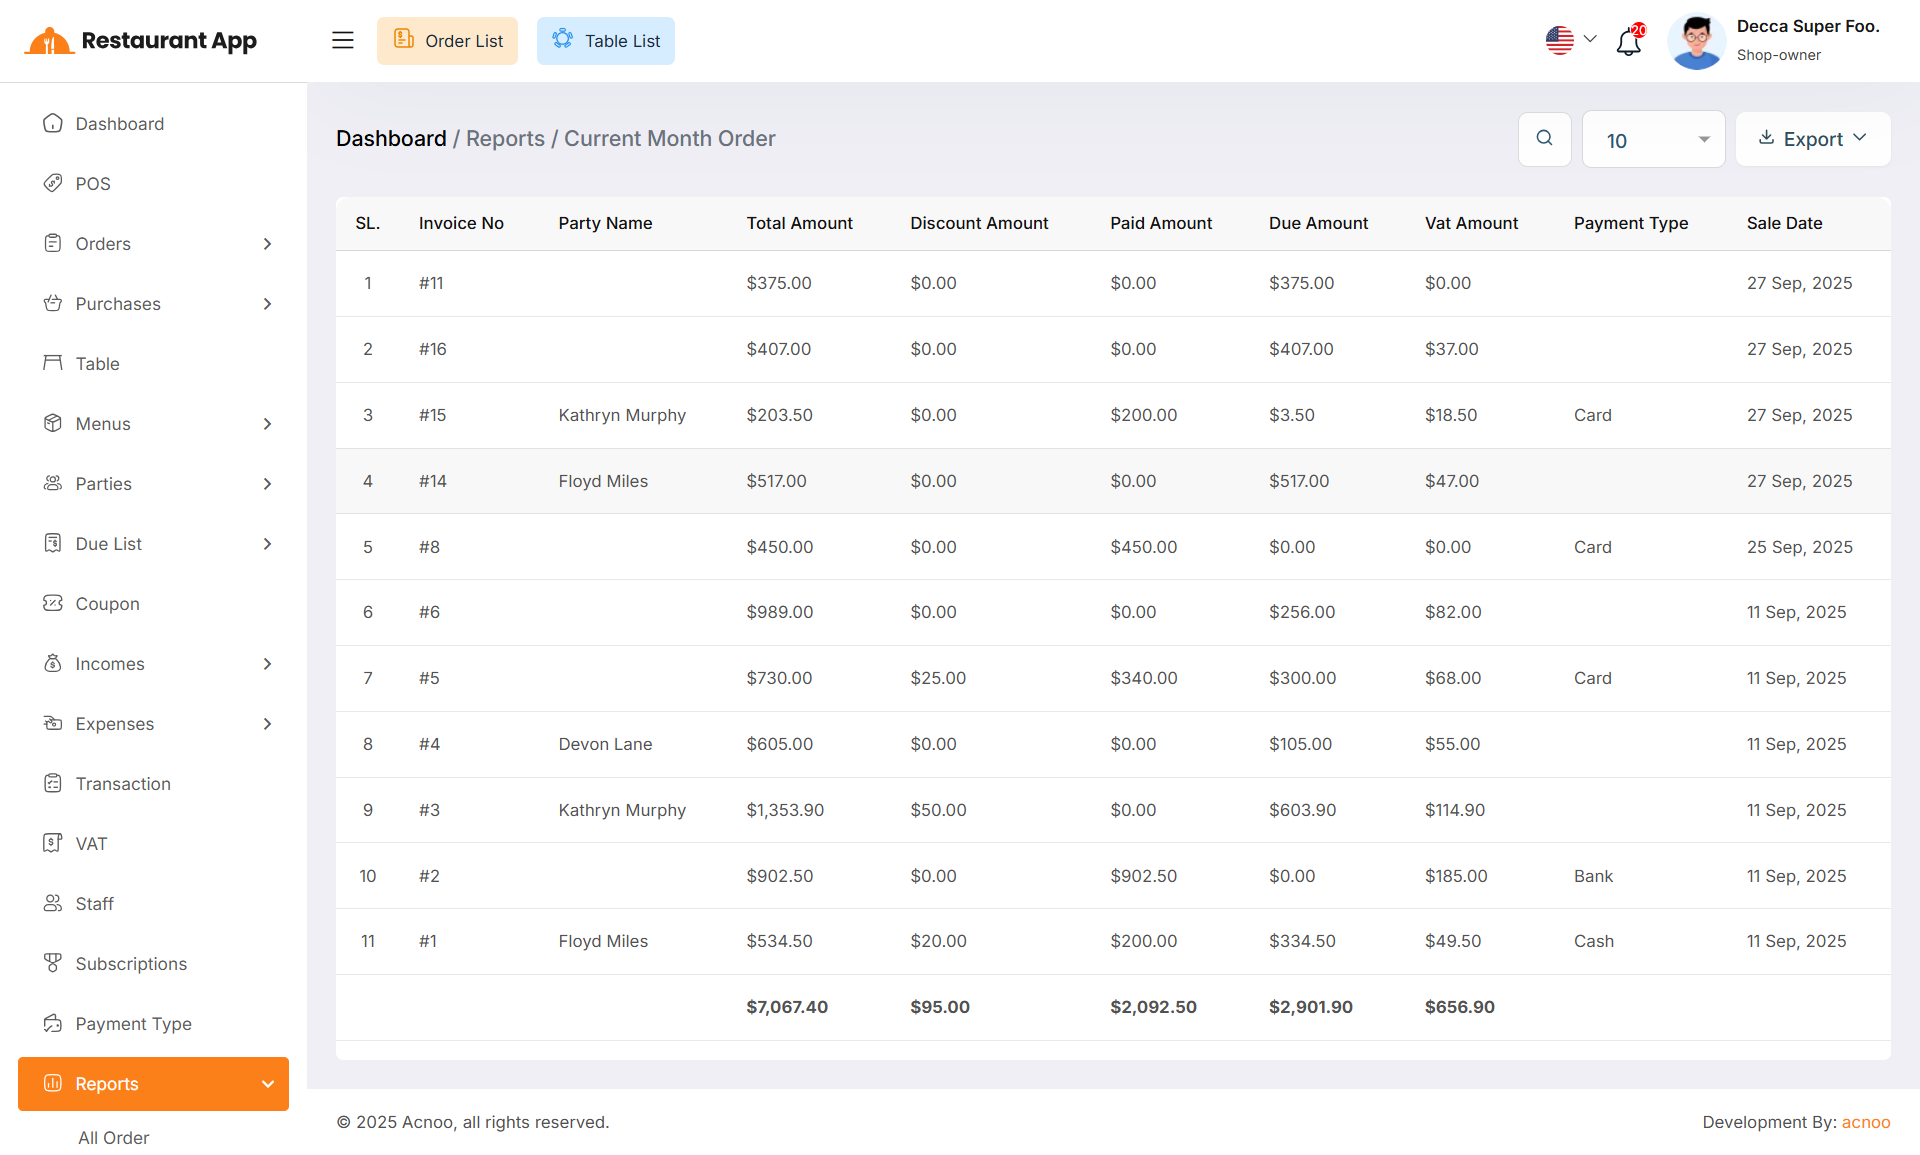
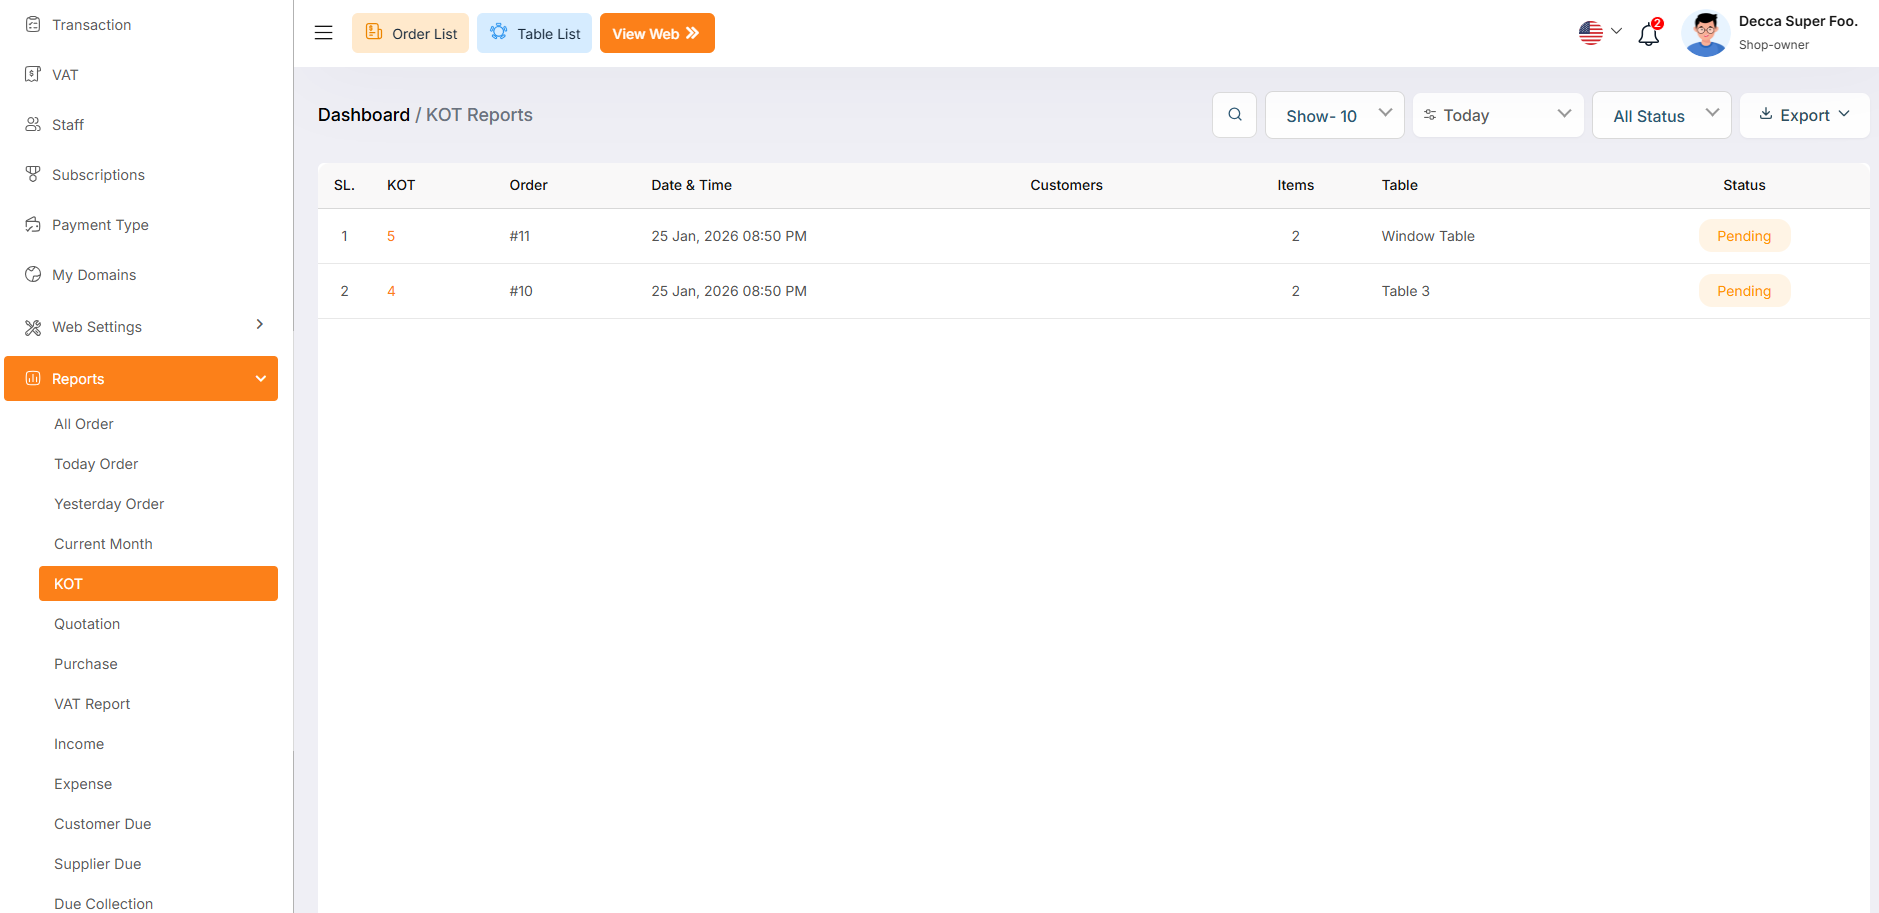
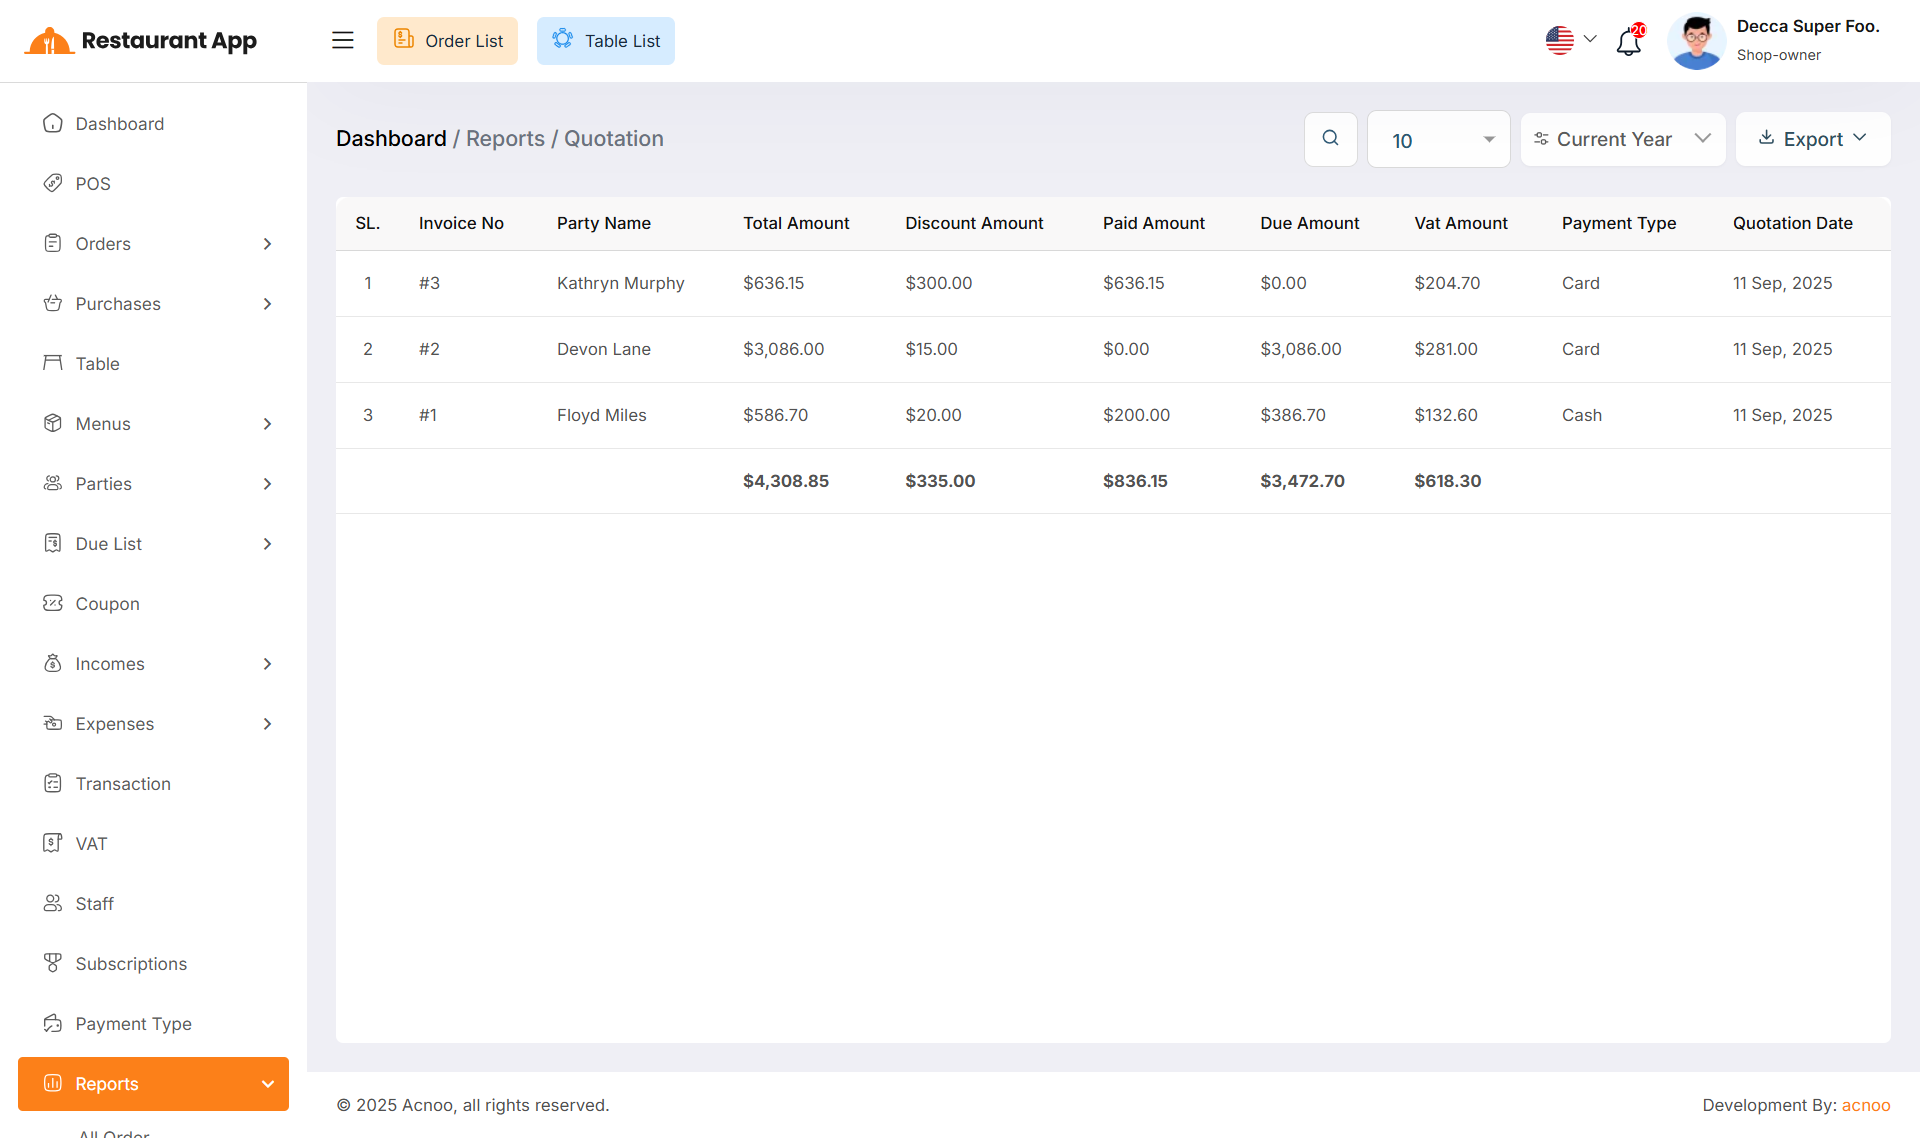
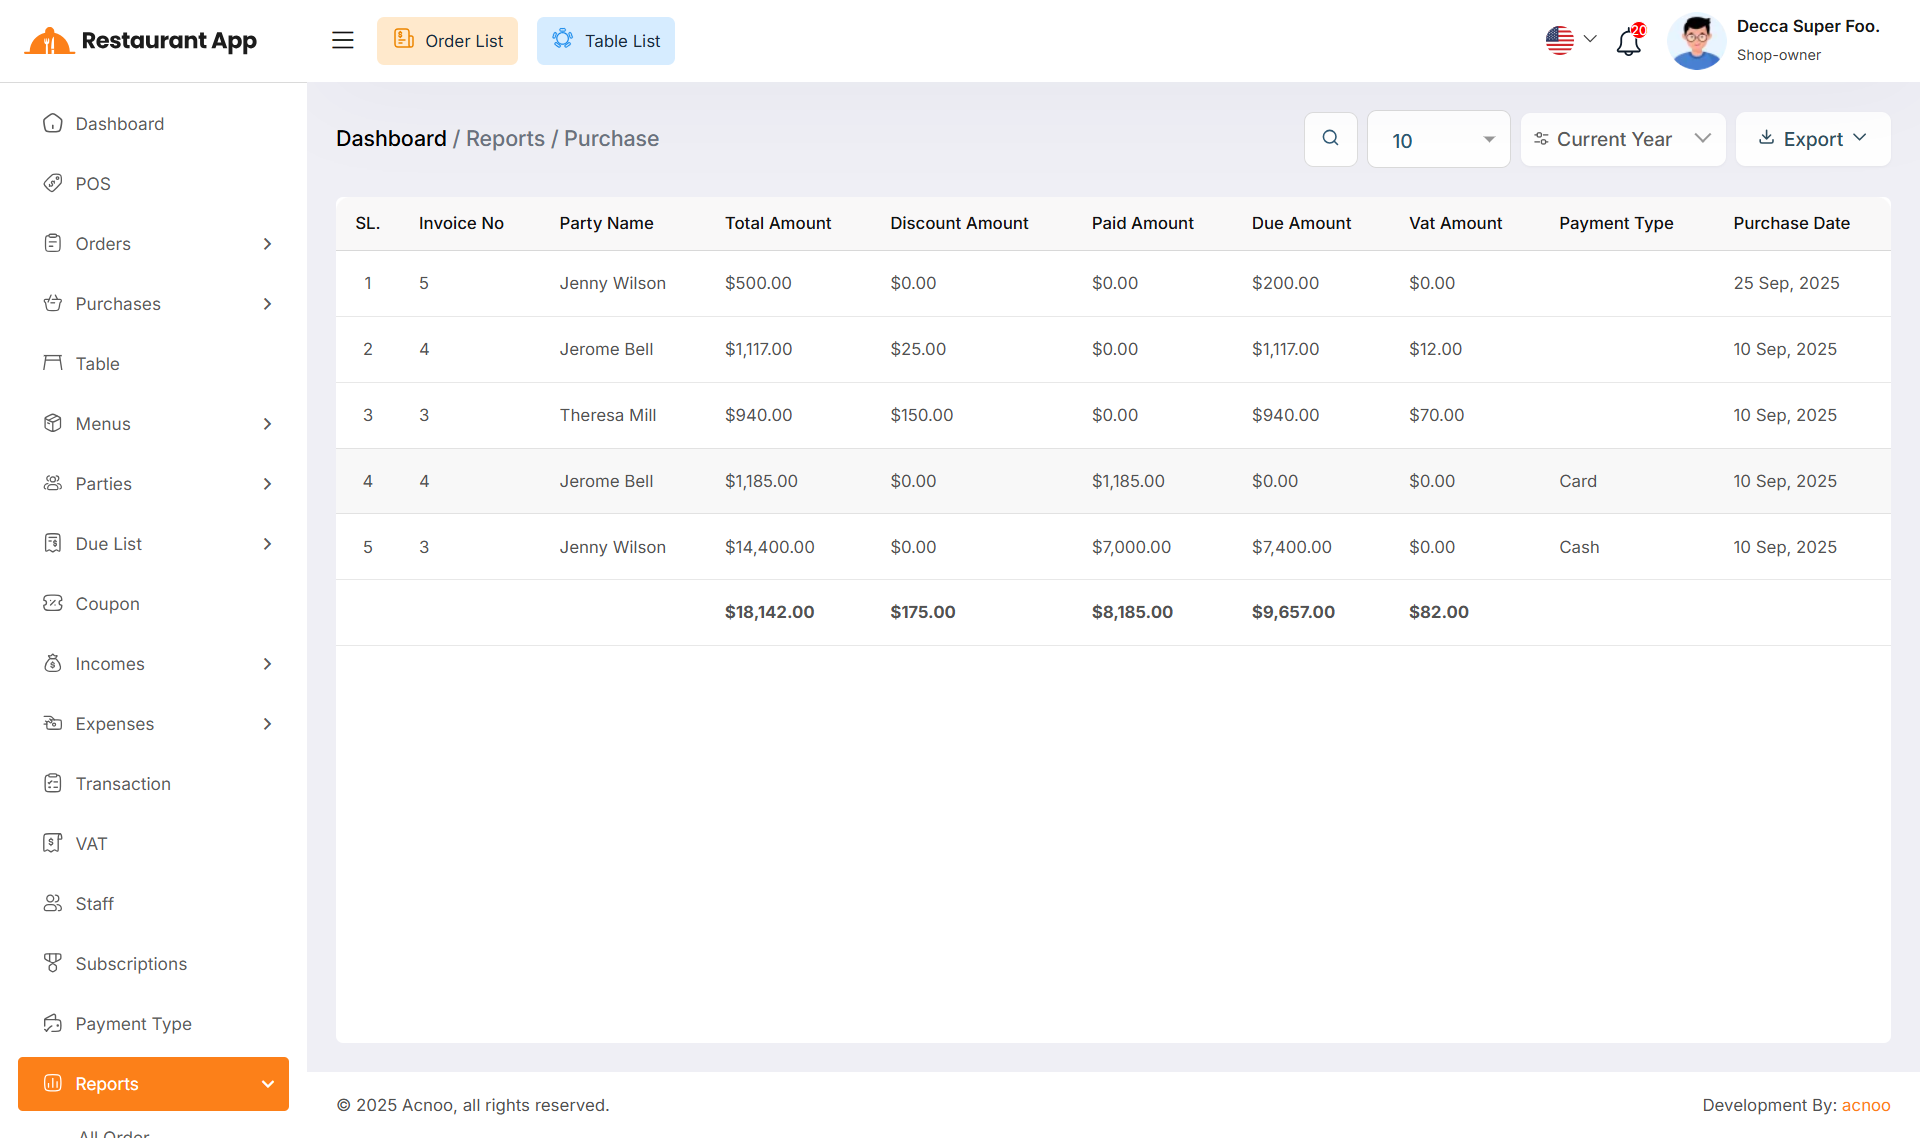
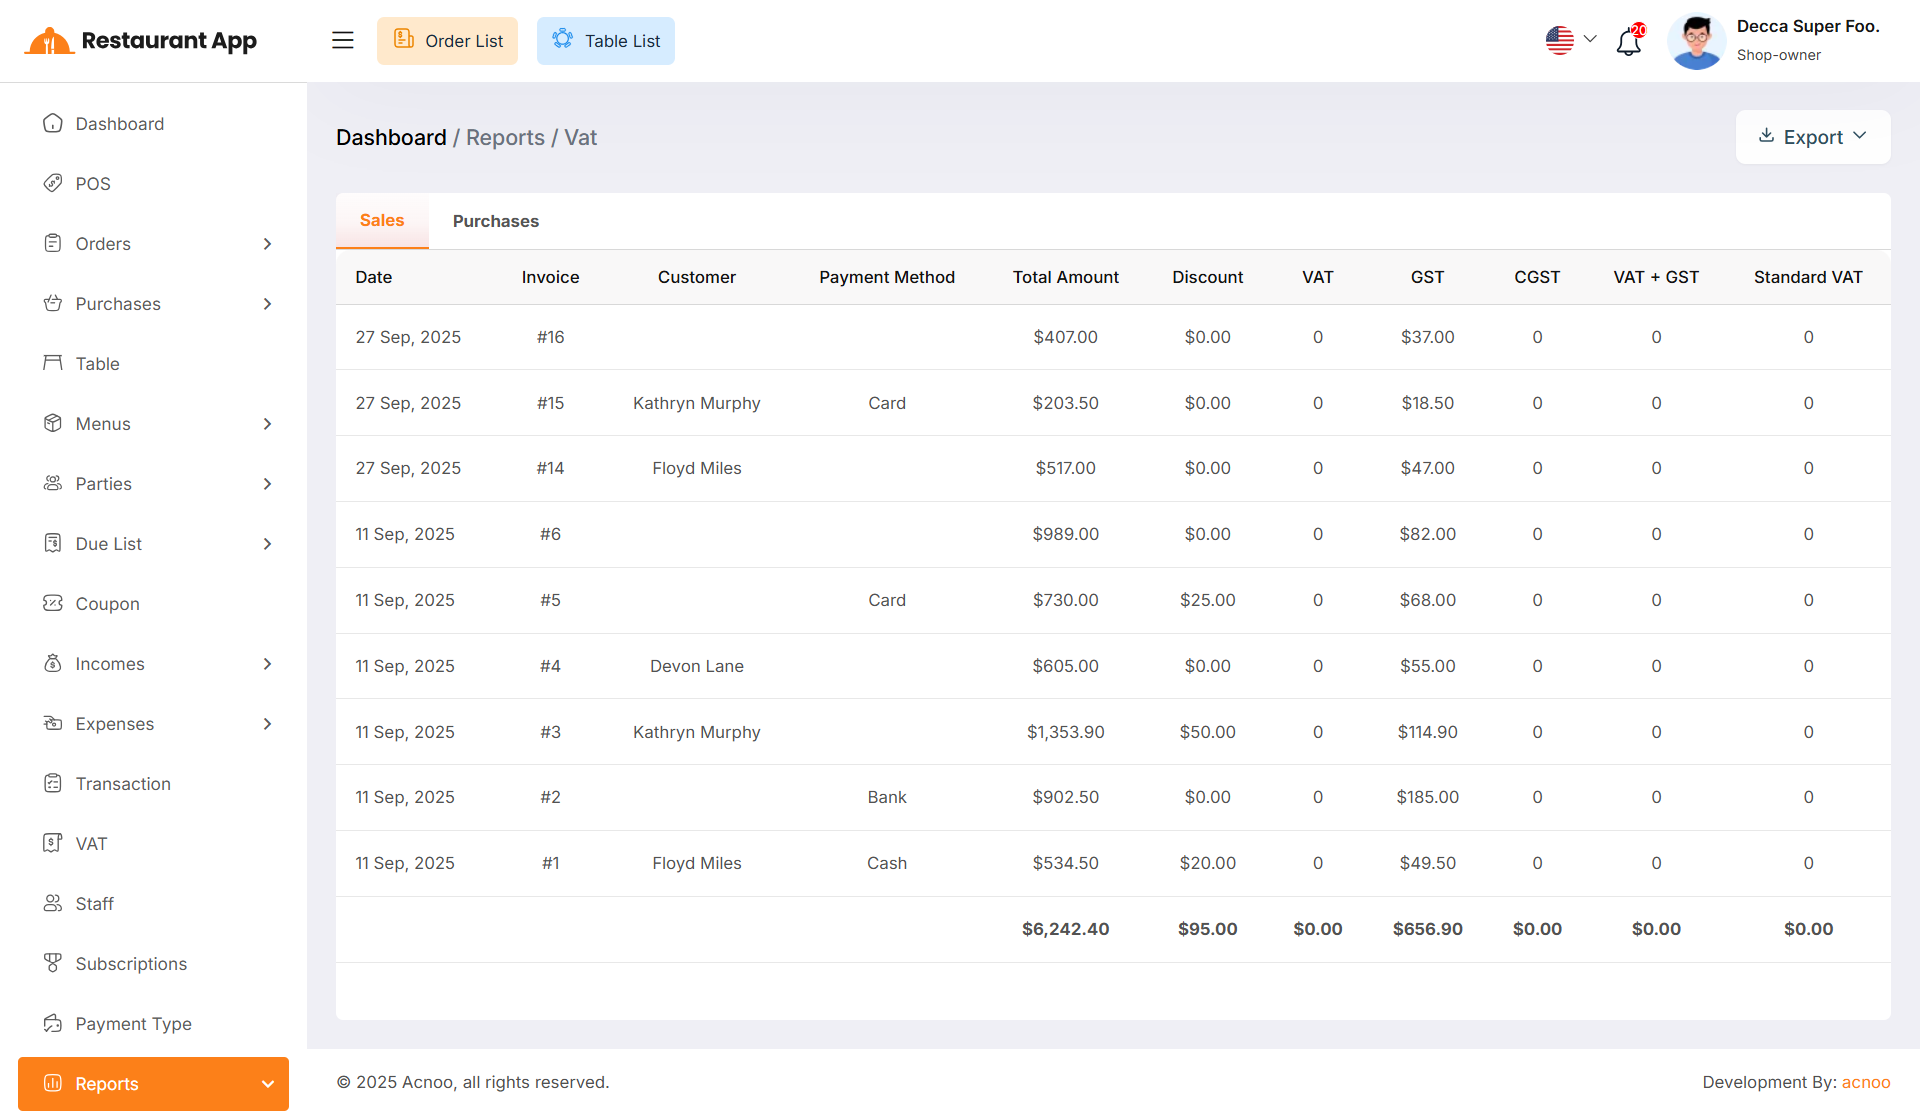
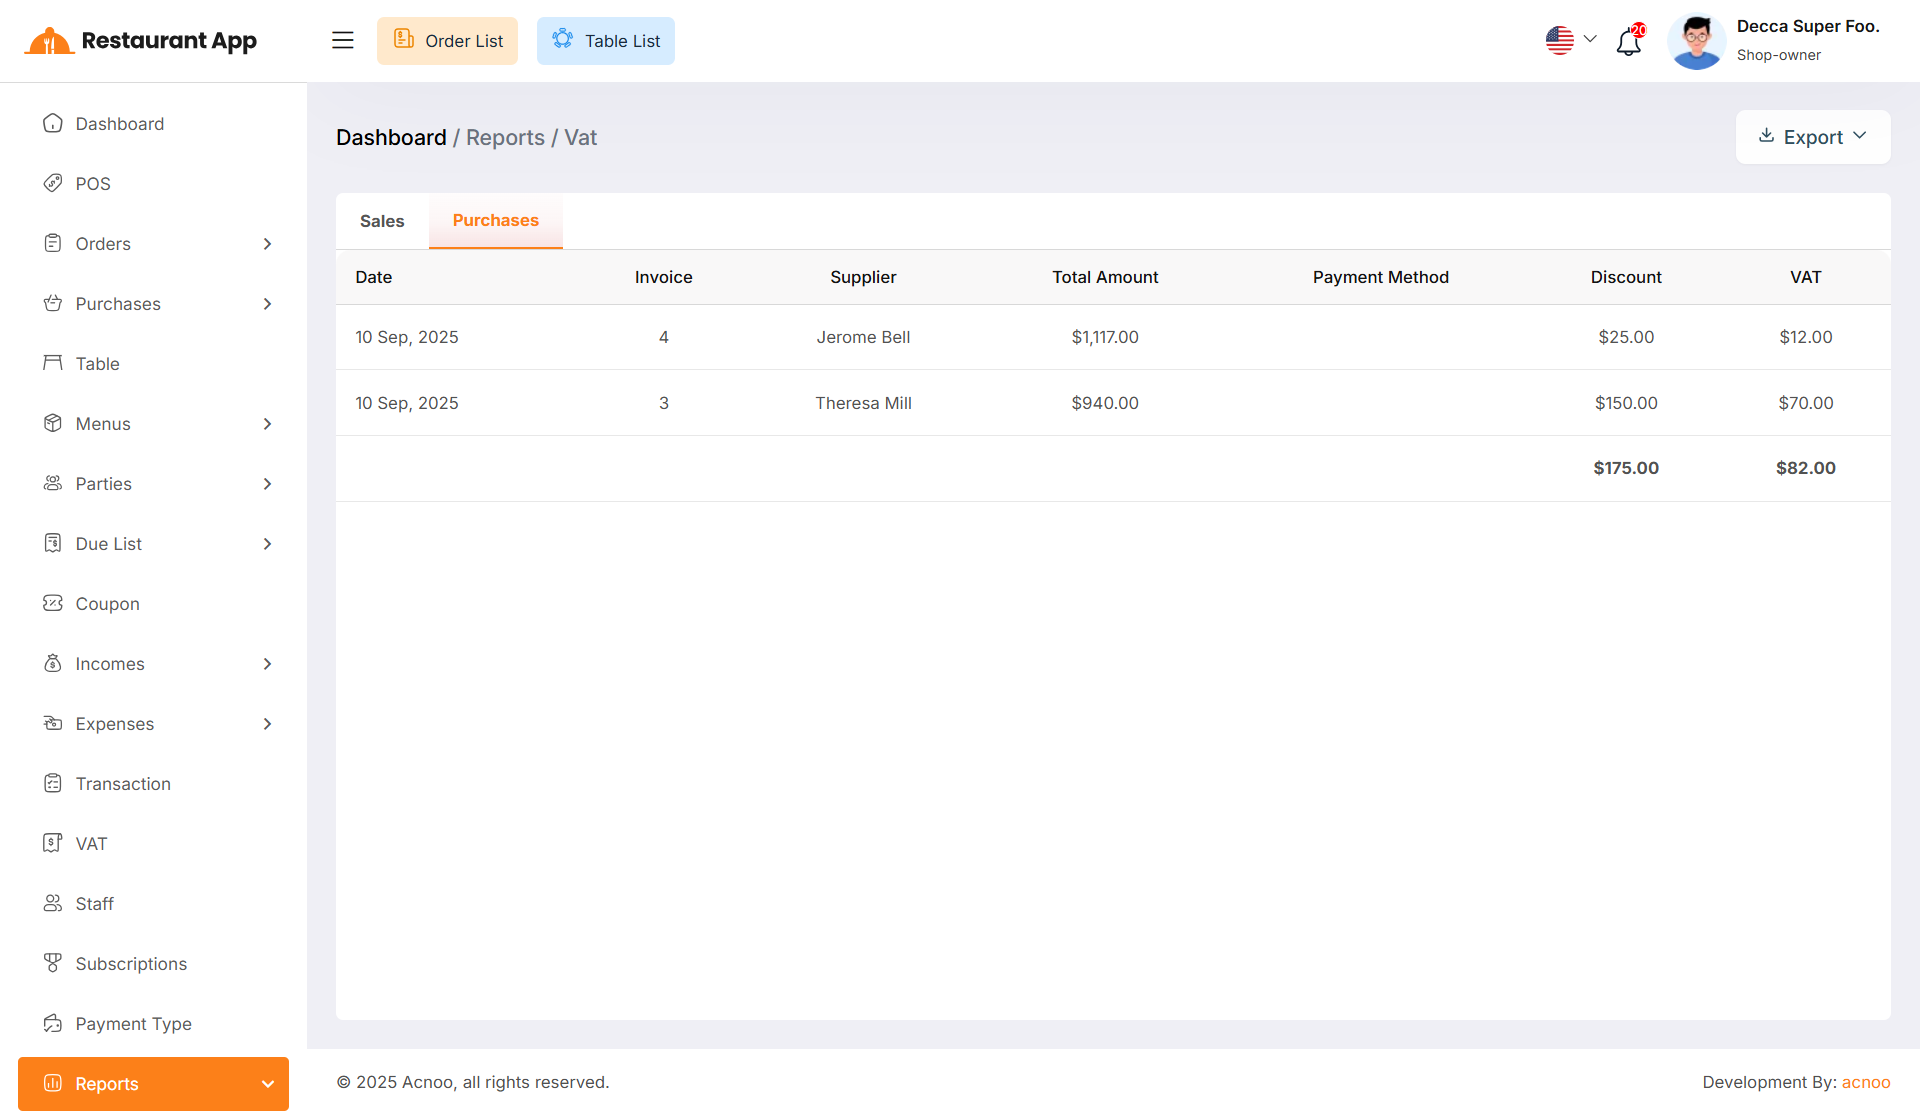
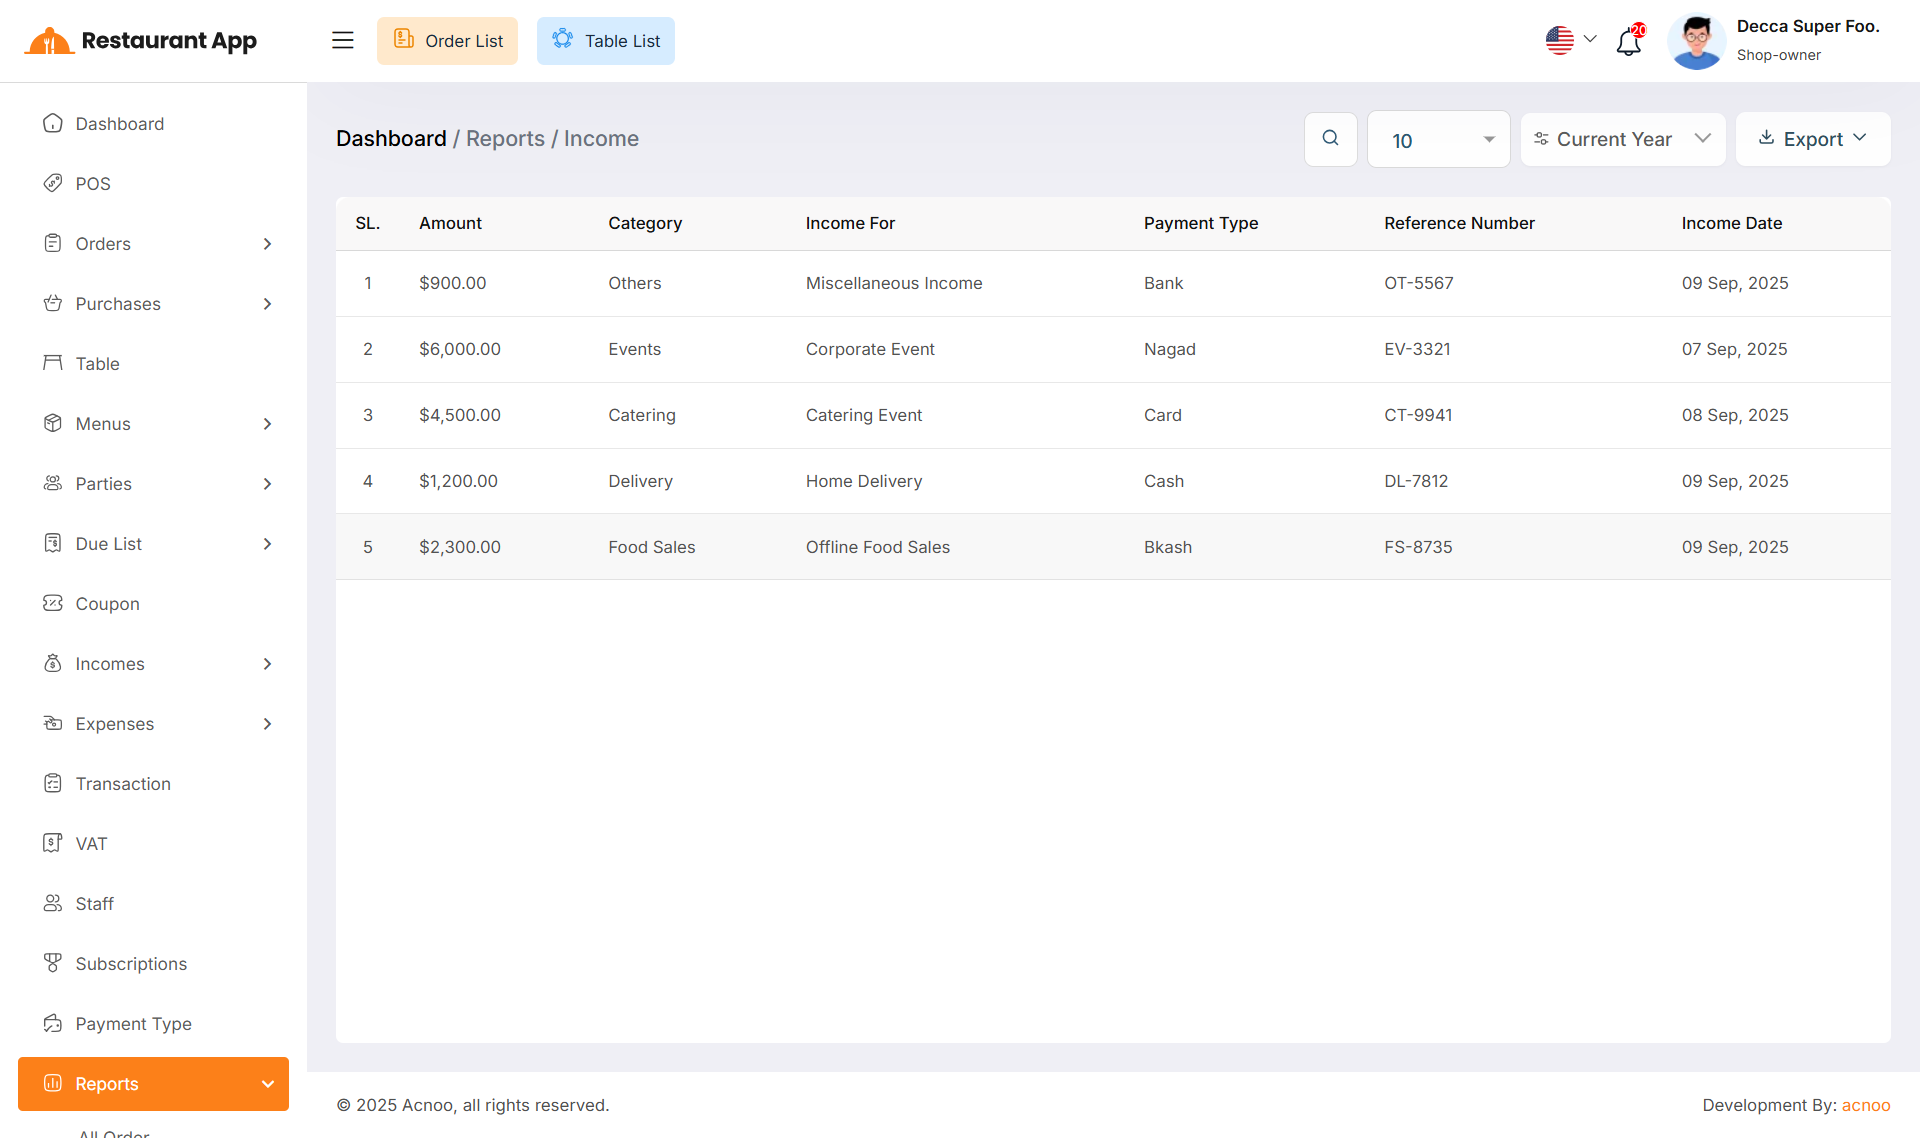
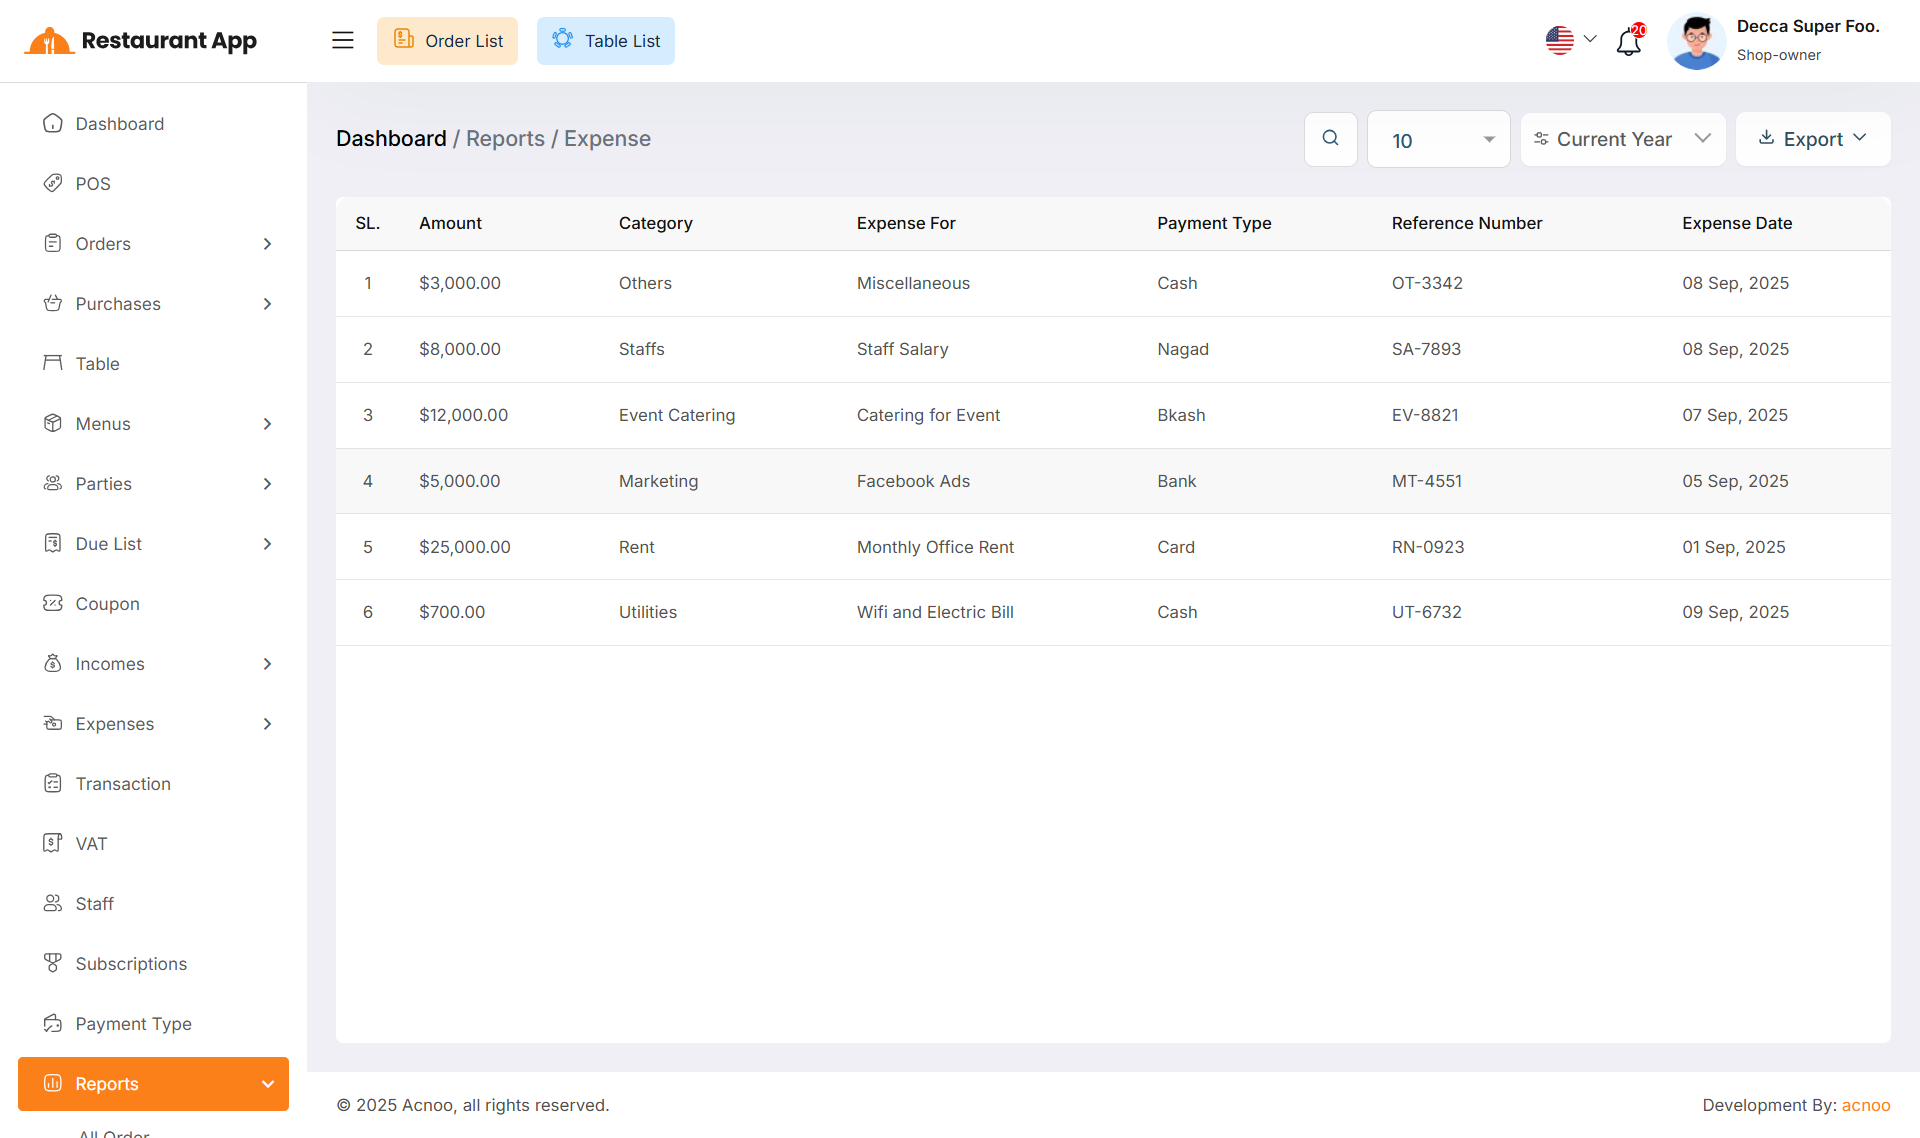
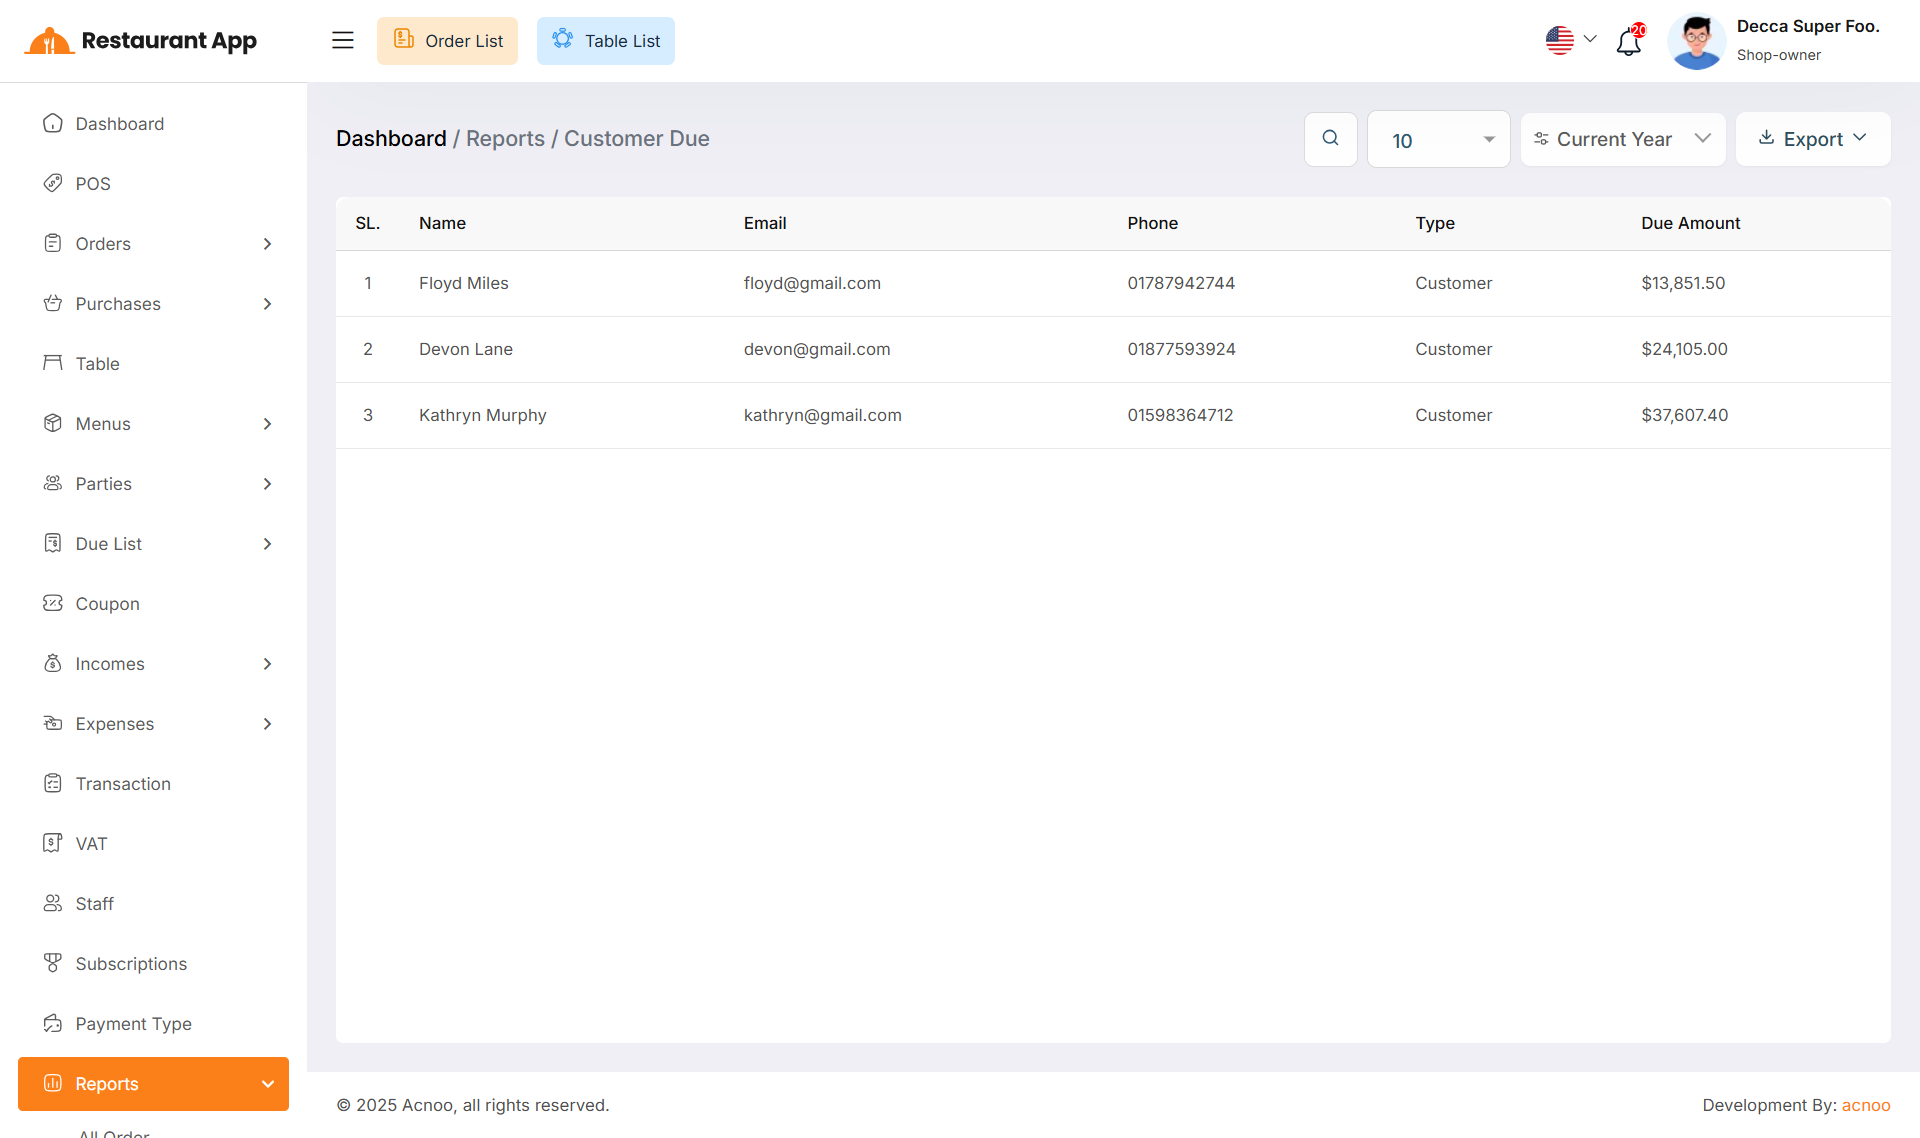
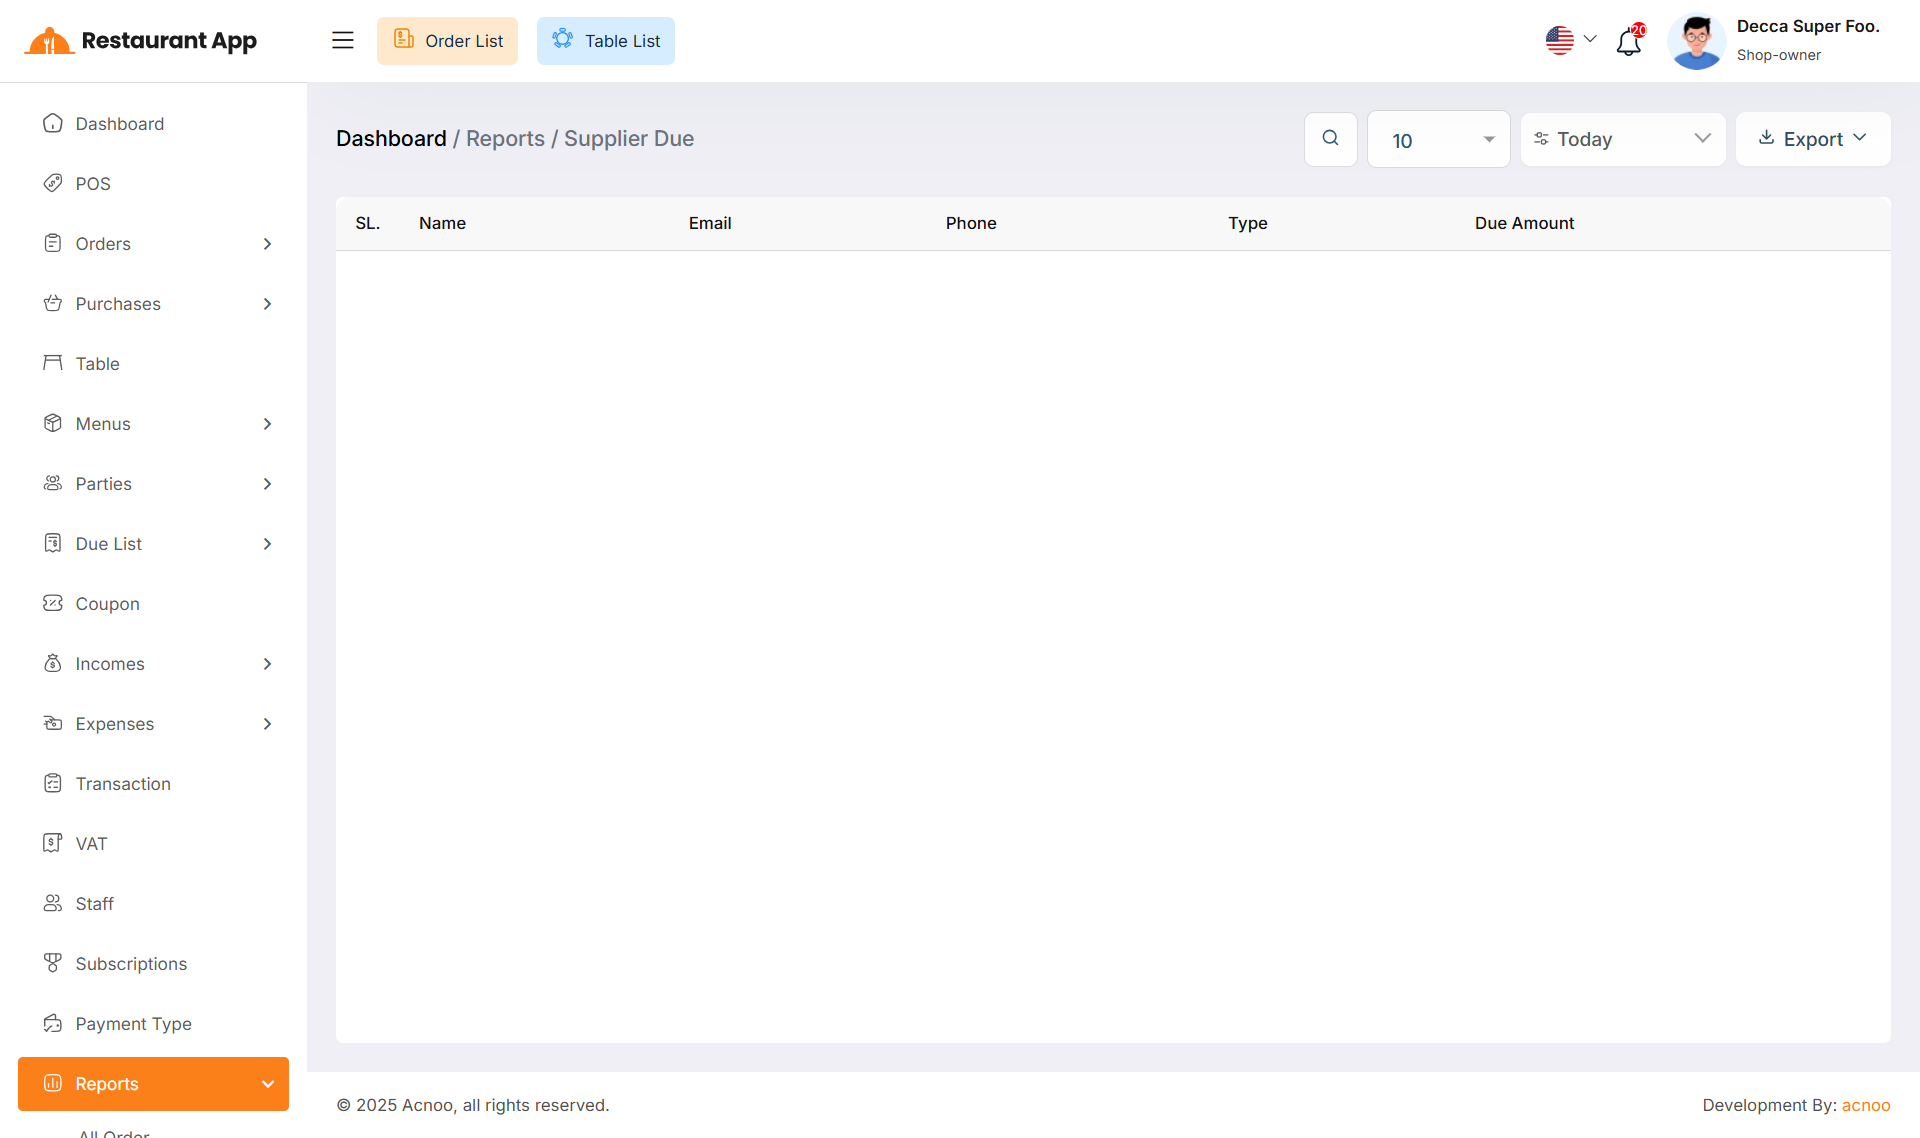
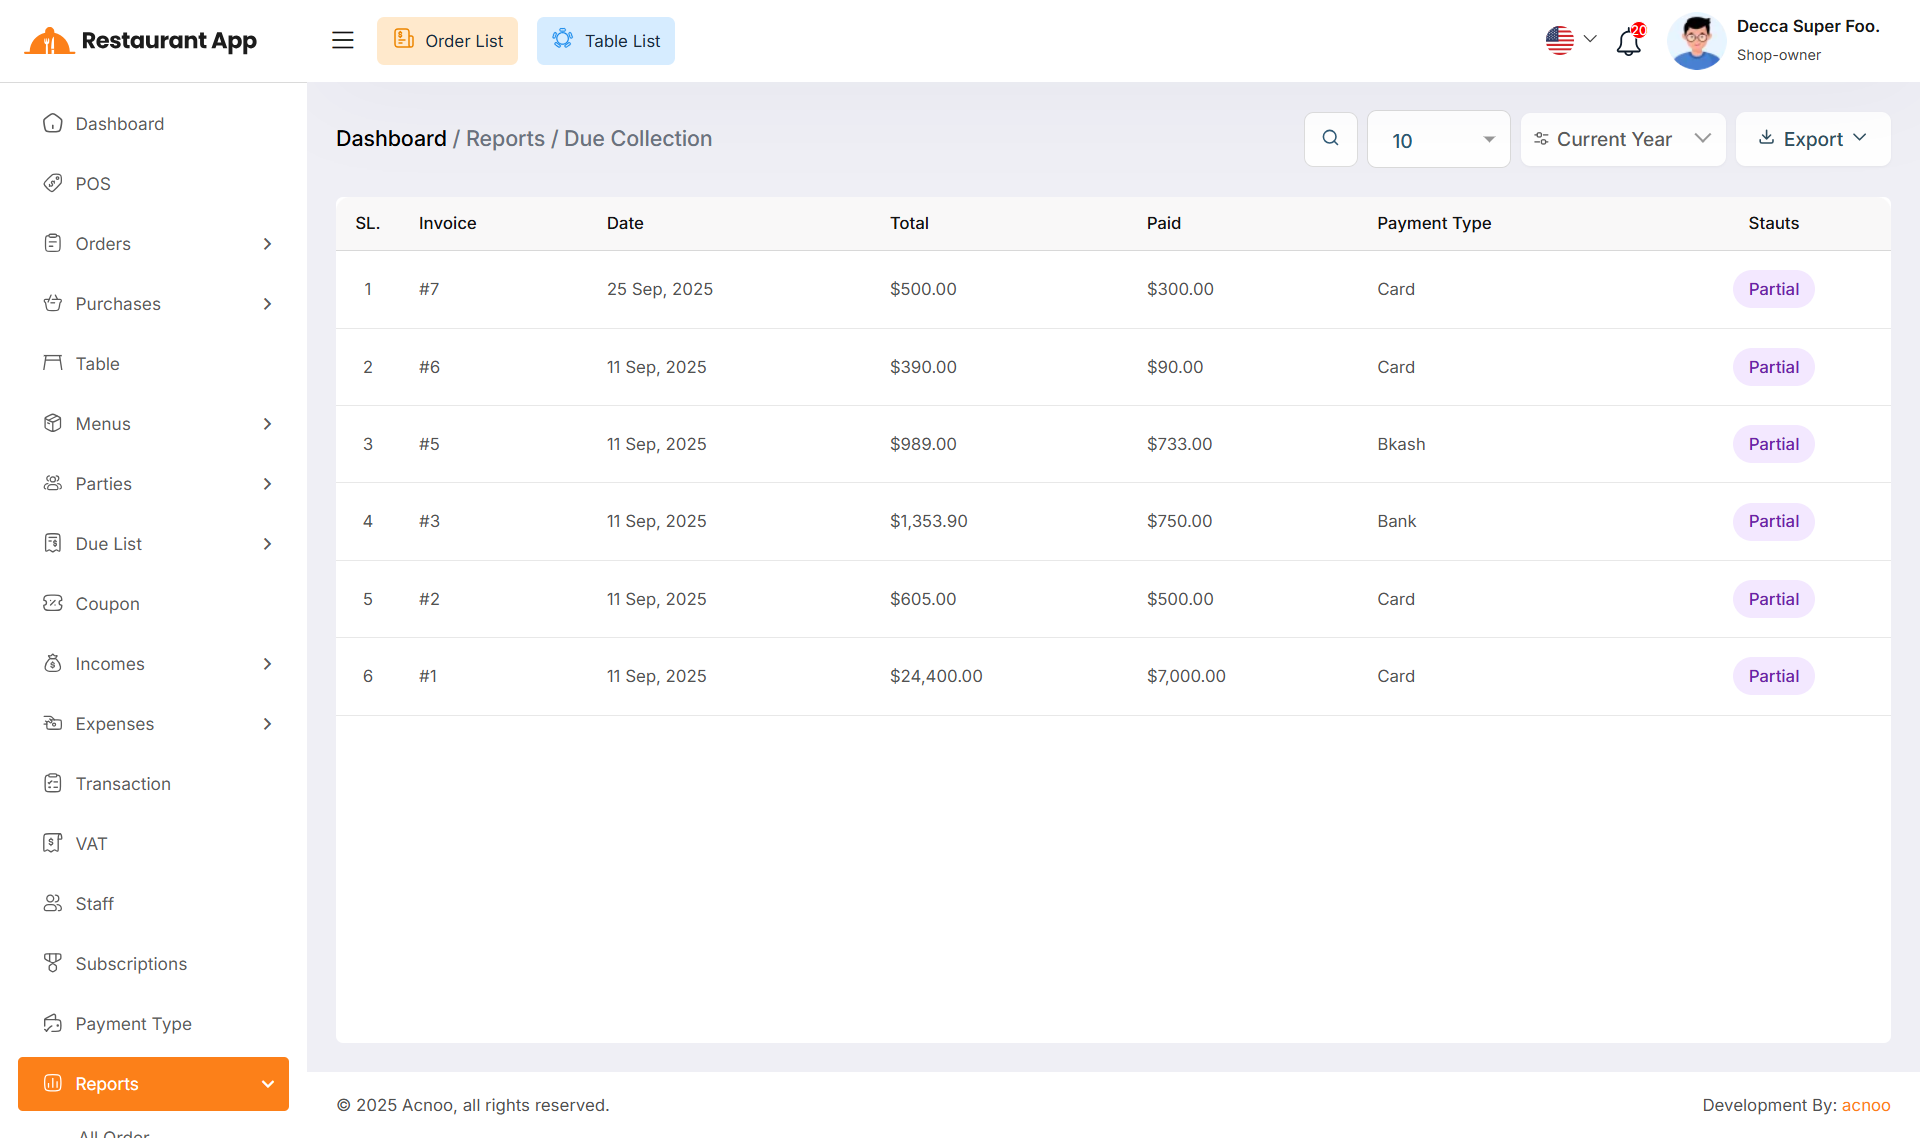
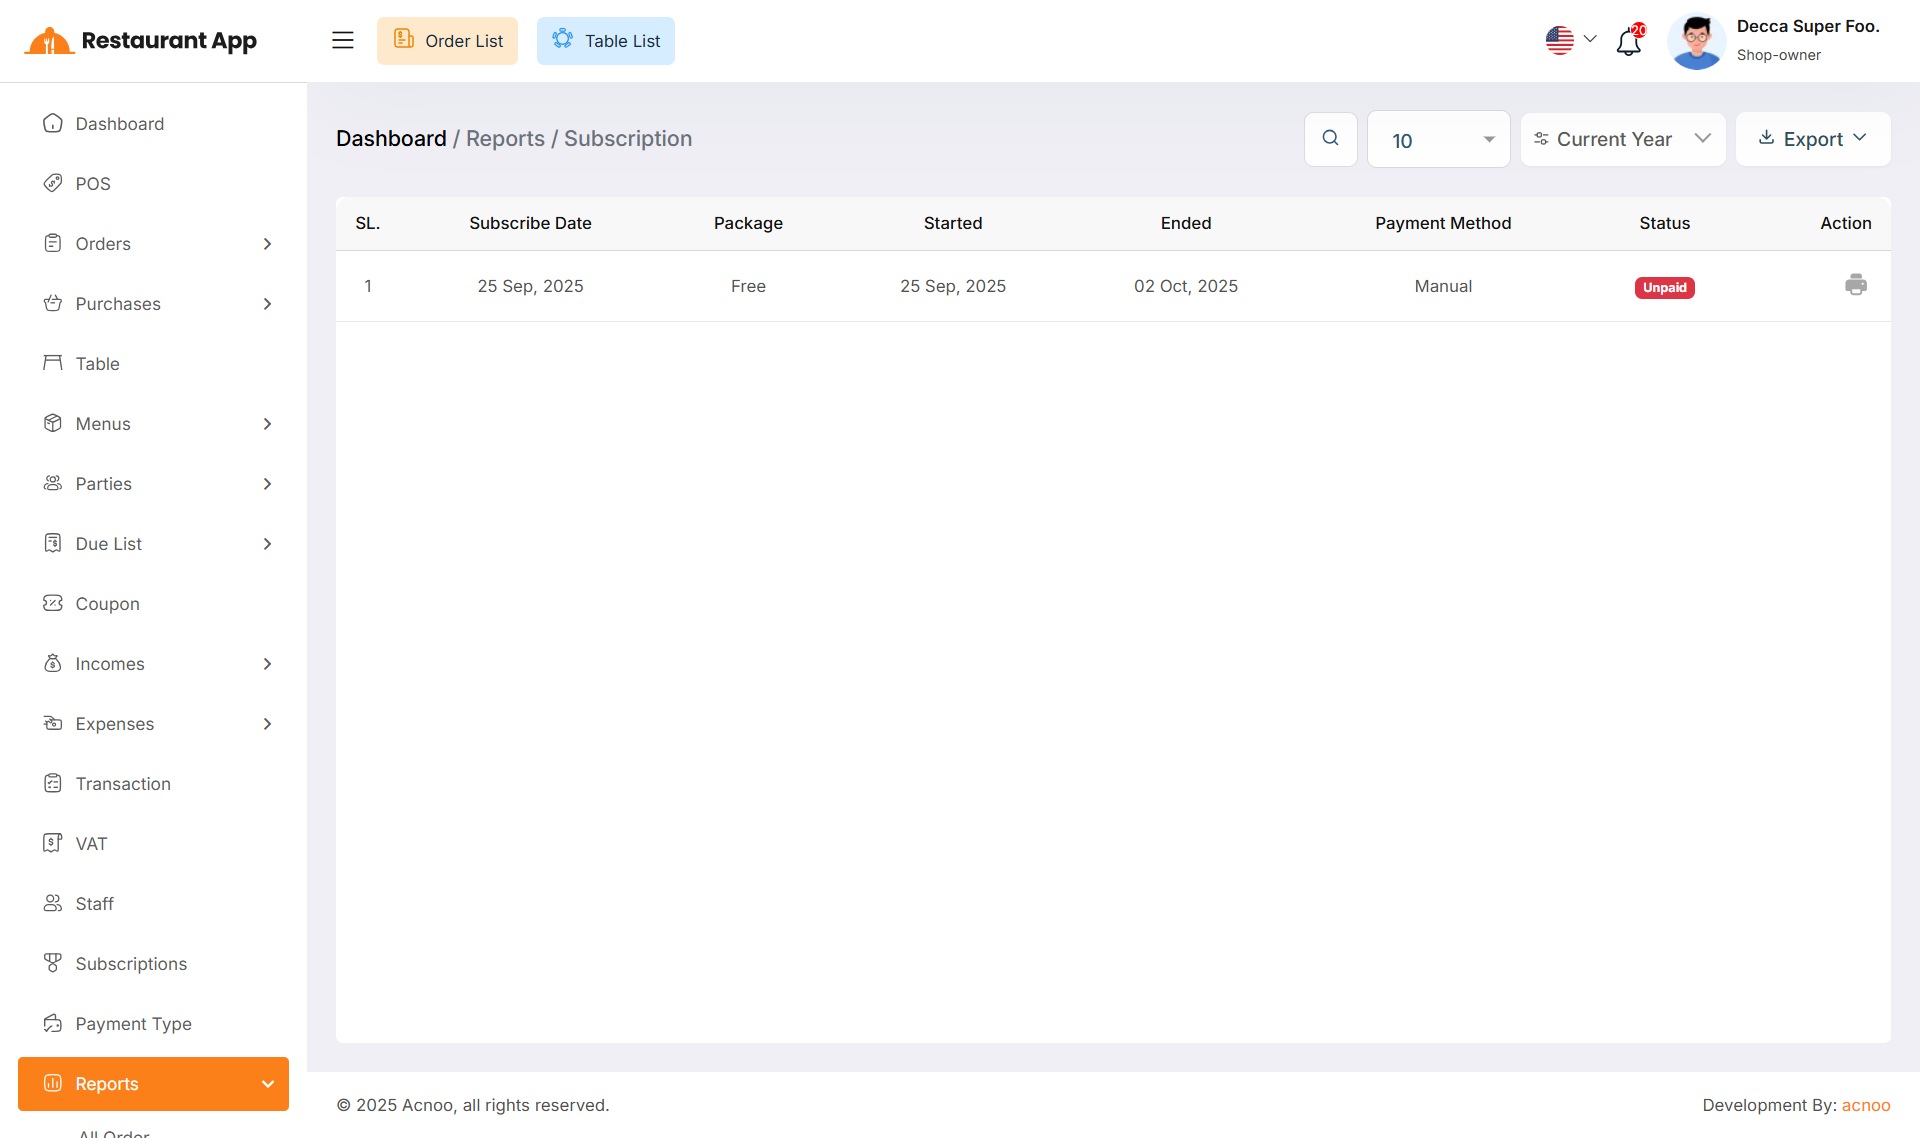
Here, various reports are available, including All Order, Today Order, Yesterday Order, Current Month Order, Quotation, Purchase, Vat, Income, Expense, Customer Due, Supplier Due, Due Collection and Subscription. Each report includes filtering options for data. Additionally, you can export data as CSV, Excel and PDF.
All Order Report
Today Order Report
Yesterday Order Report
Current Month Order Report
Kot Reports
Quotation Report
Purchase Report
Vat Report
Income Report
Expense Report
Customer Due Report
Supplier Due Report
Due Collection Report
Subscription Report
Settings
In the Setting section, you have the capability to configure the fundamental aspects or core elements of this project.
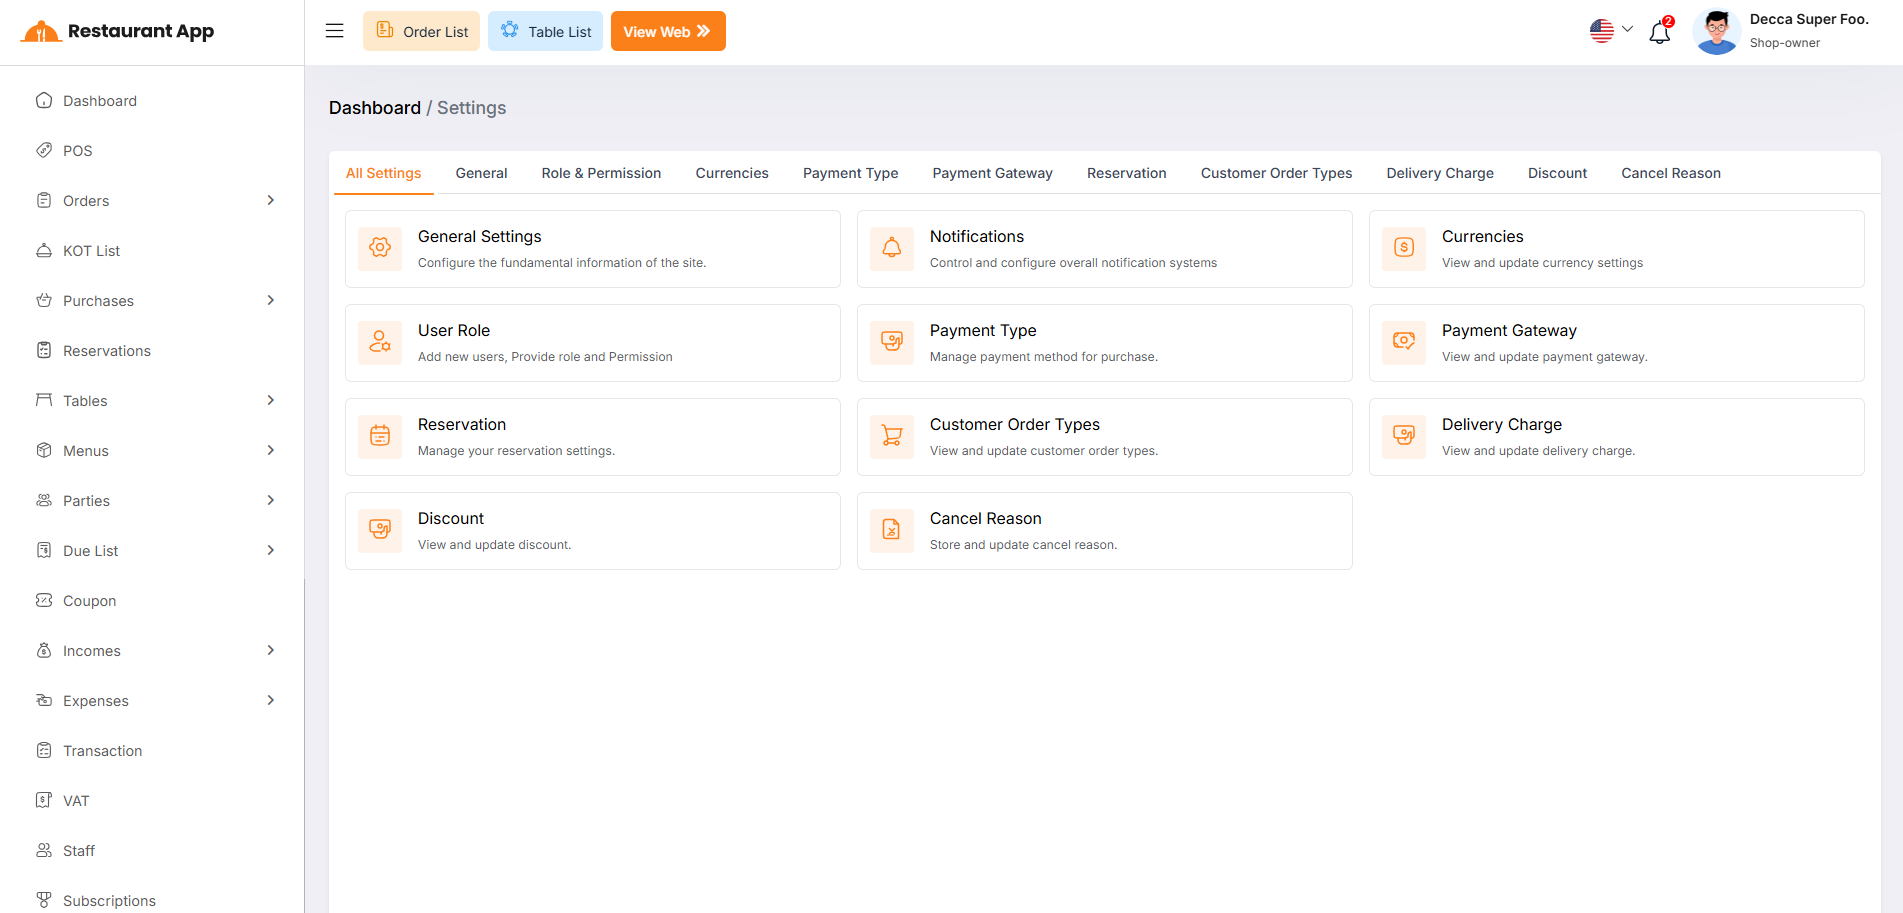
Generale Settings
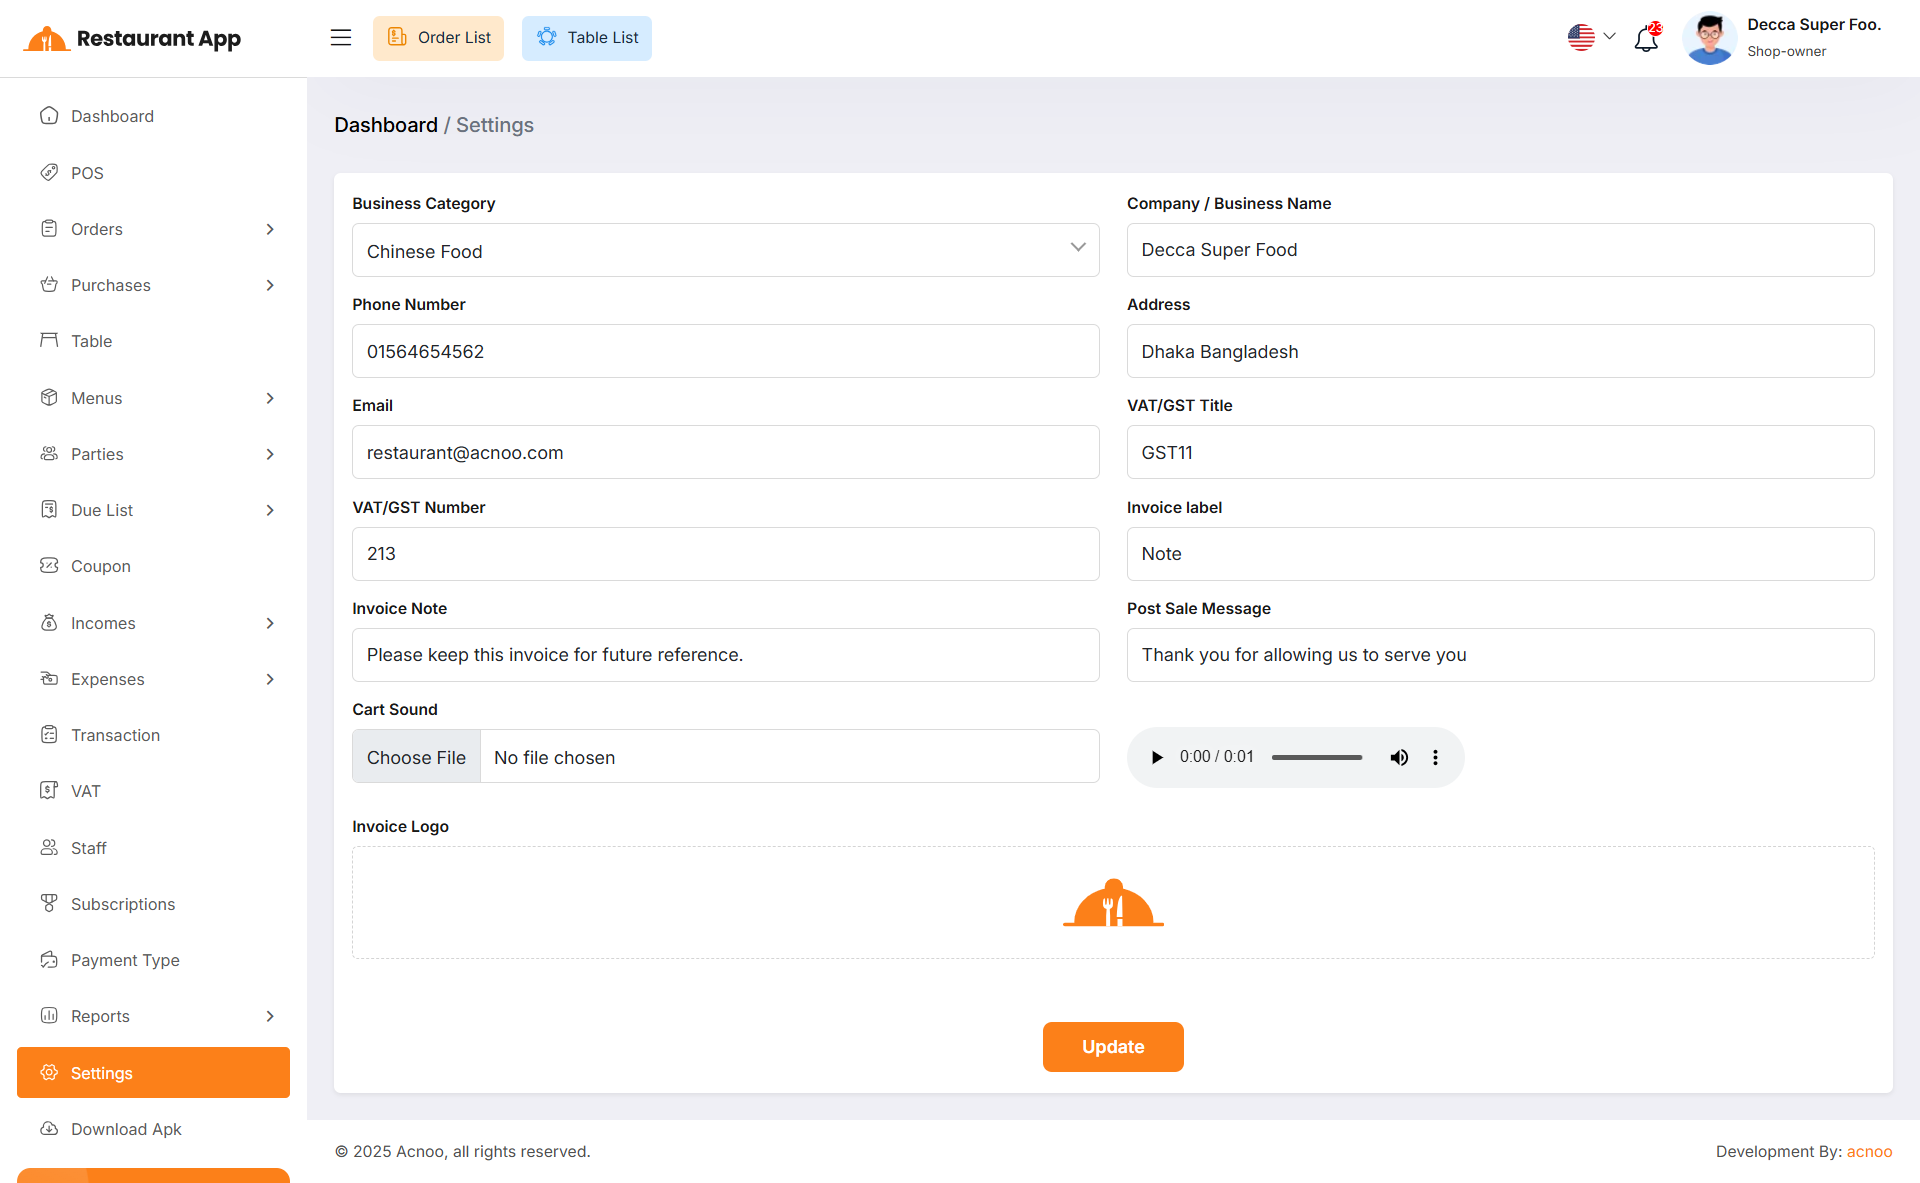
You can modify the general project information, which will also reflect in all your project invoices. For example, if you update the invoice logo here, it will be displayed on all invoices, including Sales, Purchases, and Due Invoices.
User Role
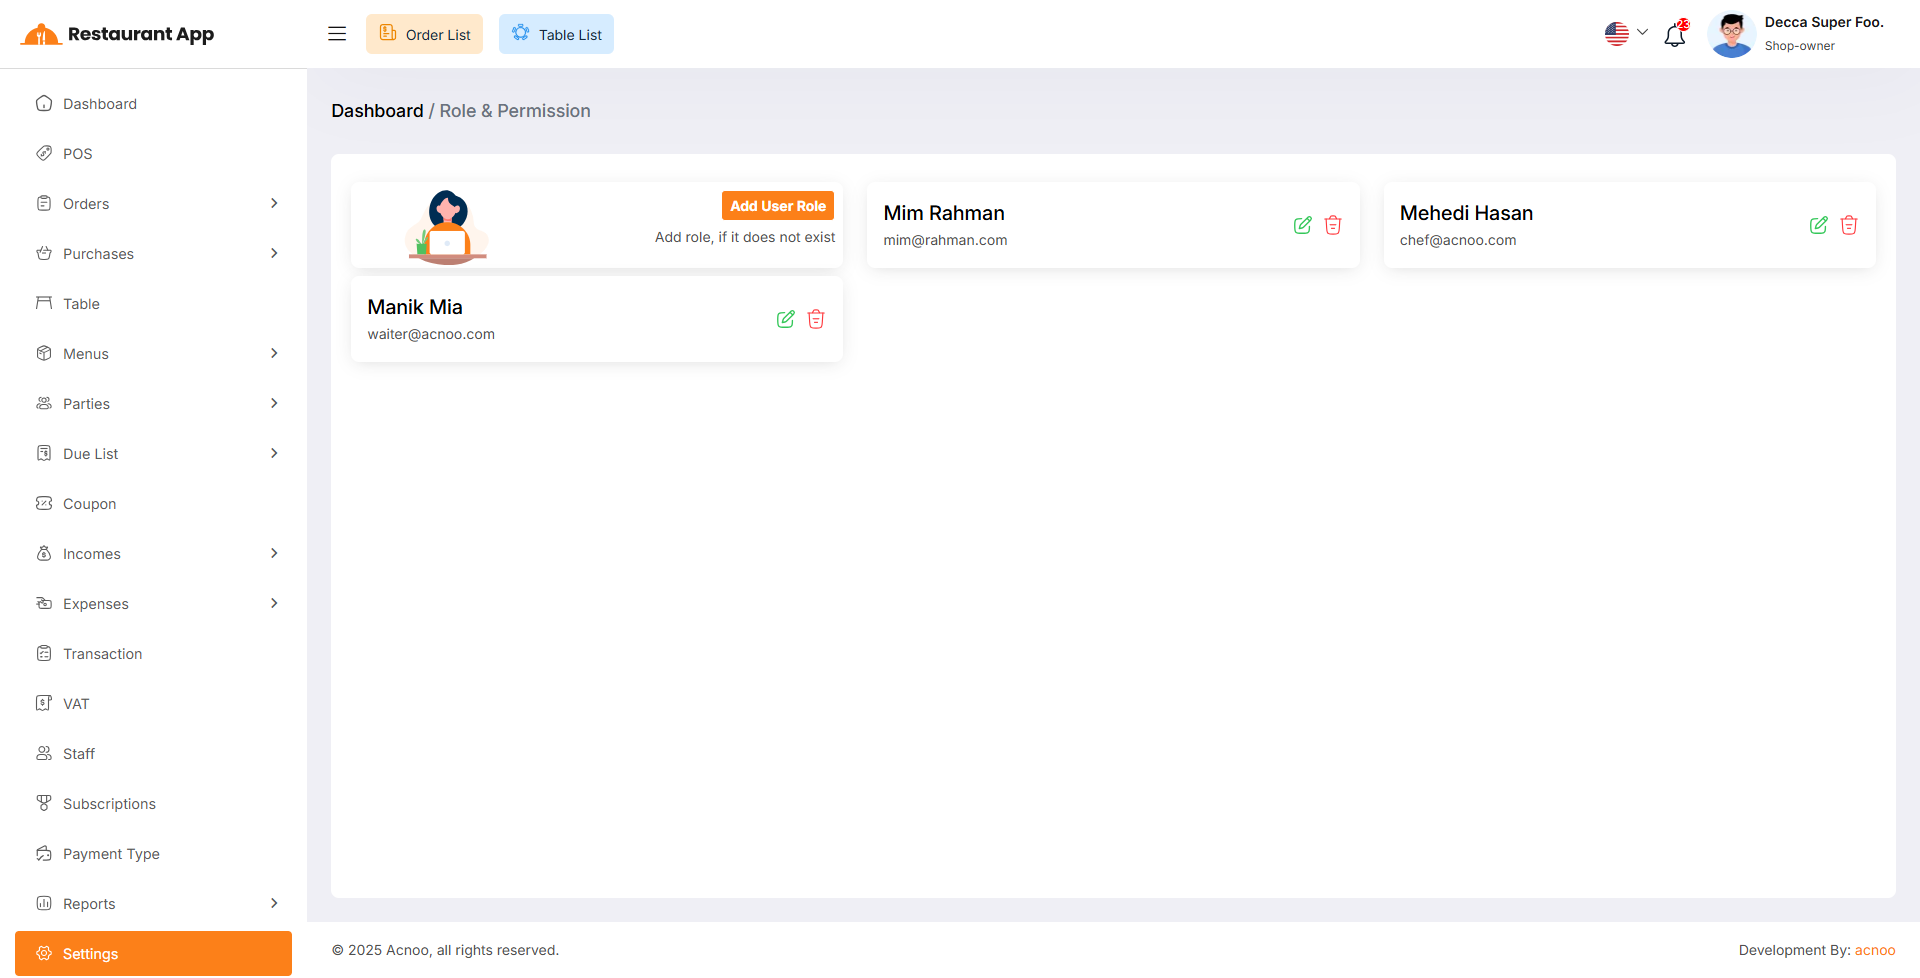
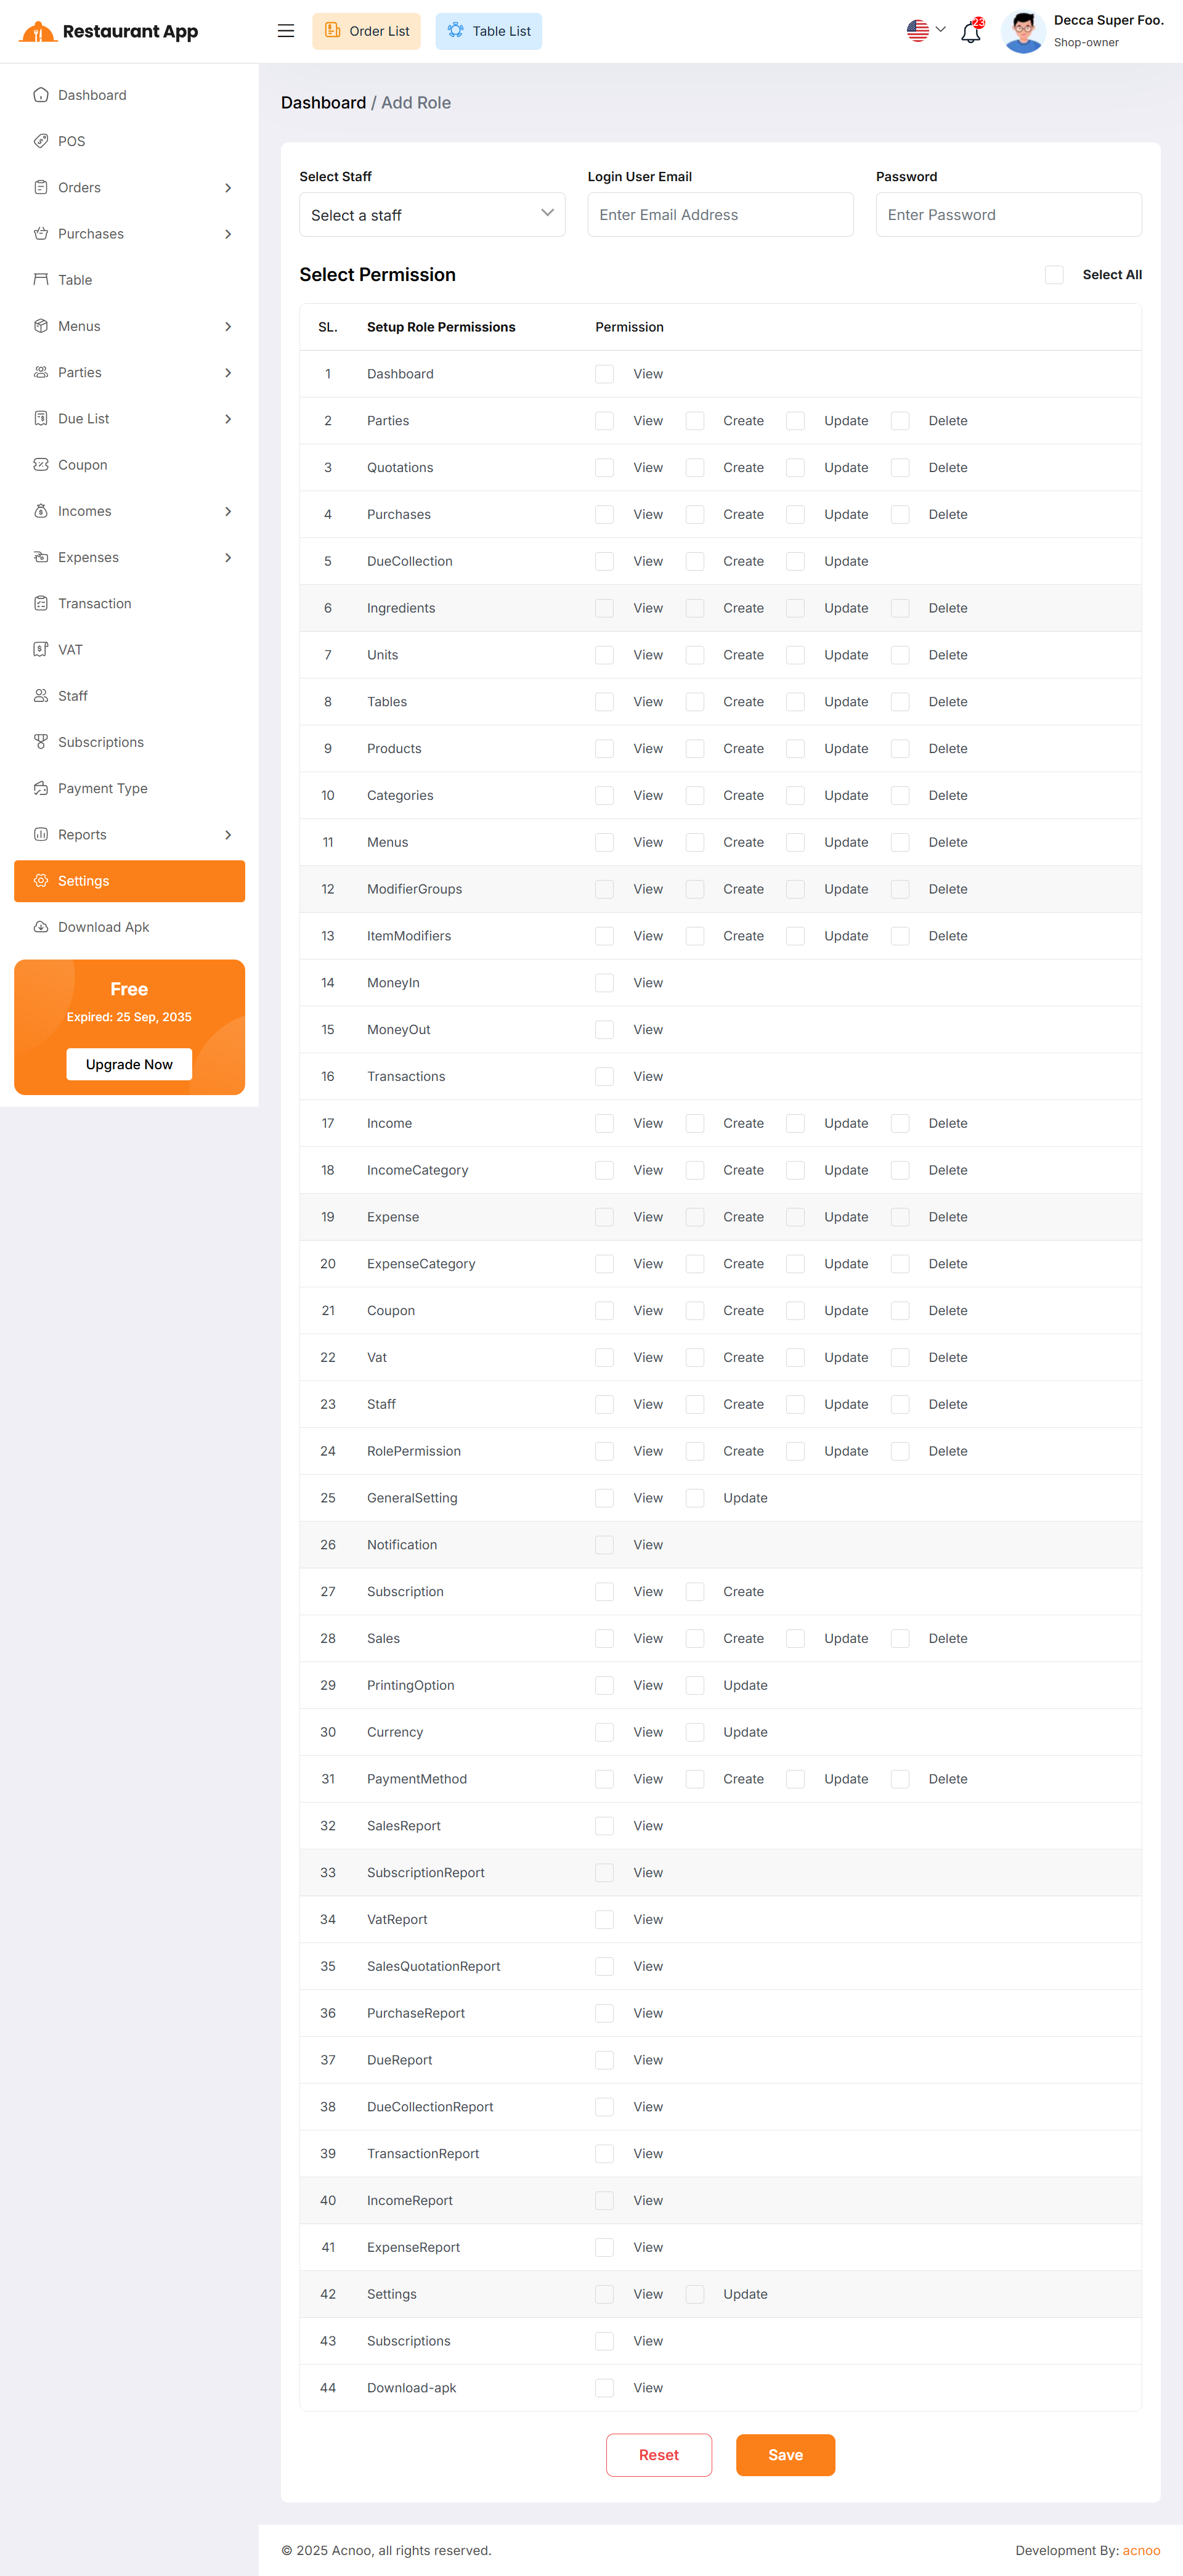
In this section, you can create new roles, update existing ones, and delete them. While updating roles, you can configure specific permissions to grant or restrict access to various features and functionalities. This enables you to customize user roles according to your organizational needs and security requirements.
Notification
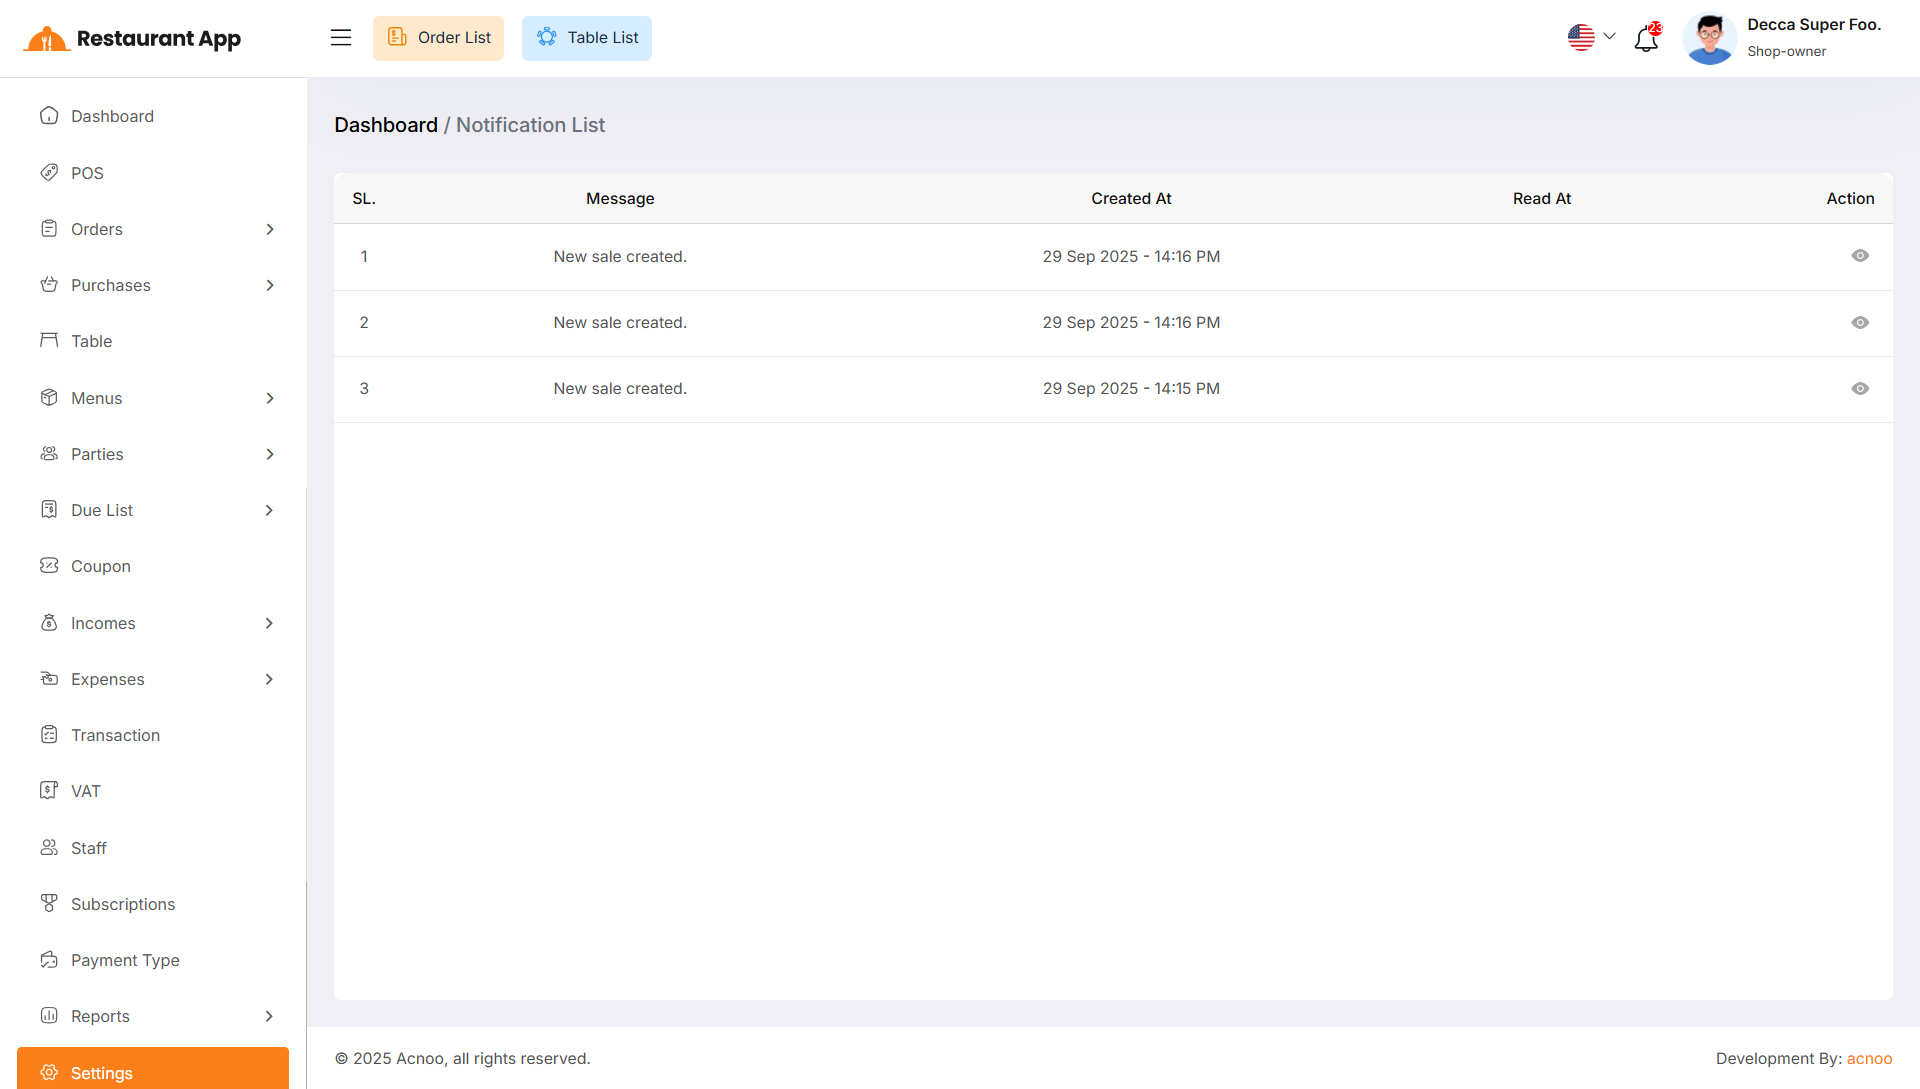
Here, you can view a list of notifications for Sales, Purchases, Income, Expenses, and Due Collections. You can also filter these notifications using the available criteria. For each notification, clicking the "View" button will display detailed information.
Currencies
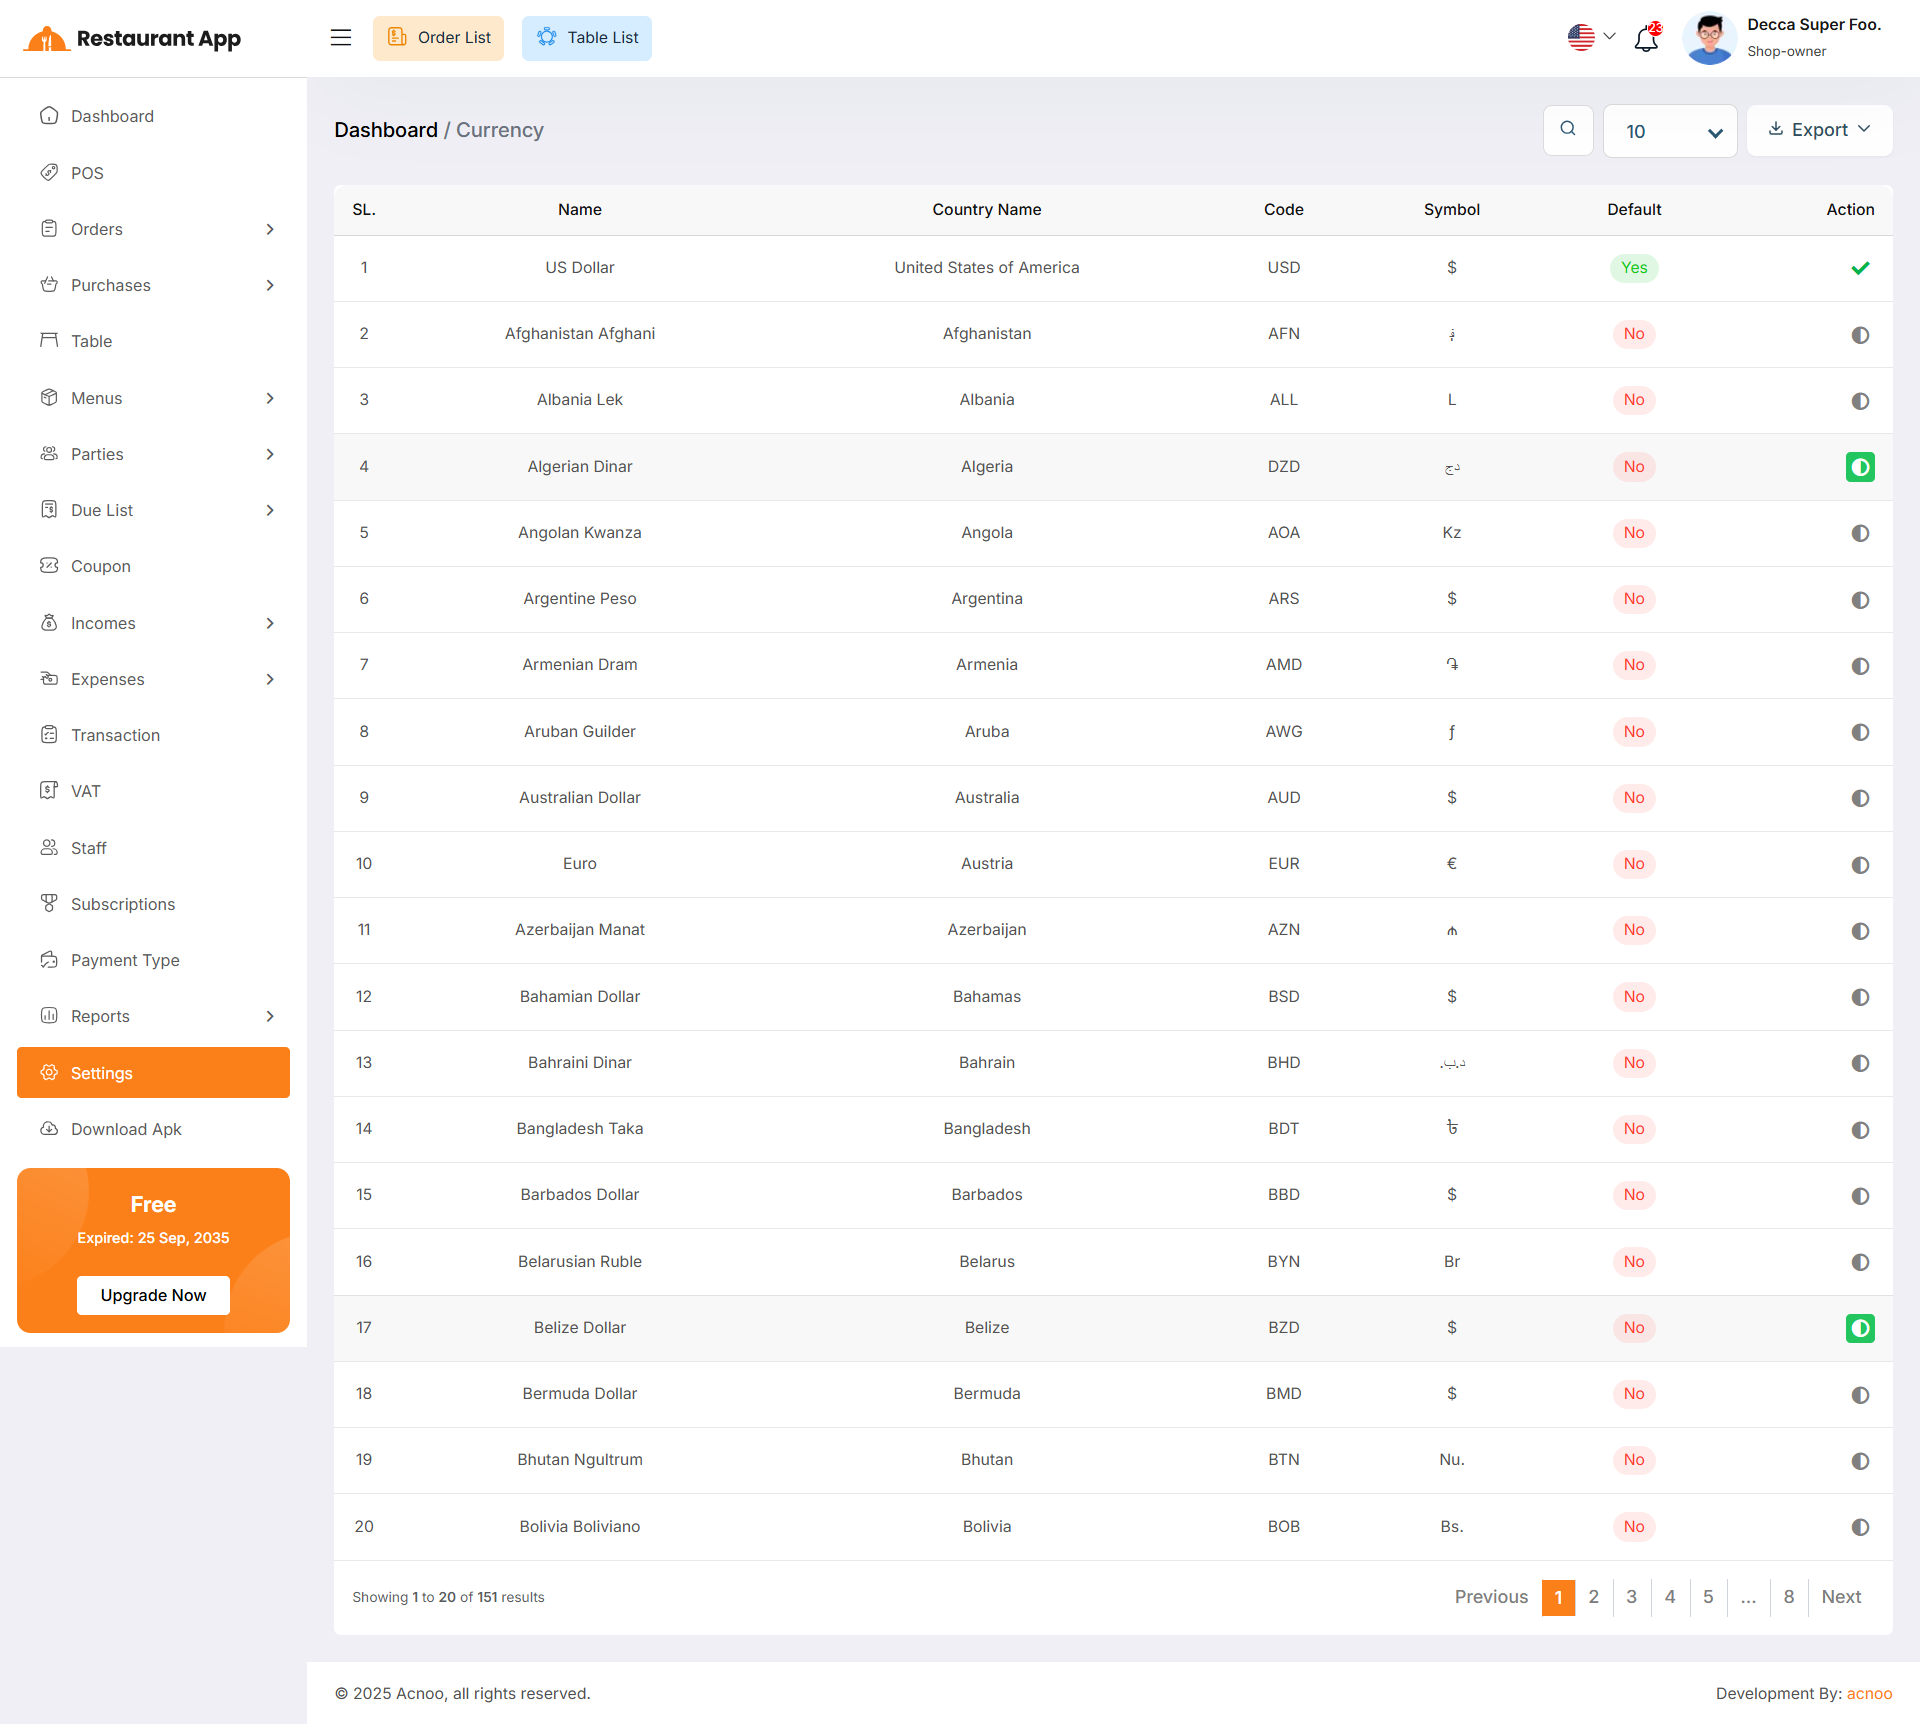
Here, you can view a list of currencies added through the Admin Panel. You can select your preferred default currency, but by default, the system uses the currency set in the Admin Panel.
Payment Gateways
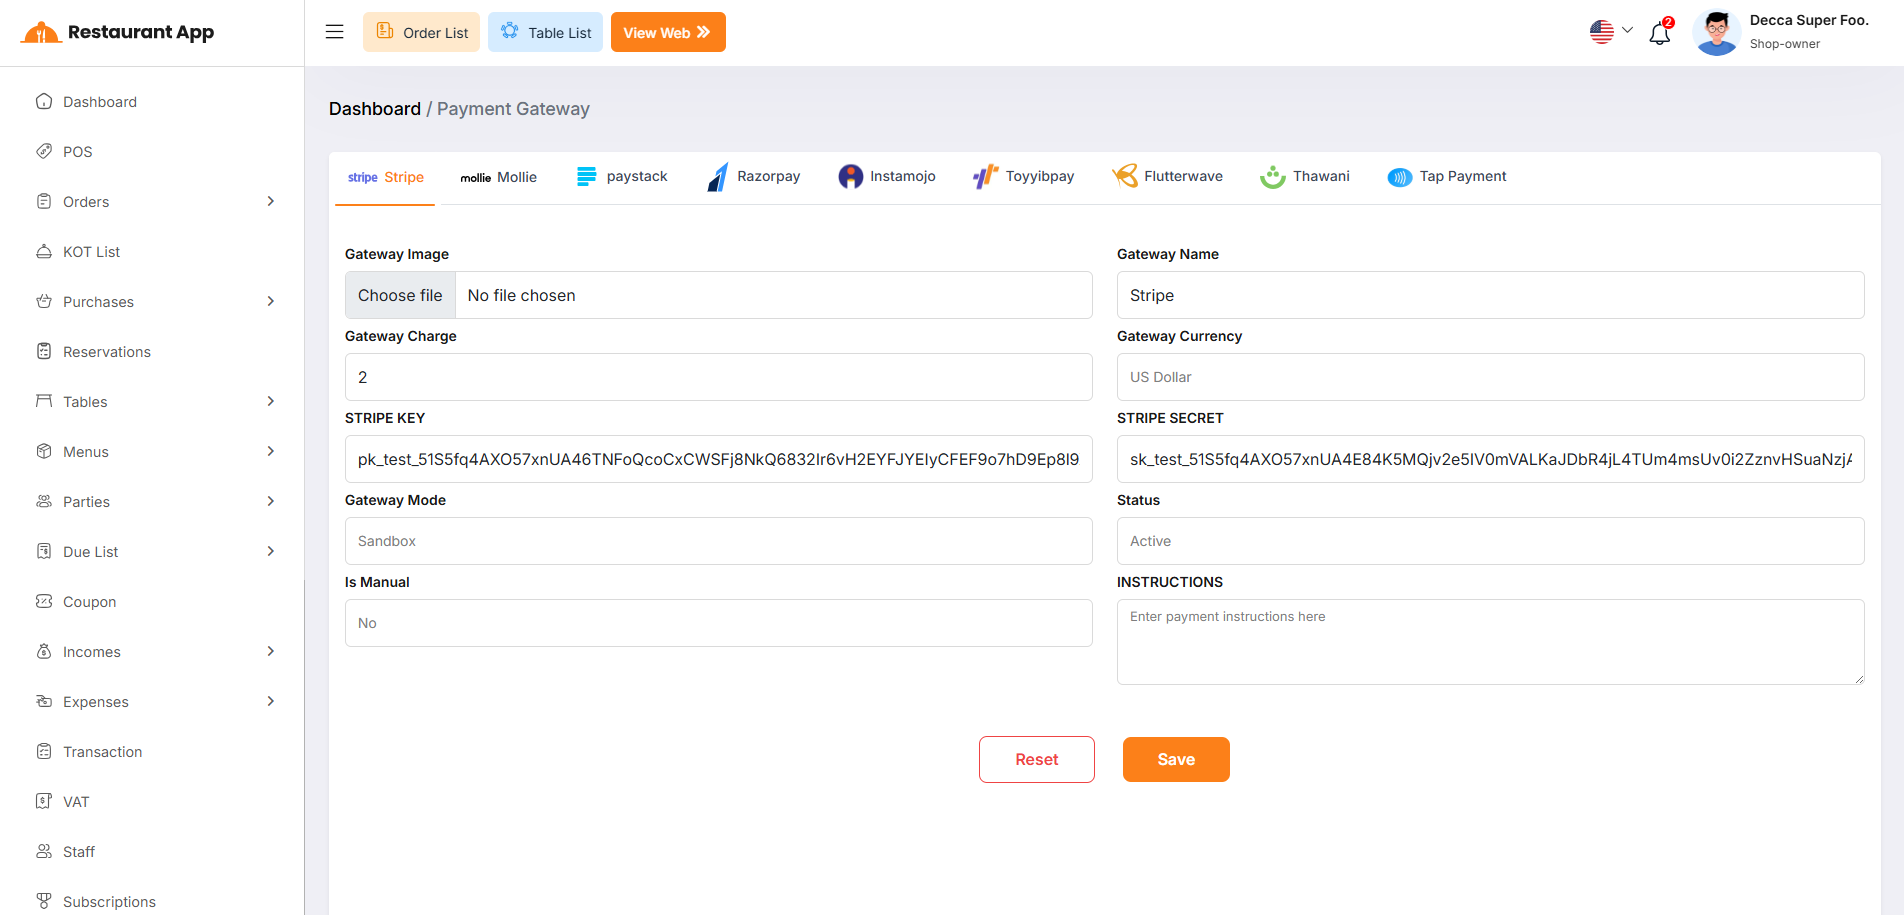
The Payment Gateway section is where administrators configure the merchant accounts required to process online payments from customers. This setup is essential for enabling seamless checkout experiences for users placing online orders.
Each gateway requires specific credentials and parameters to function correctly. Below are the key fields used during setup:Gateway Image Allows you to upload a custom logo for the payment method that will be displayed to customers during checkout.
Gateway Name The display name of the provider (e.g., "Stripe") as it appears in the system.
Gateway Charge A field to enter any additional processing fees you wish to apply to online transactions.
Gateway Currency Defines the specific currency (e.g., "US Dollar") used for transactions through this provider.
API Credentials Specific keys required for secure communication, such as the Stripe Key (Public Key) and Stripe Secret.
Gateway Mode A toggle between "Sandbox" (for testing transactions without real money) and "Live" (for actual customer payments).
Status Sets the gateway as either "Active" or "Inactive" to control its visibility on the front-end ordering site.
Instructions A text area for providing specific payment guidance or notes to the customer during the checkout process.
Reservation Settings
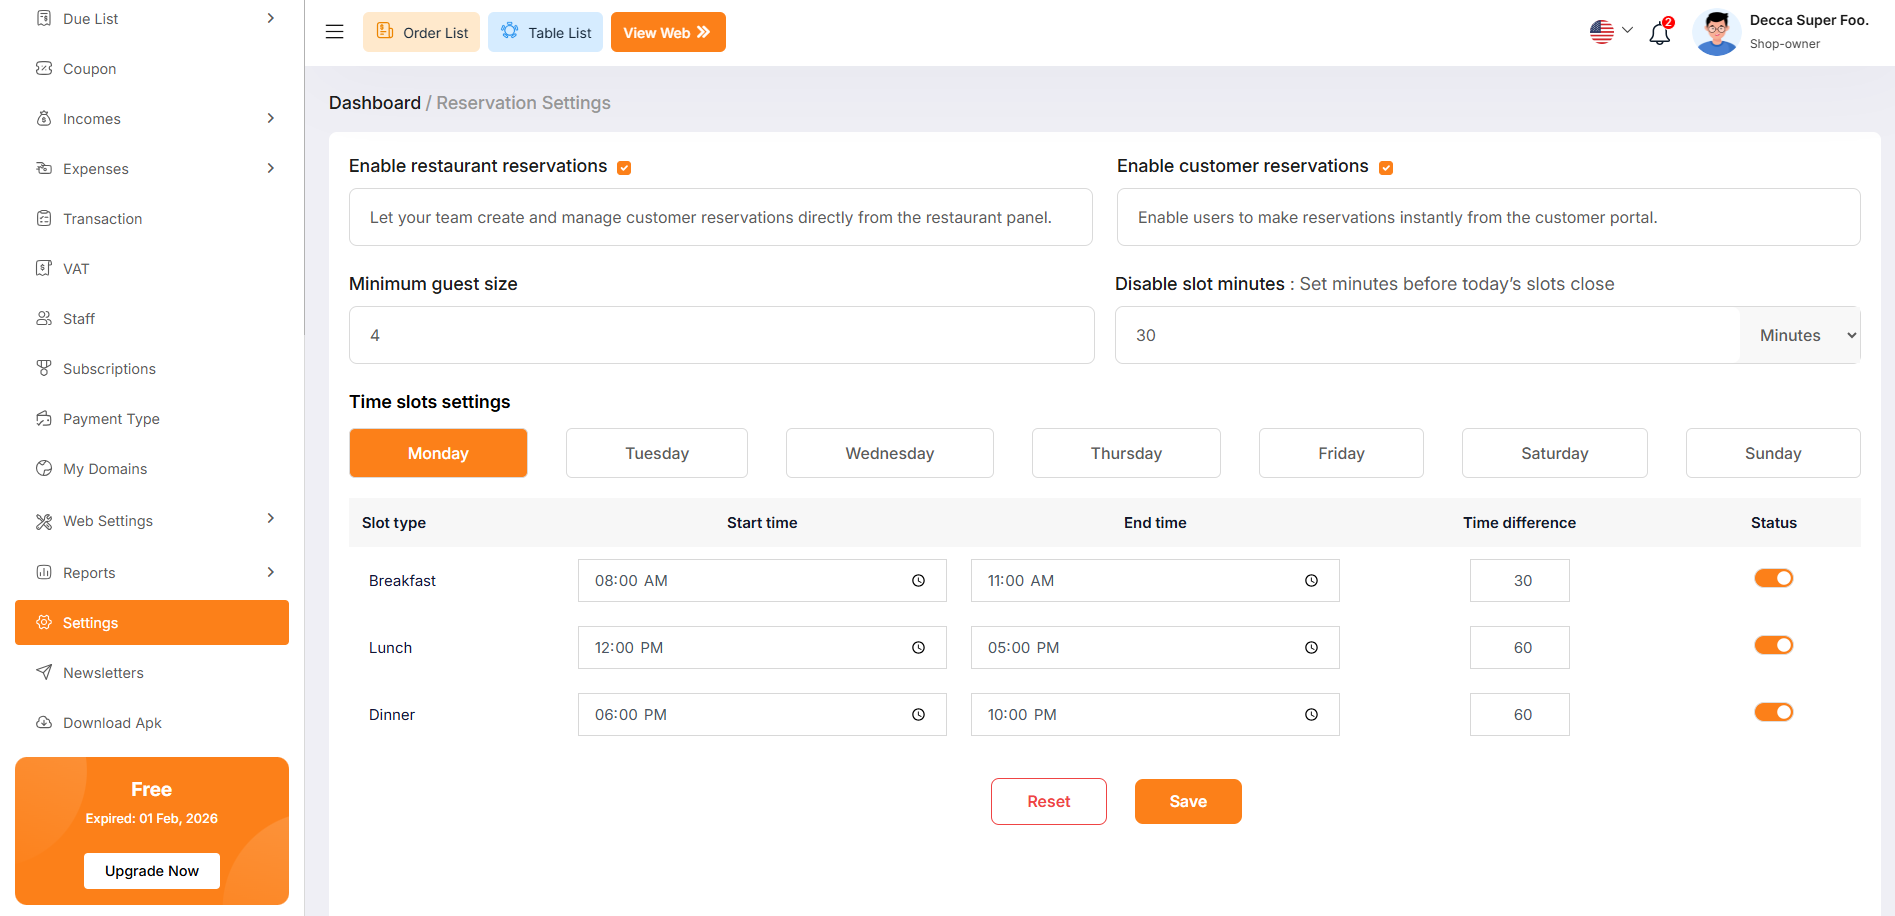
The Reservation Settings page provides administrators with the controls necessary to define how the restaurant accepts bookings, set capacity limits, and manage daily operational time slots.
These settings determine the overall functionality of the booking system across both internal and customer-facing platforms.Enable restaurant reservations When checked, this allows your internal team to create and manage customer reservations directly from the restaurant panel.
Enable customer reservations Checking this box allows users to make reservations instantly through the customer portal.
Minimum guest size Defines the smallest party size permitted for a reservation (e.g., 4 guests).
Disable slot minutes Sets how many minutes before a specific time slot occurs that it should close and no longer accept new bookings.
This section allows for granular control over the restaurant's daily availability. Settings can be customized individually for each day of the week (Monday through Sunday).Slot Type Categorizes time blocks into standard meal periods such as Breakfast, Lunch, and Dinner.
Start & End Time Defines the specific operational hours for each meal period (e.g., Breakfast from 08:00 AM to 11:00 AM).
Time Difference Sets the duration or interval (in minutes) between available booking slots within that period (e.g., 30 or 60 minutes).
Status Toggle An orange switch used to enable or disable specific meal periods for the selected day.
Order Type Settings
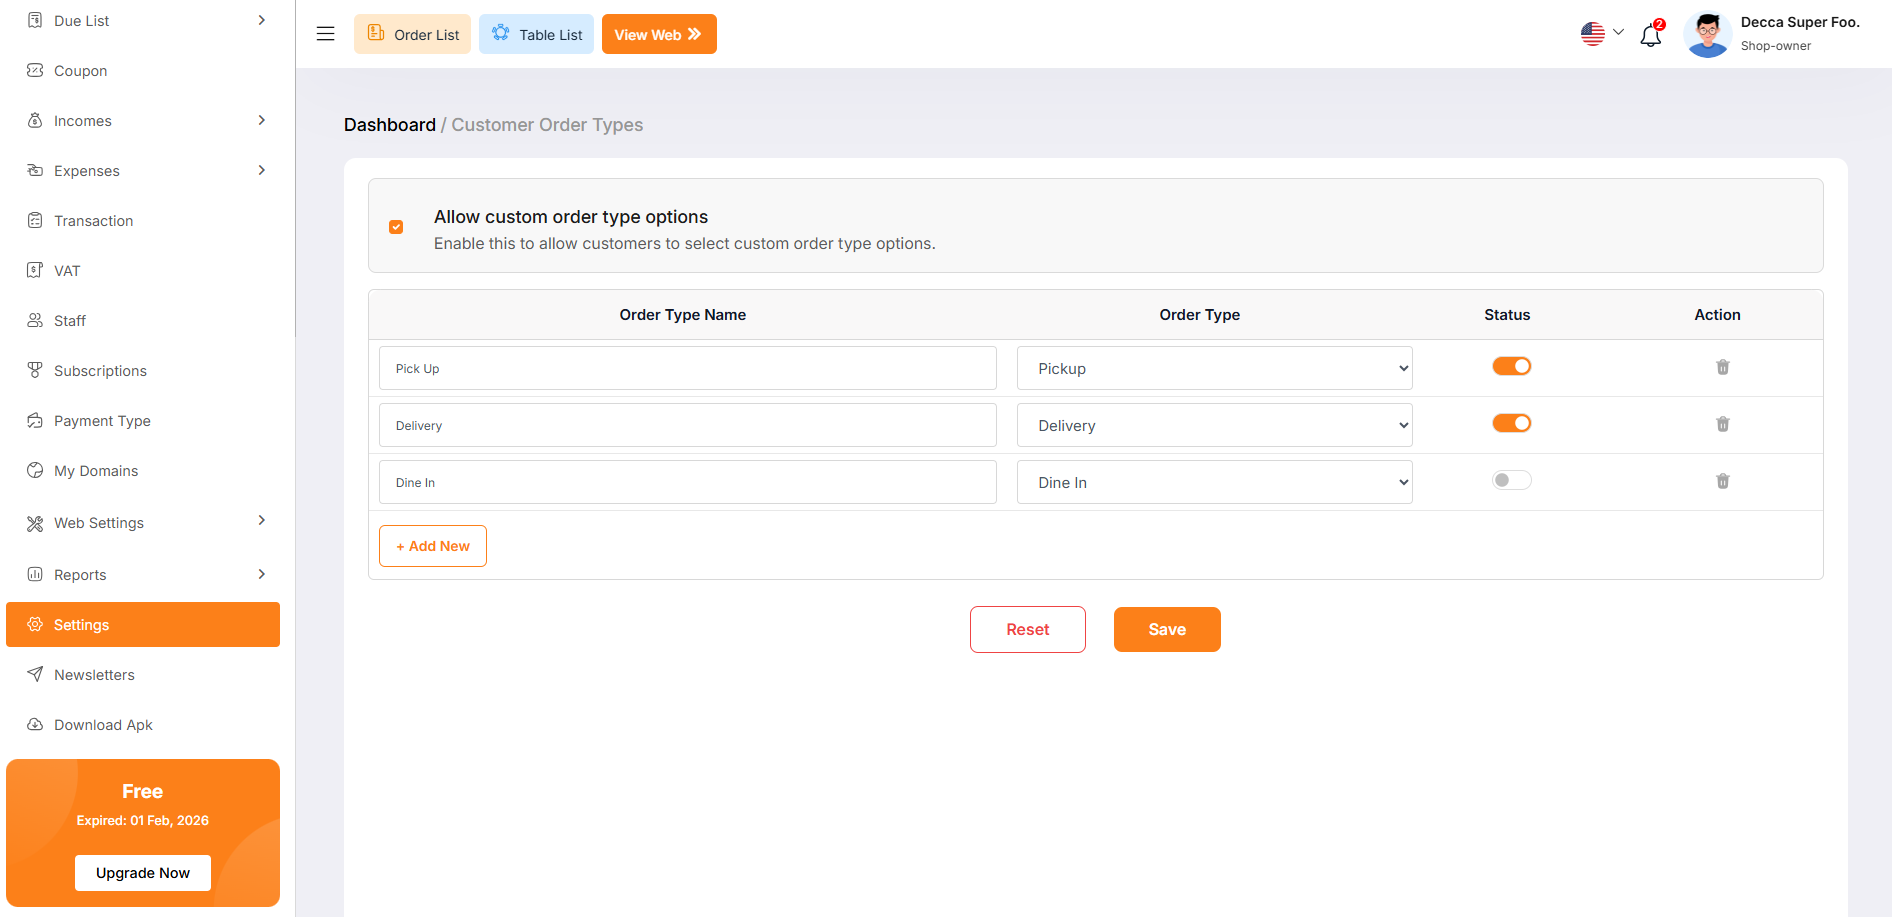
The Customer Order Types page under the Settings menu allows administrators to define and manage the different fulfillment methods available to customers. This configuration is essential for controlling how orders are categorized and processed through the system.
The primary toggle at the top of the page controls the availability of custom fulfillment options.Allow custom order type options Enable this checkbox to allow customers to select from specific order type options during the checkout process.
Delivery Charge Settings
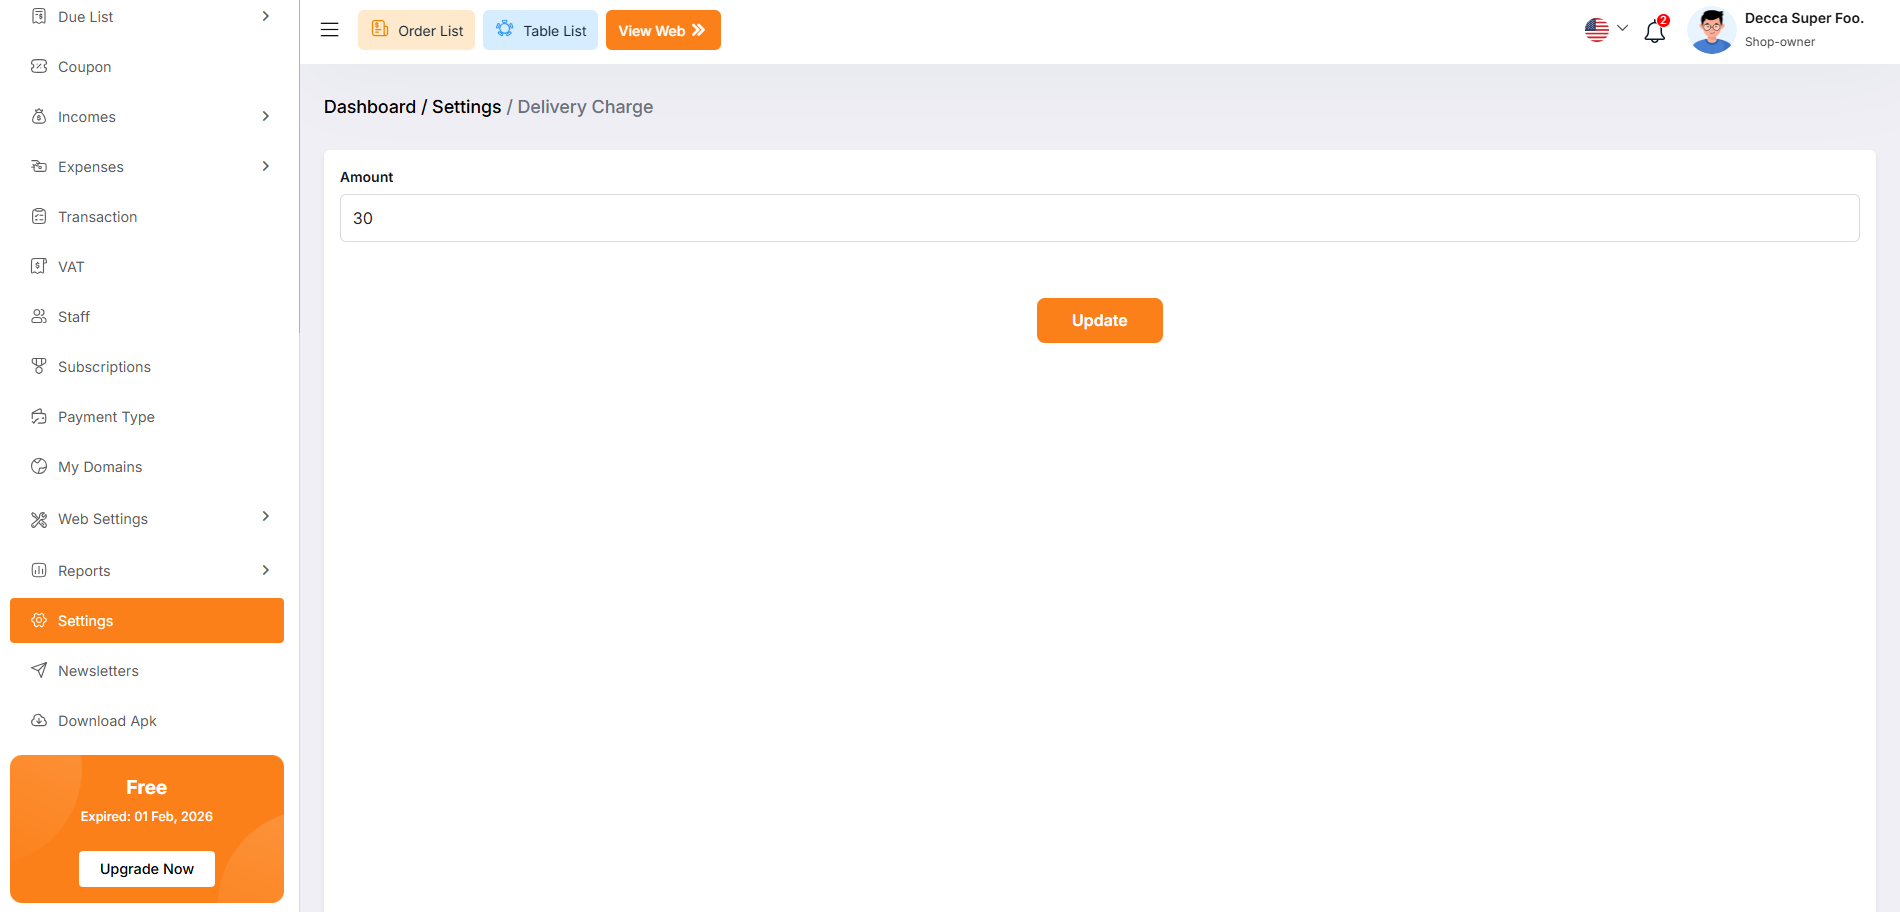
This simple interface ensures that your delivery pricing is consistent across all online orders.
Discount Settings
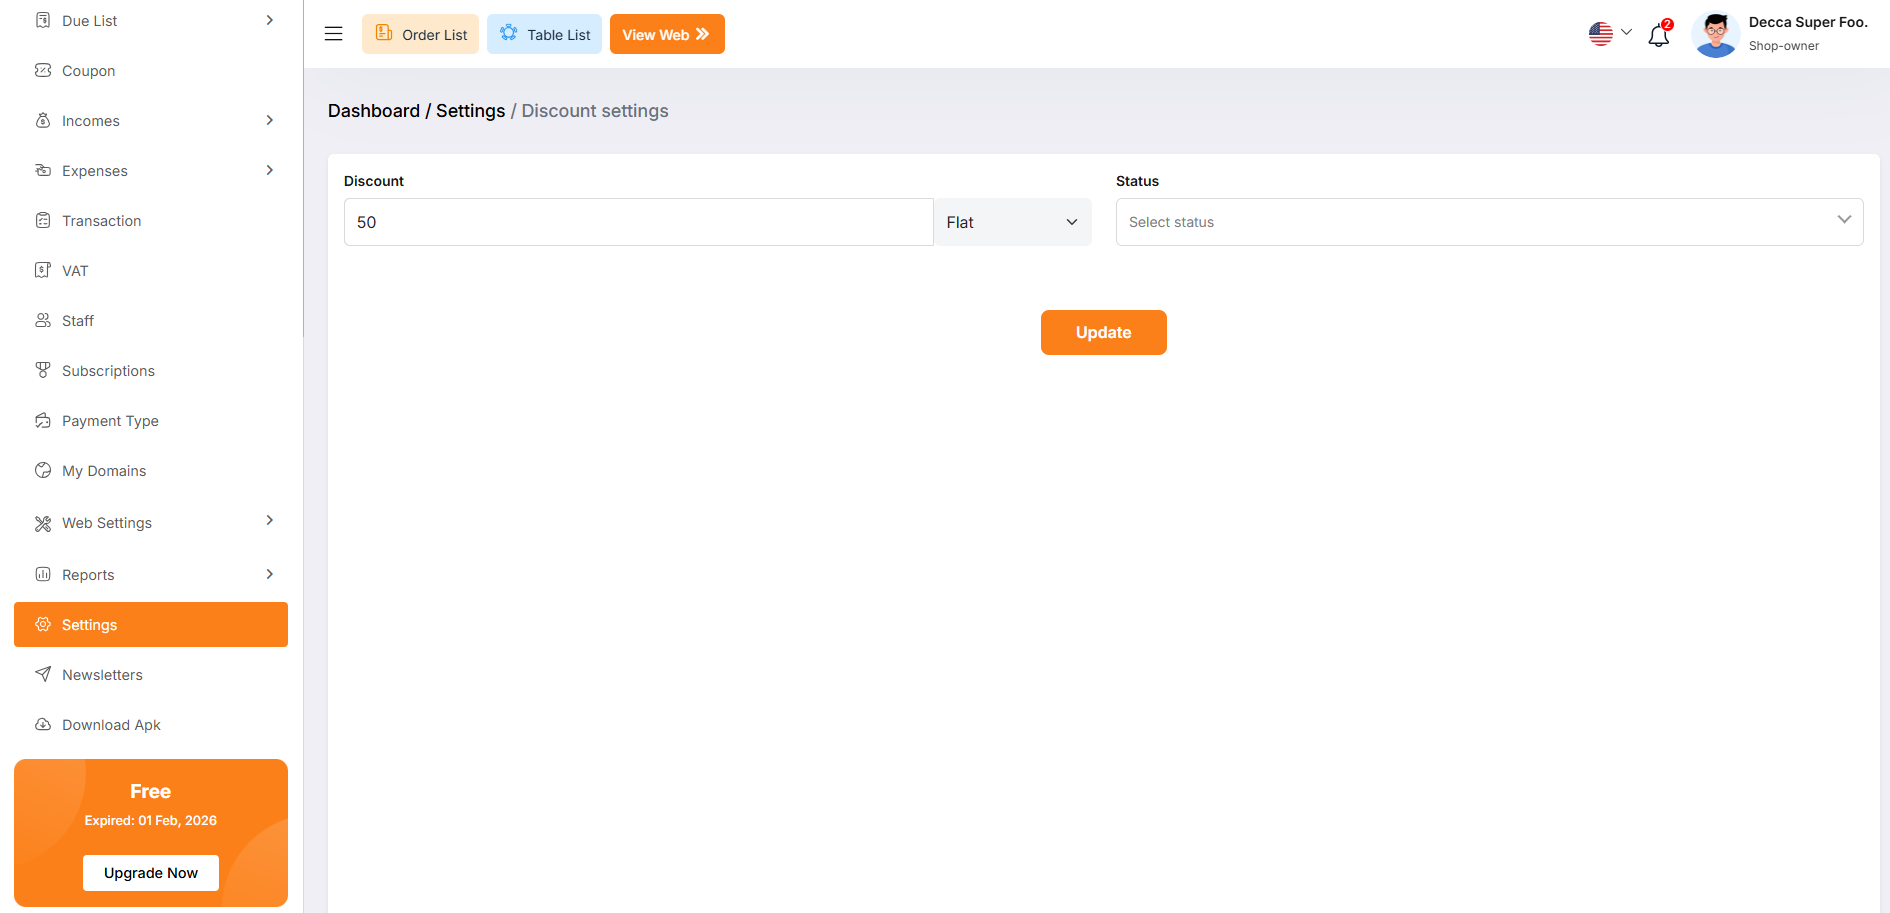
Administrators can set the primary value and type for the discount across online orders.
Cancel Reason Settings
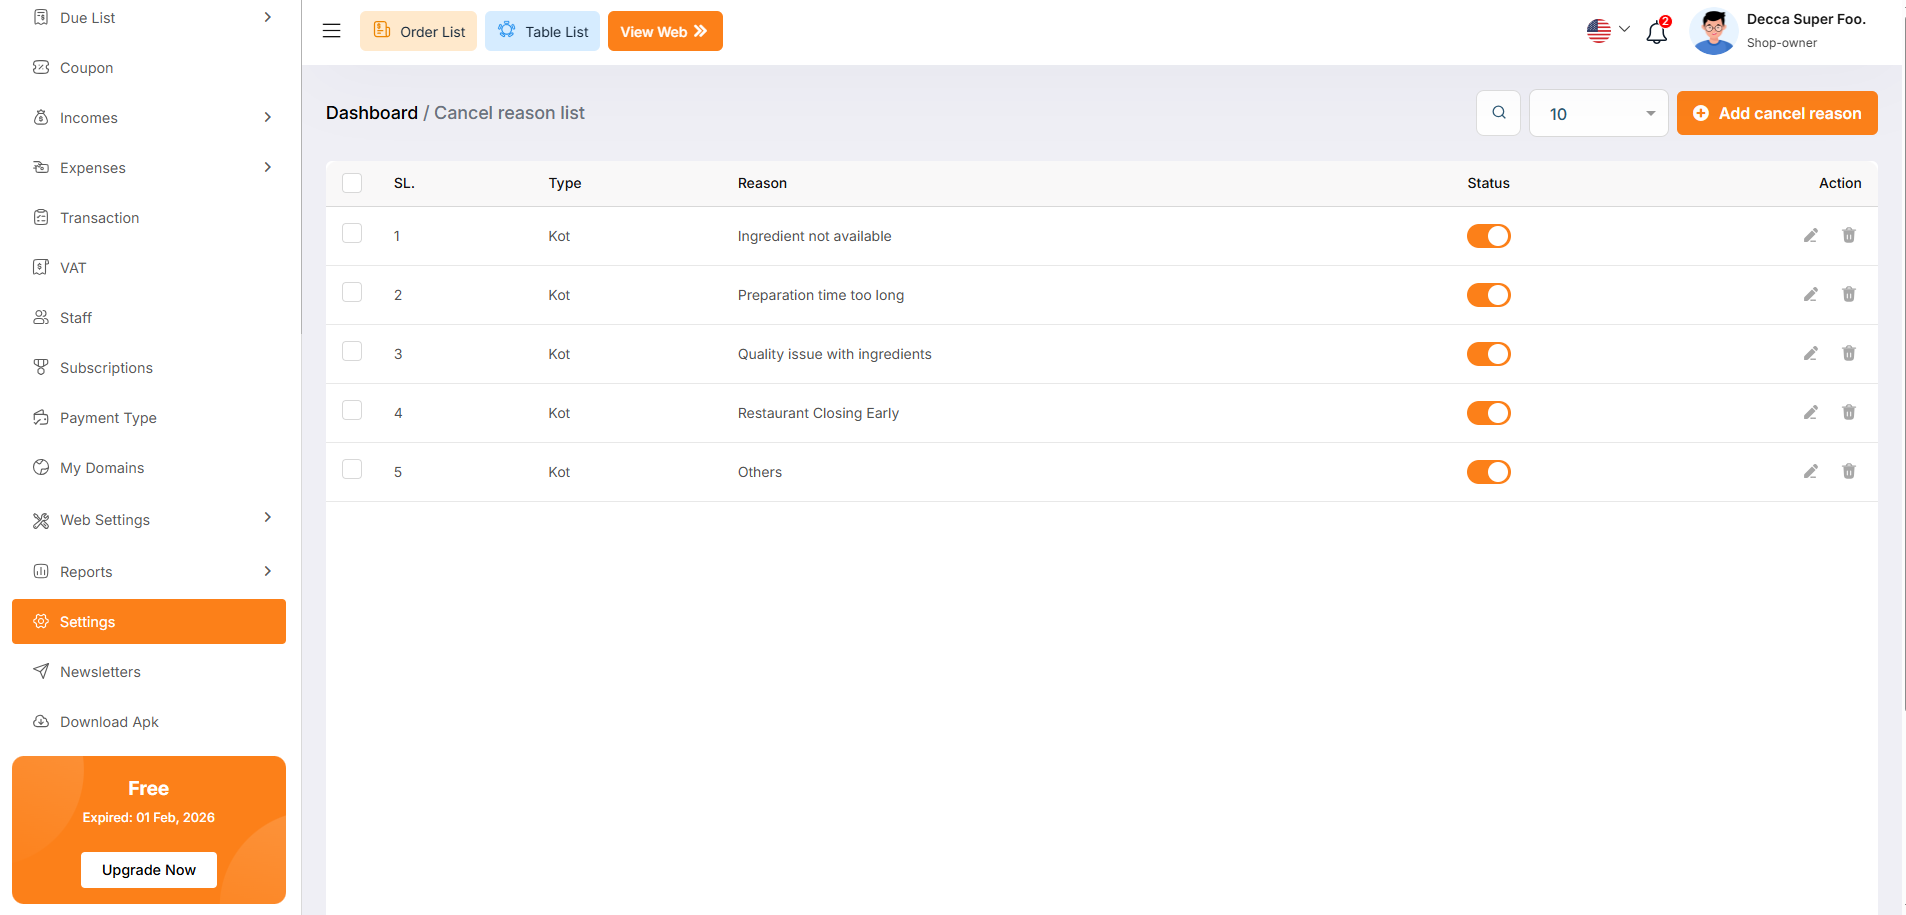
The Cancel Reason List page allows administrators to predefined standard justifications for order or KOT cancellations. Maintaining a consistent list of reasons helps management track operational issues, such as ingredient shortages or timing delays, for future analysis.
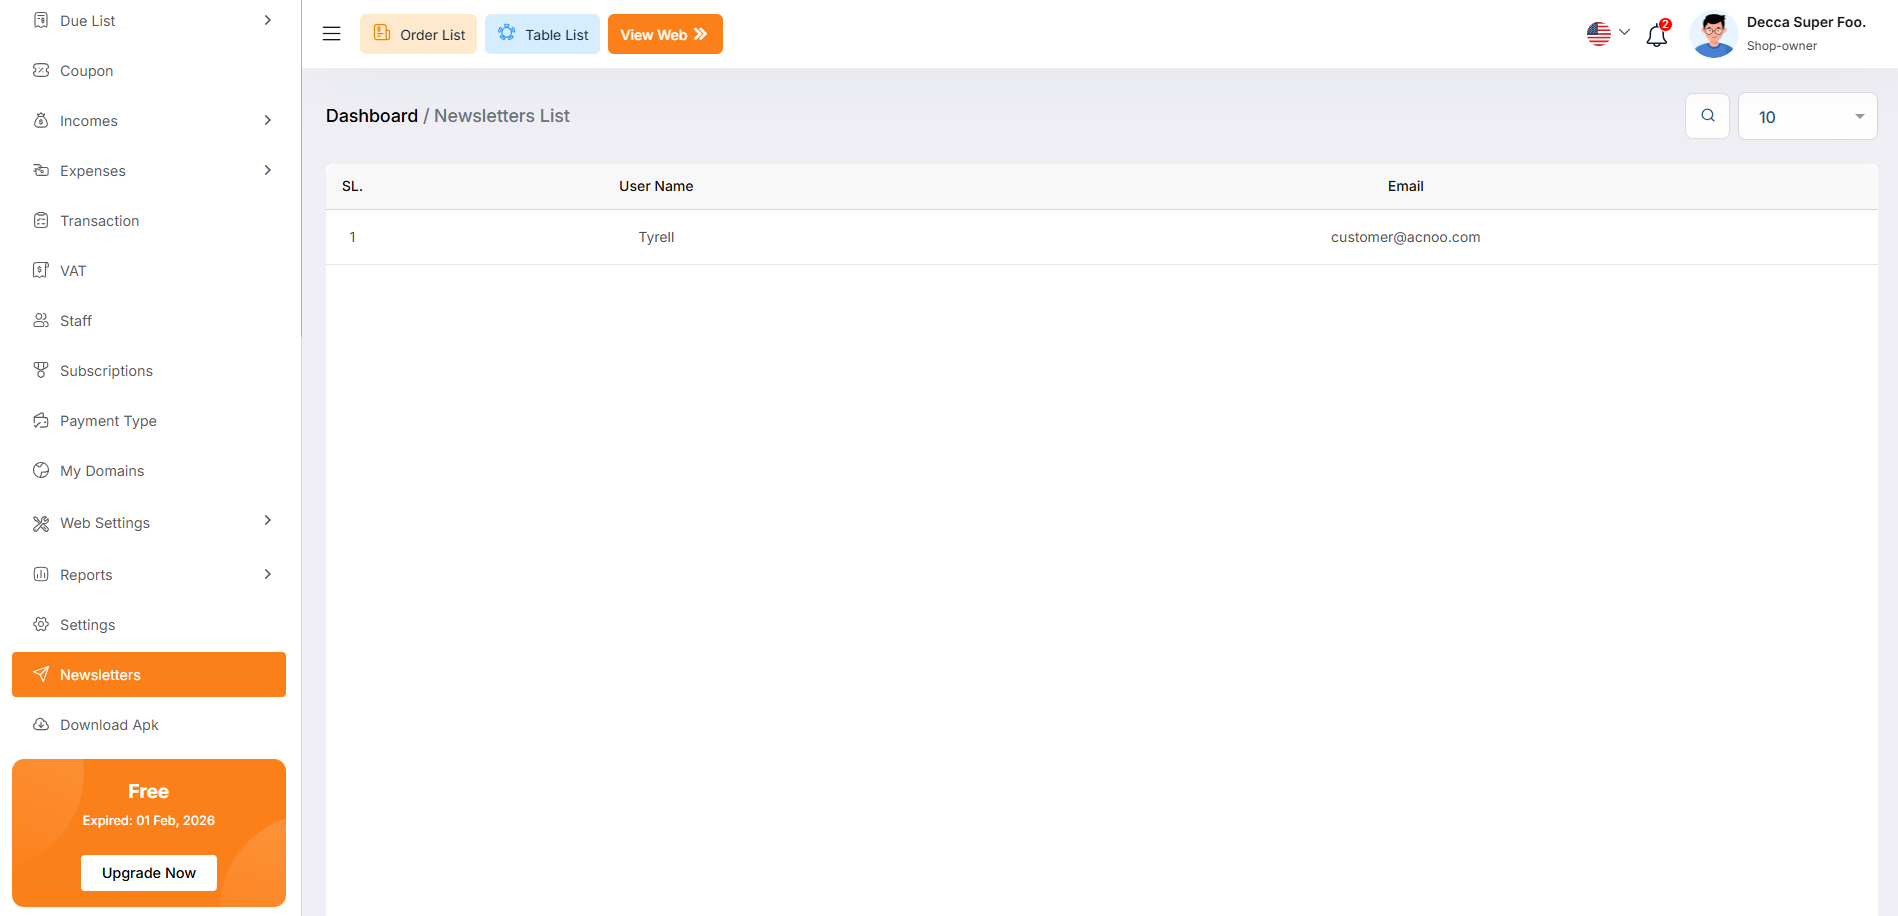
Newsletter
The Newsletters List page provides administrators with a centralized directory of customers who have subscribed to receive marketing communications, updates, and promotional content from the restaurant.
Download Apk
After this, you will be redirected to a URL where you can download the APK file
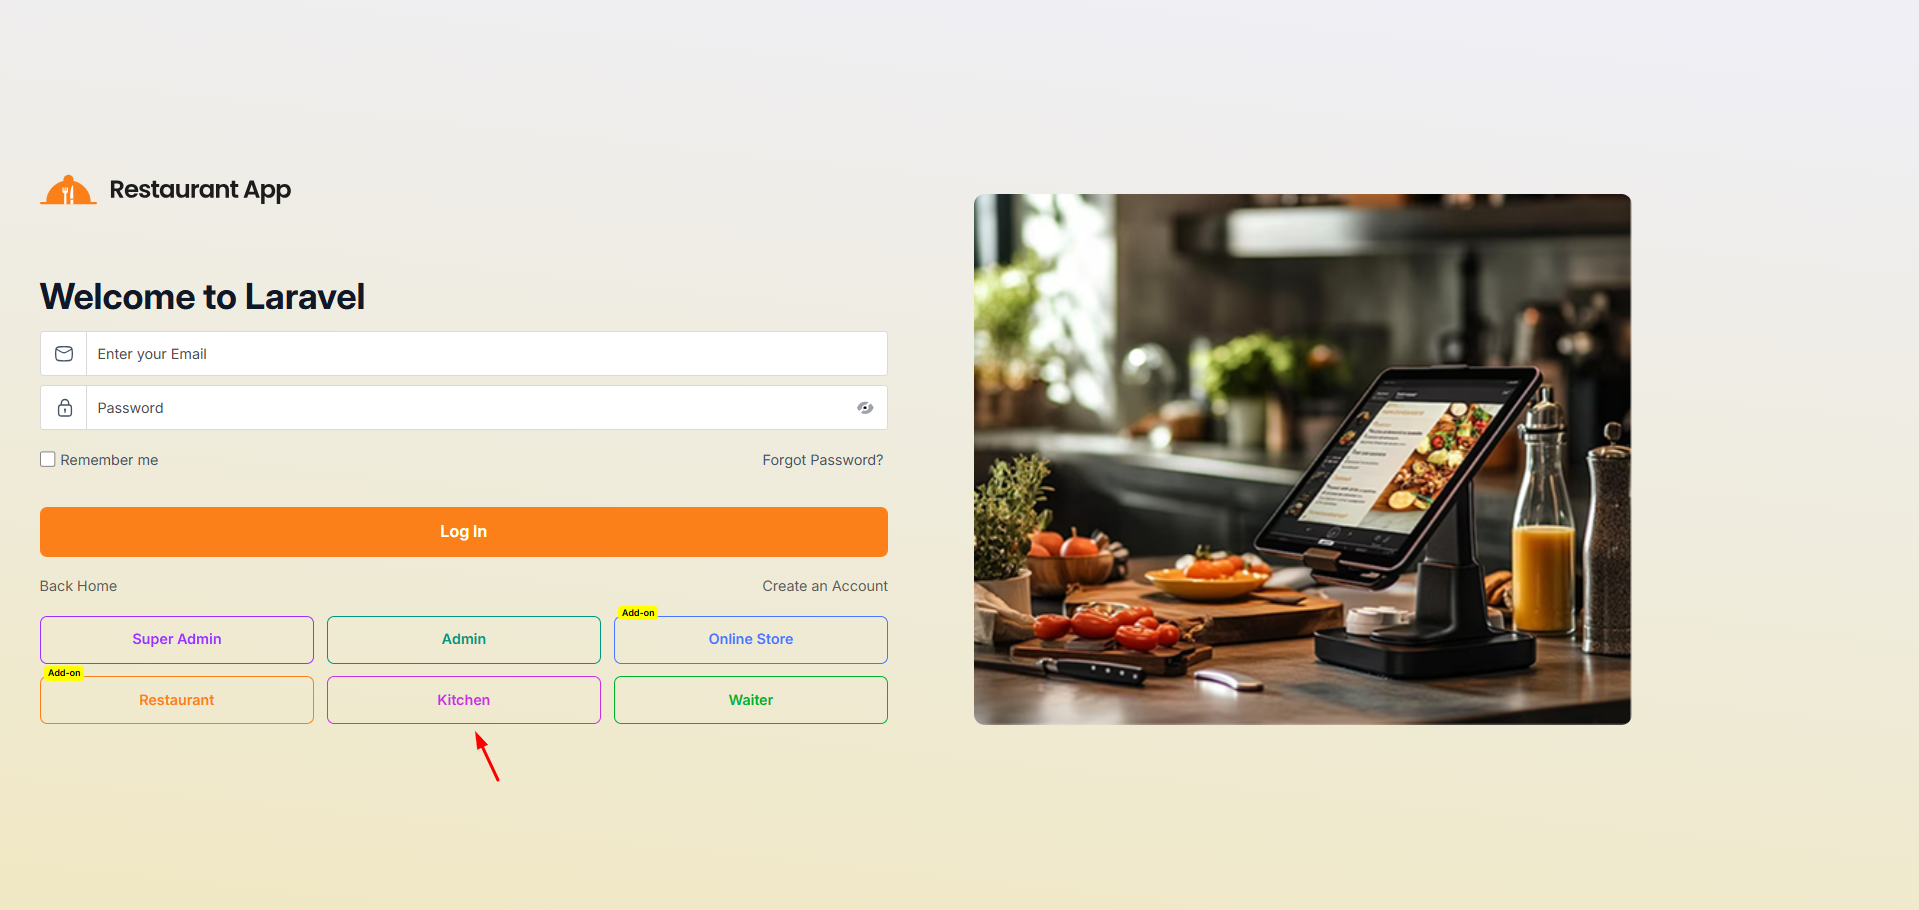
Getting Started
The Kitchen Panel Login page is the secure entry point for culinary staff to access the restaurant's real-time order management system. This specialized portal ensures that the kitchen team can view, process, and update the status of incoming food orders efficiently.
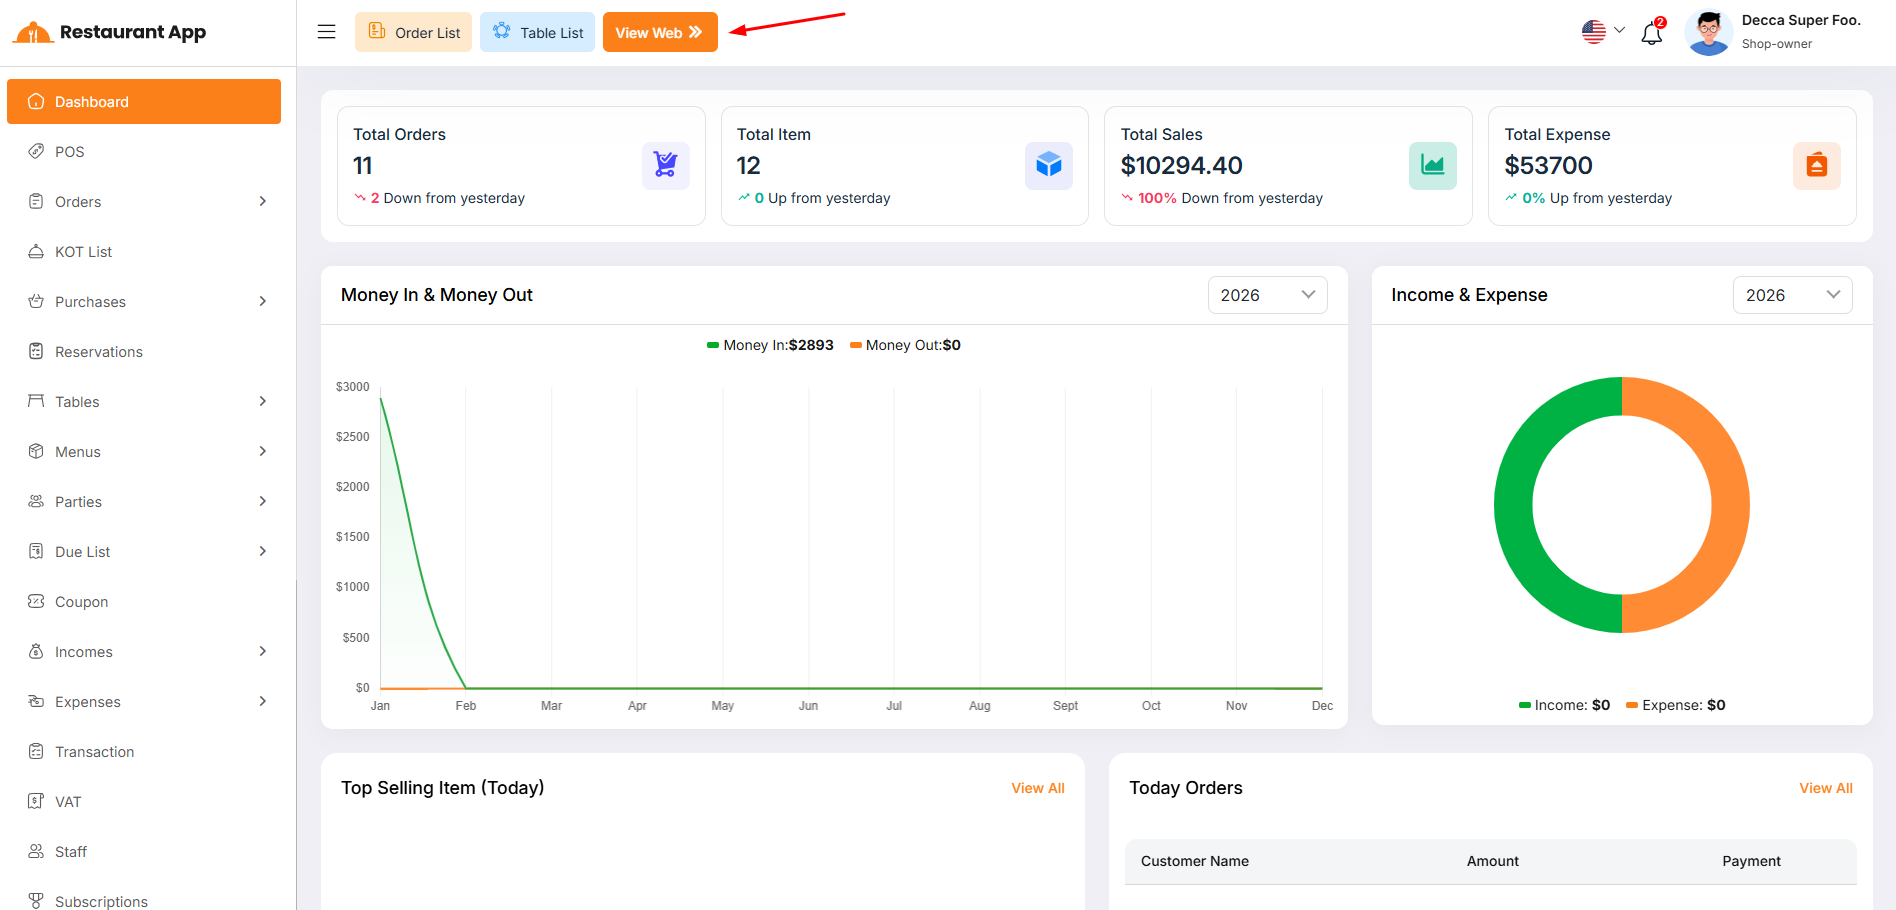
You can access the online store by clicking the "View Web" button in the top corner of the restaurant panel.
All Kitchen
The Kitchens module is designed to streamline restaurant operations by separating food preparation into logical units (e.g., Non-Veg Kitchen, Veg Kitchen). This ensures that orders are routed to the correct staff and inventory is managed efficiently.
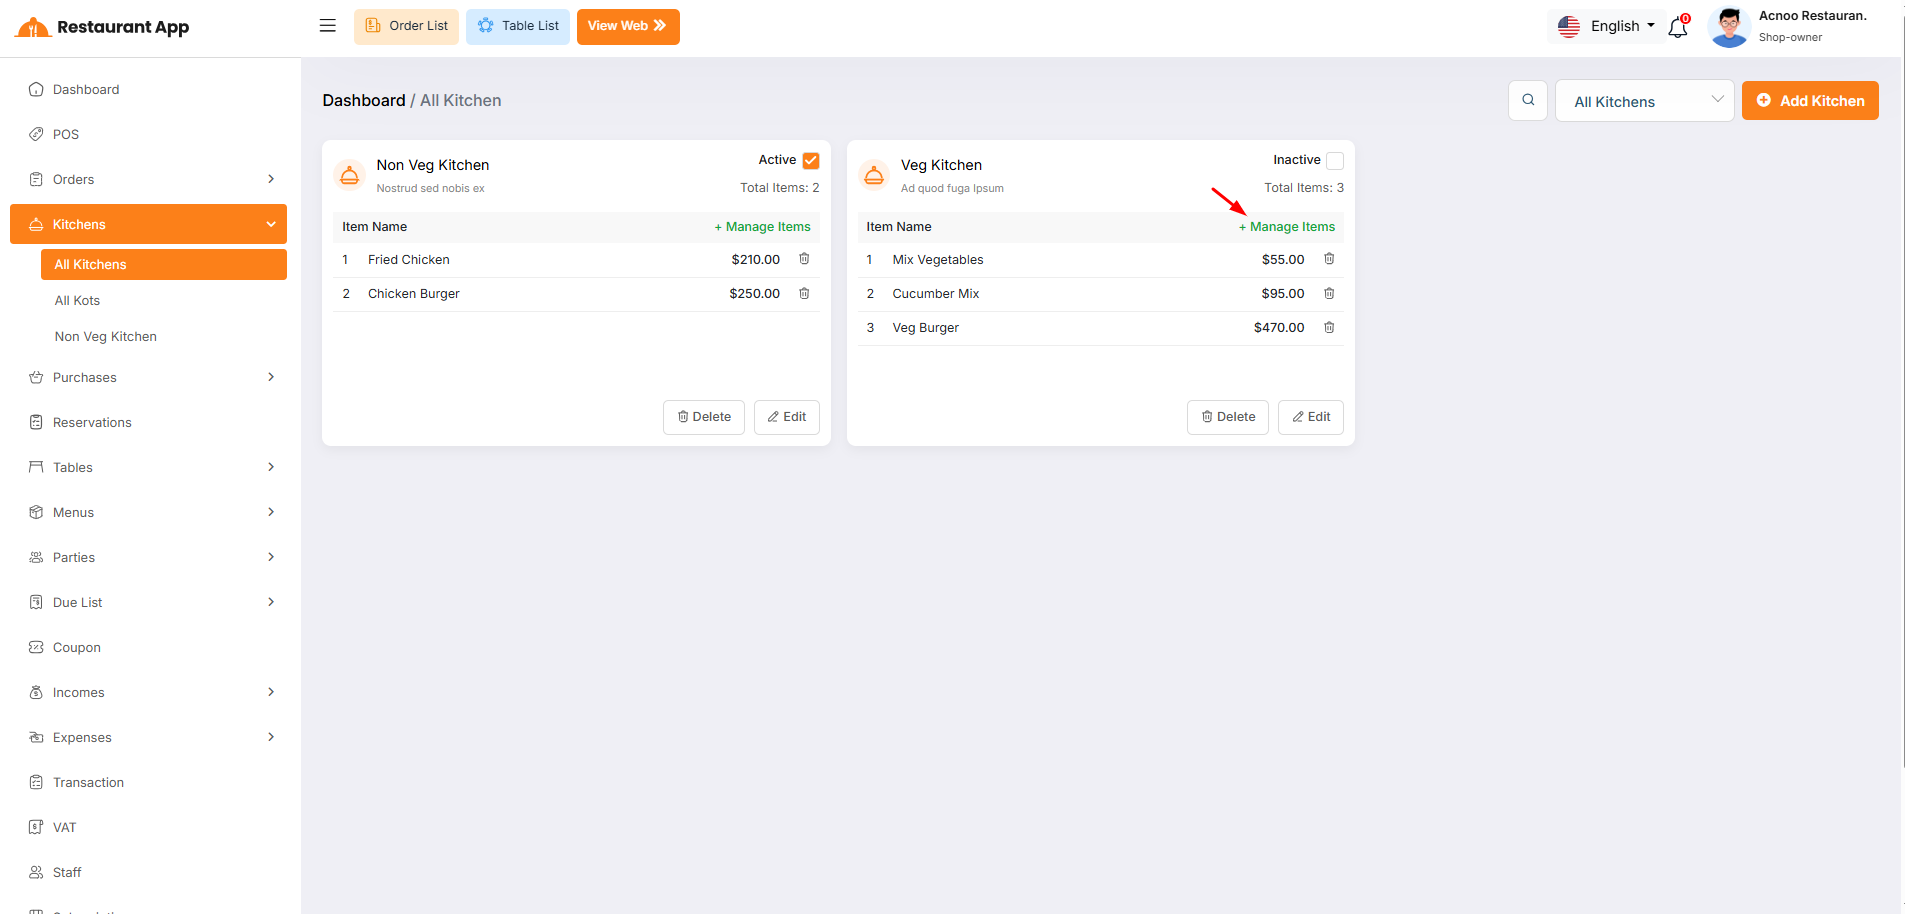
Manage Items
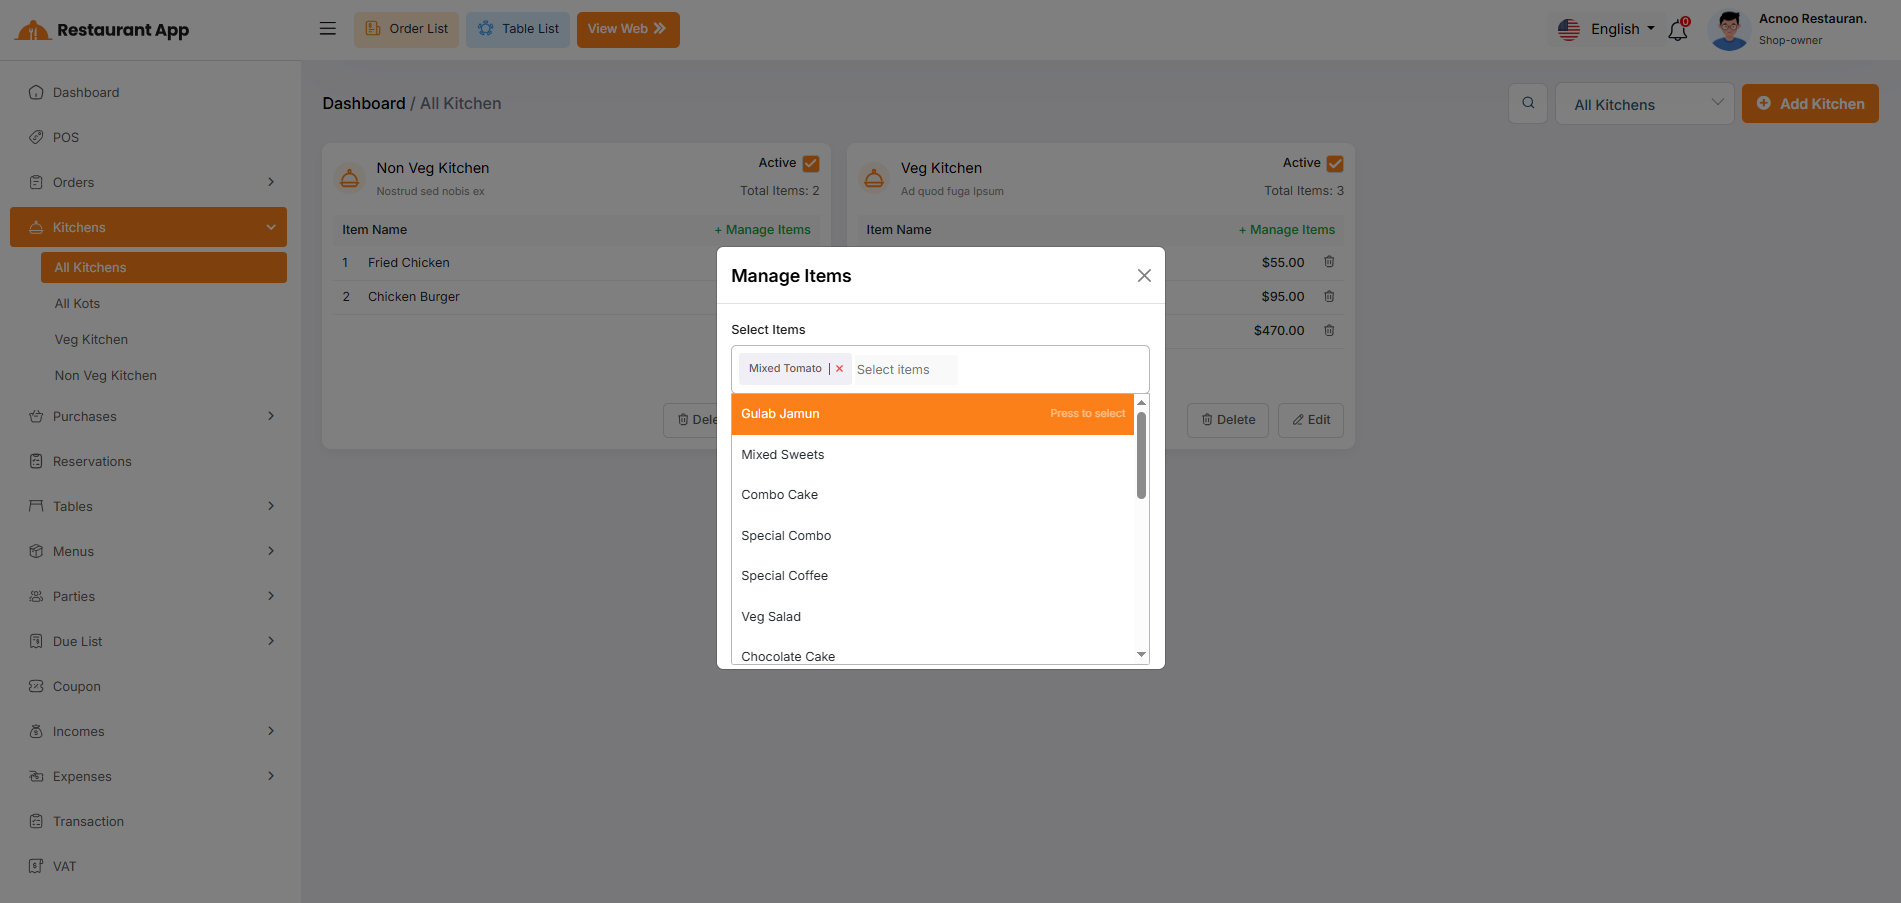
Operational Segmentation: It allows a restaurant to split food preparation into specific stations, such as a "Veg Kitchen" and a "Non-Veg Kitchen". Order Routing: By assigning items to specific kitchens, the system ensures that when an order is placed, the ticket is sent to the correct preparation area. Status Control: Owners can quickly toggle a kitchen to "Inactive" if a station is closed for the day, preventing orders from being routed there.
All KOTS
You can access the online store by clicking the "View Web" button in the top corner of the restaurant panel.
1. Individual Item Status ControlsEach dish within a single order can be managed independently to account for different preparation times.
Start Cooking: When a chef begins preparing a specific dish (e.g., Basmoti Rice), they trigger this action. This moves the item from a "New" state into an active preparation state.
Mark Ready: Once an individual item is finished, the chef selects this option. This signals that the specific dish is plated and waiting for the rest of the order.
Ready: The final state for an individual item, confirming it is complete and ready to be served or packed.
2. Global KOT (Full Order) StatusesWhile individual items are being prepared, the entire order moves through a global lifecycle that is visible on the KOT List and the customer’s My Orders page.
Pending: The initial state of the full order immediately after the customer clicks Place Orders. It remains here until the kitchen acknowledges the ticket.
Preparing: The global status automatically shifts to Preparing as soon as the first item in the order is set to Start Cooking. This provides live transparency to the customer that their meal is on the line.
Ready: Once all individual items in a ticket are marked as finished, the global KOT status updates to Ready. This alerts waitstaff (for Table: Special) or drivers that the entire order is ready for pickup.
Cancelled: If the restaurant cannot fulfill the order due to ingredient shortages or other issues, the status is set to Cancelled. This stops the preparation process and notifies the customer immediately.
KOT Reports
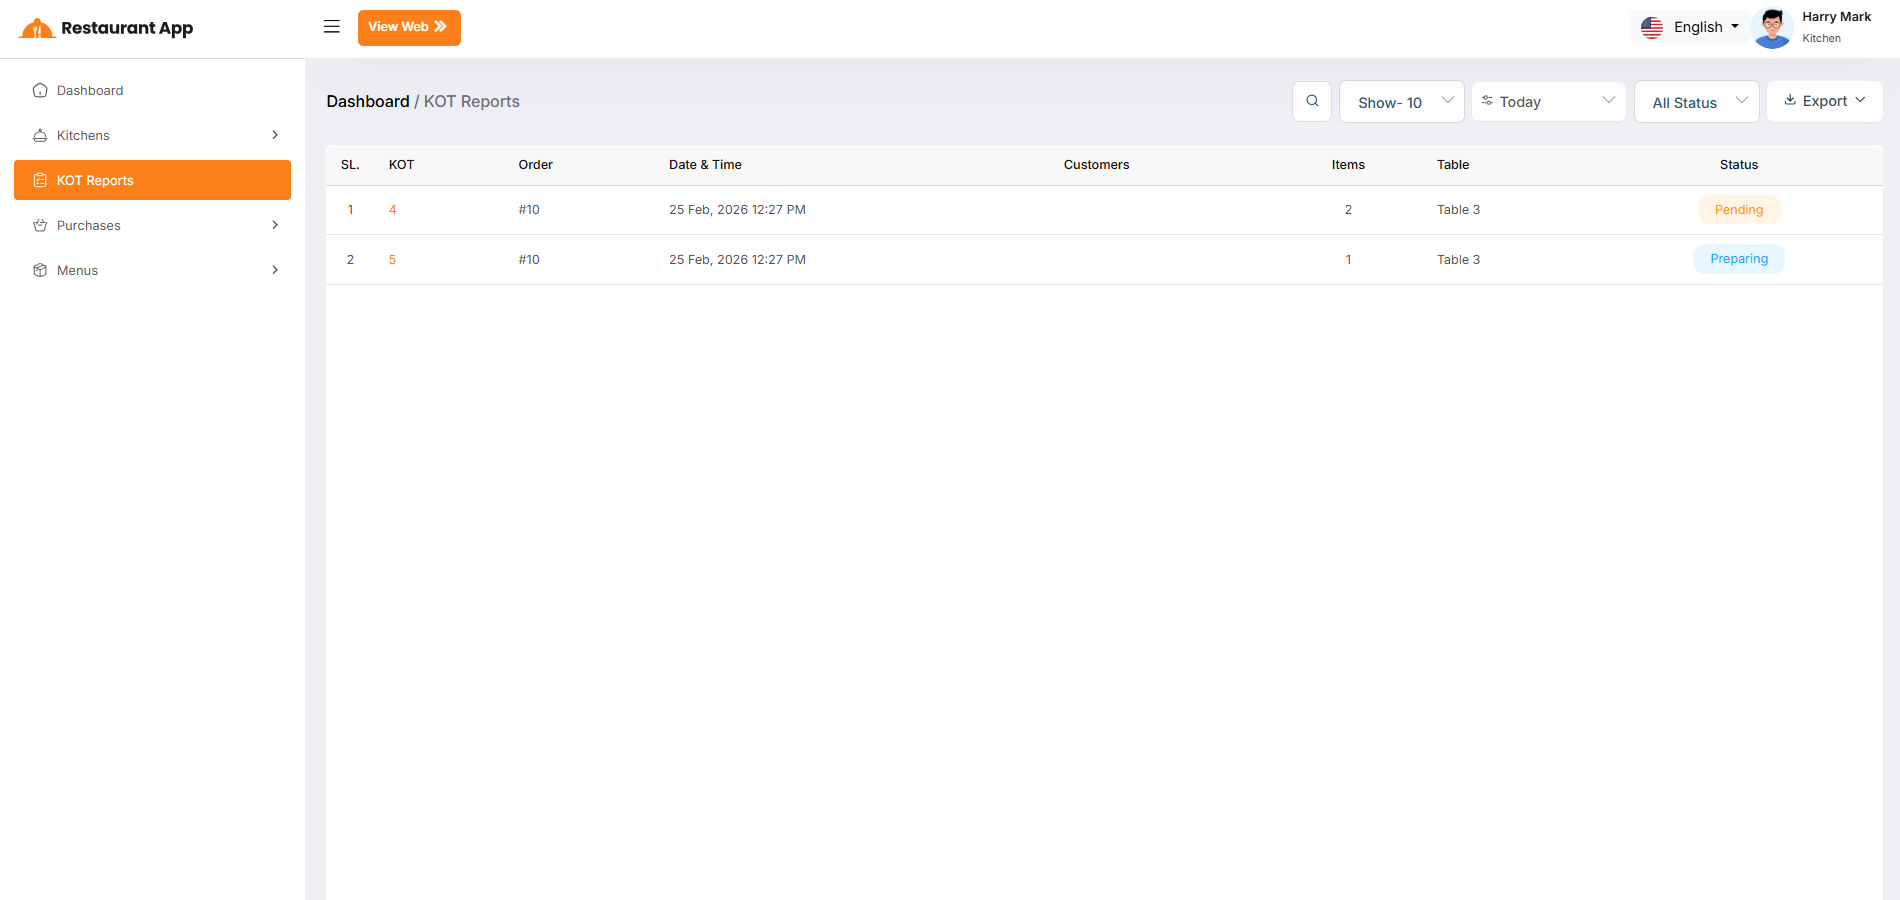
The Kitchen Dashboard features a granular status management system that tracks both individual menu items and the overall KOT (Kitchen Order Ticket). This ensures that the culinary team can monitor the specific progress of every dish while keeping the customer and front-of-house staff informed of the total order lifecycle.
Getting Started
You can access the online store by clicking the "View Web" button in the top corner of the restaurant panel.
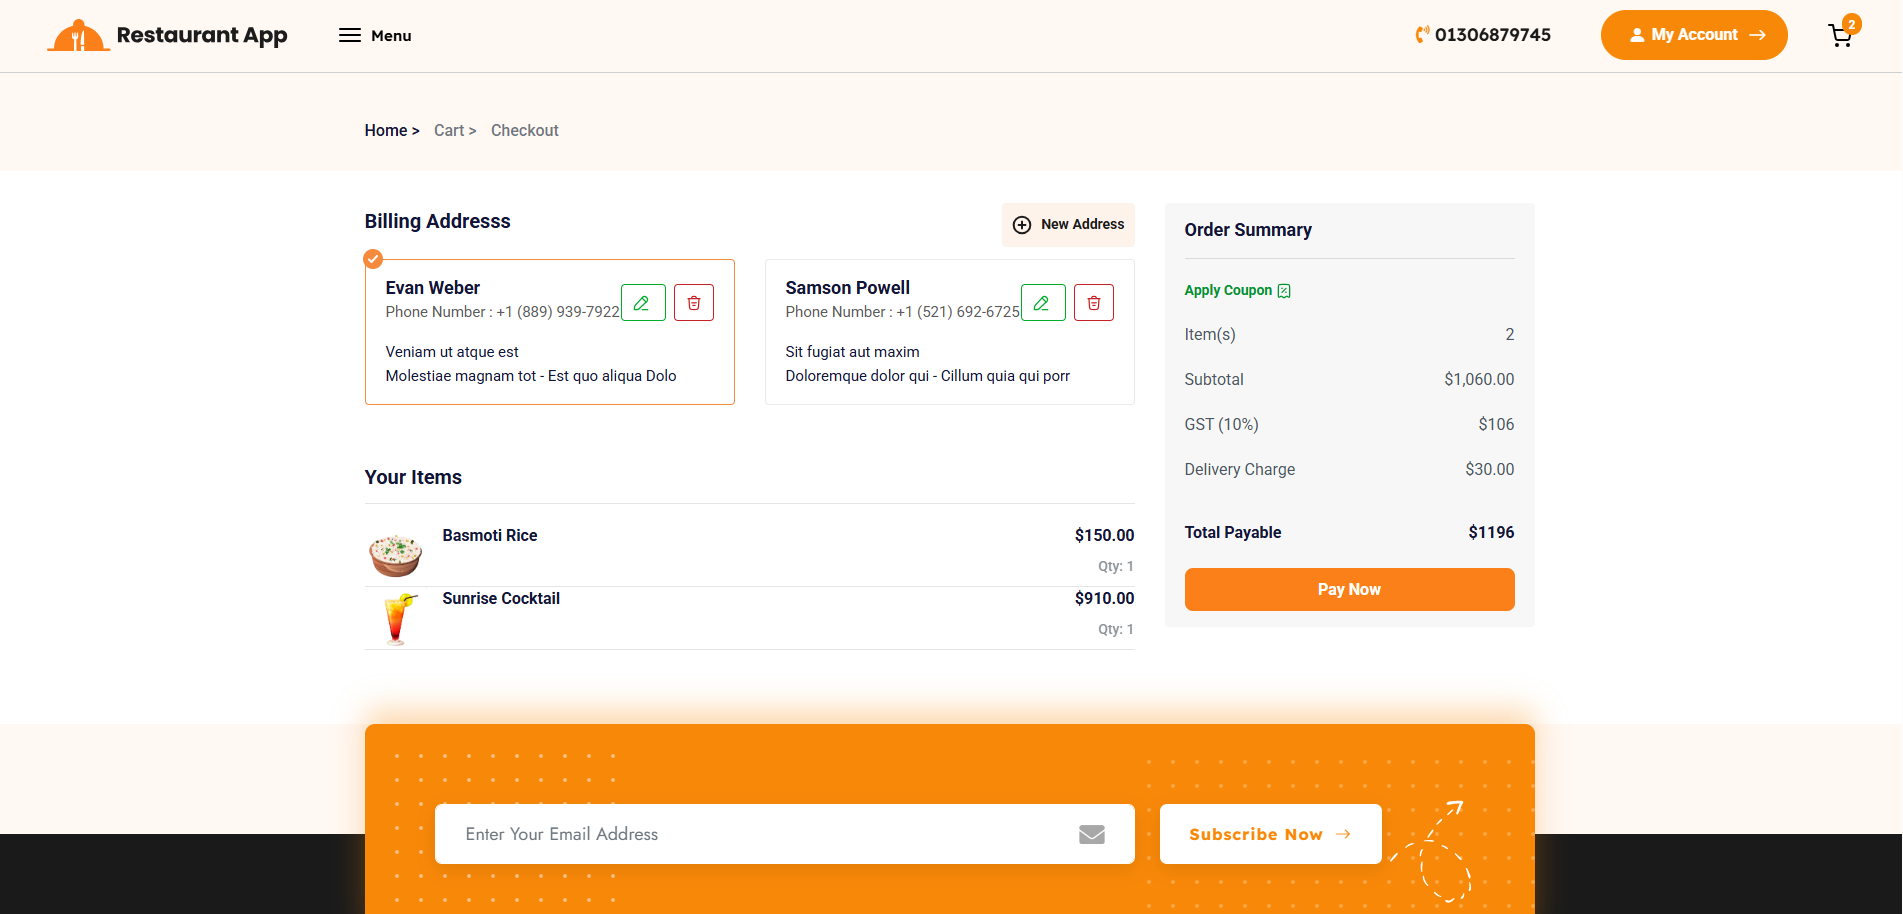
Home Page
1. Hero & Service Sections This is the primary engagement area located at the top of the website.Brand Welcome Features a customizable main title (e.g., "Welcome To Your Food Village"), a supporting subtitle, and a brand description to introduce the restaurant's culinary philosophy.
Primary Call-to-Action A prominent button (e.g., "Shop Now") that directs users to the full menu or ordering platform.
Service Highlights Three key pillars of service are showcased here, such as "Online Order," "Swiss Delivery," and "Best Quality," to build immediate trust with new visitors.
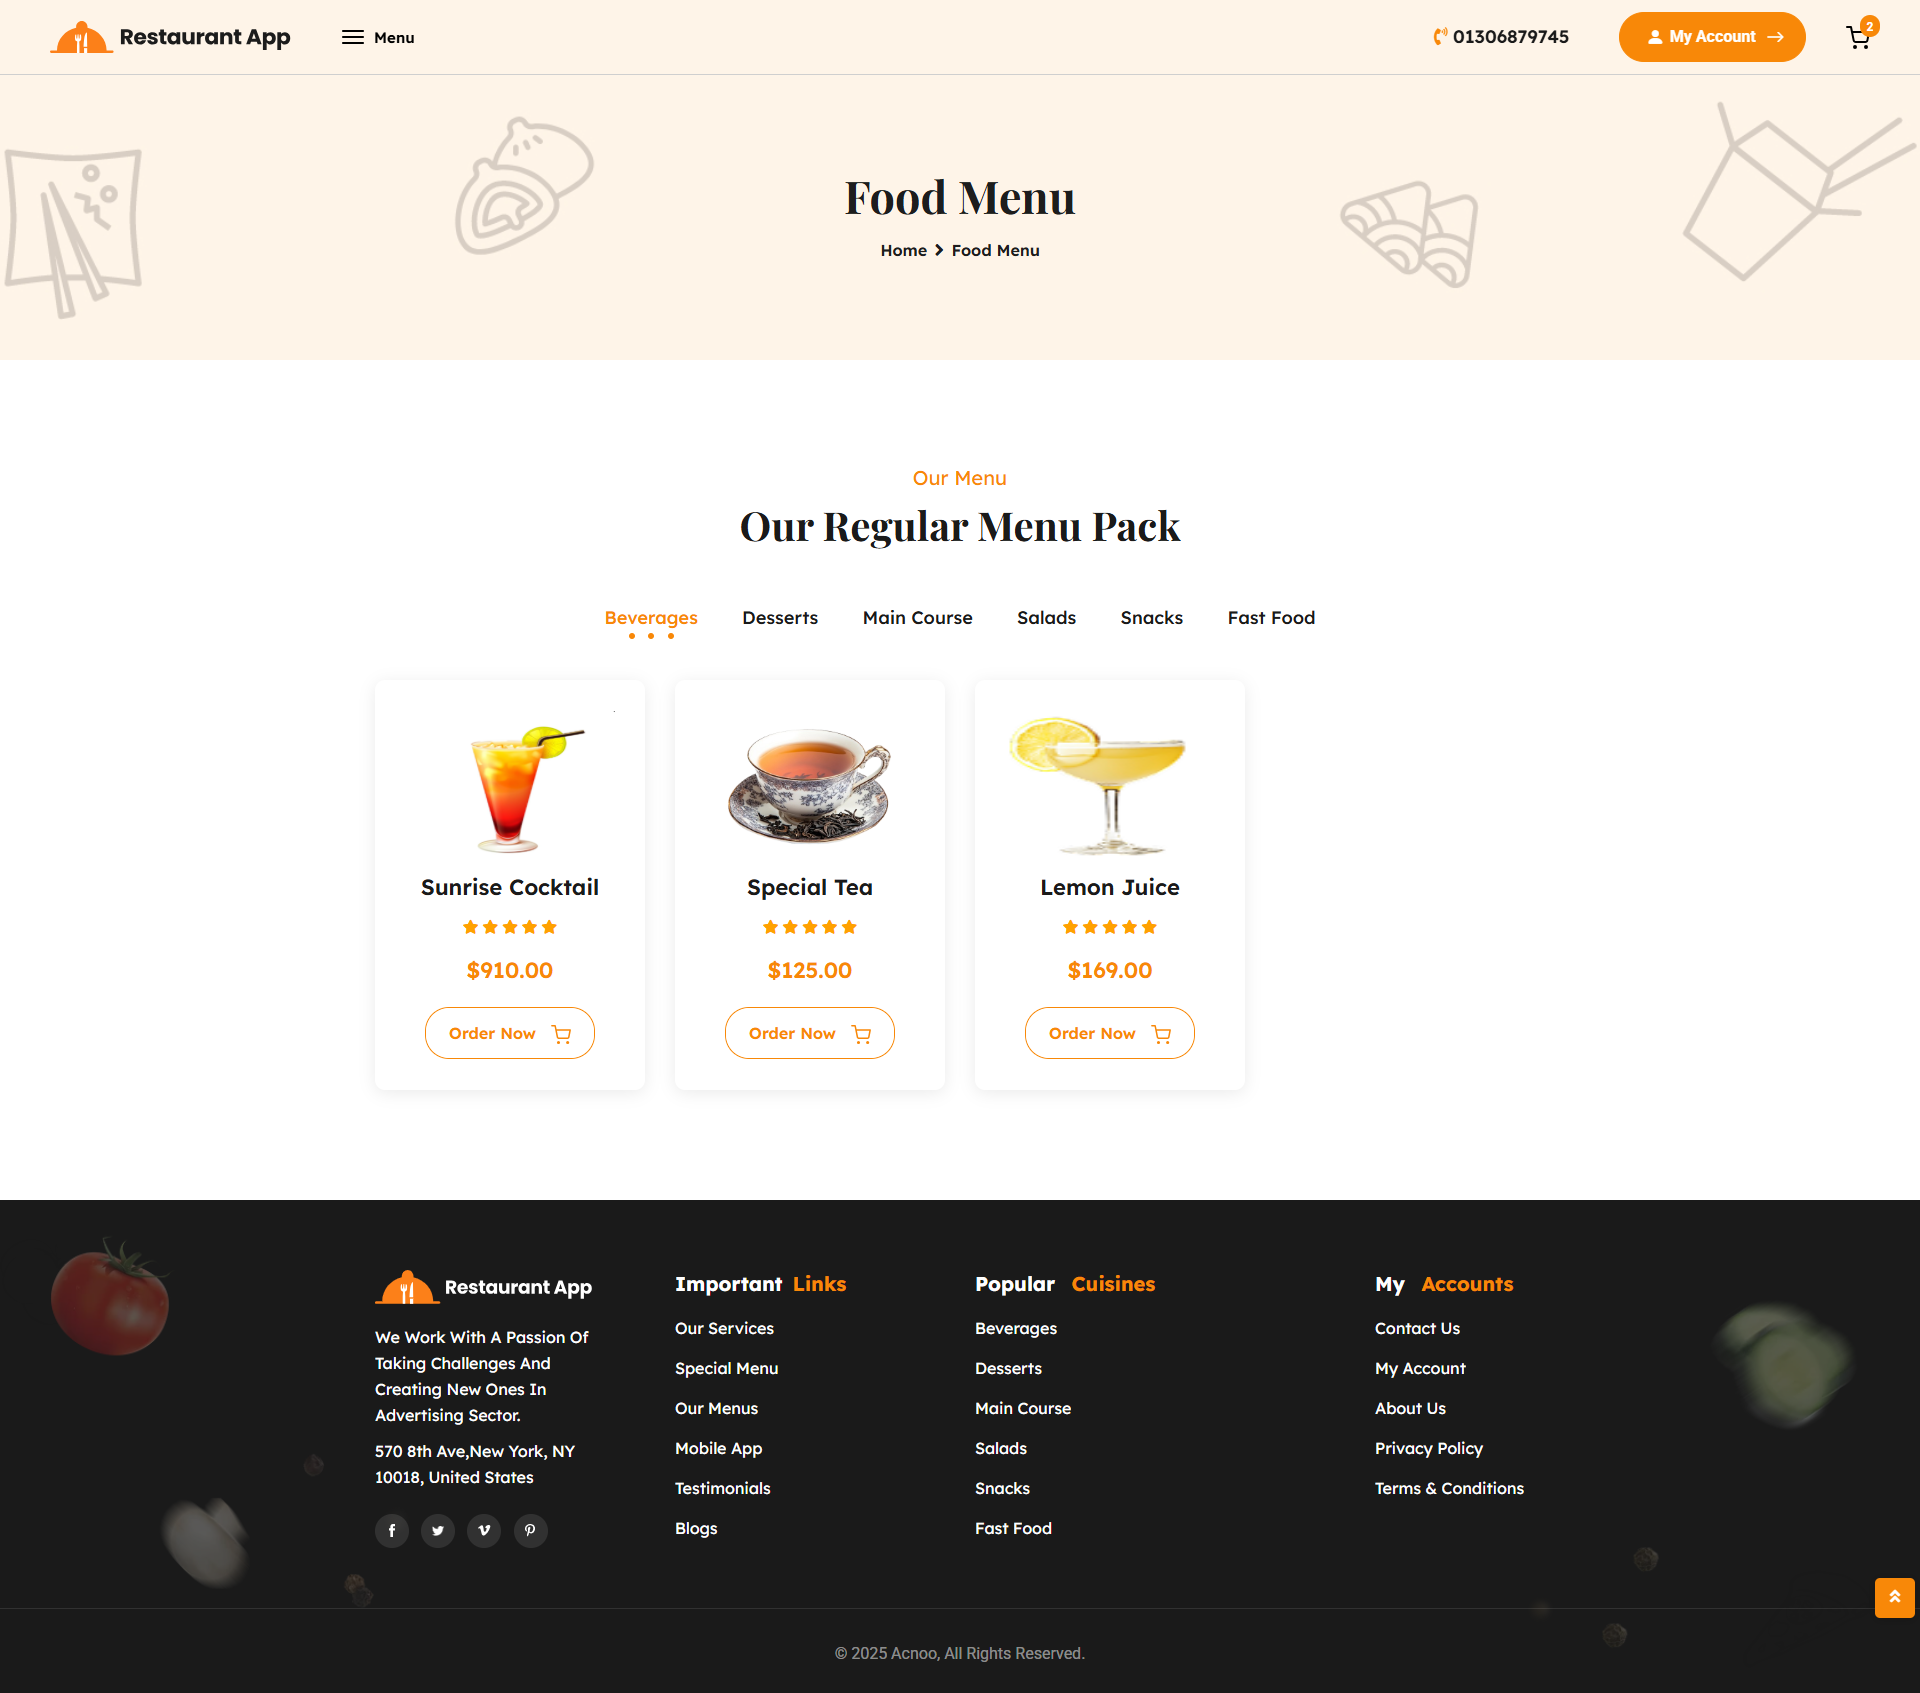
2. Menu & Dining Explorations These sections allow customers to view the restaurant's offerings and secure their visit.Popular Dishes A curated carousel or grid featuring top-rated menu items with their respective pricing and quick-add-to-cart functionality.
Regular Menu Pack Categorized tabs (e.g., Breakfast, Pizza, Drinks) that allow customers to filter and browse the full menu catalog with ease.
Table Reservations A dedicated "Book Your Table" module where guests can select their preferred date, time, and guest count to secure a reservation directly from the home page.
3. Social Proof & Engagement This area focuses on building community and credibility through customer feedback and updates.Mobile Integration A dedicated section encouraging users to download the restaurant's mobile application for a more streamlined ordering experience.
Testimonials ("Food Lover Says") Displays verified customer reviews, including star ratings, client names, and profile images managed through the Testimonial List.
Latest Blogs Showcases the most recent articles, food festivals, or chef tips created in the Blog List section to keep content fresh and improve SEO.
4. Footer & Newsletter The bottom of the page provides essential navigation and subscription options.Newsletter Subscription A prominent input field allowing customers to subscribe to the restaurant's mailing list, with data populating the Newsletters List for marketing use.
Navigation Links Provides quick access to legal policies managed in the admin panel, including Terms & Conditions and Privacy & Policy.
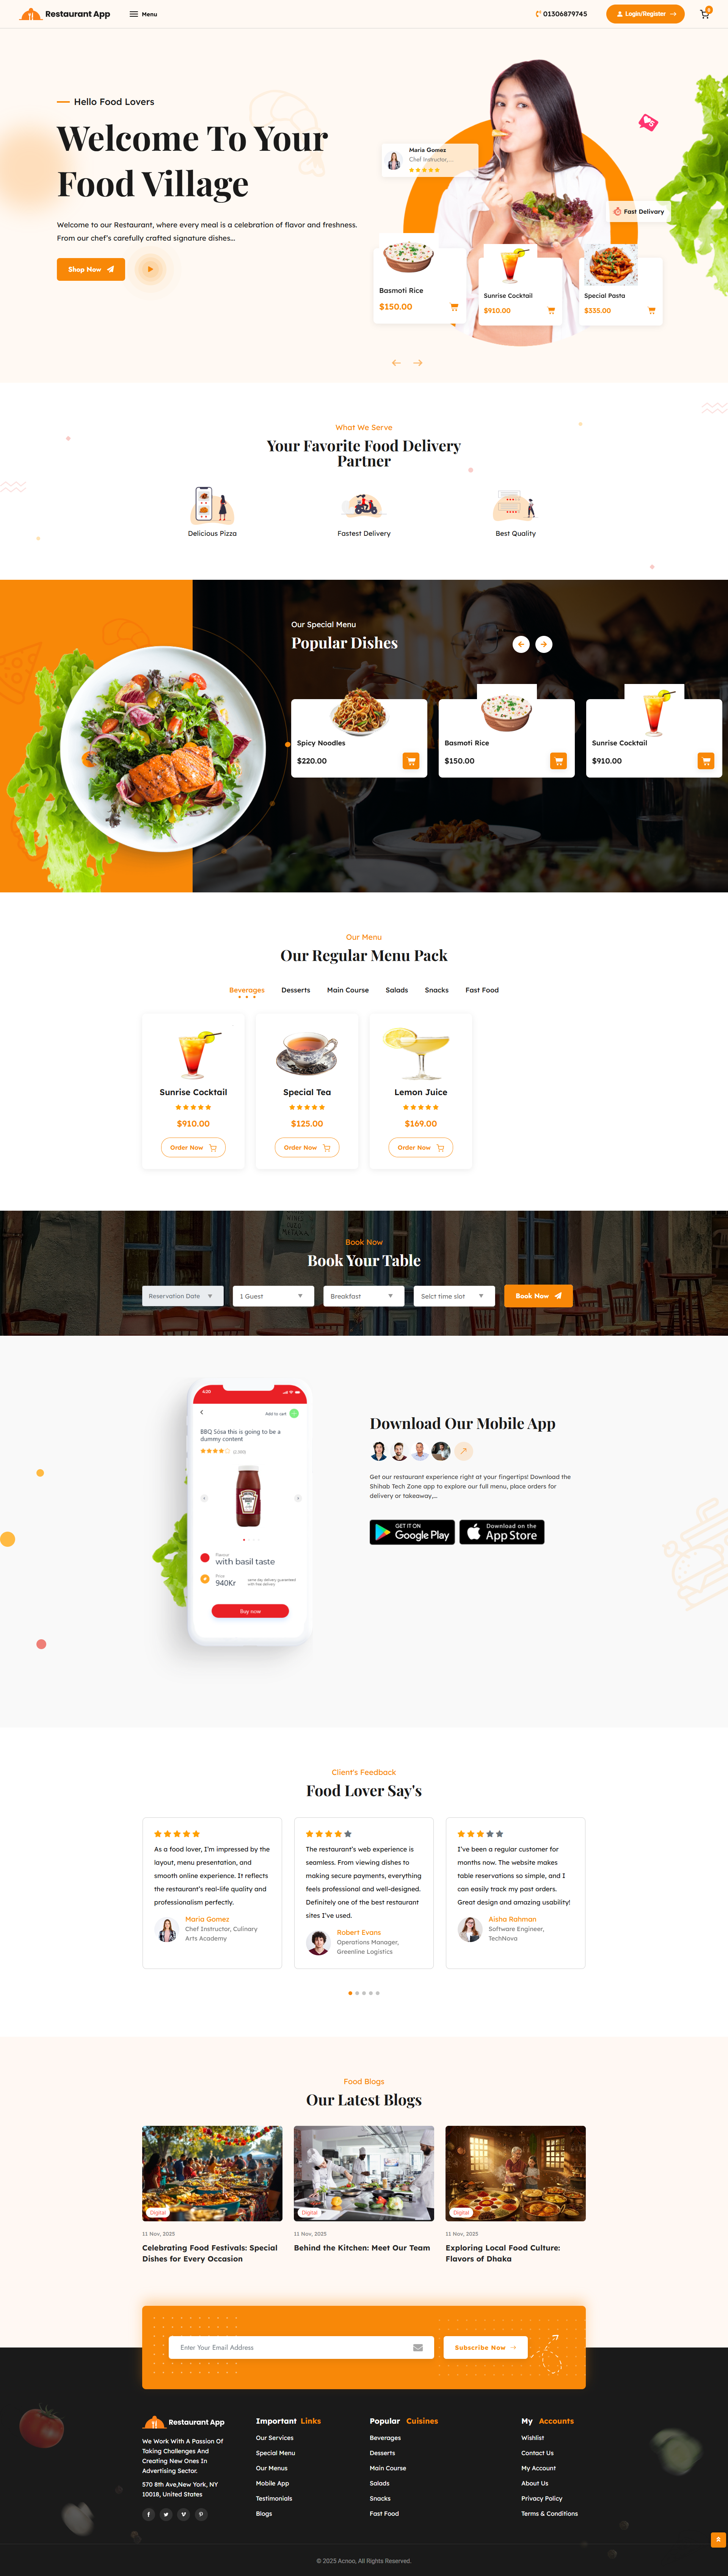
Cart Content
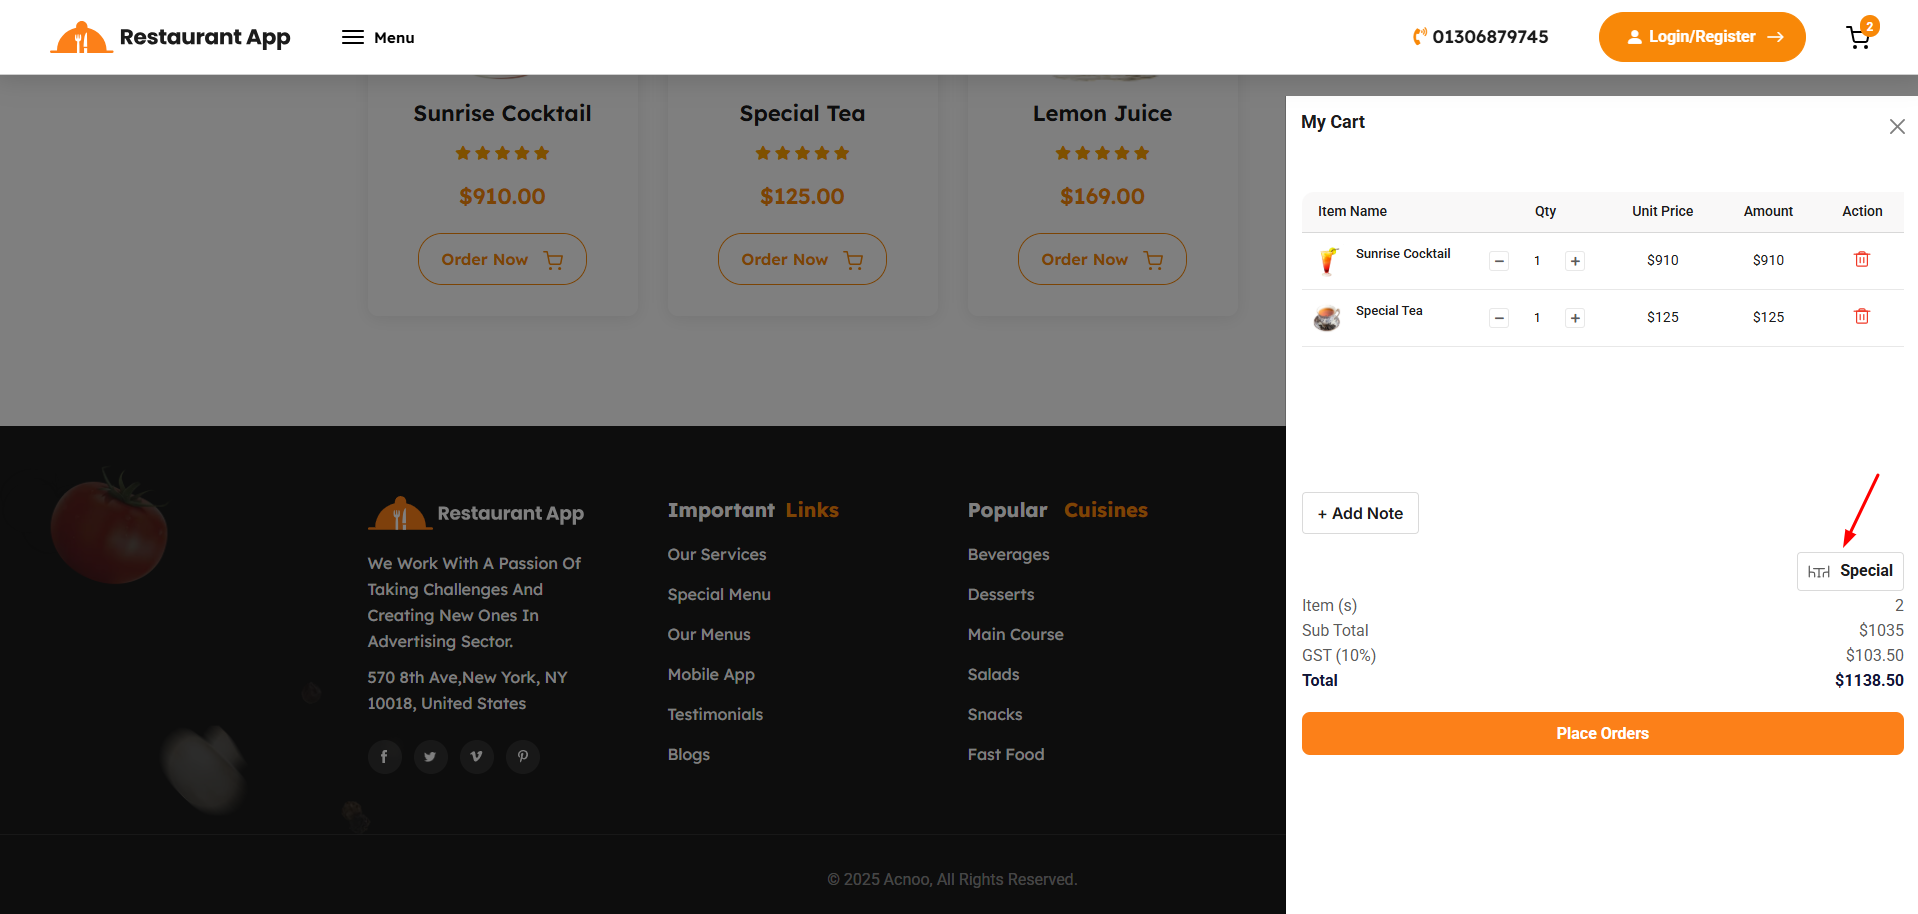
The My Cart interface is a dynamic sidebar component designed to manage the customer's selection and initiate the checkout process.
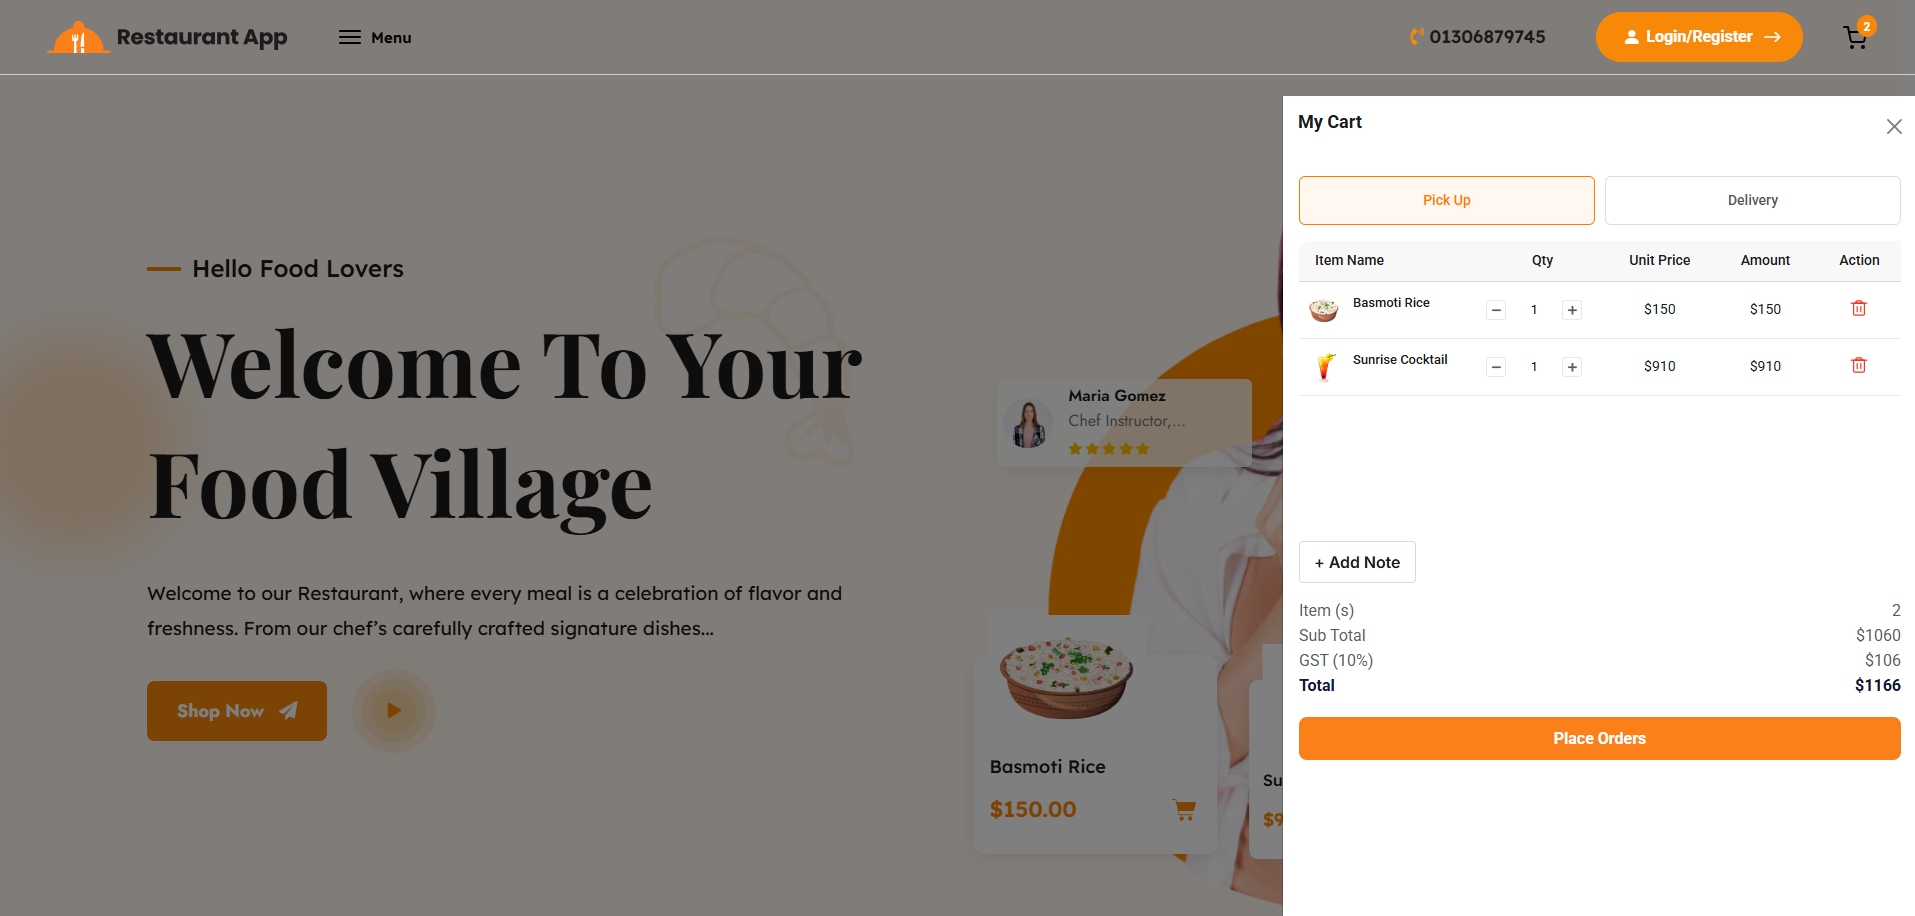
The Order Authentication workflow ensures that all transactions are tied to a verified customer account. This process is automatically triggered during the checkout phase to maintain secure record-keeping and order tracking.
When a customer has finalized their selections in the My Cart sidebar, they must initiate the final transaction process.
Place Orders Button: Clicking this primary orange action button signals the system to begin the final invoice calculation and payment transition.
Authentication Check: Before proceeding to the payment gateway, the system performs a real-time check of the user's current session status.
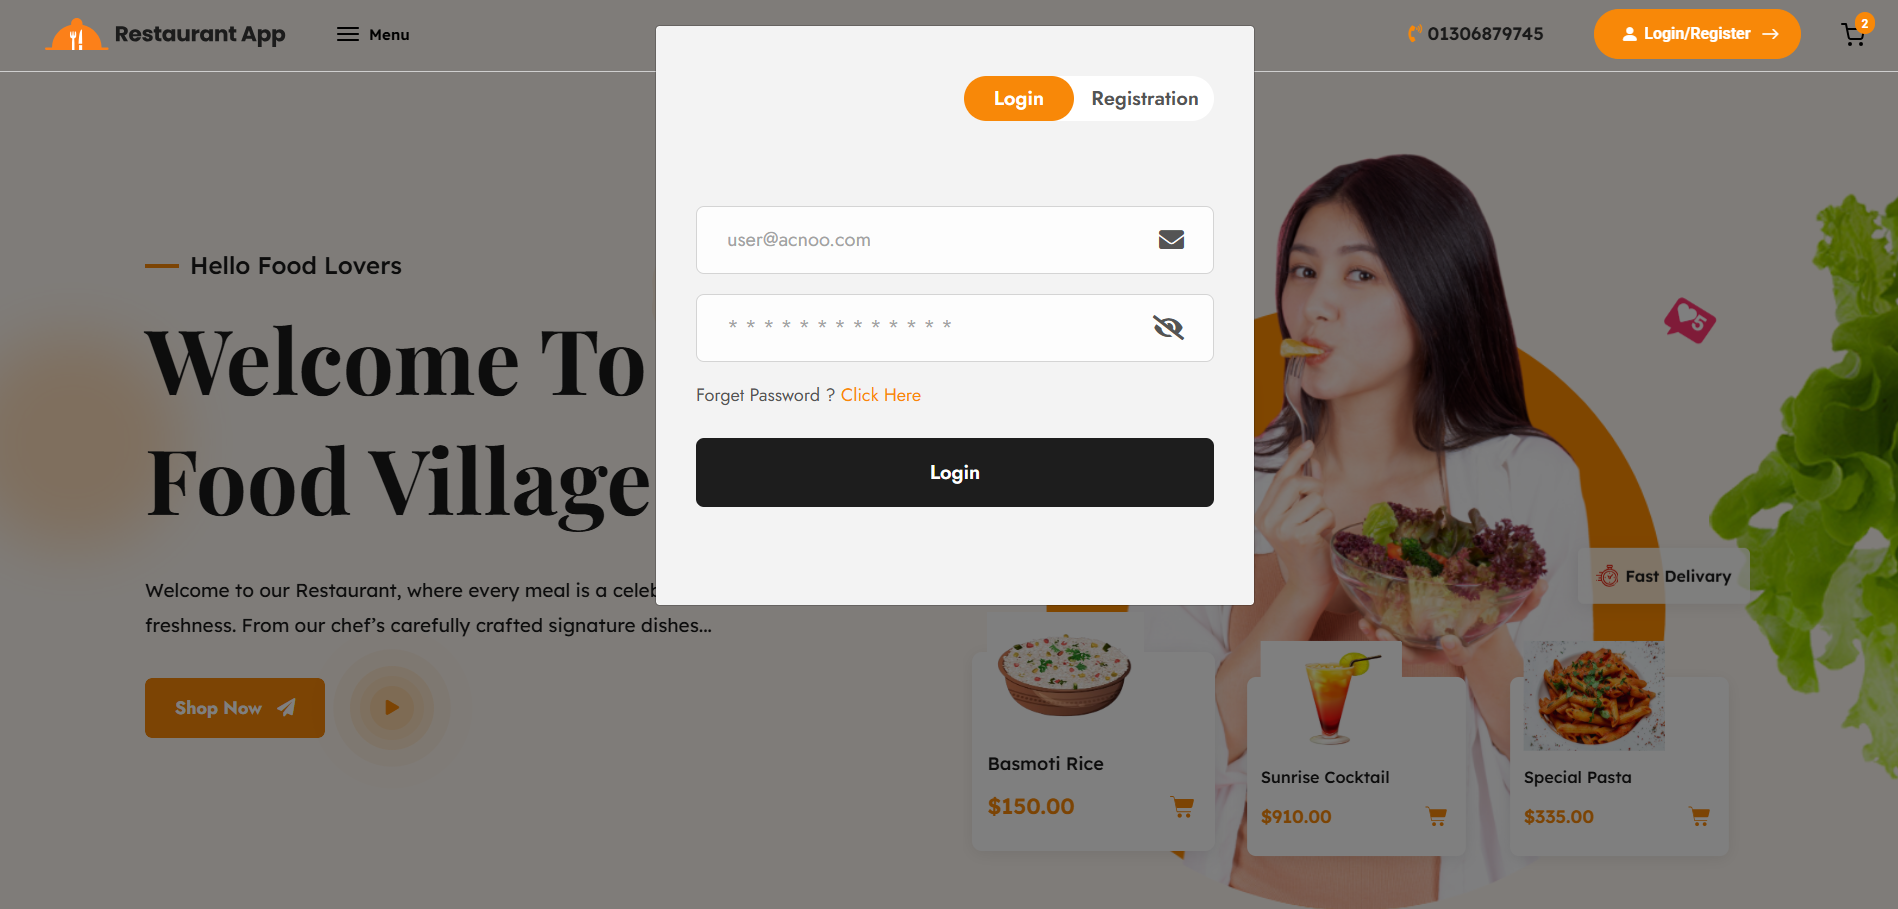
Checkout
The Checkout Page is the final destination for authenticated users to review their order details, select a delivery address, and proceed to payment. This page is automatically accessed after a user successfully logs in or registers via the authentication modal during the "Place Orders" workflow.
Food Menu
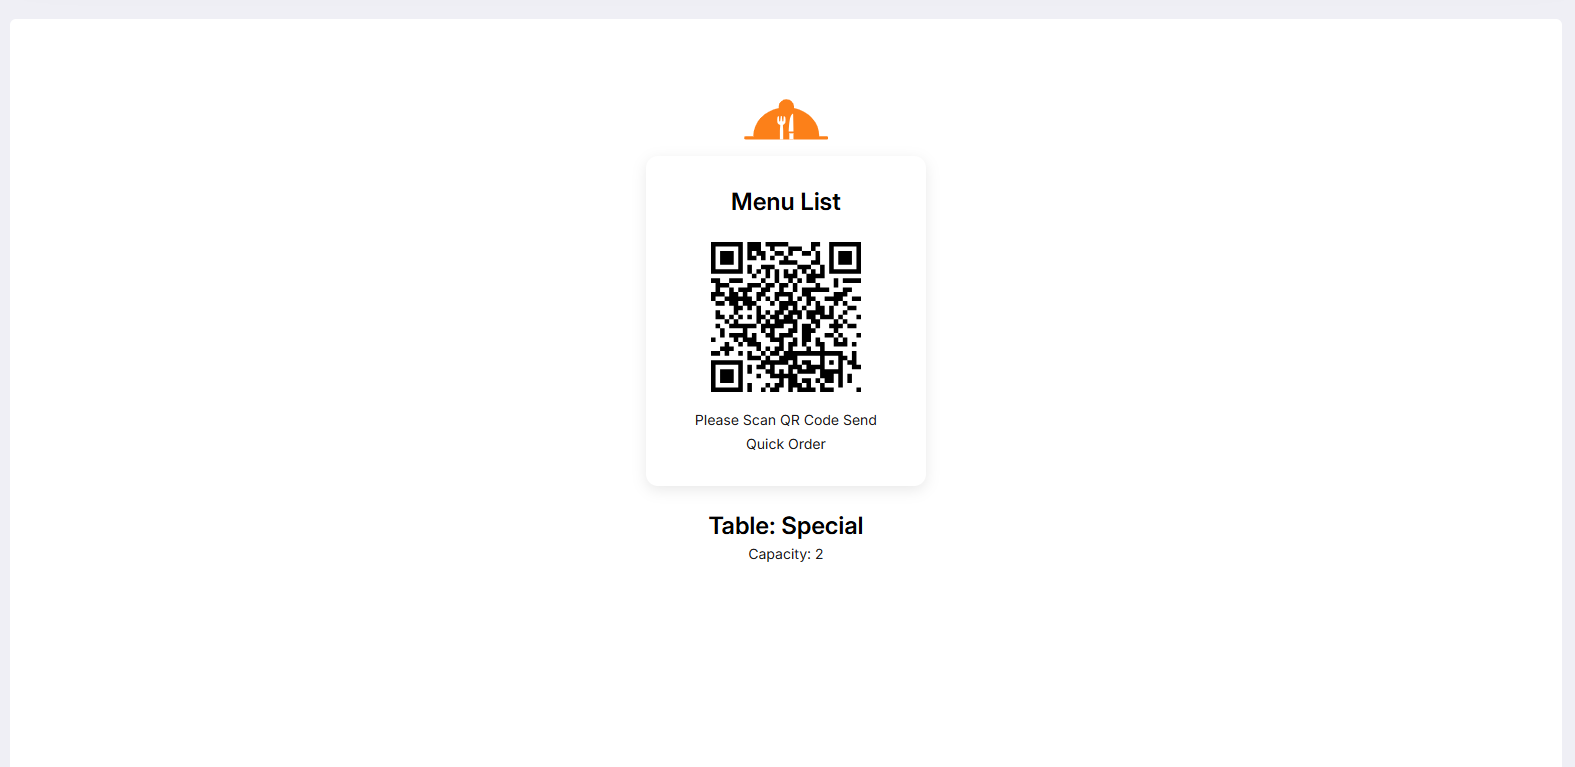
The Table QR Ordering system allows guests to access the digital menu and place orders directly from their seat by scanning a unique QR code. This process streamlines the dining experience by linking the customer's digital cart directly to their physical table in the restaurant's Point of Sale (POS) system.
1. Landing Page & Table IdentificationUpon scanning the QR code, the customer is redirected to a landing page that confirms their physical location within the restaurant.
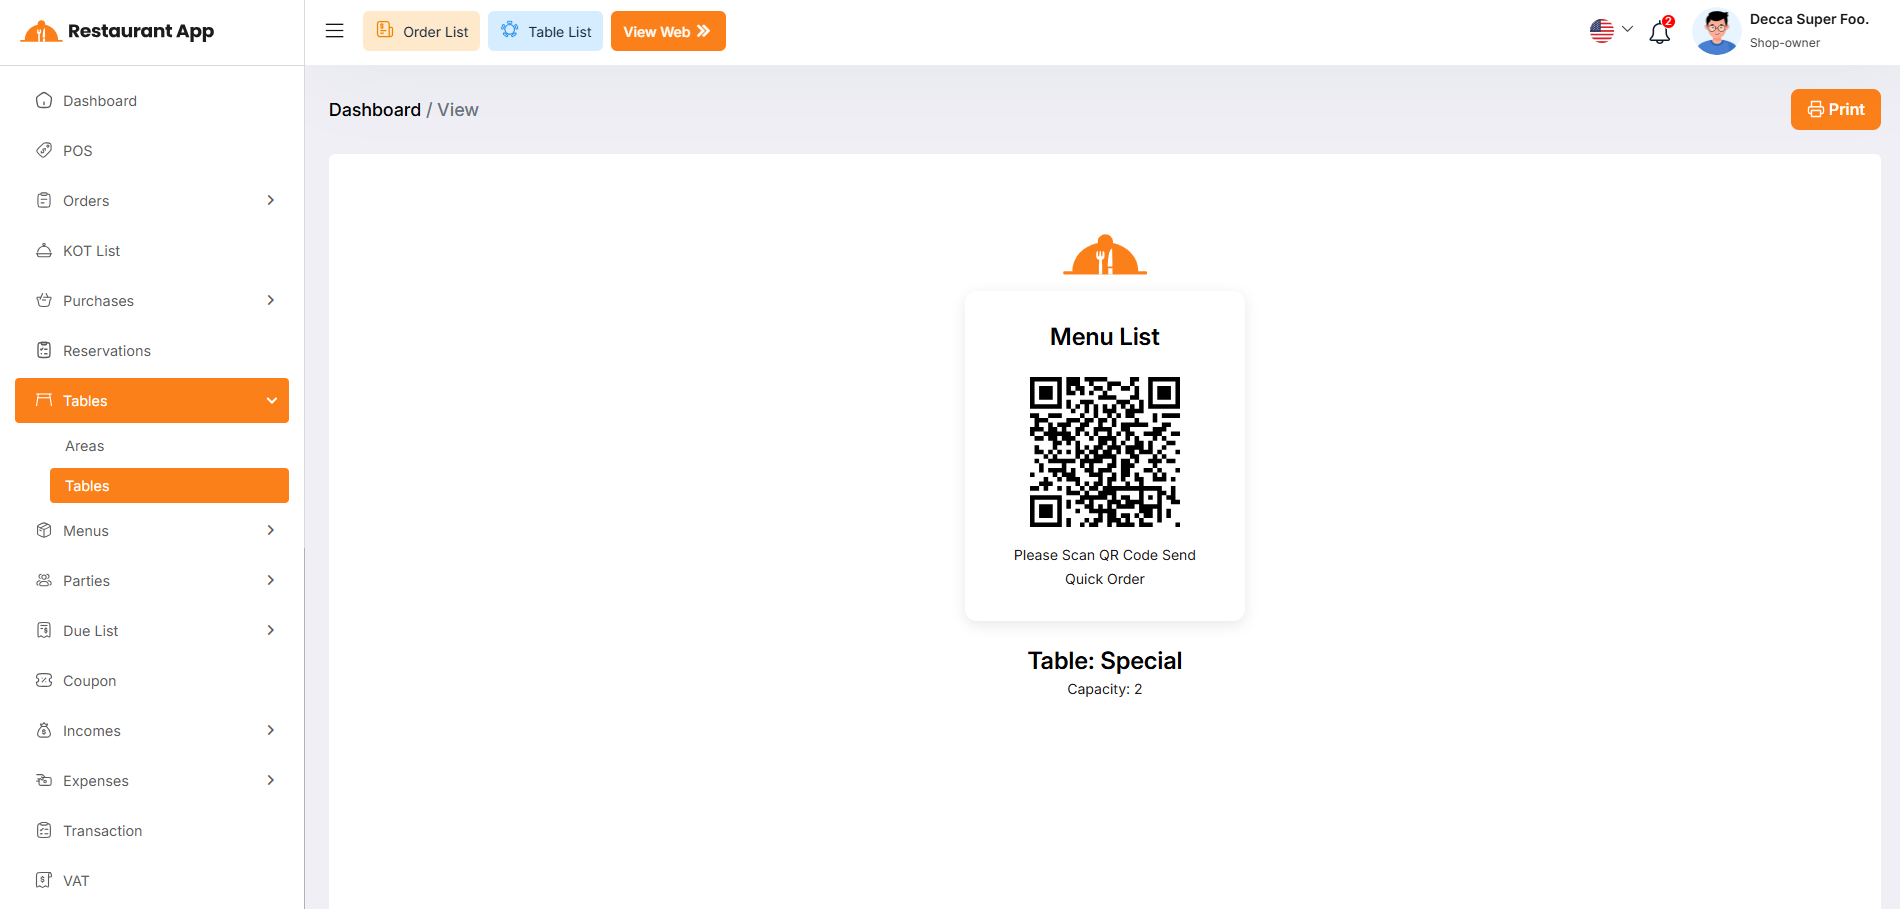
QR Verification: The page displays a Menu List header with the message "Please Scan QR Code Send Quick Order," confirming the digital connection.
Table Assignment: The system automatically identifies and displays the specific table name (e.g., Table: Special) and its seating Capacity. This ensures that when the order is placed, the kitchen and waitstaff know exactly where to deliver the food.
My Profile
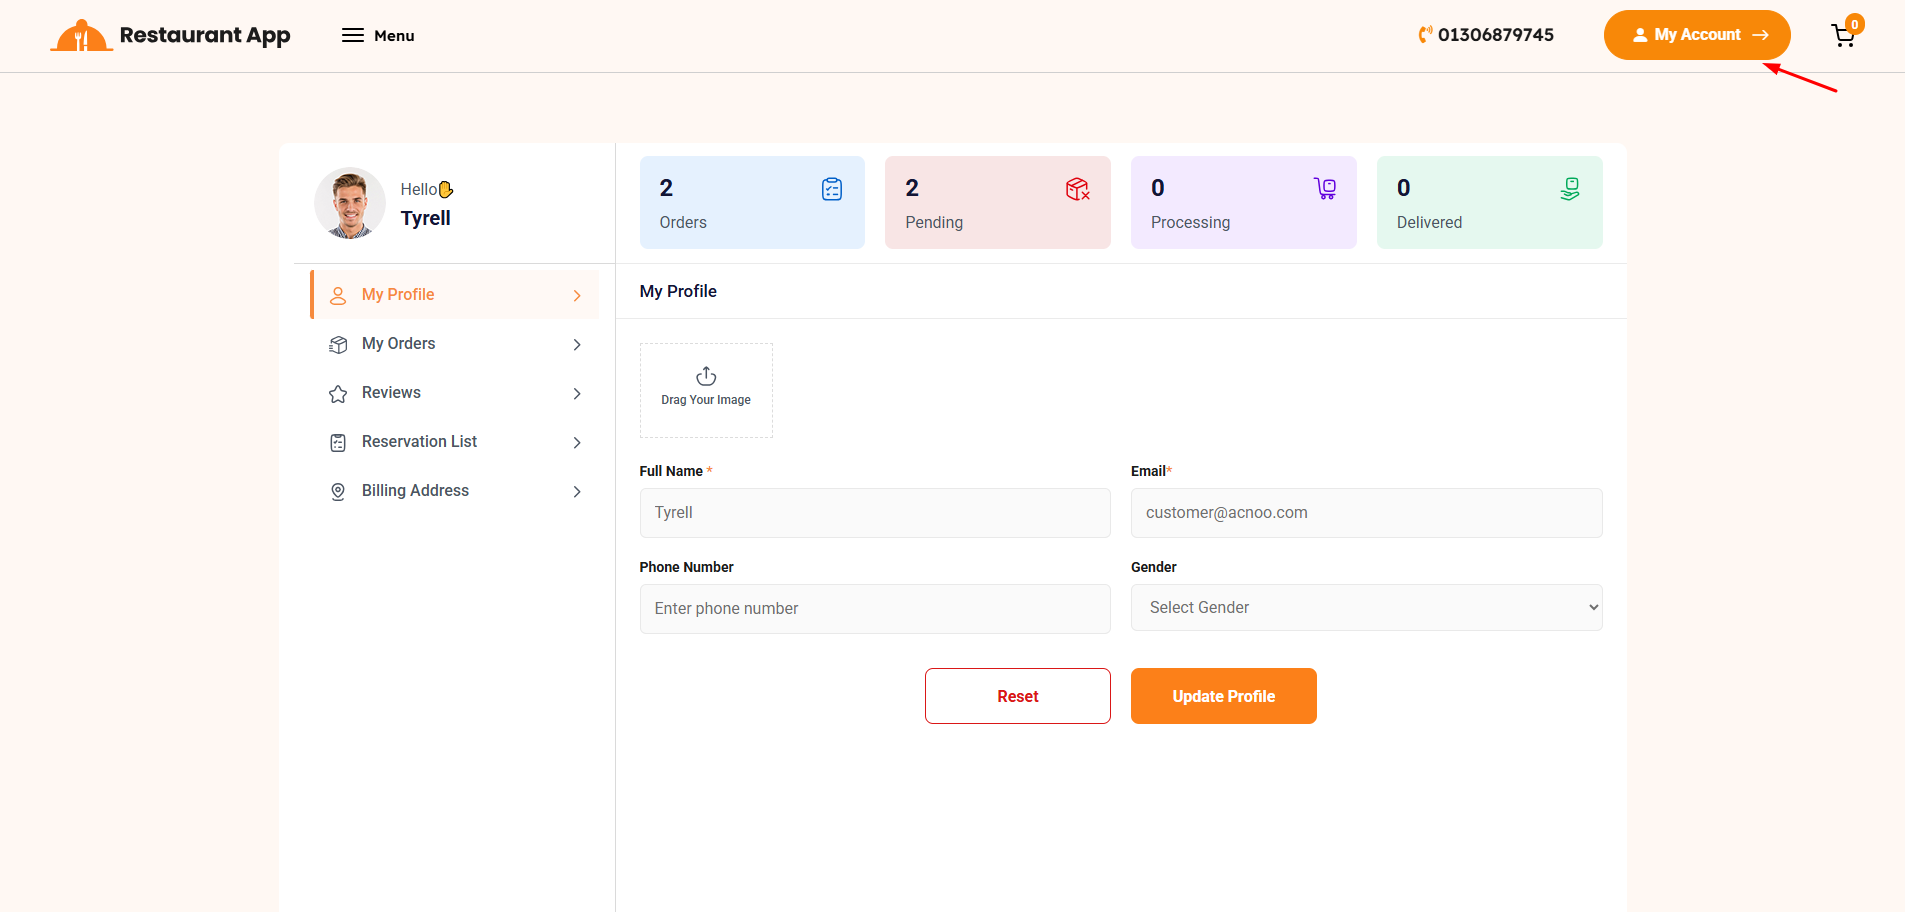
The My Profile page serves as the personal dashboard for authenticated customers. It provides a centralized location for users to manage their account details, track their dining activity, and review their interaction history with the restaurant.
Order List
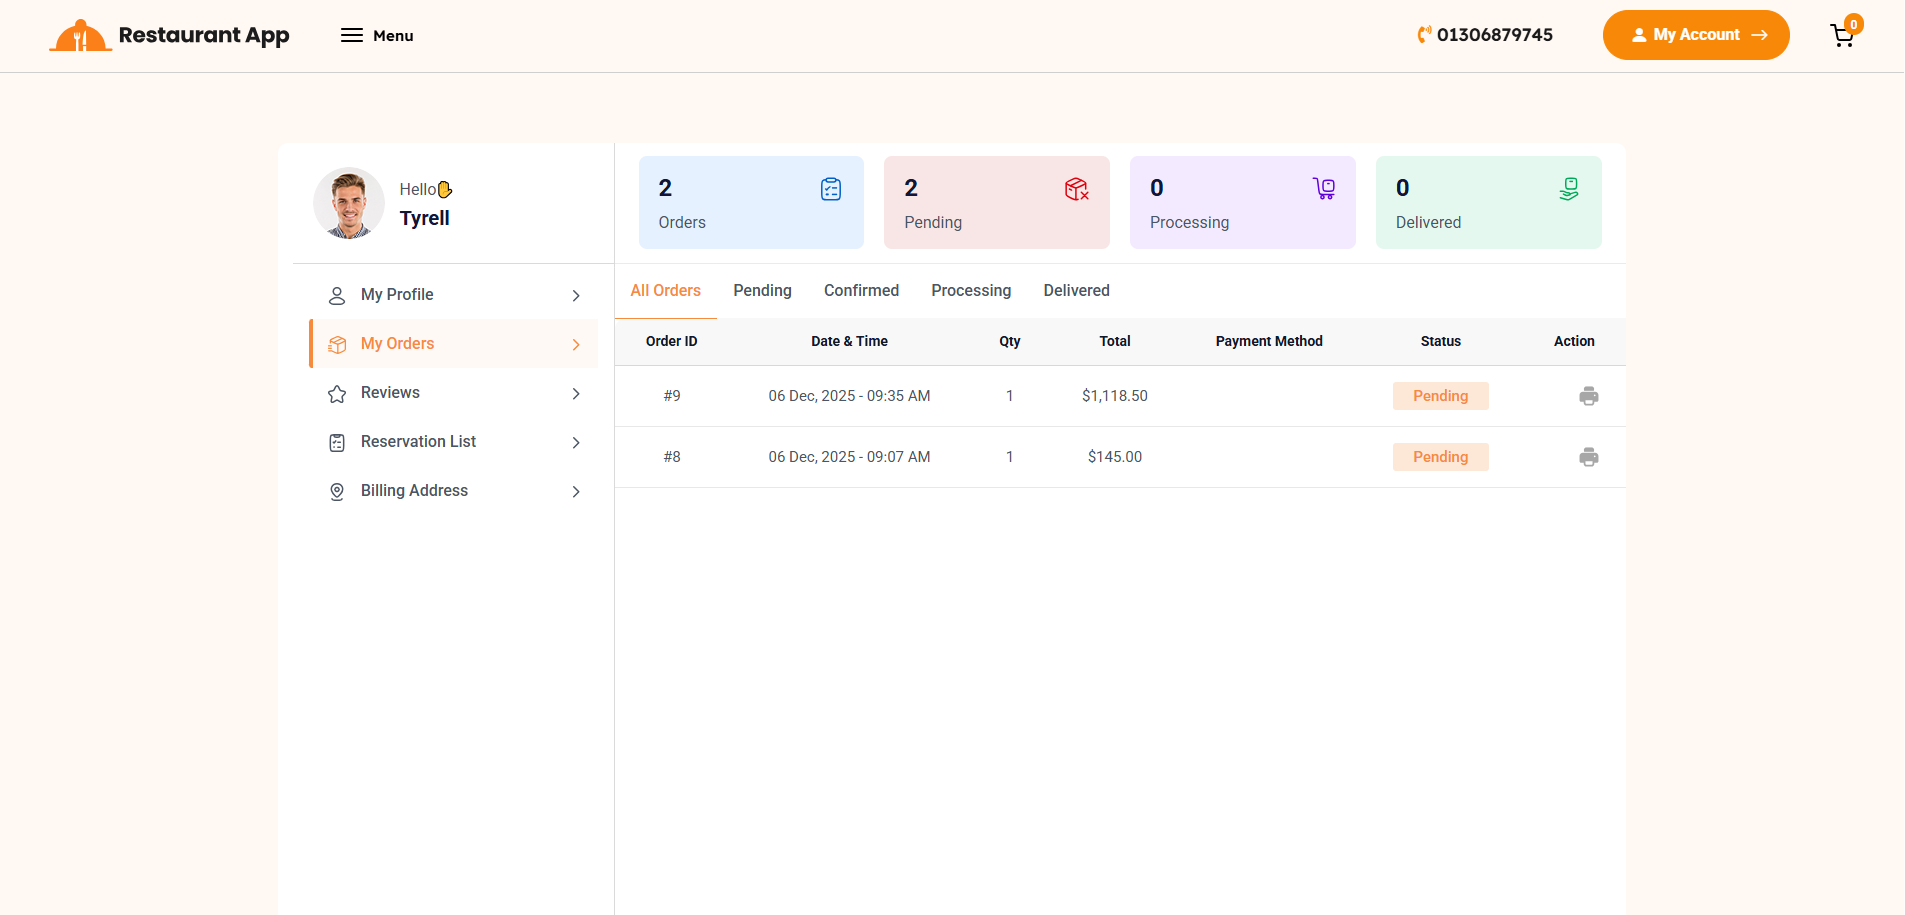
The My Orders page, accessible through the customer profile dashboard, provides a comprehensive history of all transactions made by the user. This interface allows customers to track real-time order progress and access historical receipts.
Review Create
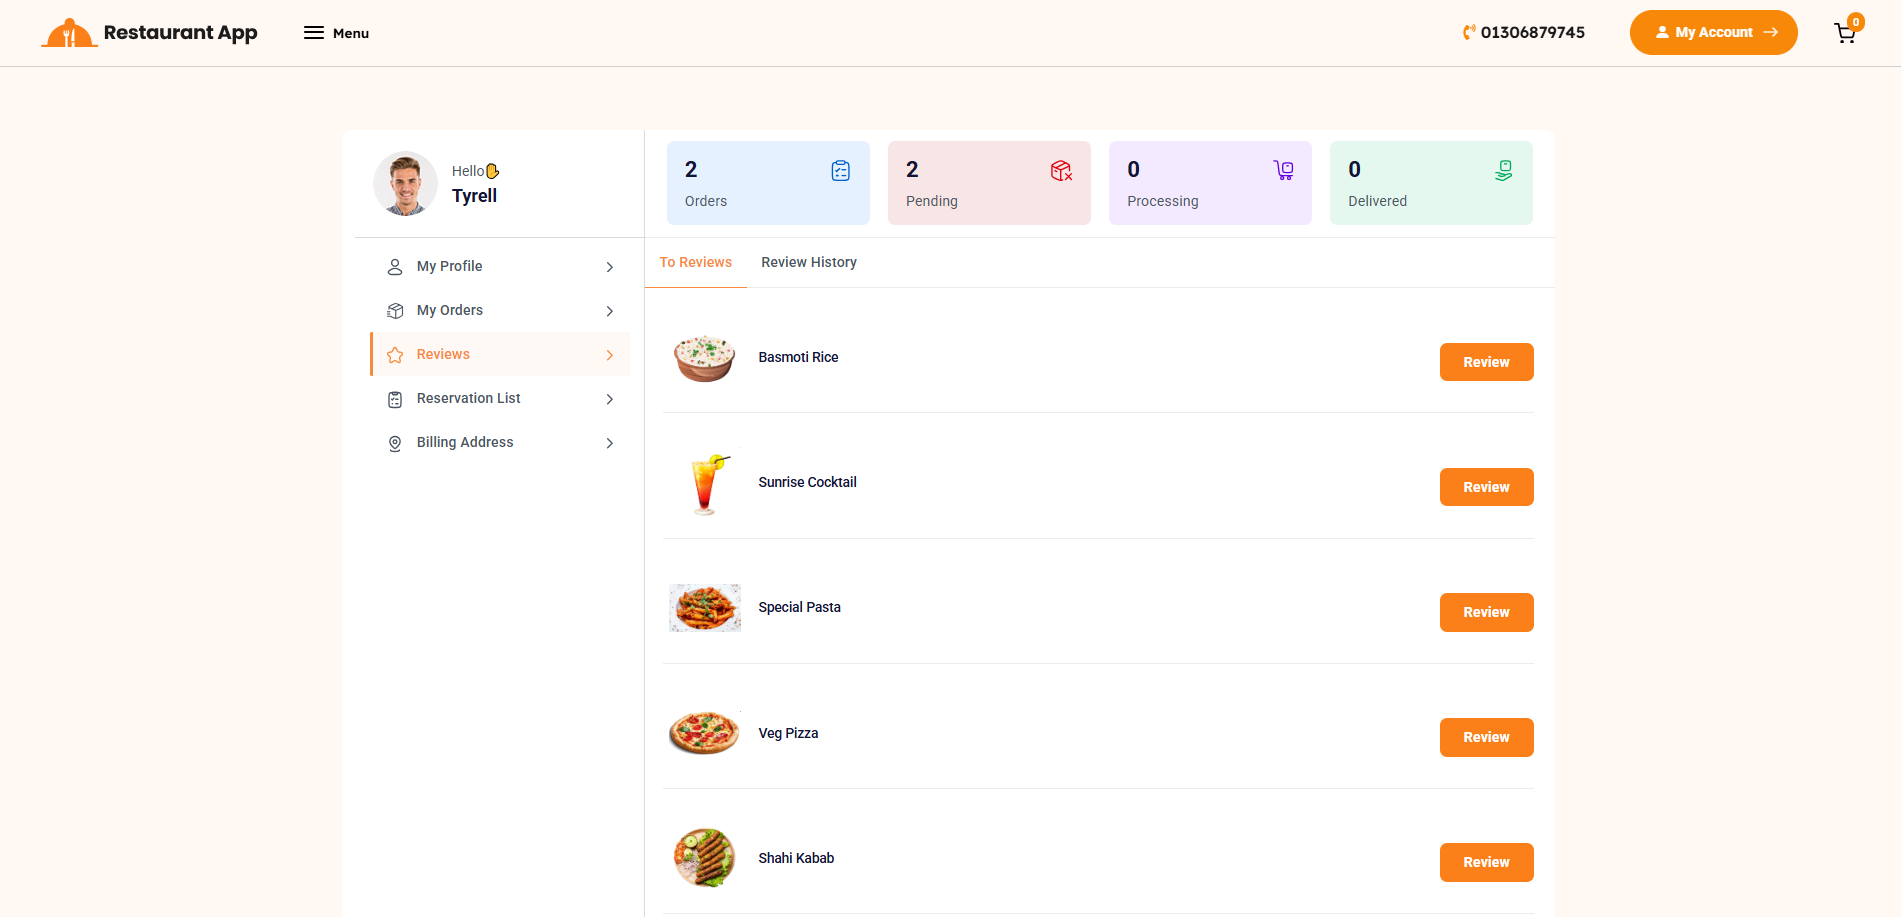
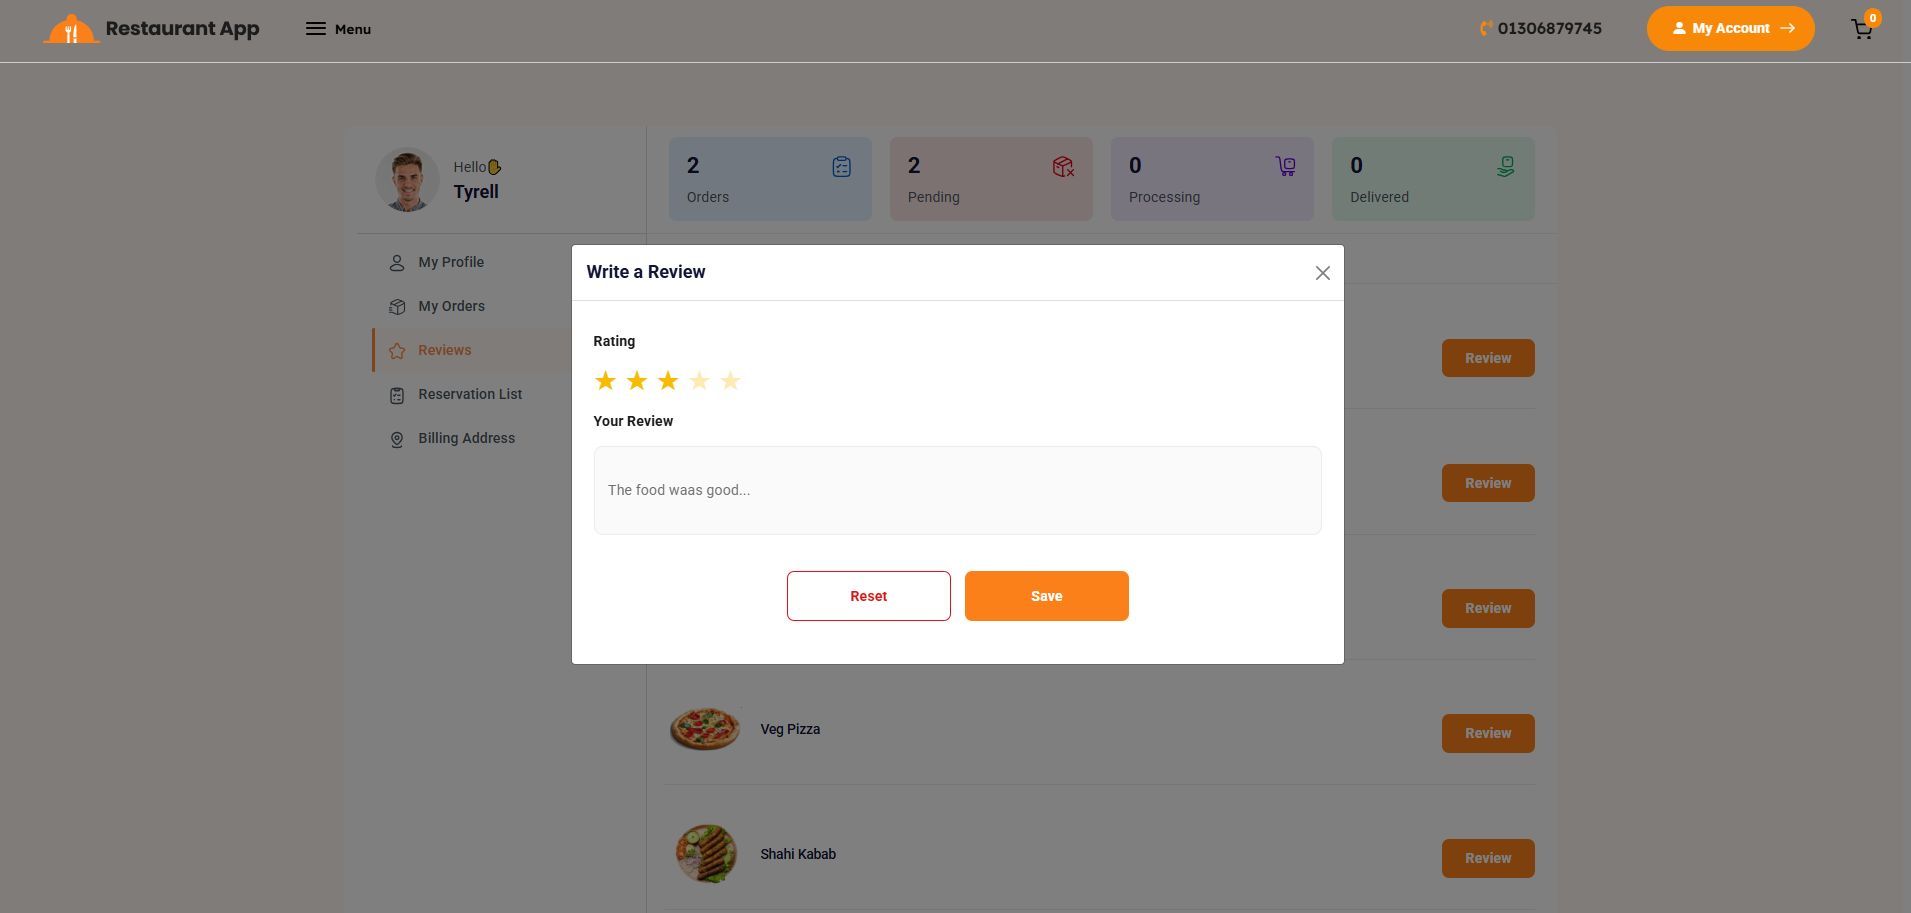
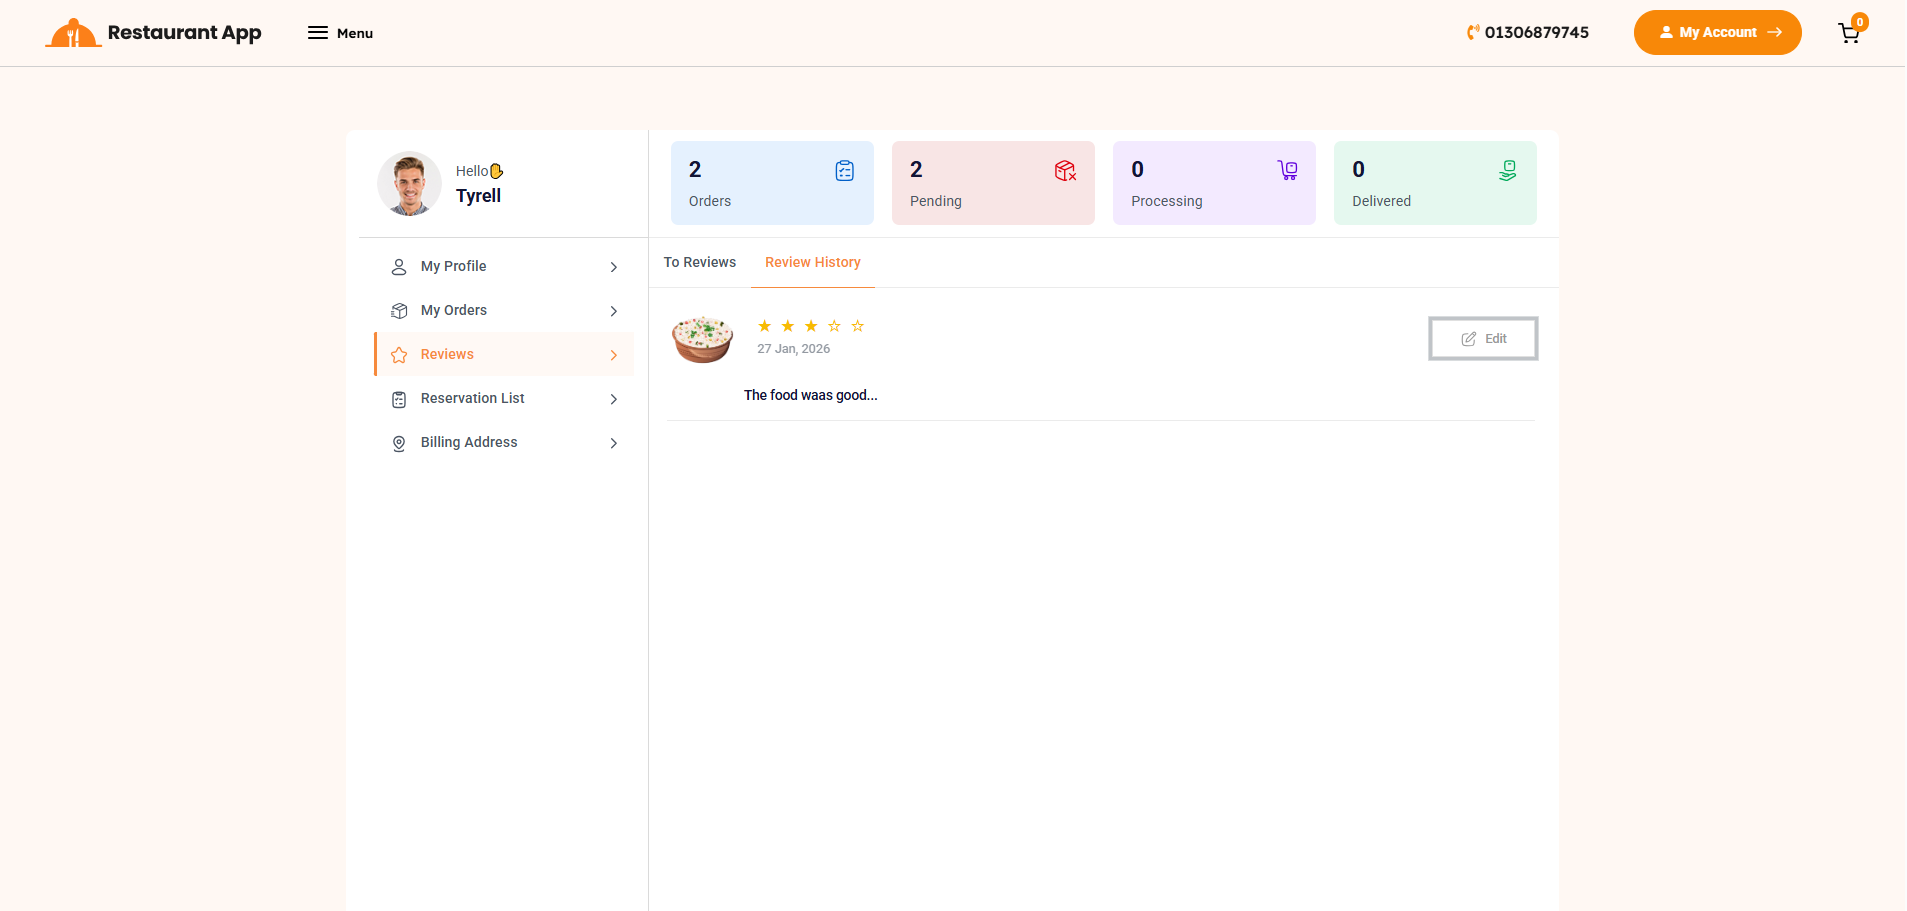
The Reviews section, located within the customer dashboard, provides a dedicated space for guests to share their dining experiences. This feedback loop is essential for maintaining food quality and helping other customers make informed choices.
Reservation
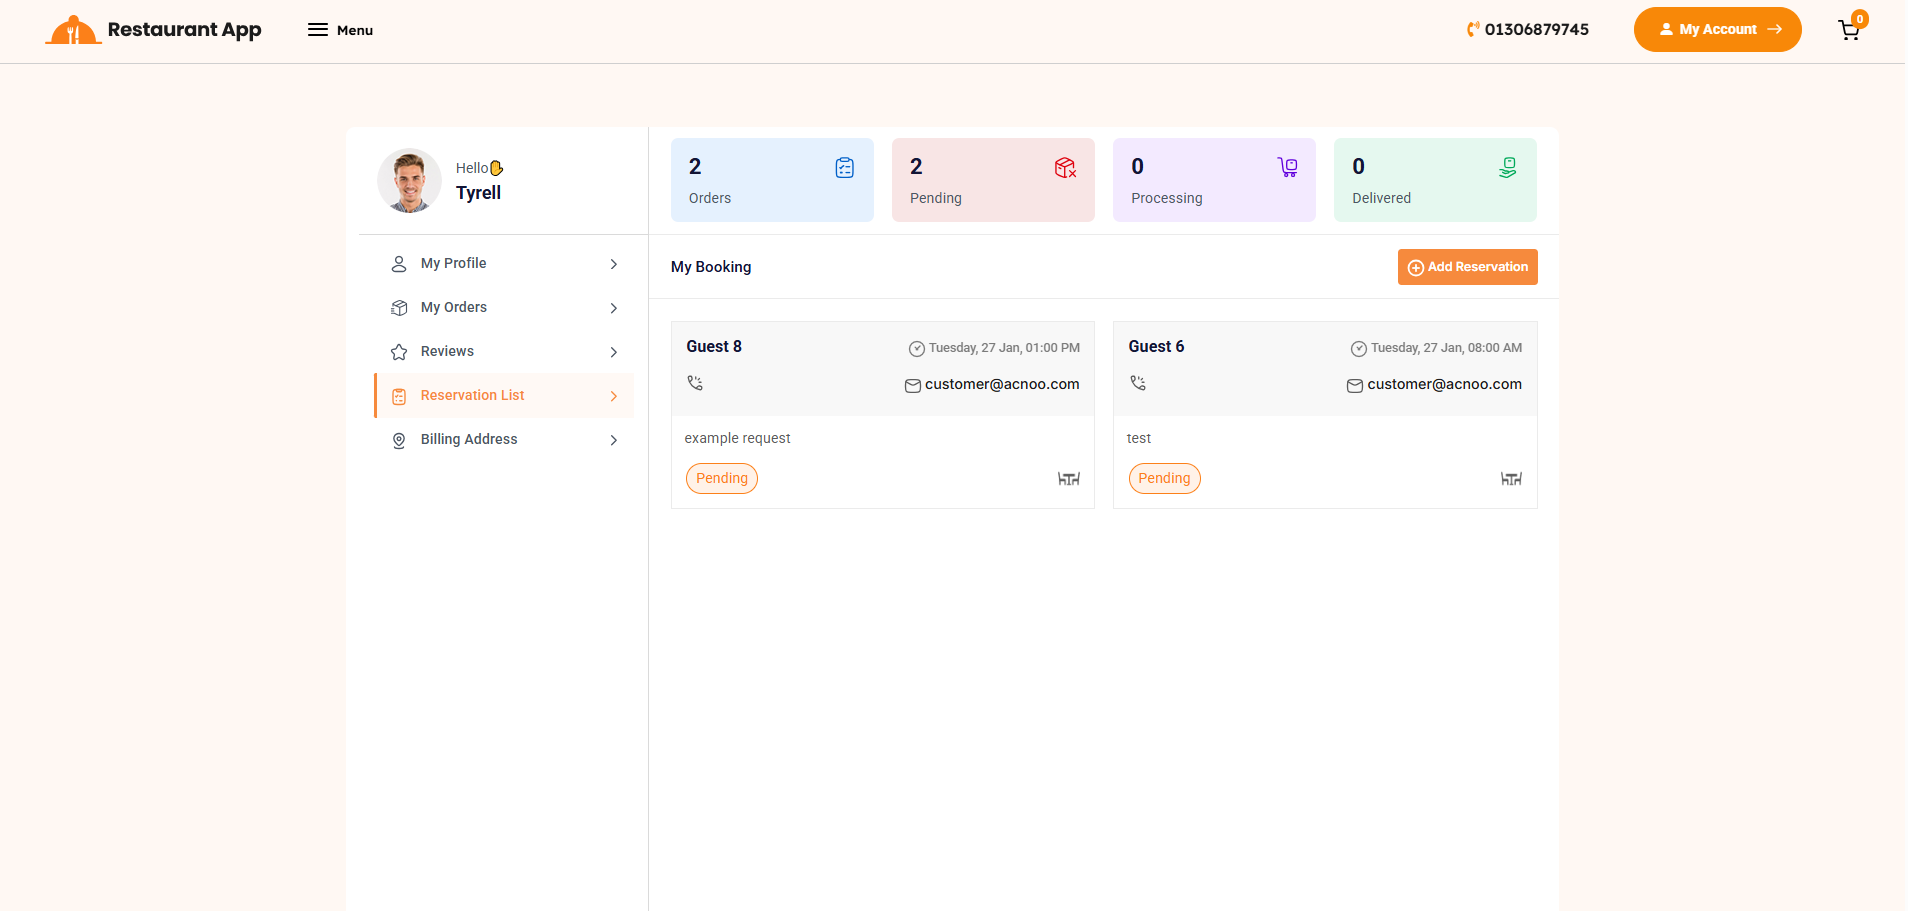
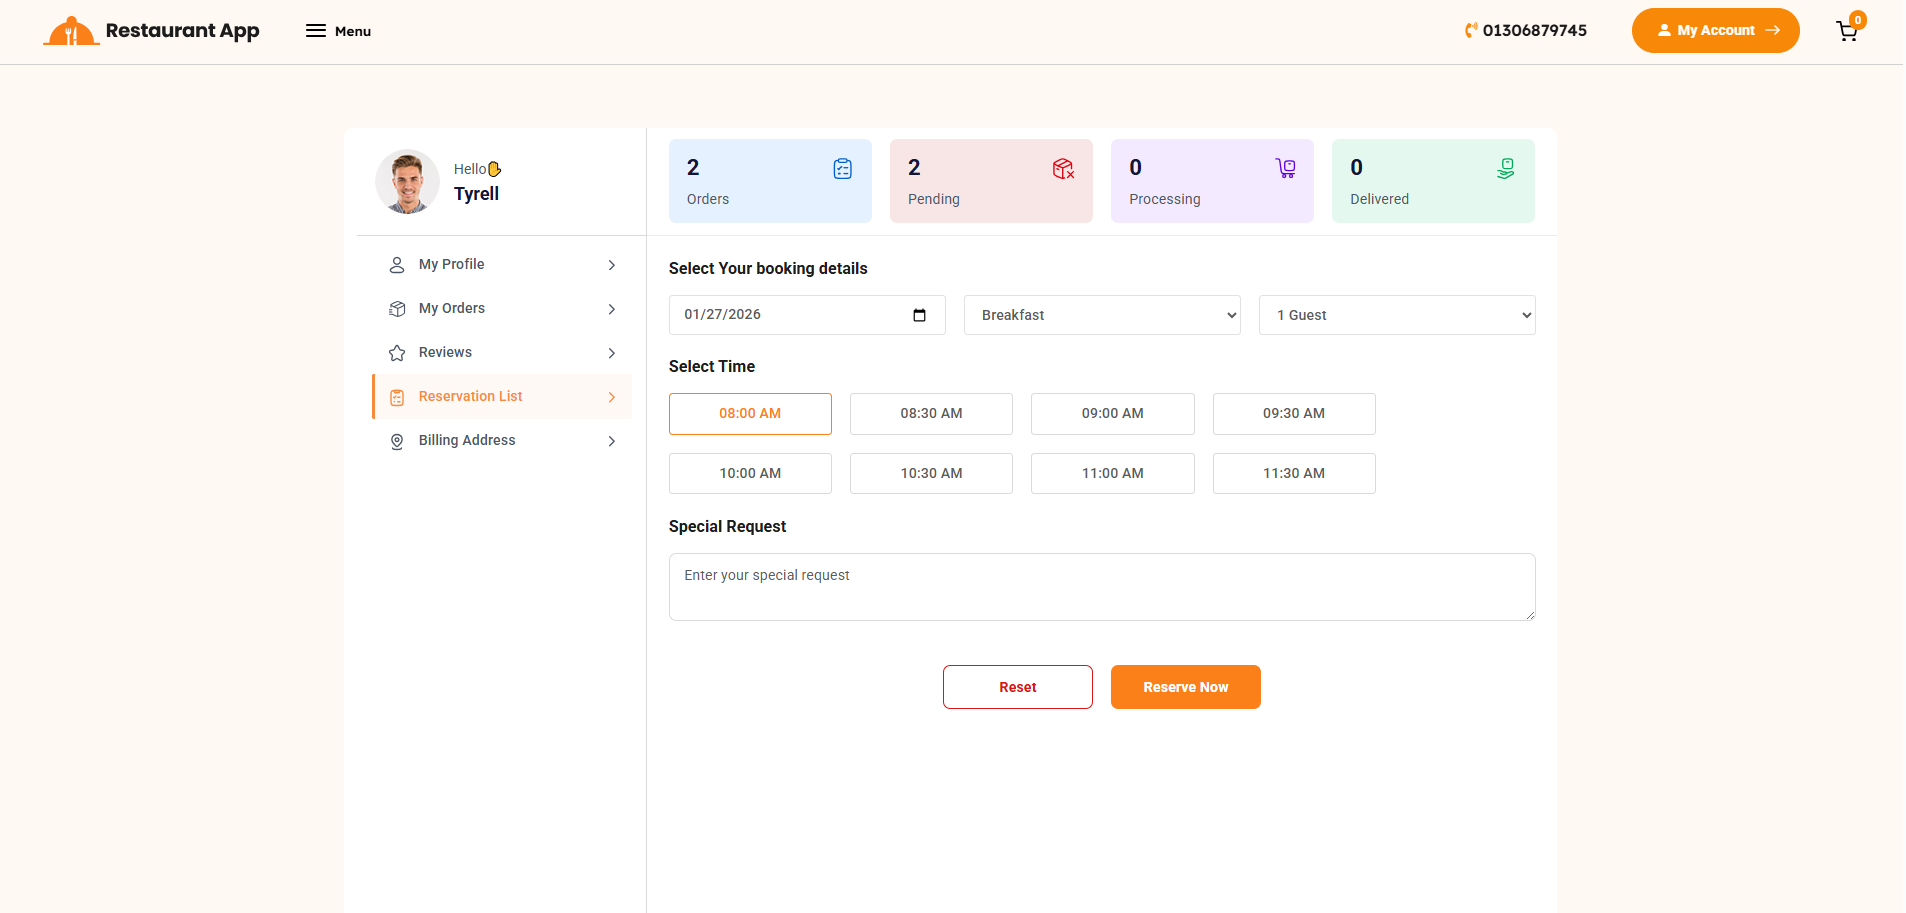
The Reservation List section, located within the customer dashboard, provides a comprehensive overview of all table booking requests. This interface allows guests to manage their upcoming dining plans and schedule new reservations directly from their profile.
Billing Address
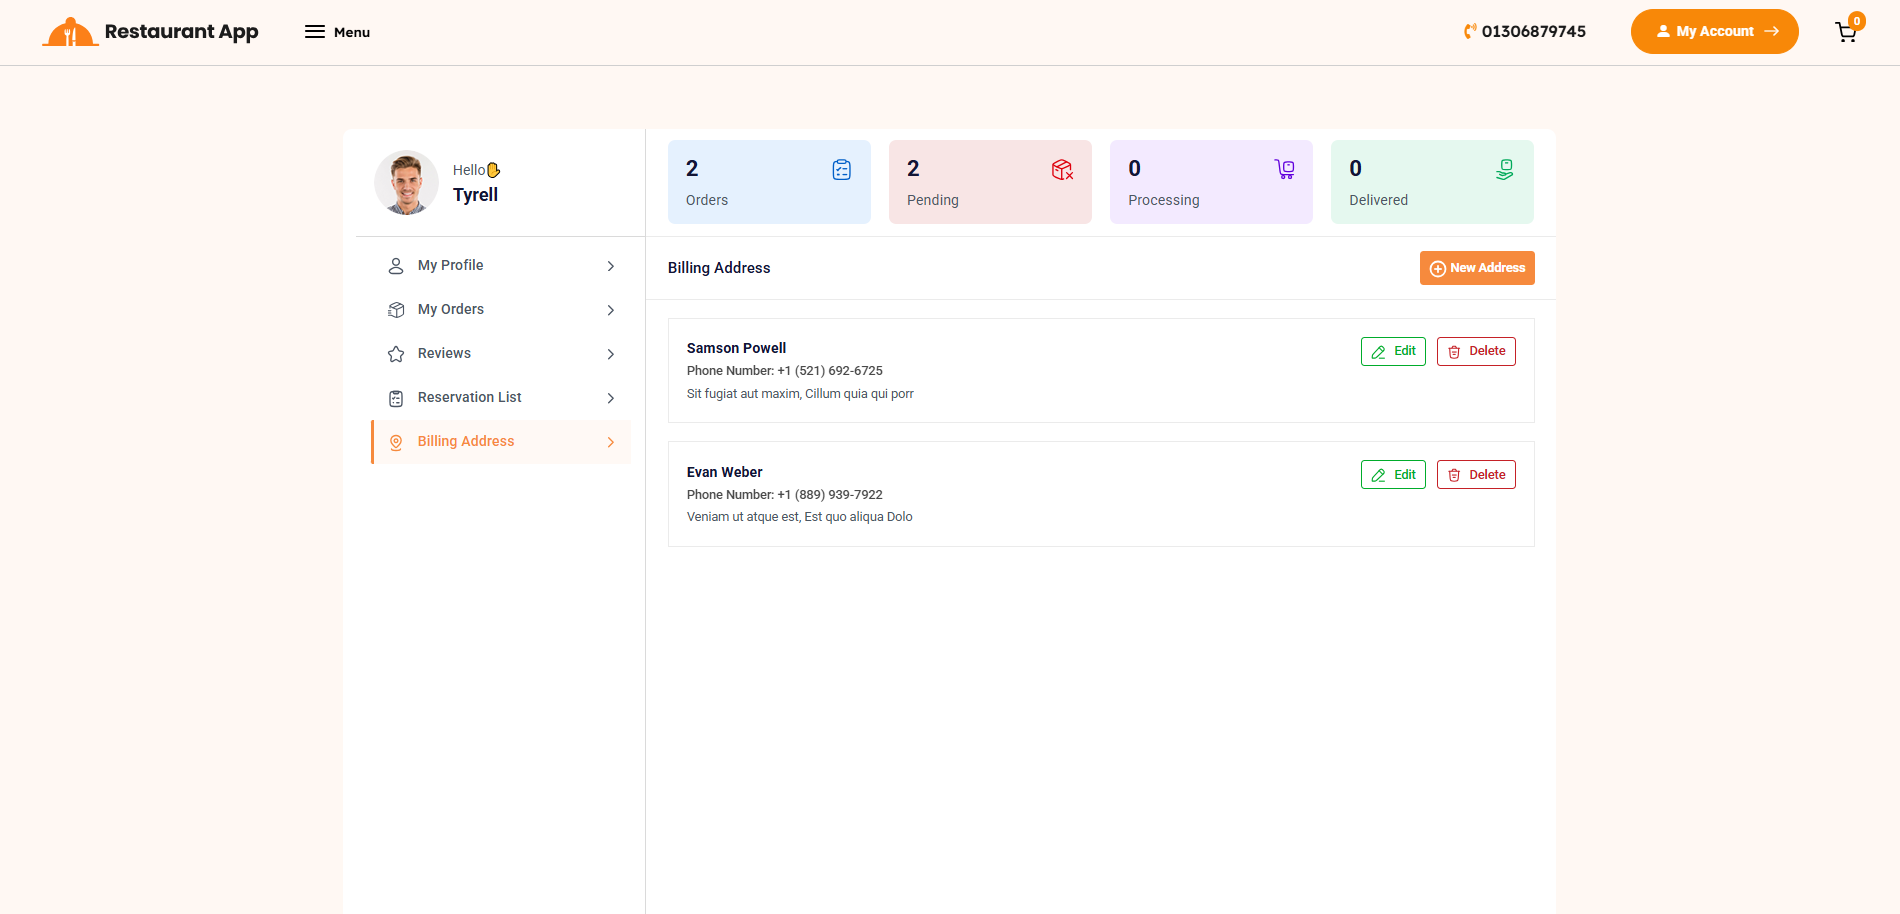
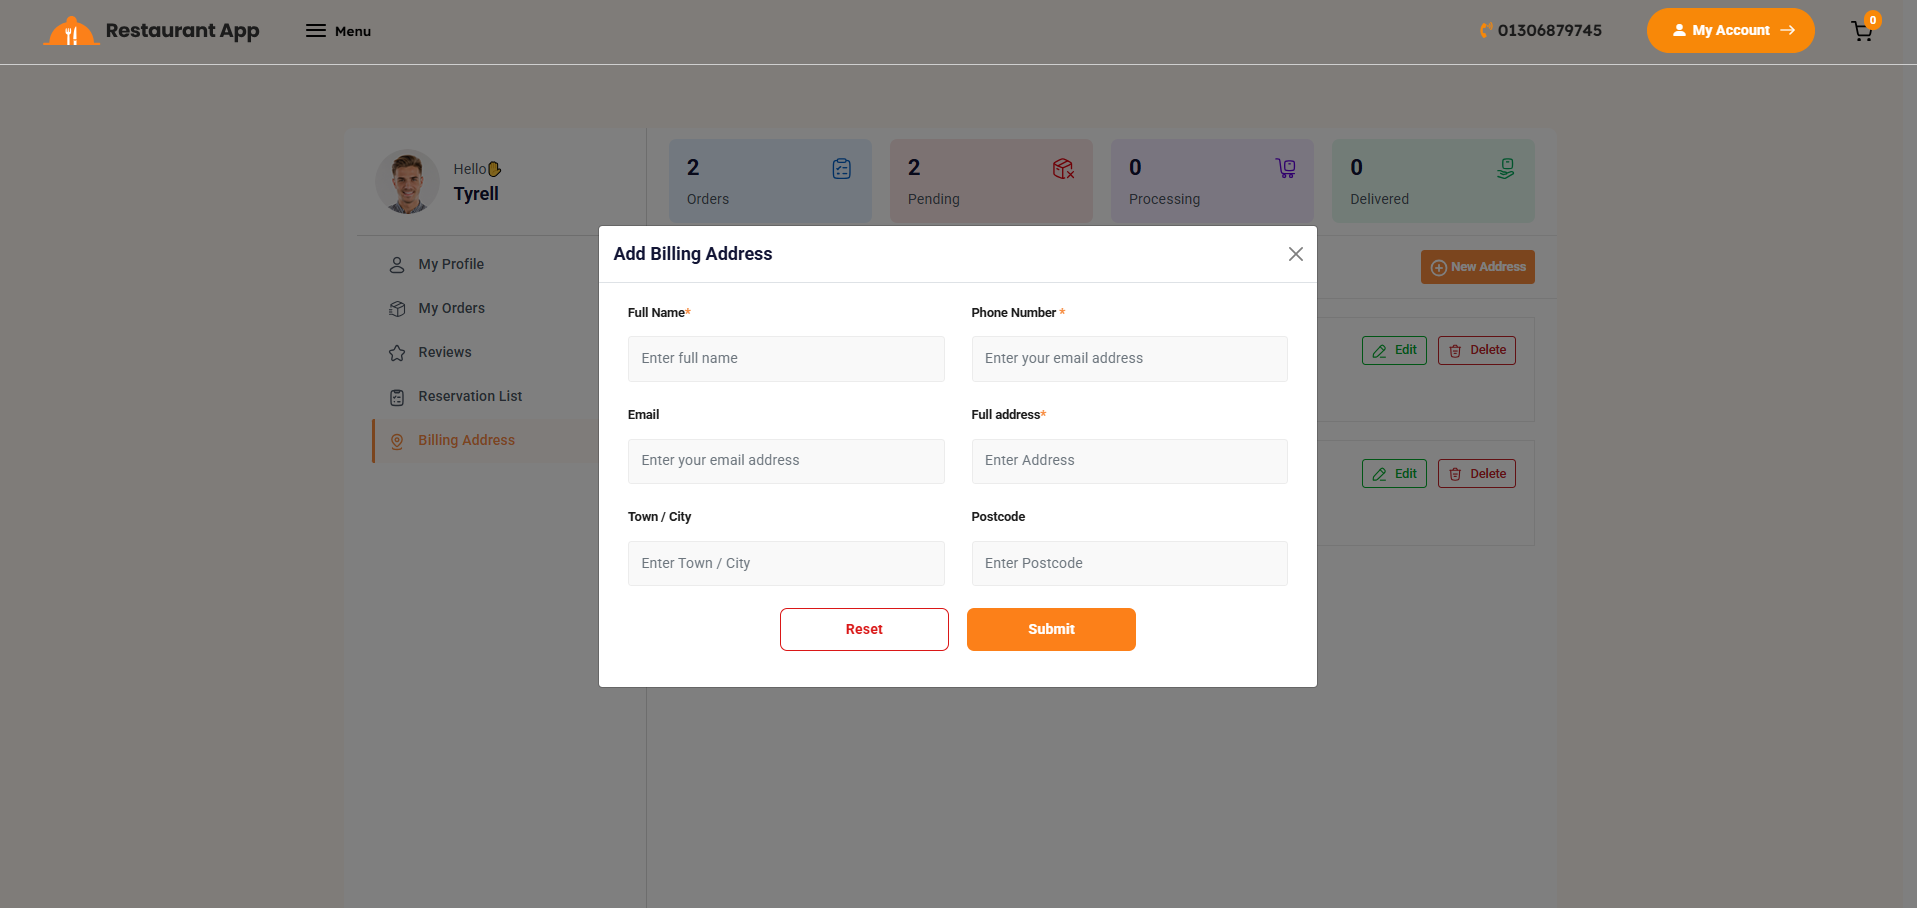
The Billing Address page, located within the customer dashboard, provides a centralized interface for users to manage their saved locations. This section ensures a faster checkout process by allowing customers to store and edit multiple delivery or billing destinations.
📌 Custom Domain Add-on: Setup and Installation
🚀 Why You Need This Add-On
After installing this add-on, you will unlock Subdomain and Custom Domain features for your customers (businesses).
-
After installing this add-on, two new options will be available in your Subscription Plan: Custom Domain Limit and Subdomain Limit.
You can configure how many custom domains and subdomains each plan will allow, giving you full control over your subscription tiers.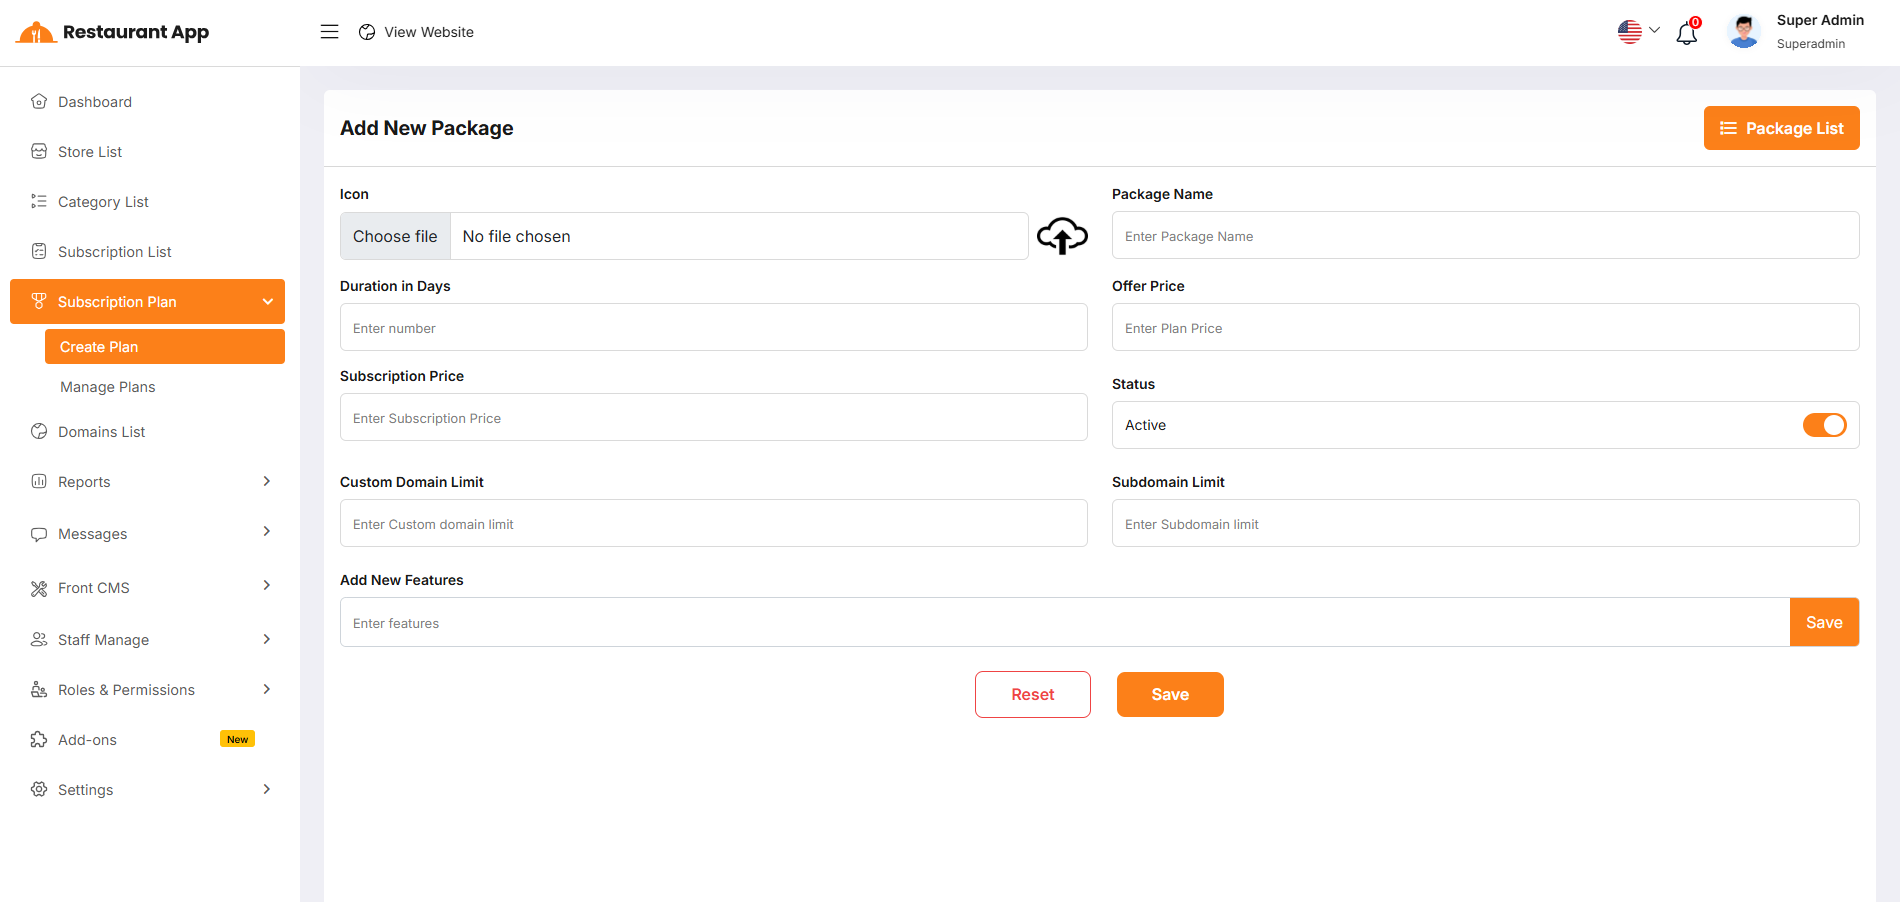
-
A new section will also appear in the Settings page, where you can configure how domain requests will be handled.
You may choose to approve requests automatically or review them manually before activation.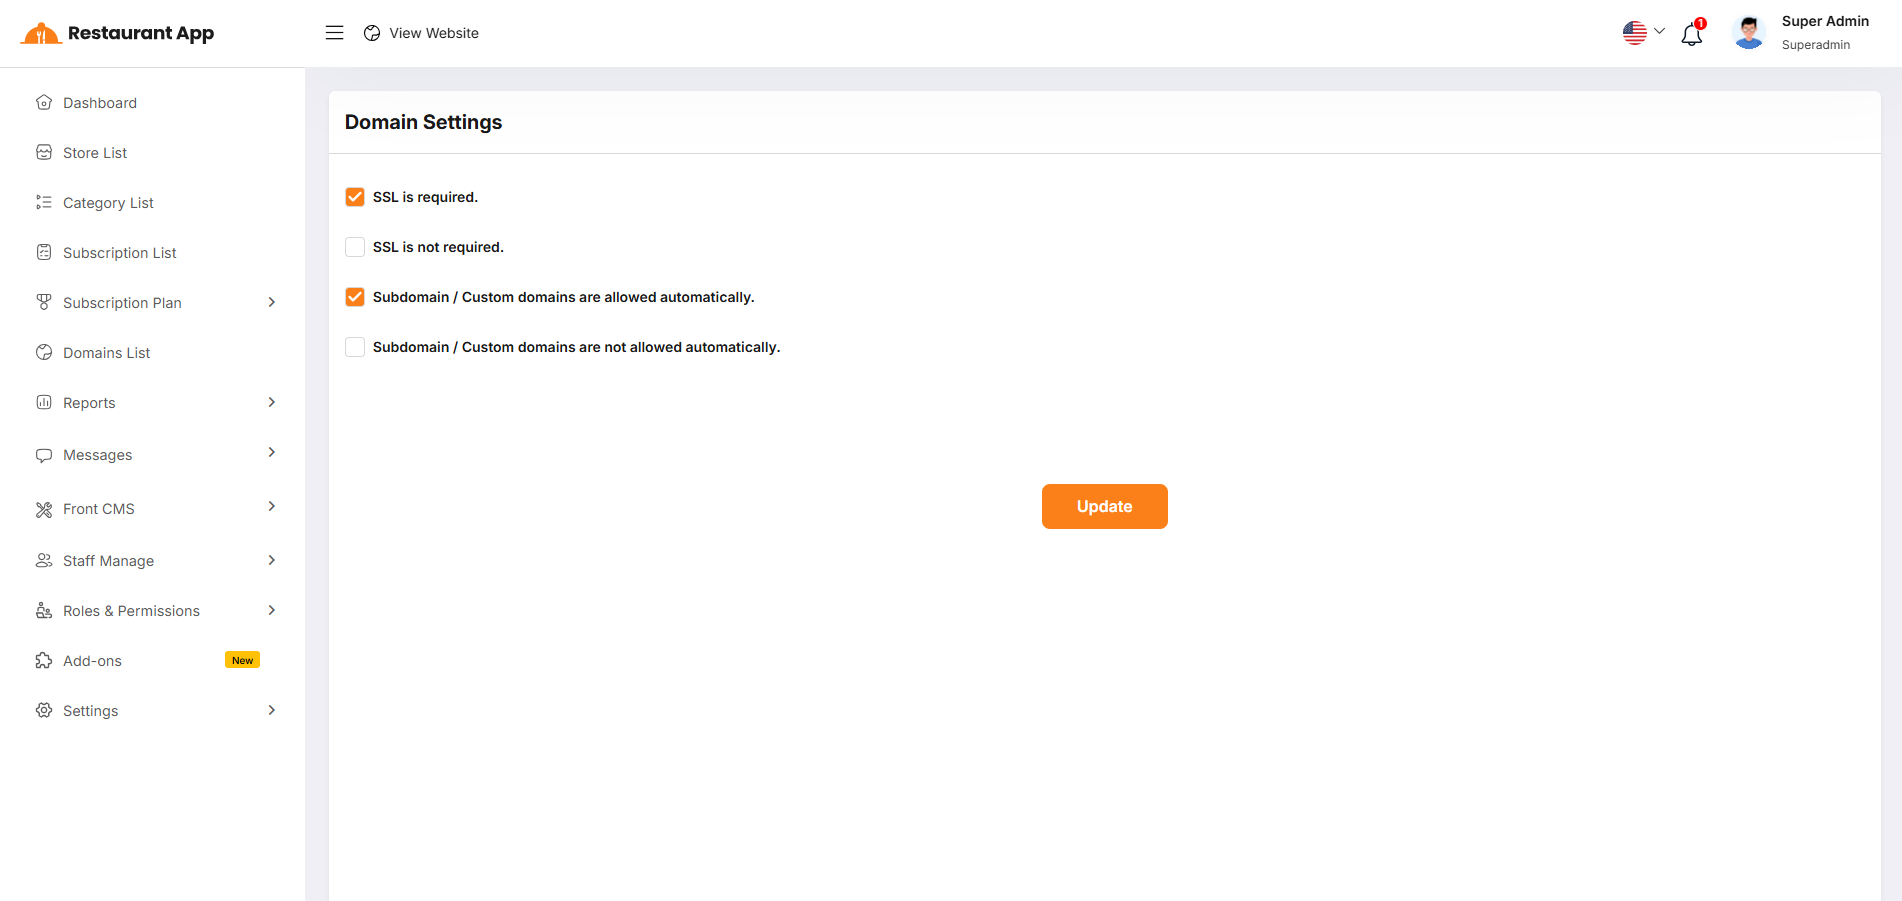
-
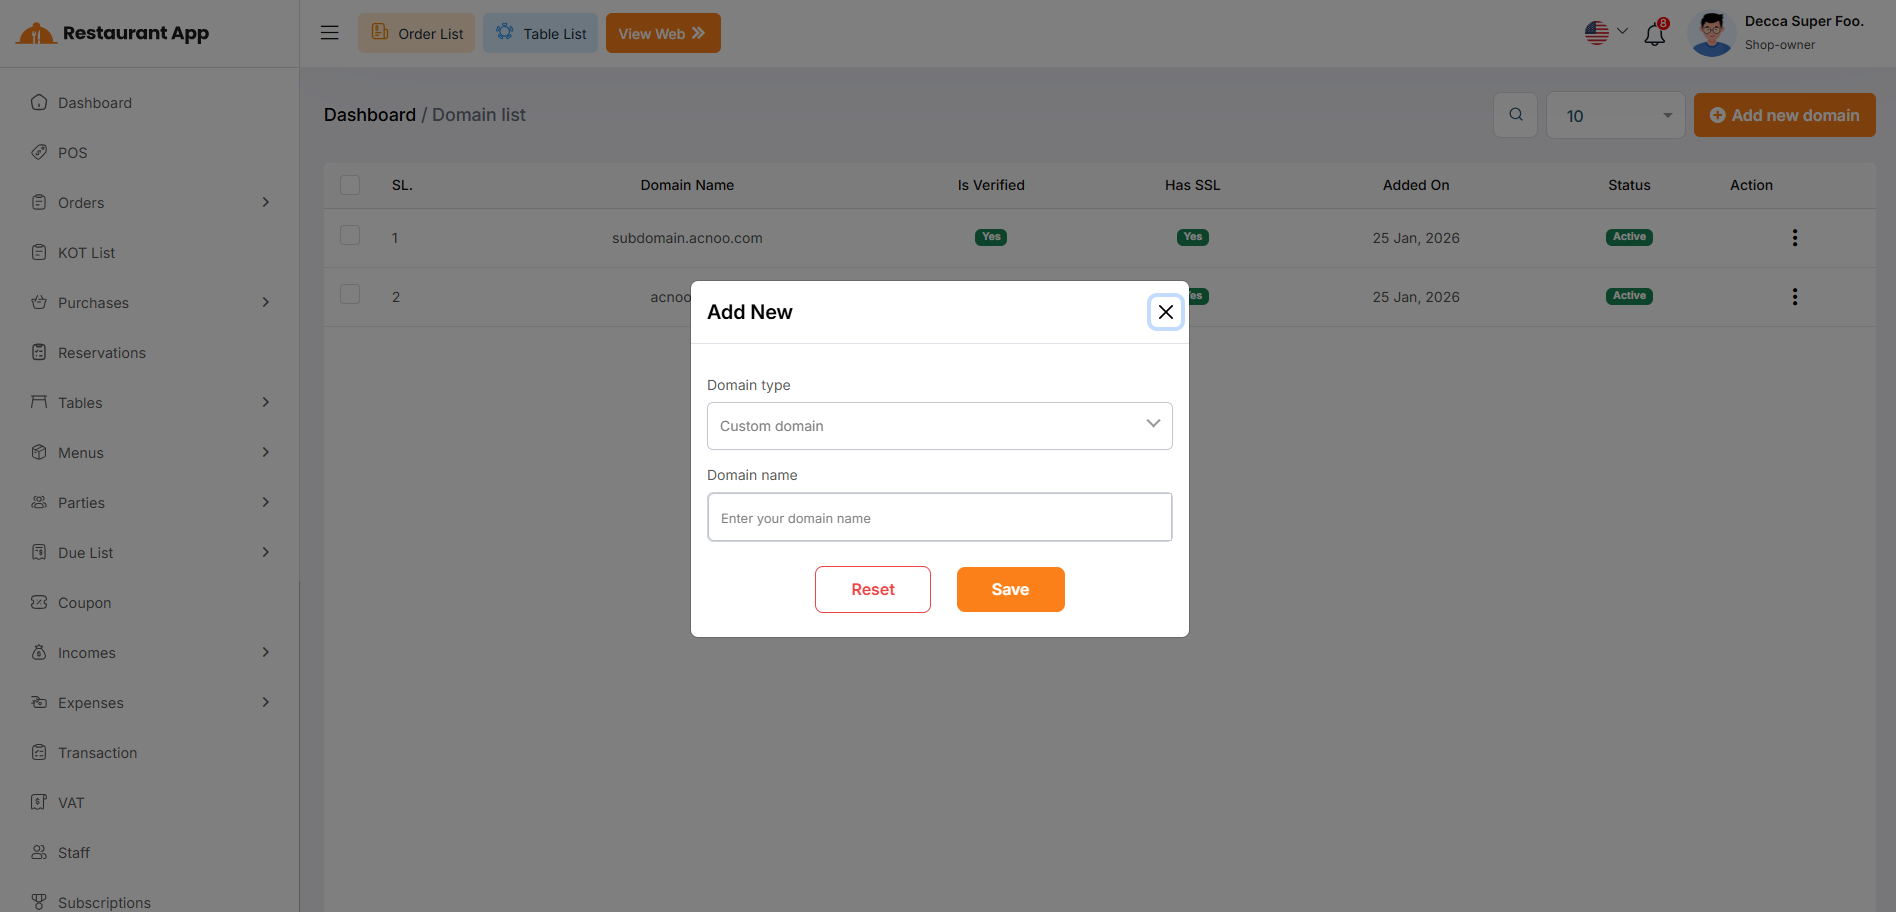
Each business can create and manage multiple Subdomains (e.g.,
yourbusiness.yourdomain.com) and Custom Domains (e.g.,yourbusiness.com), depending on the limits defined in their Subscription Plan.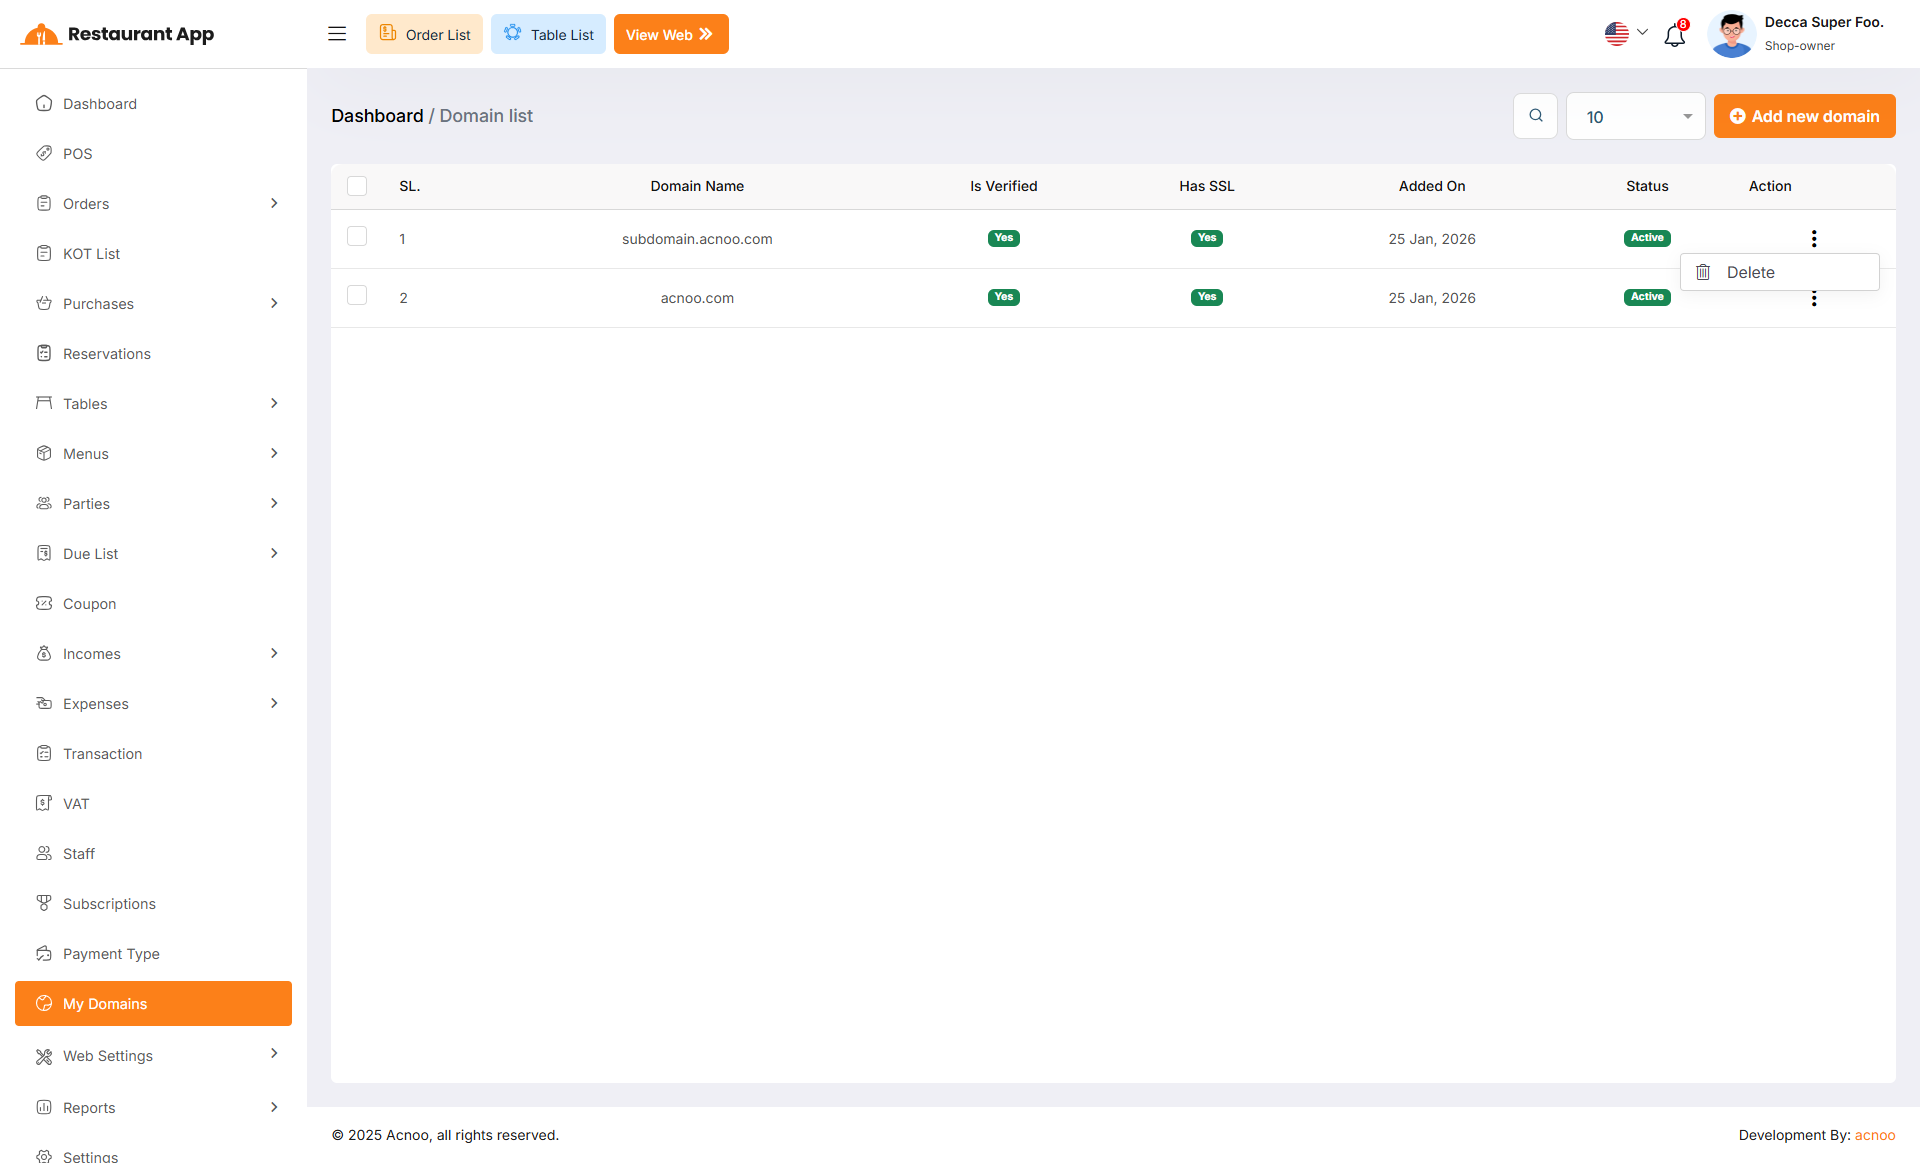
-
These features are seamlessly integrated with your subscription plans, ensuring businesses enjoy premium branding options as part of their plan without extra setup.
-
By enabling subdomains and custom domains, you boost professionalism, strengthen brand identity, and make your Menulyn platform more flexible and appealing for businesses of all sizes.
📦 Installation
The installation process for the Custom Domain Add-on follows the same steps as outlined in the Business Add-on documentation.
👉 Please refer to the Business Add-on Installation Guide for detailed instructions.
⚙️ Domain Setup Instructions
🌐 cPanel Setup
- Login to your cPanel account
- Go to
Domains → Addon Domains - Enter your new domain (e.g.,
restaurantapp.com) - Leave the auto-generated subdirectory and FTP as default
- Click Add Domain
- Update your domain’s DNS to point to your cPanel nameservers
SSL/TLS in cPanel and issue a
certificate
(Let’s Encrypt is free).
🌐 hPanel (Hostinger) Setup
- Login to your hPanel account
- Go to
Websites → Managefor your hosting plan - Click Domains → Add Website / Add Domain
- Enter your domain name (e.g.,
restaurantapp.com) - Choose the directory (or keep default)
- Click Add Domain
- Update DNS to point to Hostinger nameservers
Websites → Manage → SSL and activate
free
SSL (Let’s Encrypt).
⚙️ Apache VPS Setup
Create a config file in /etc/apache2/sites-available/:
<VirtualHost *:80>
ServerName default
ServerAlias *
DocumentRoot /var/www/your_project/public
DirectoryIndex index.php

<Directory /var/www/your_project/public>
    AllowOverride All
    Require all granted
</Directory>
</VirtualHost>
Enable site & reload Apache:
sudo a2ensite your_conf.confsudo systemctl reload apache2
example.com,
and use Certbot for SSL.
⚙️ Nginx VPS Setup
Create a config file in /etc/nginx/sites-available/:
server {
listen 80;
server_name _;
root /var/www/your_project/public;

index index.php index.html;

location / {
    try_files $uri $uri/ /index.php?$query_string;
}

location ~ \.php$ {
    include snippets/fastcgi-php.conf;
    fastcgi_pass unix:/var/run/php/php8.1-fpm.sock;
}
}
Enable site & reload Nginx:
sudo ln -s /etc/nginx/sites-available/your_config /etc/nginx/sites-enabled/sudo nginx -t && sudo systemctl reload nginx
example.com, and use Certbot for SSL.
Menulyn HRM Add-on
📘 Overview:
The HRM Add-on for Menulyn is a comprehensive extension designed to streamline human resource management in your organization. This add-on allows users to efficiently manage employees, departments, shifts, leaves, attendance, and payroll in one unified system. With real-time visibility, HR managers can quickly track employee status, monitor attendance, process payroll, and generate detailed reports on workforce activities.
🔑 Key Features
👥 Employee management with complete profiles and role assignments
🏢 Department and designation setup for structured organizational hierarchy
⏰ Shift management and attendance tracking for accurate working hours
📅 Leave and holiday management with approval workflows
💰 Payroll management including salaries, deductions, and bonuses
📊 Detailed reports for attendance, leave, payroll, and HR analytics
🔄 Seamless integration with Menulyn modules for smooth operations
🔒 Secure and reliable system, ensuring HR data integrity
⚡ User-friendly, lightweight, and compatible with future Menulyn updates
📦 Installation
The installation process for the HRM Add-on follows the same steps as outlined in the Business Add-on documentation.
👉 Please refer to the Business Add-on Installation Guide for detailed instructions.
Department
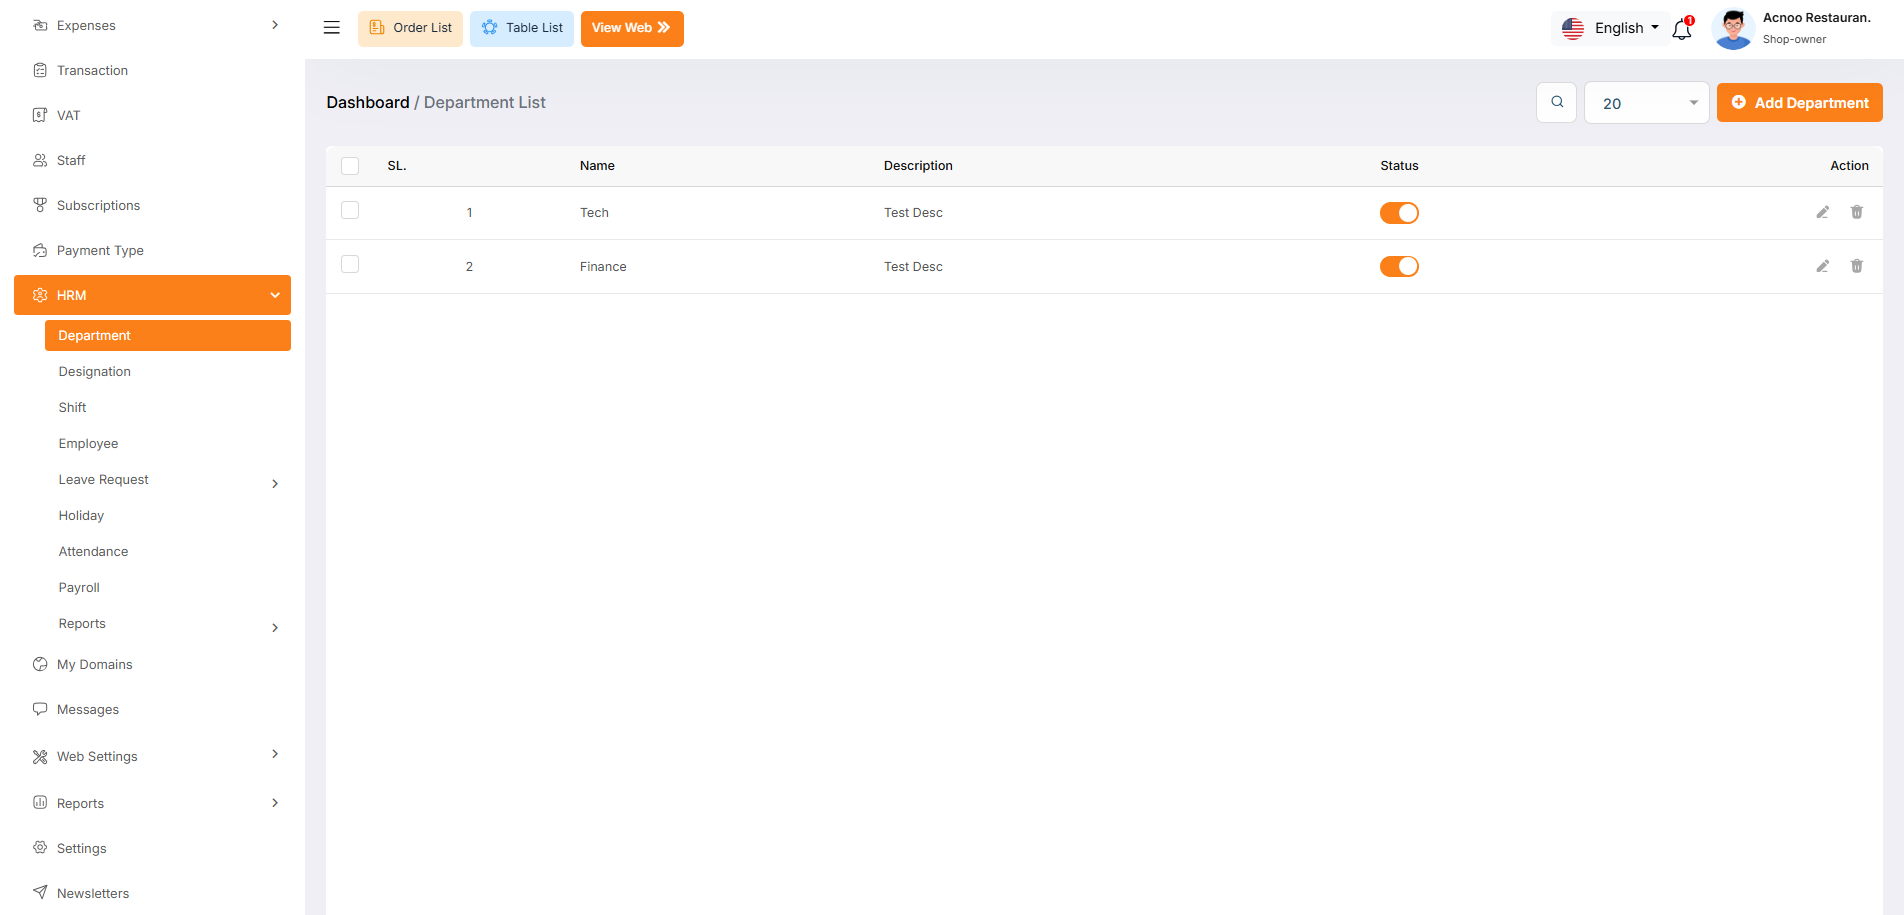
The "Department List" page displays a list of all defined department,
including
their names, descriptions, and status. It provides options to manage these
department.
Use the search bar to find specific department by name or description.Click the "Add New
department" button to navigate to a page or modal where you can add a new
department.Clicking the three dots in the "Action" where you can edit,delete and view.
Add New Department
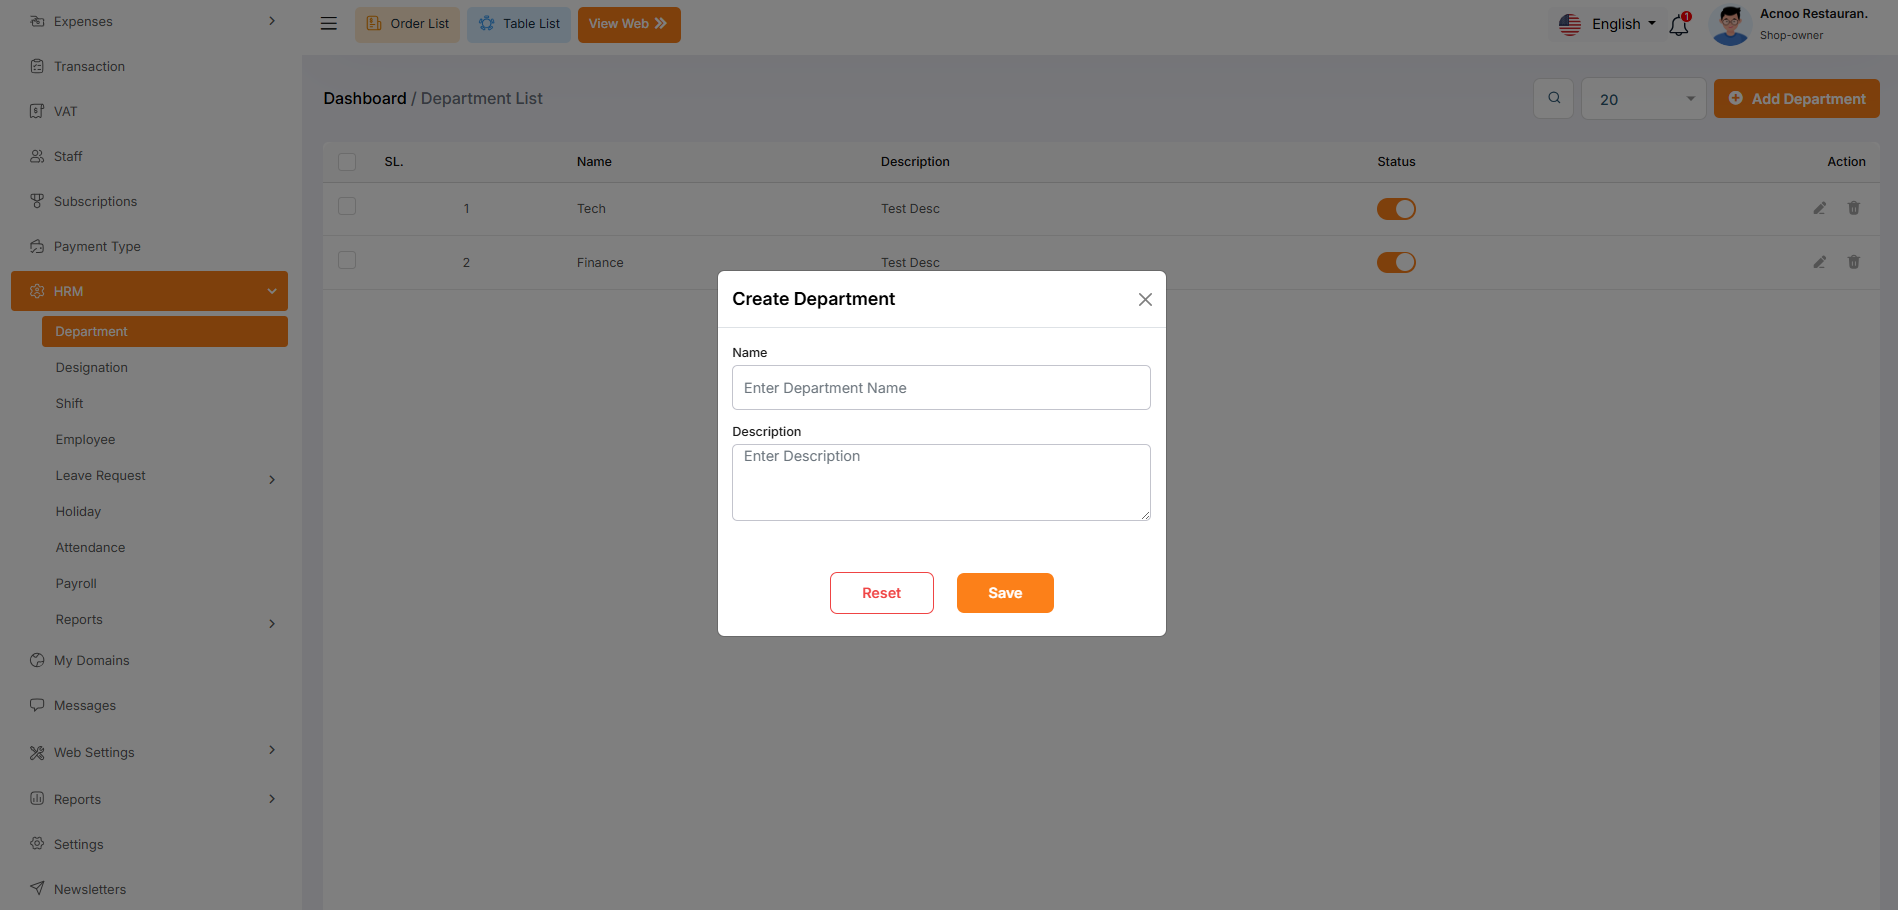
The "Department" form appears as a pop-up or overlay on the "Department List" page. It contains the following fields:
Designation
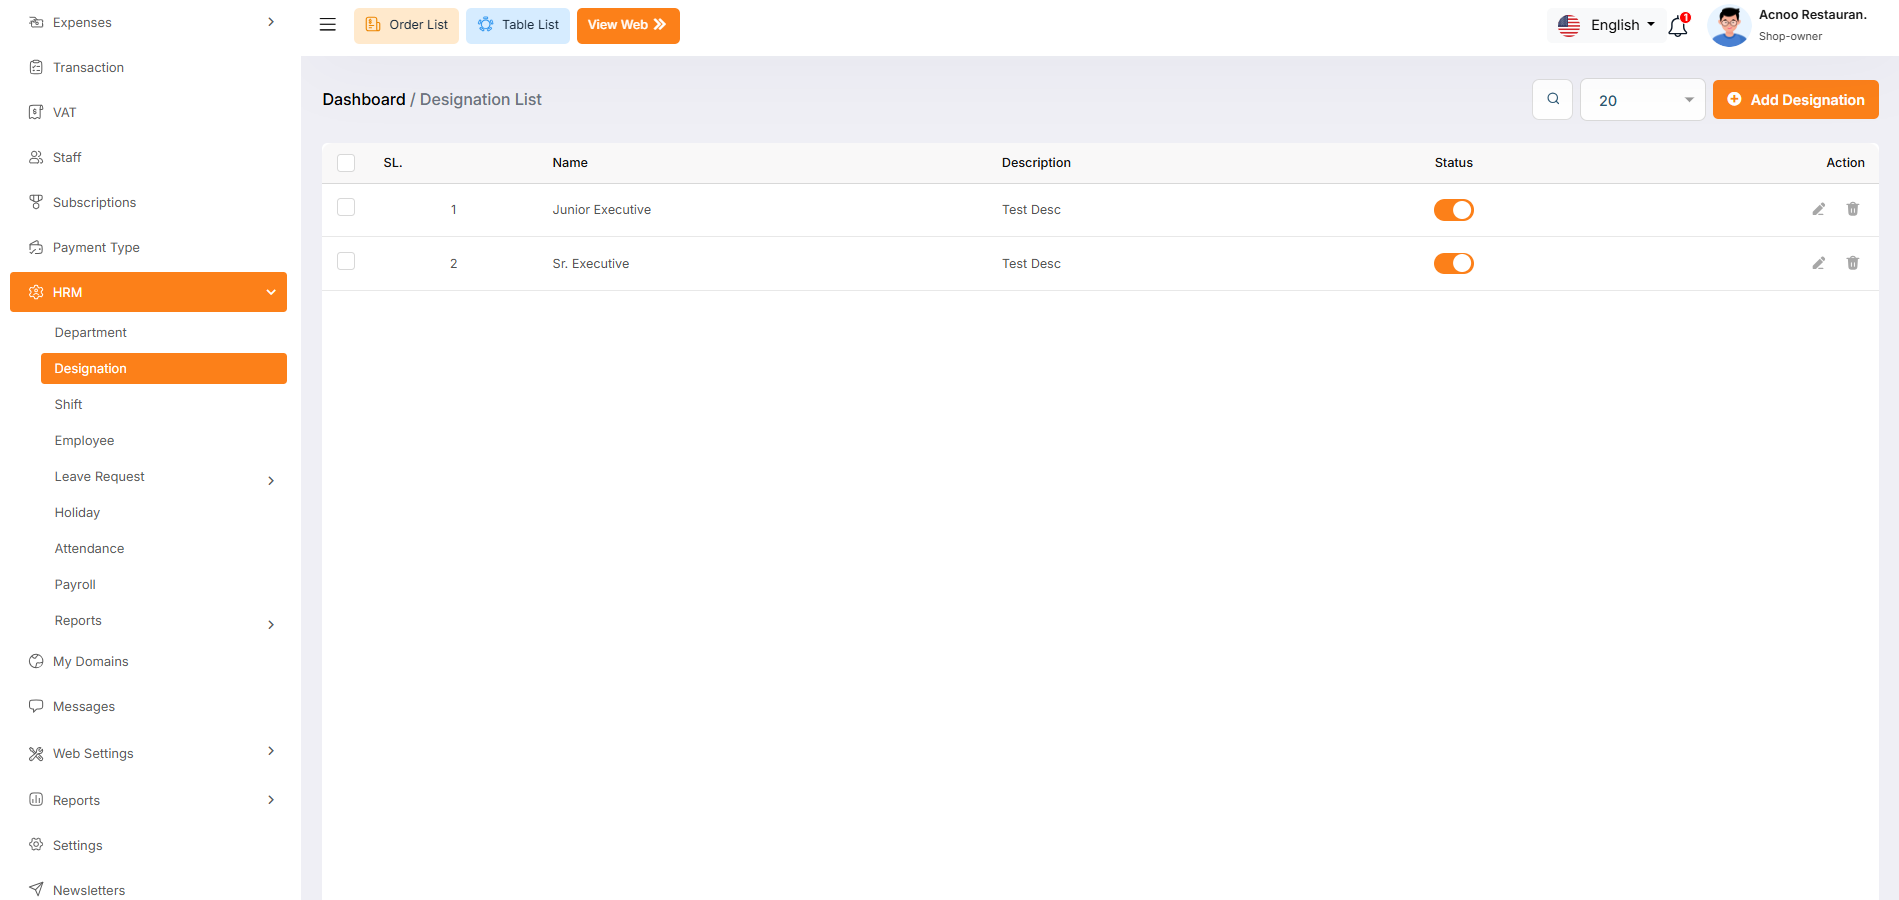
The "Designation List" page displays a list of all defined designations,
including their names, descriptions, and status. It provides options to manage these
designations.
Use the search bar to find specific designations by name or description.Click the "Add New
designation" button to navigate to a page or modal where you can add a new
designation.Clicking the three dots in the "Action" where you can edit,delete and view.
Add New Designation
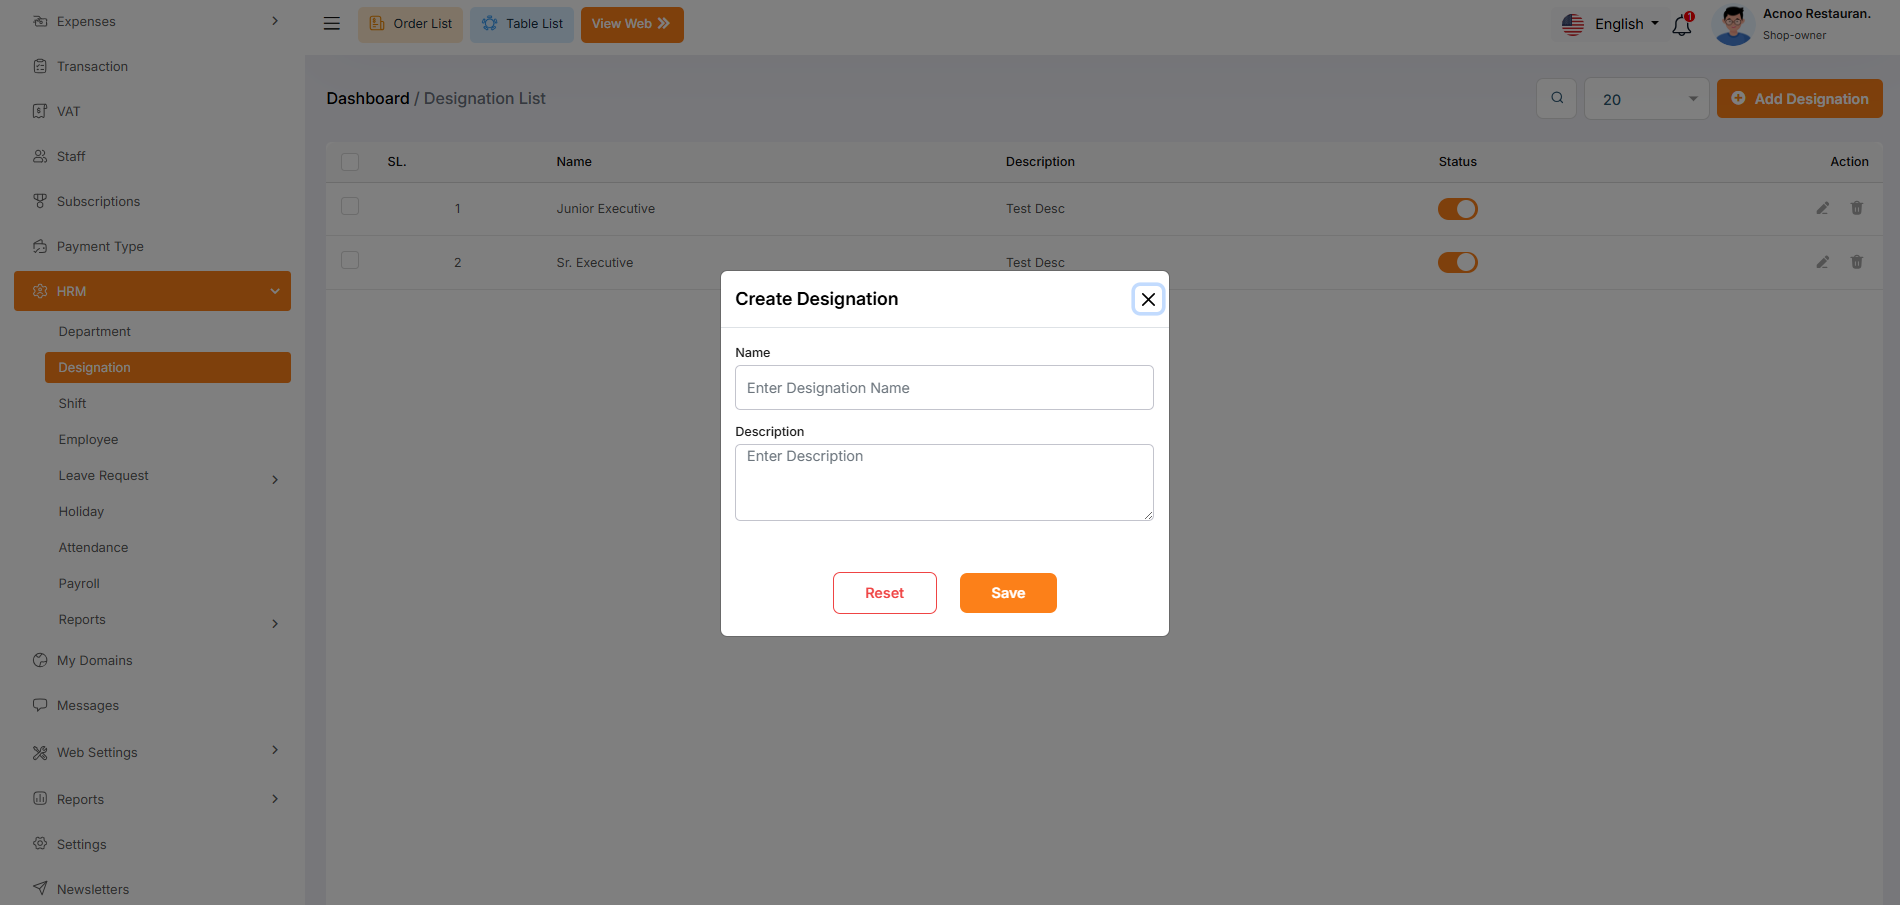
The "Designation" form appears as a pop-up or overlay on the "Designation List" page. It contains the following fields:
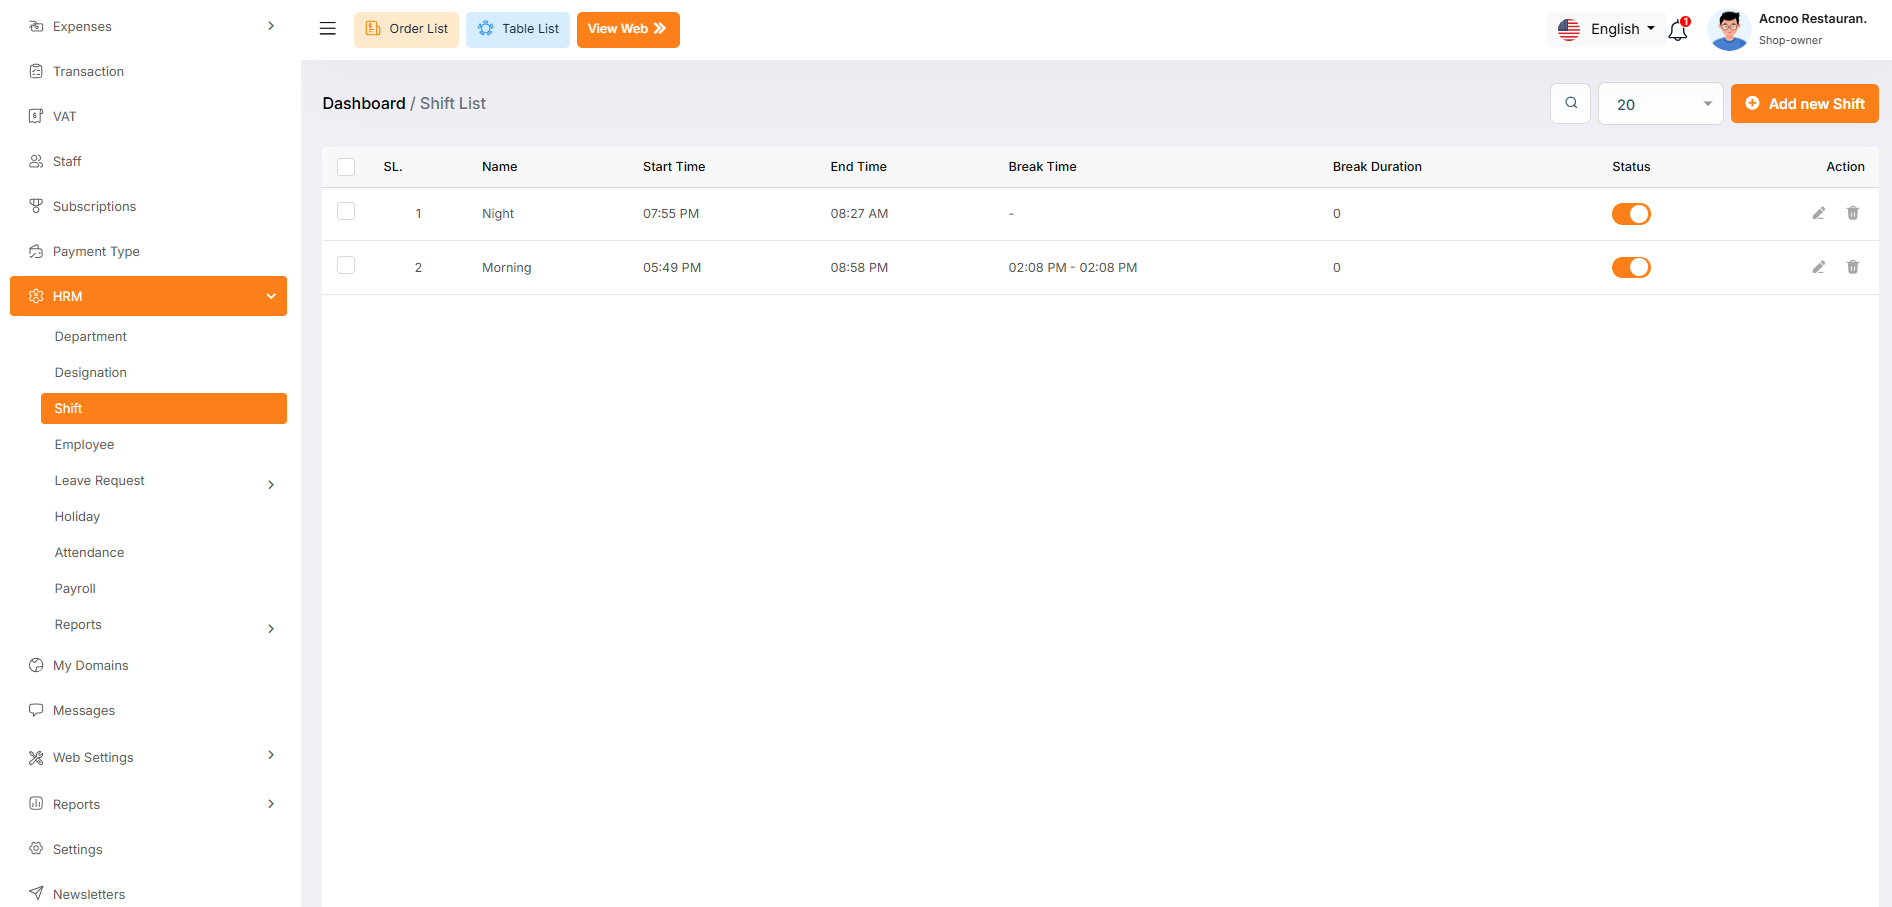
Shift List
The "Shift List" page displays a list of all defined work shifts, including their
names, start and end times, break times, and status. It provides options to manage these
shifts.
Use the search bar to find specific shifts by name.Click the "Add New Shift" button to
navigate to a page or modal where you can add a new work shift to the system.Clicking the
three dots where you can edit,delete and view for shift.
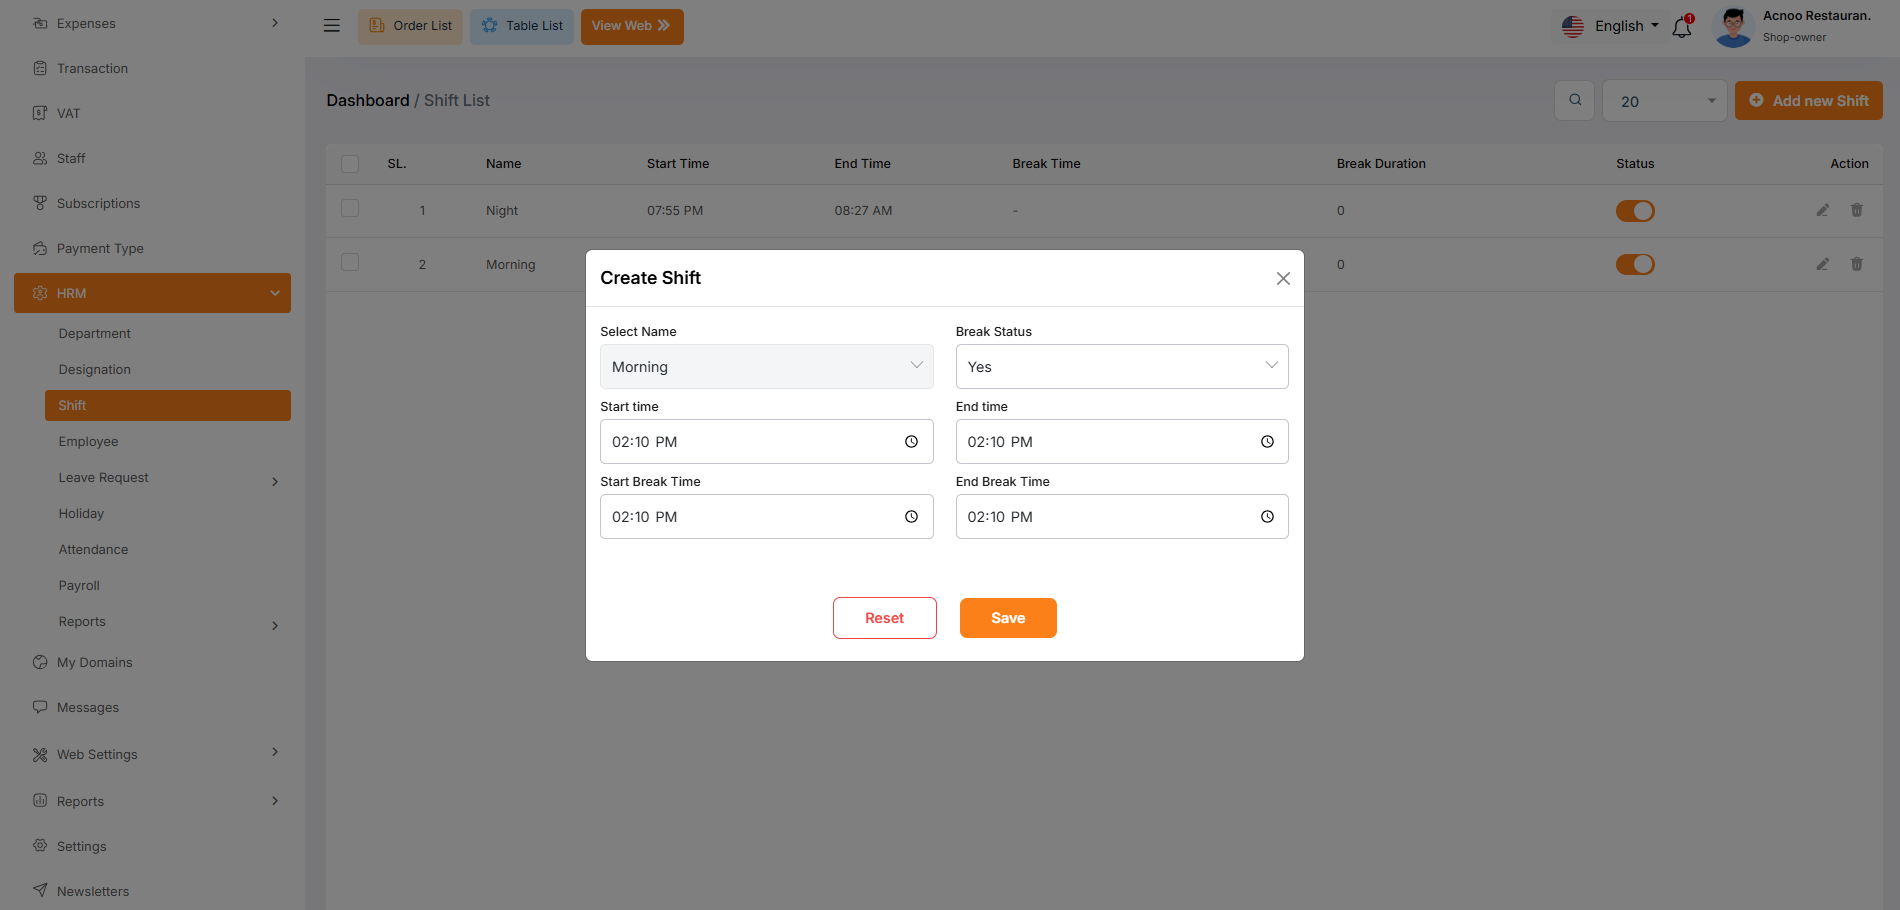
Create New Shift
The "Add New Shift" form appears as a pop-up or overlay on the "Shift List" page. It contains filled the following input fields.
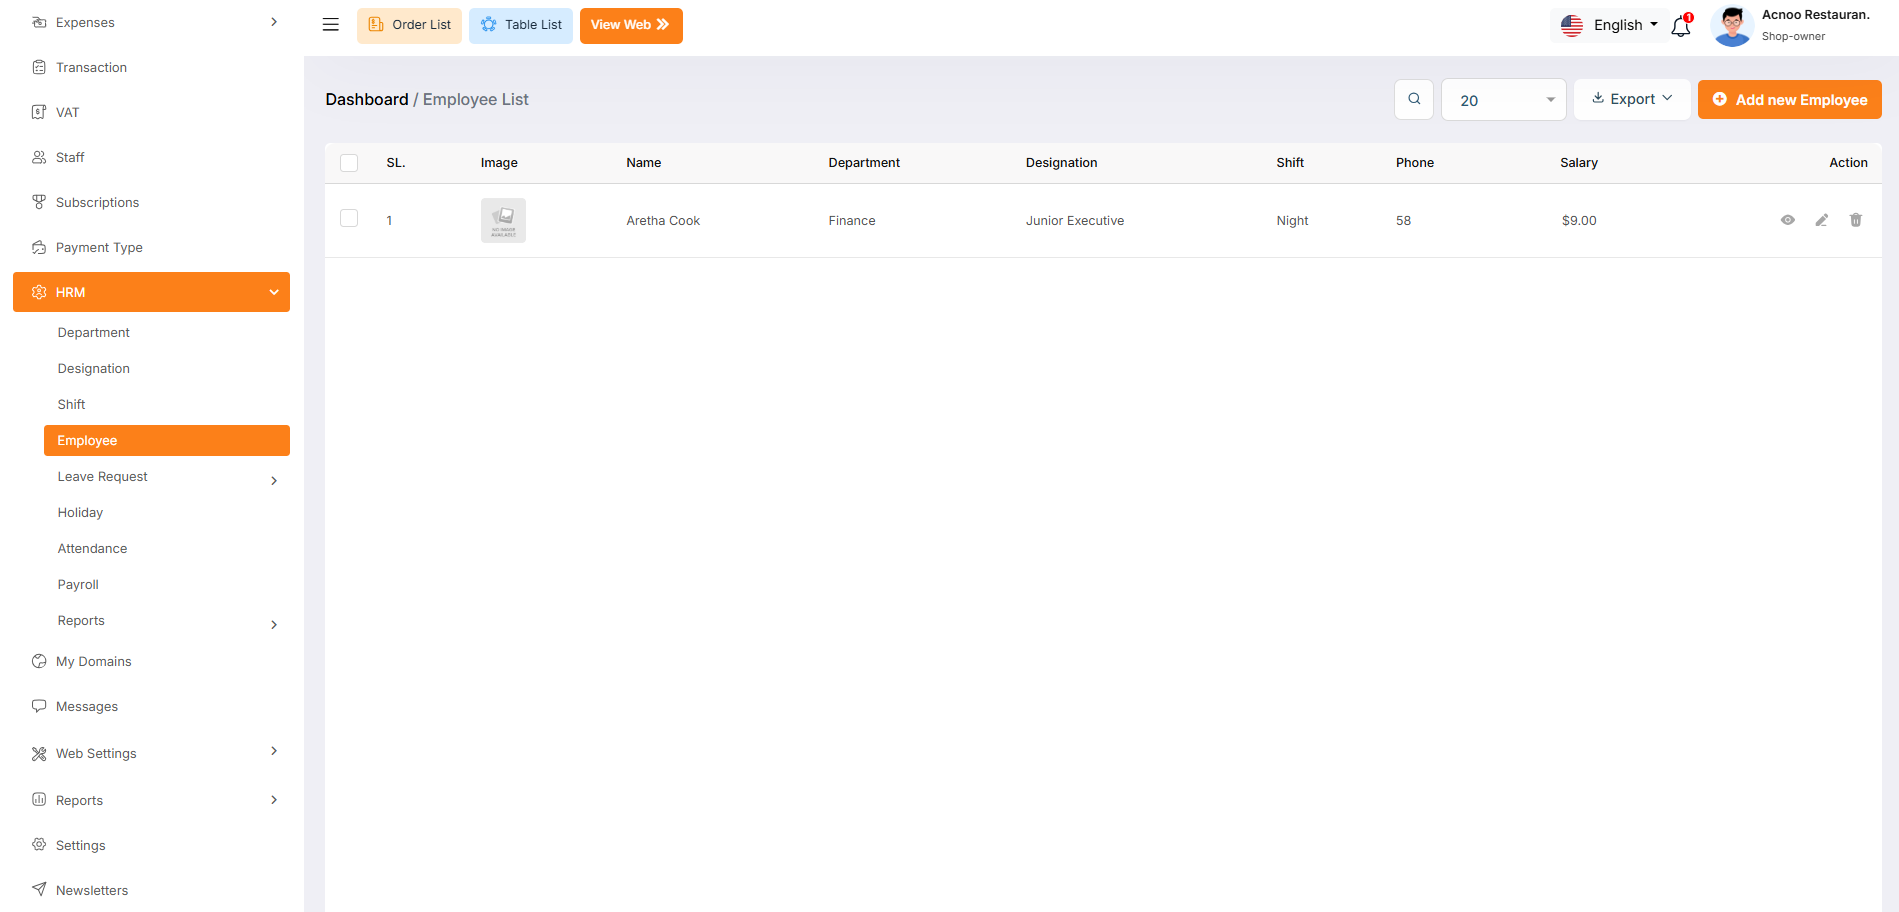
Employee
The "Employee List" page displays a list of all employees, including relevant
details such as their employee ID, name, designation, department, join date, employment
status, shift, and salary. It provides options to manage these employee records.
Use the search bar to find specific employees by name, employee ID, designation, or other
relevant criteria.Click the "Add New Employee" button to navigate to a page or modal where
you can add a new employee record.Clicking the three dots in the "Action" where you can
perform edit,delete and view.
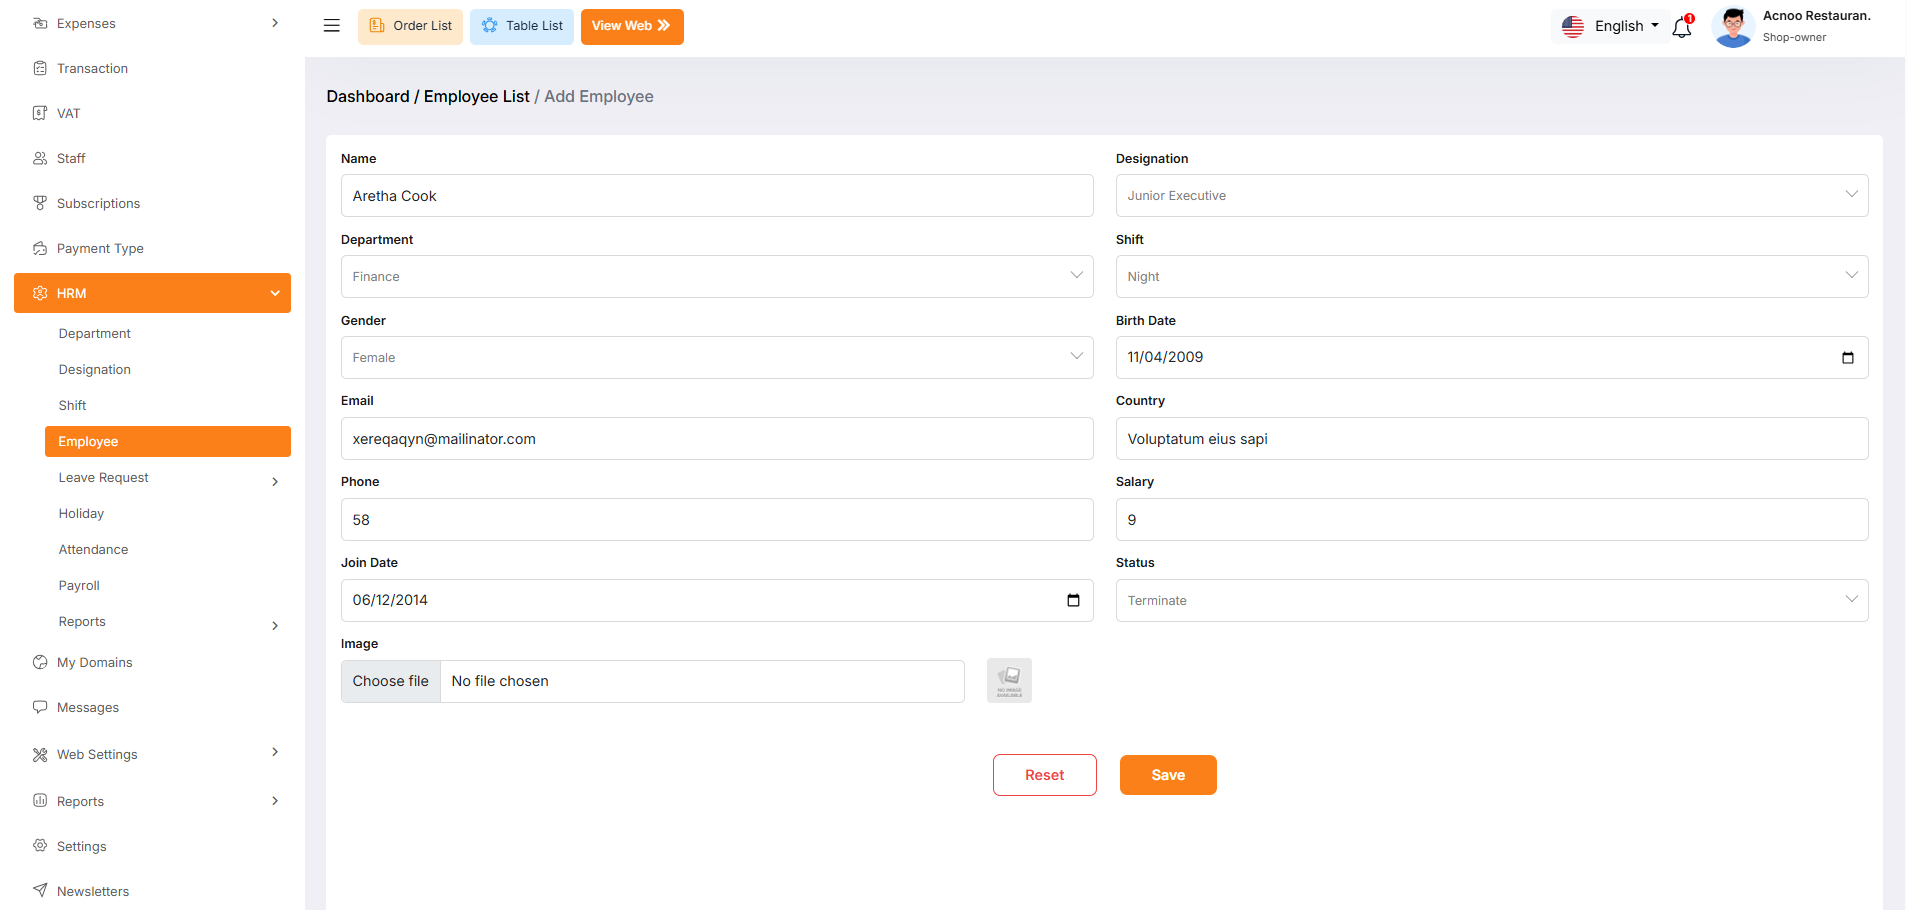
Add New Employee
Here you can create a Employee by filling the following form.
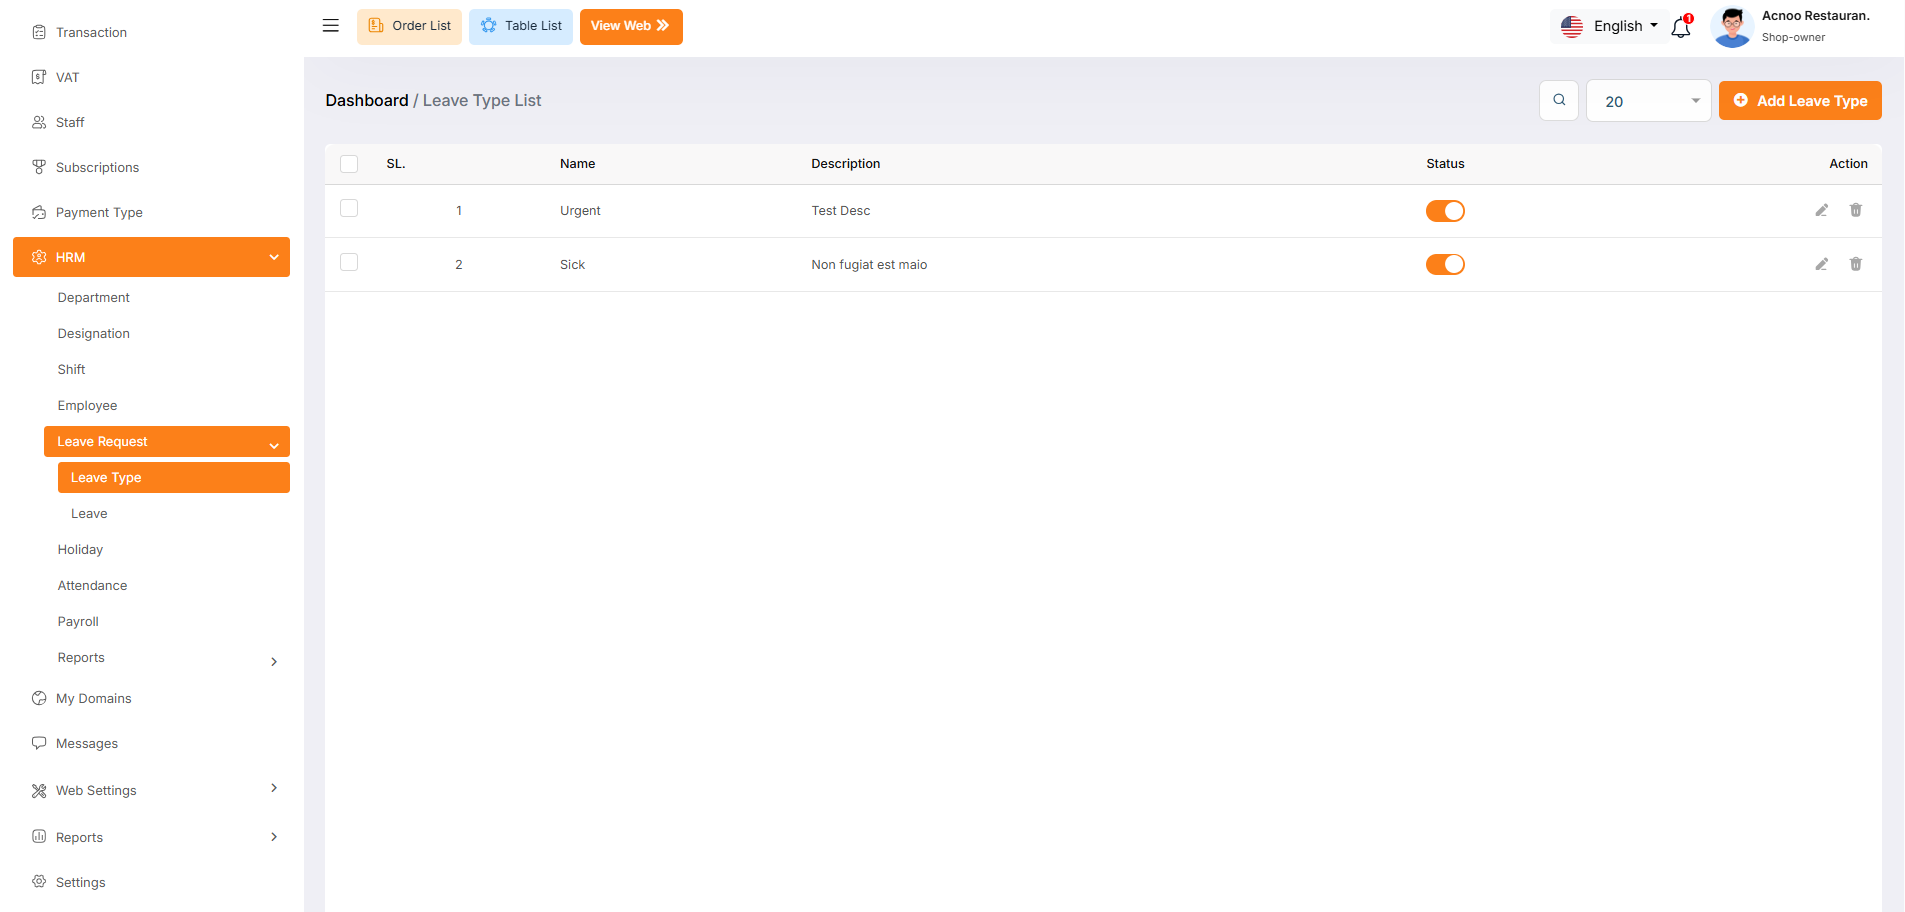
Leave Type List
The "Leave Type List" page displays a list of all defined leave types, including
their names, descriptions, and status. It provides options to manage these leave types.
Use the search bar to find specific leave types by name or description.Click the "Add New
Leave Type" button to navigate to a page or modal where you can add a new leave
type.Clicking the three dots where you can edit,delete and view for leave type.
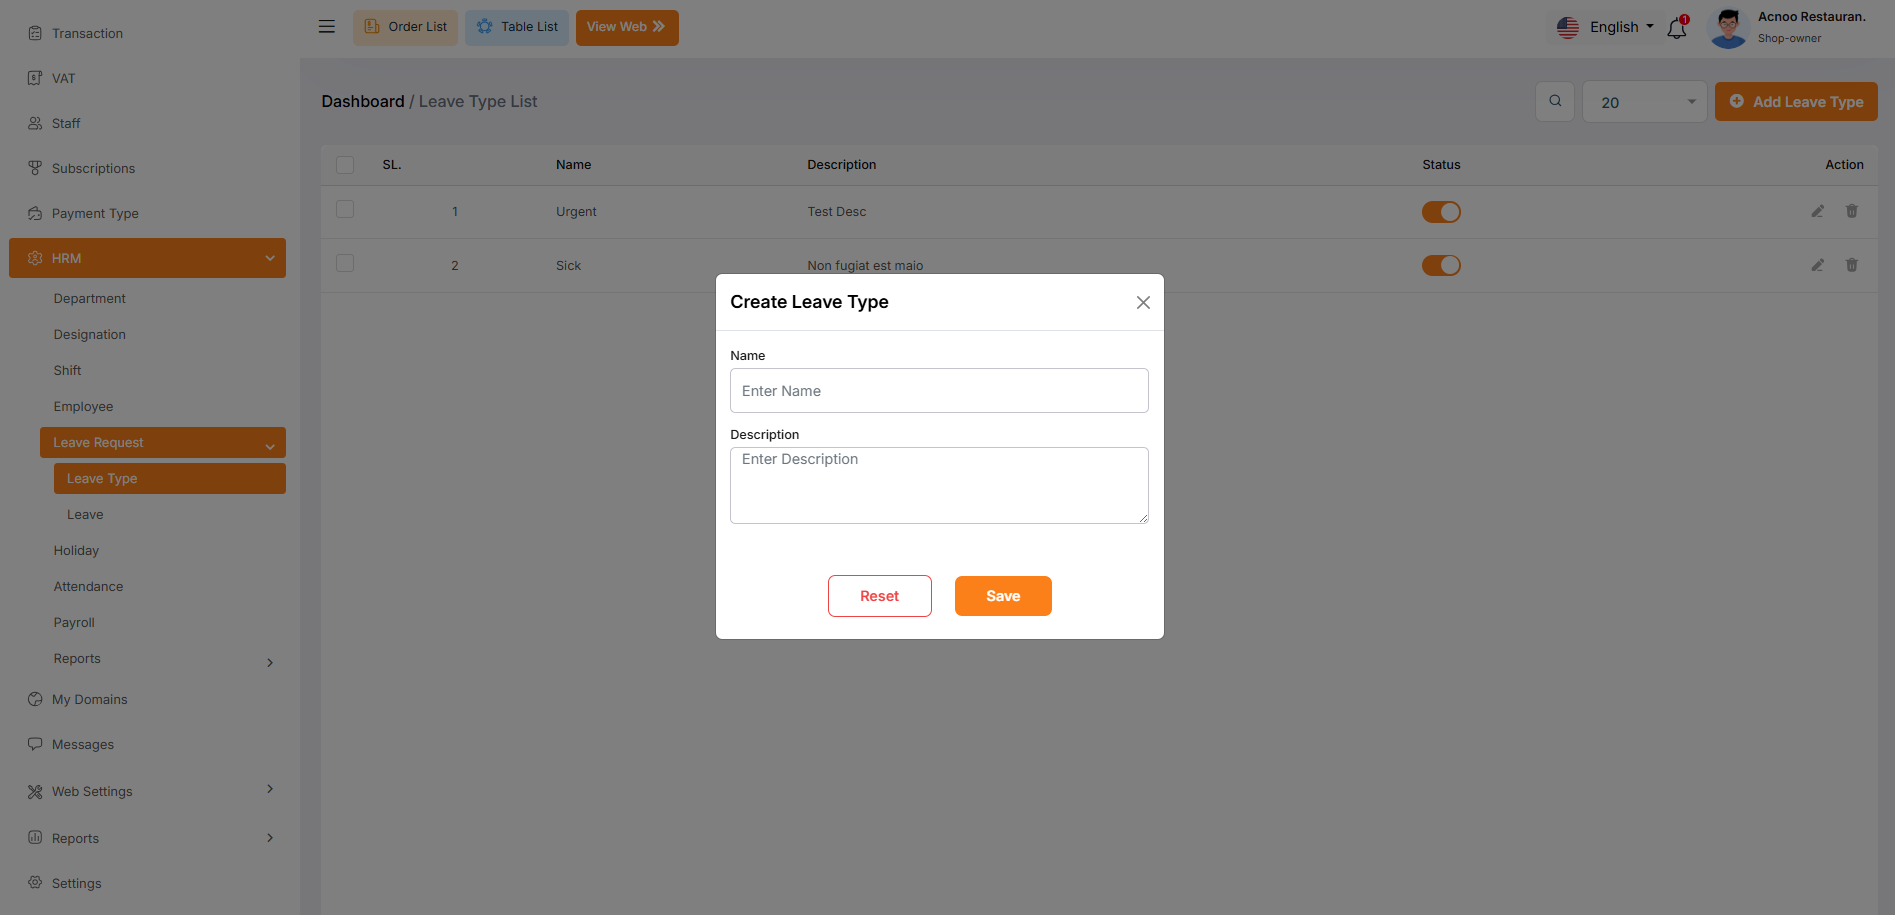
Create New leave type
The "Add New leave type" form appears as a pop-up or overlay on the "Leave Type List" page. It contains filled the following input fields.
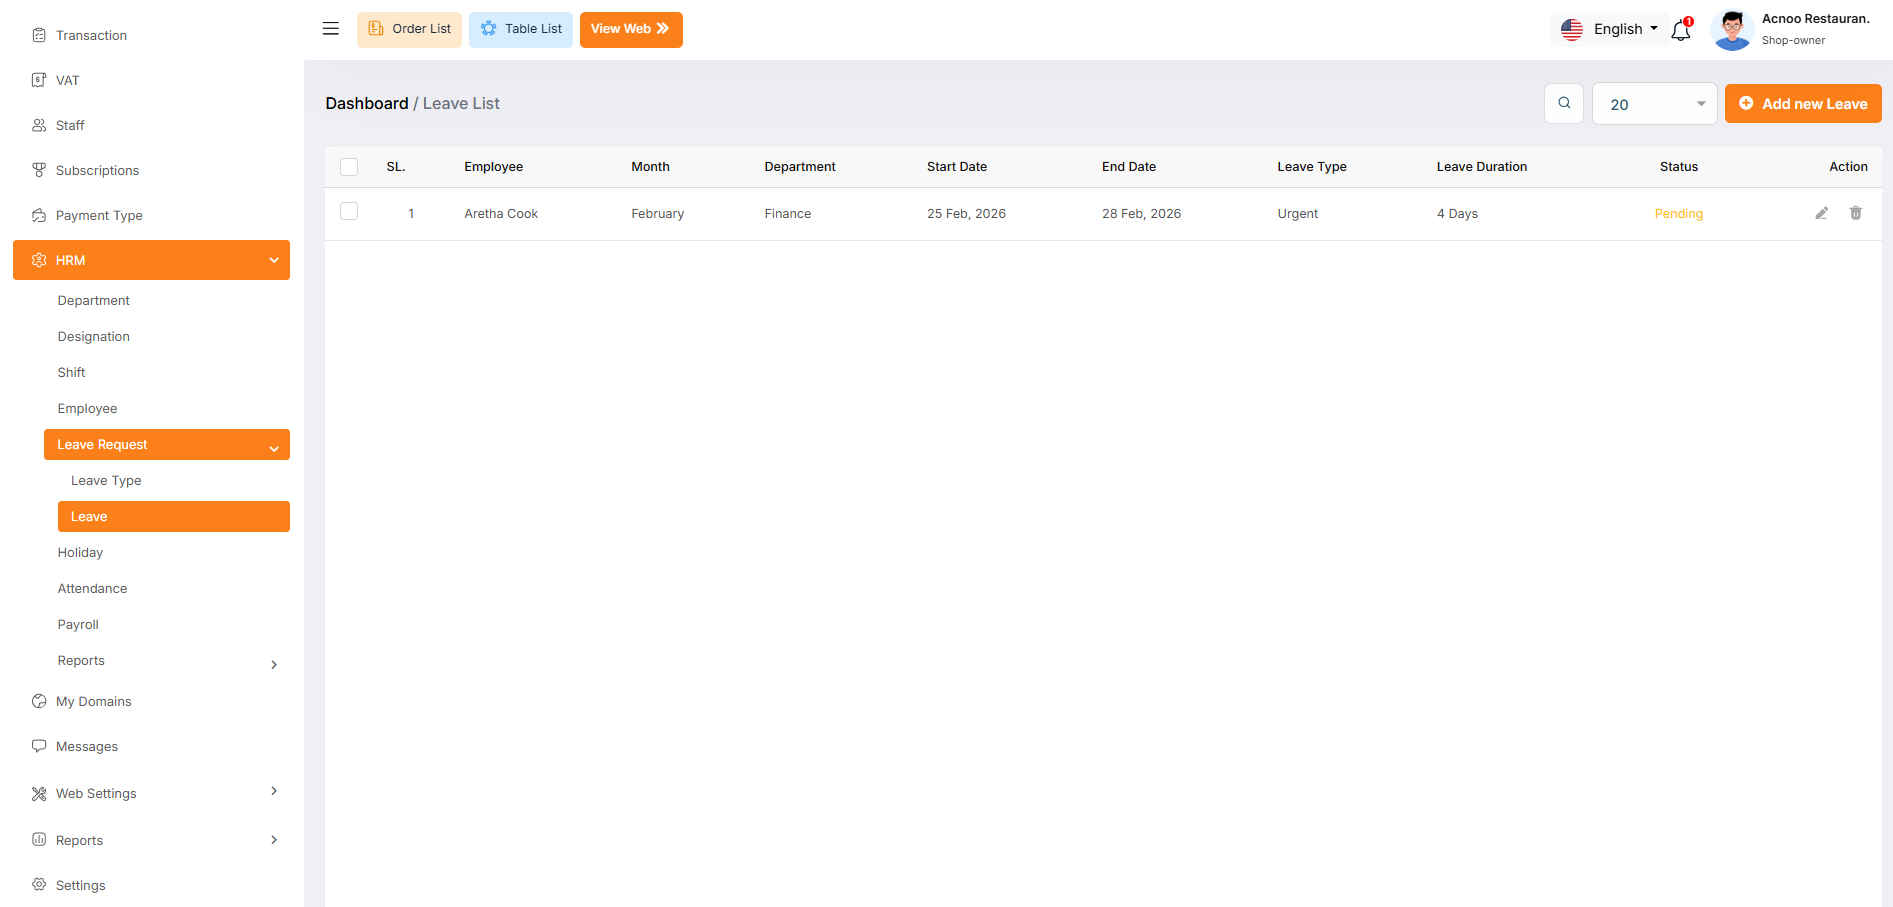
Leaves
The "Leave Employee List" page displays a list of all employee leave requests,
including relevant details such as the employee ID, name, leave type, start and end dates,
leave duration, approval status, and approver. It provides options to manage these leave
requests.
Use the search bar to find specific leave requests by employee ID, name, leave type, or
other relevant criteria.Click the "Add Now Leave" button to navigate to a page where you can
add a new leave request.Clicking the three dots in the "Action" where you can edit,delete
and view.
Status: The current status of the leave request (e.g., Pending, Approved,
Rejected).Where you can update the status.
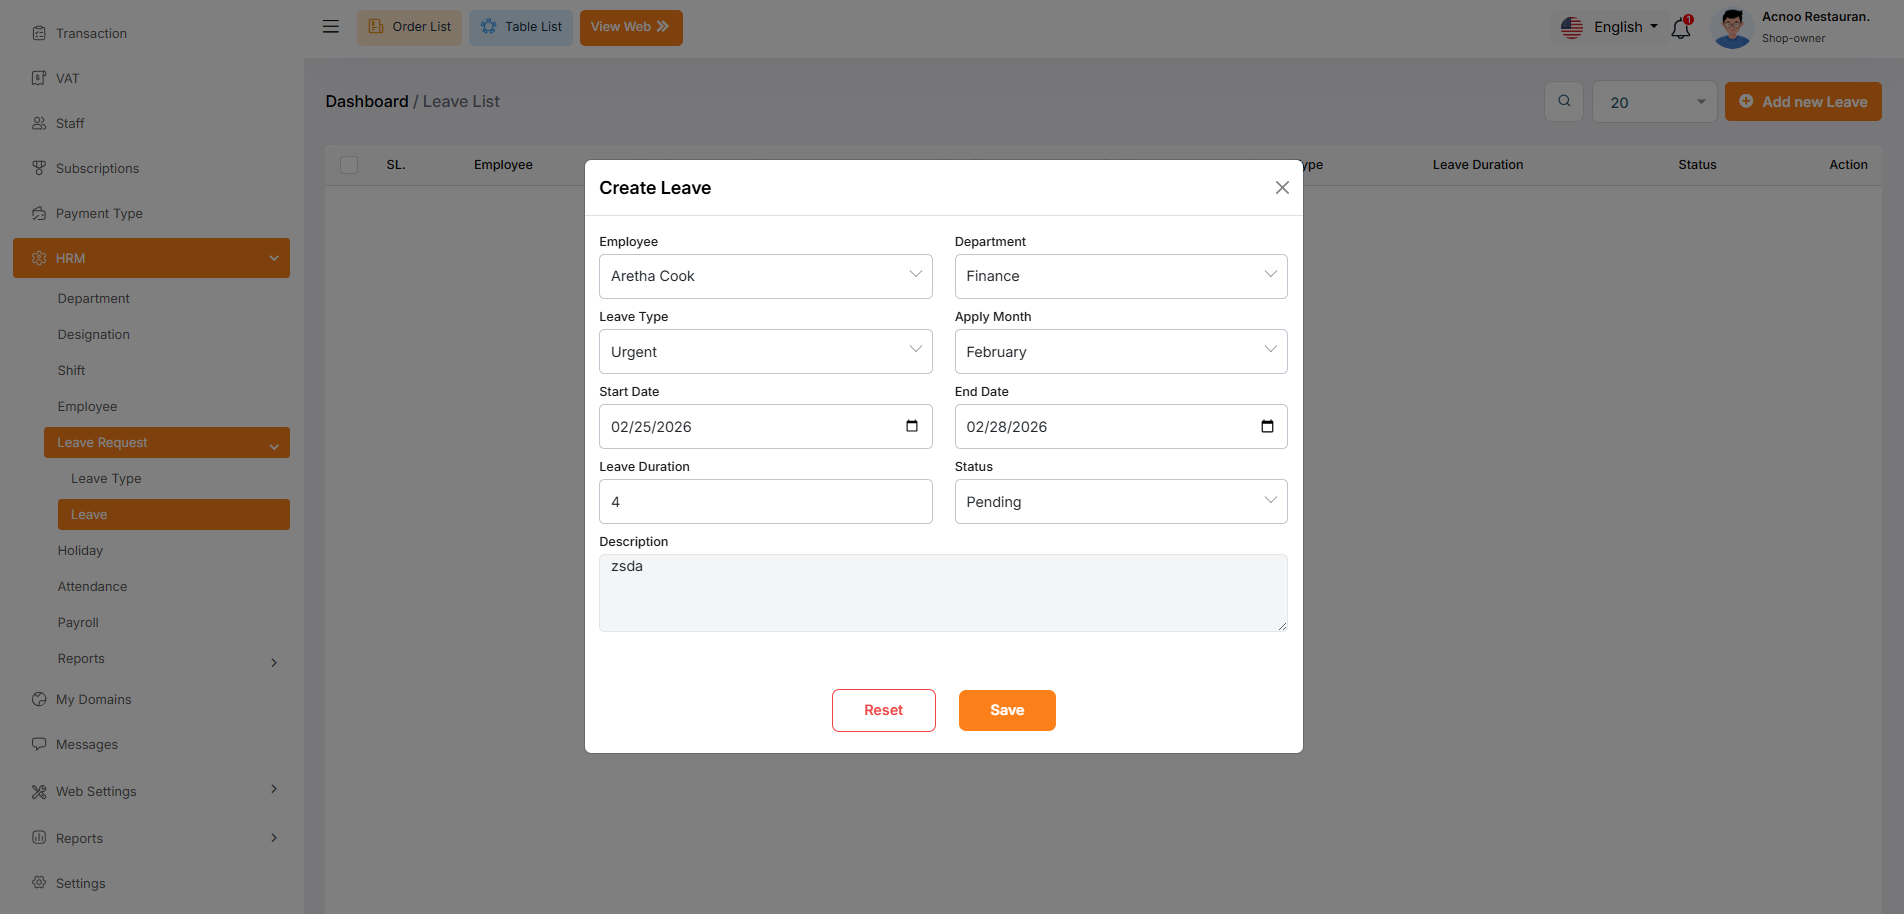
Add New Leave
The "Add New Leave" form appears as a pop-up or overlay on the "Leave Employee List" page. It contains the following fields:
Holiday List
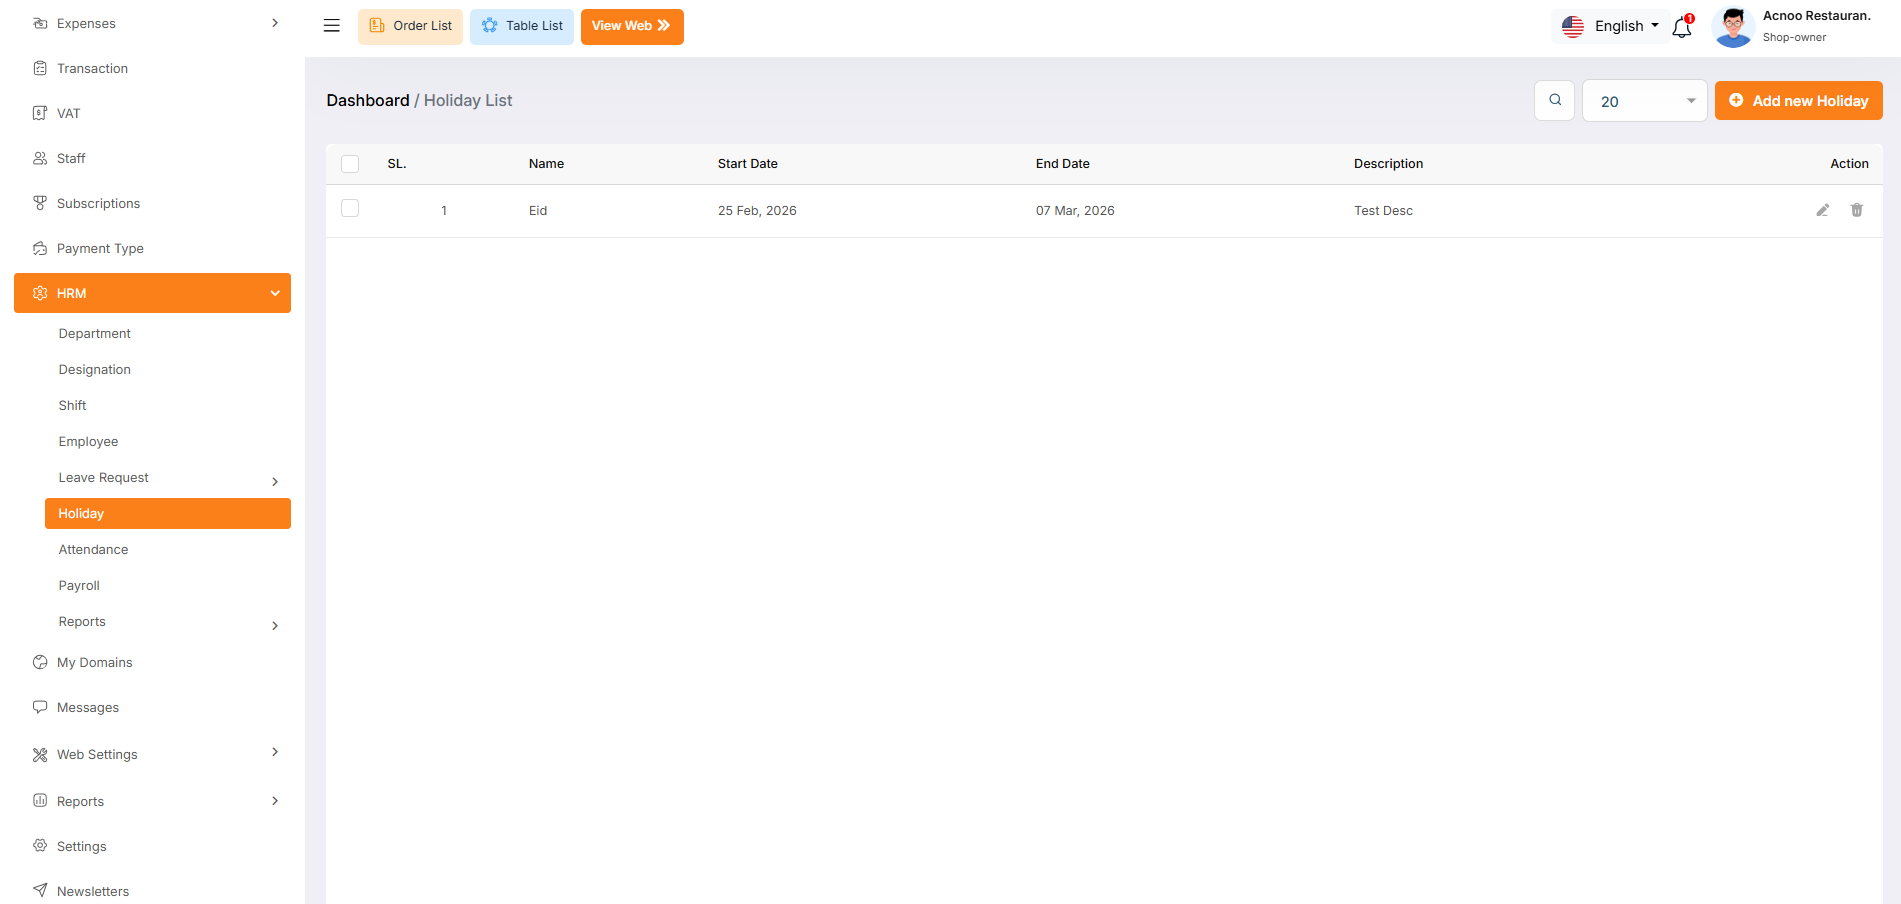
The "Holiday List" page displays a list of defined holidays with their dates, names, and descriptions. It provides options to manage these holidays.Click the "Add New Holiday" button to navigate to a modal where you can add a new holiday to the system.Clicking the three dots in the "Action" where you can edit,delete and view for holiday.
Create New Holiday
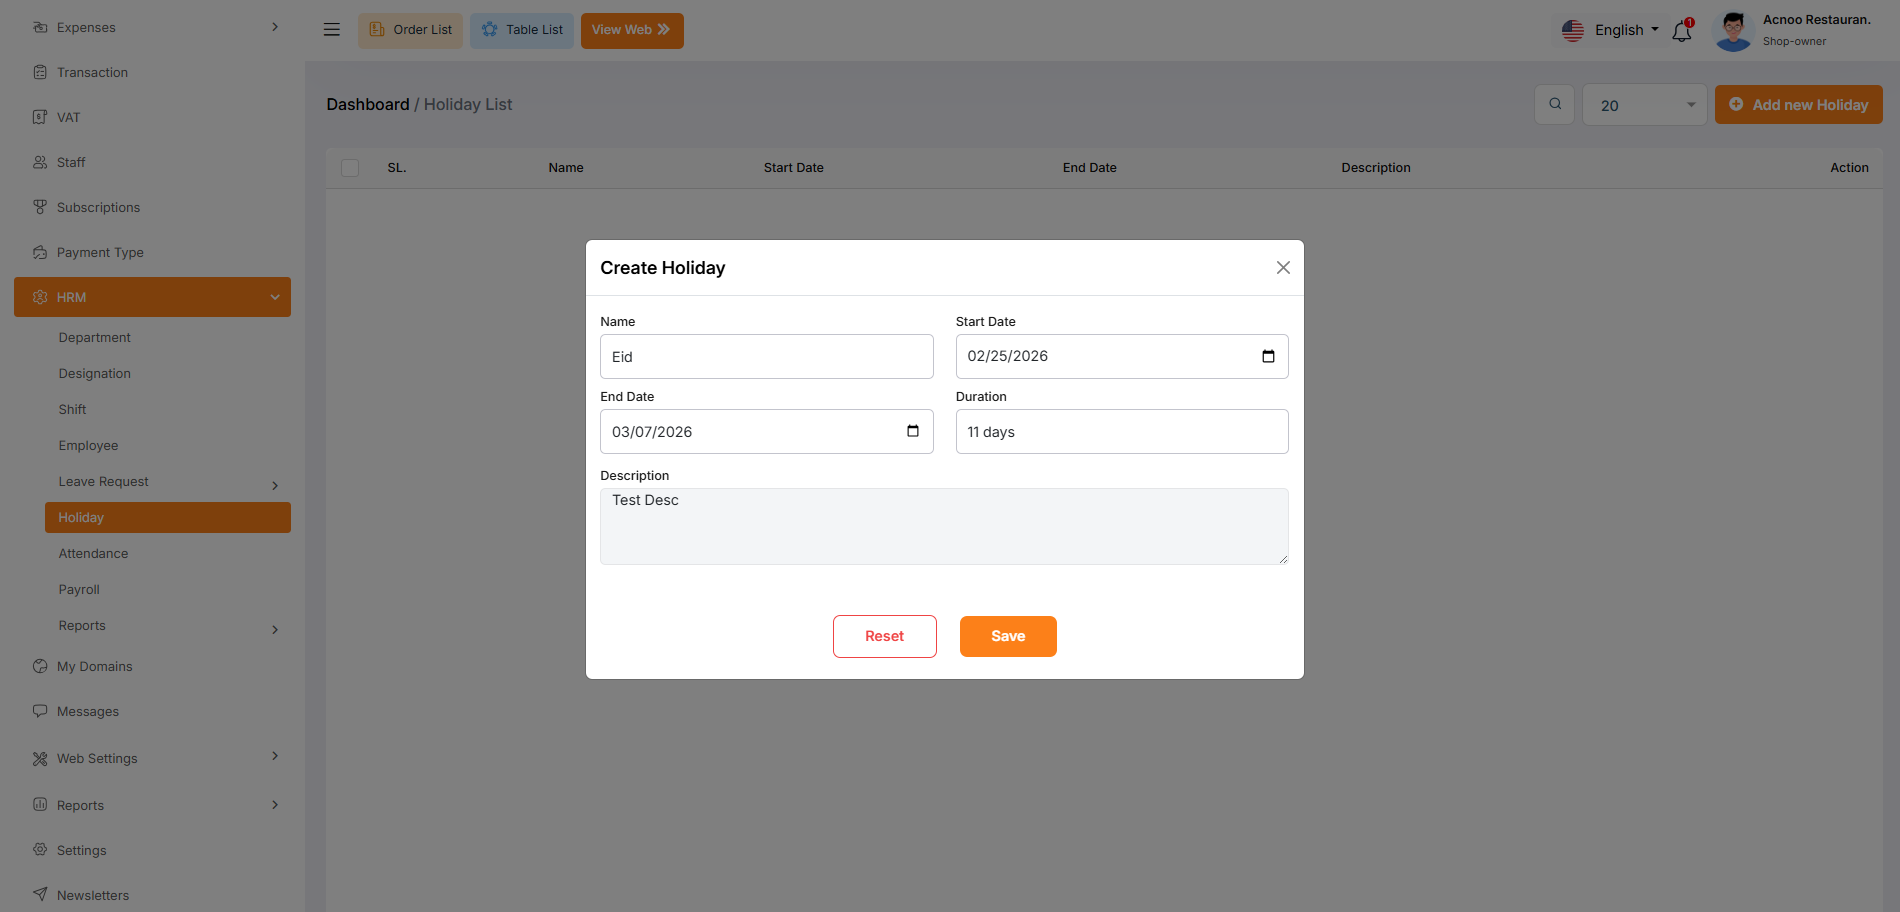
The "Add New Holidays" form appears as a pop-up or overlay on the "Holiday List" page. It contains filled the following input fields.
Attendance List
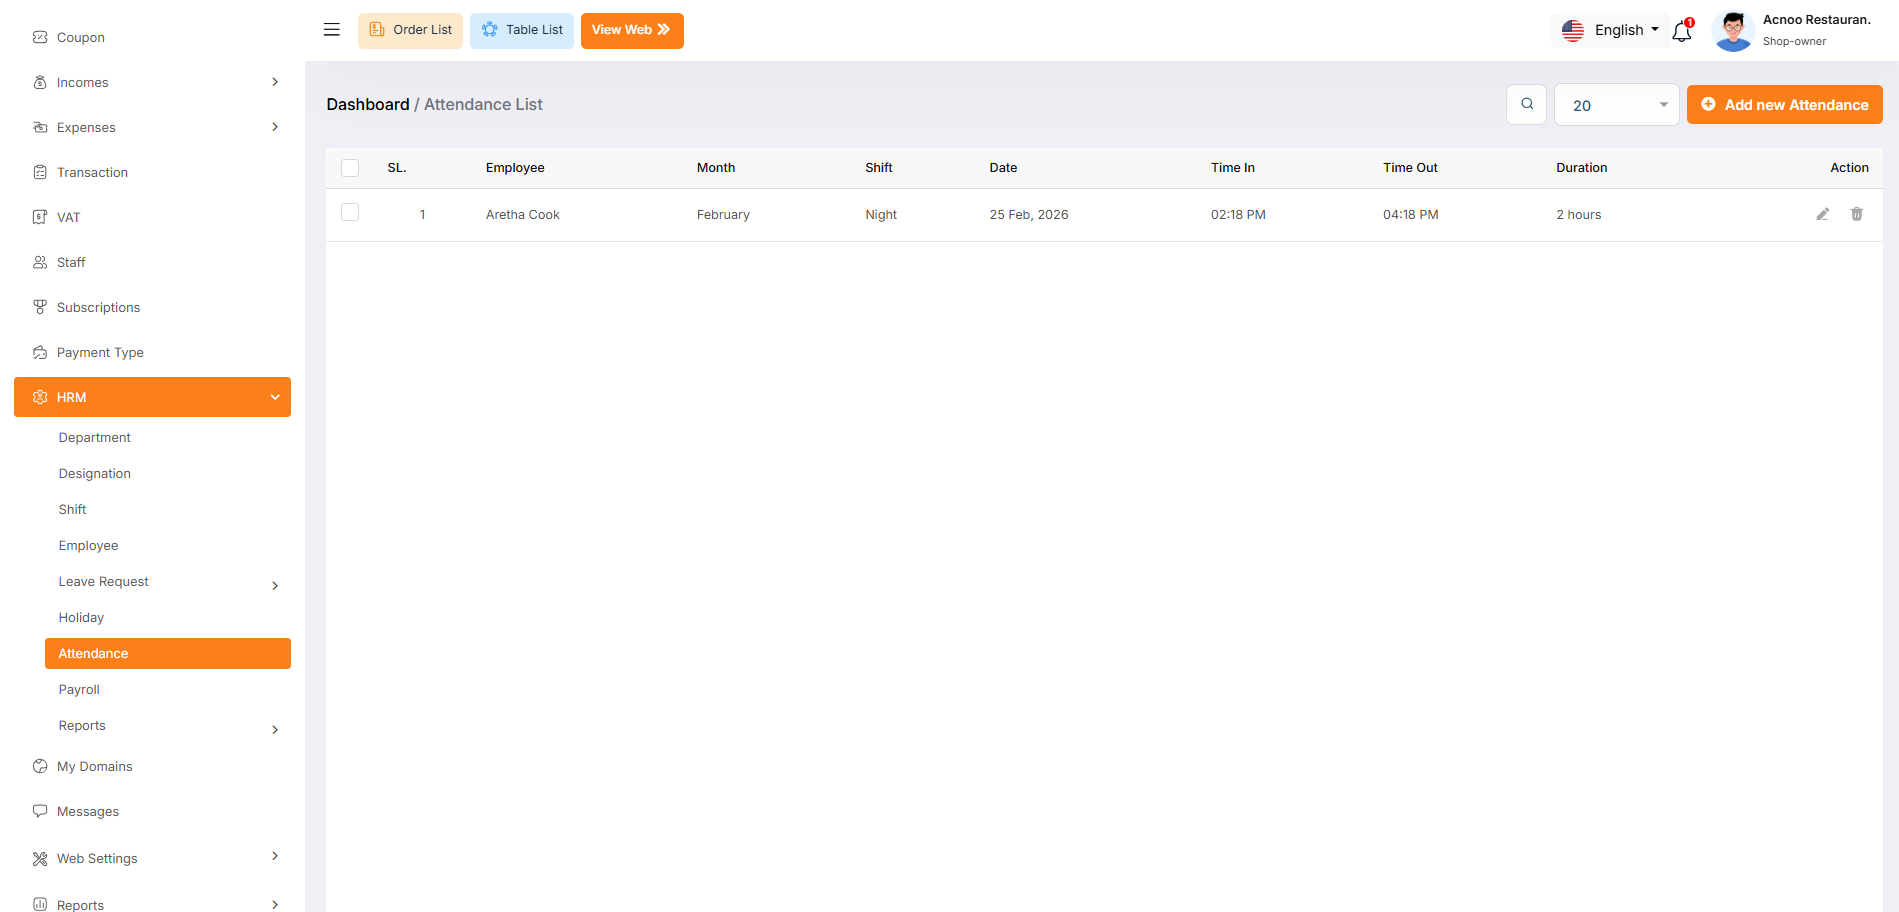
The image displays an attendance records of employees. The system appears to track employee attendance with timestamps and duration calculations.Click the "Add New Attendance" button to navigate to a modal where you can add a new Attendance to the system.Clicking the three dots in the "Action" where you can edit,delete and view for Attendance.
Create New Attendance
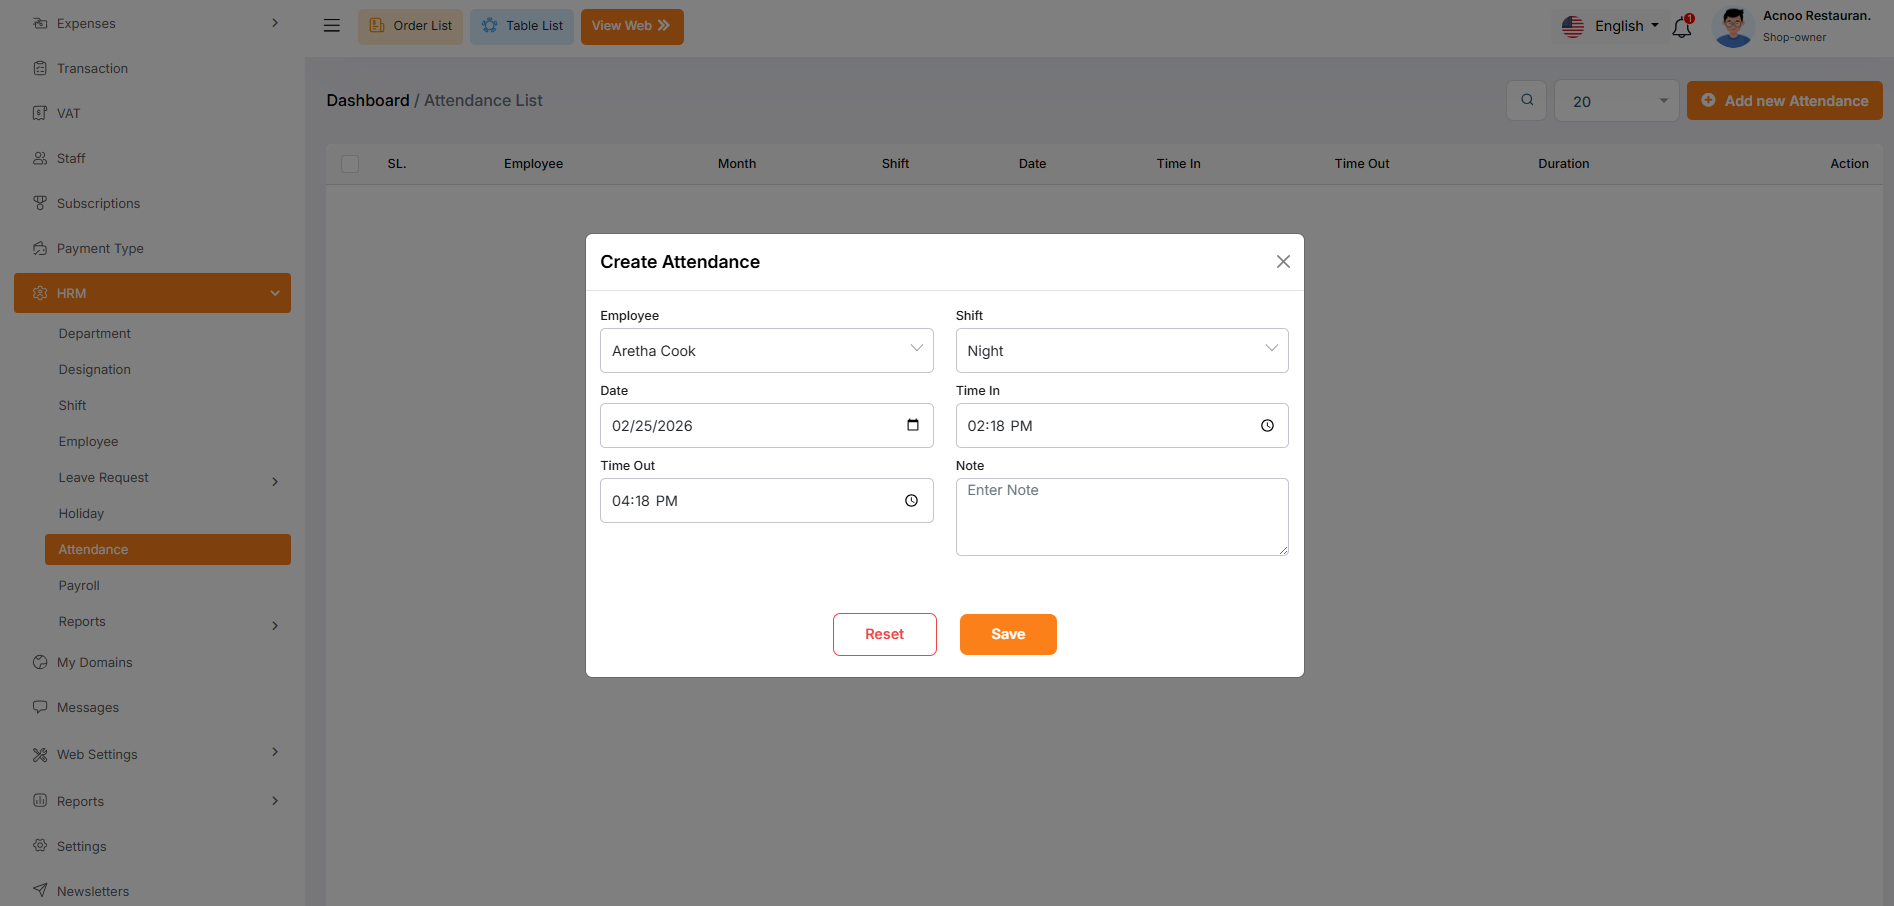
The "Add New Attendance" form appears as a pop-up or overlay on the "Attendance List" page. It contains filled the following input fields.
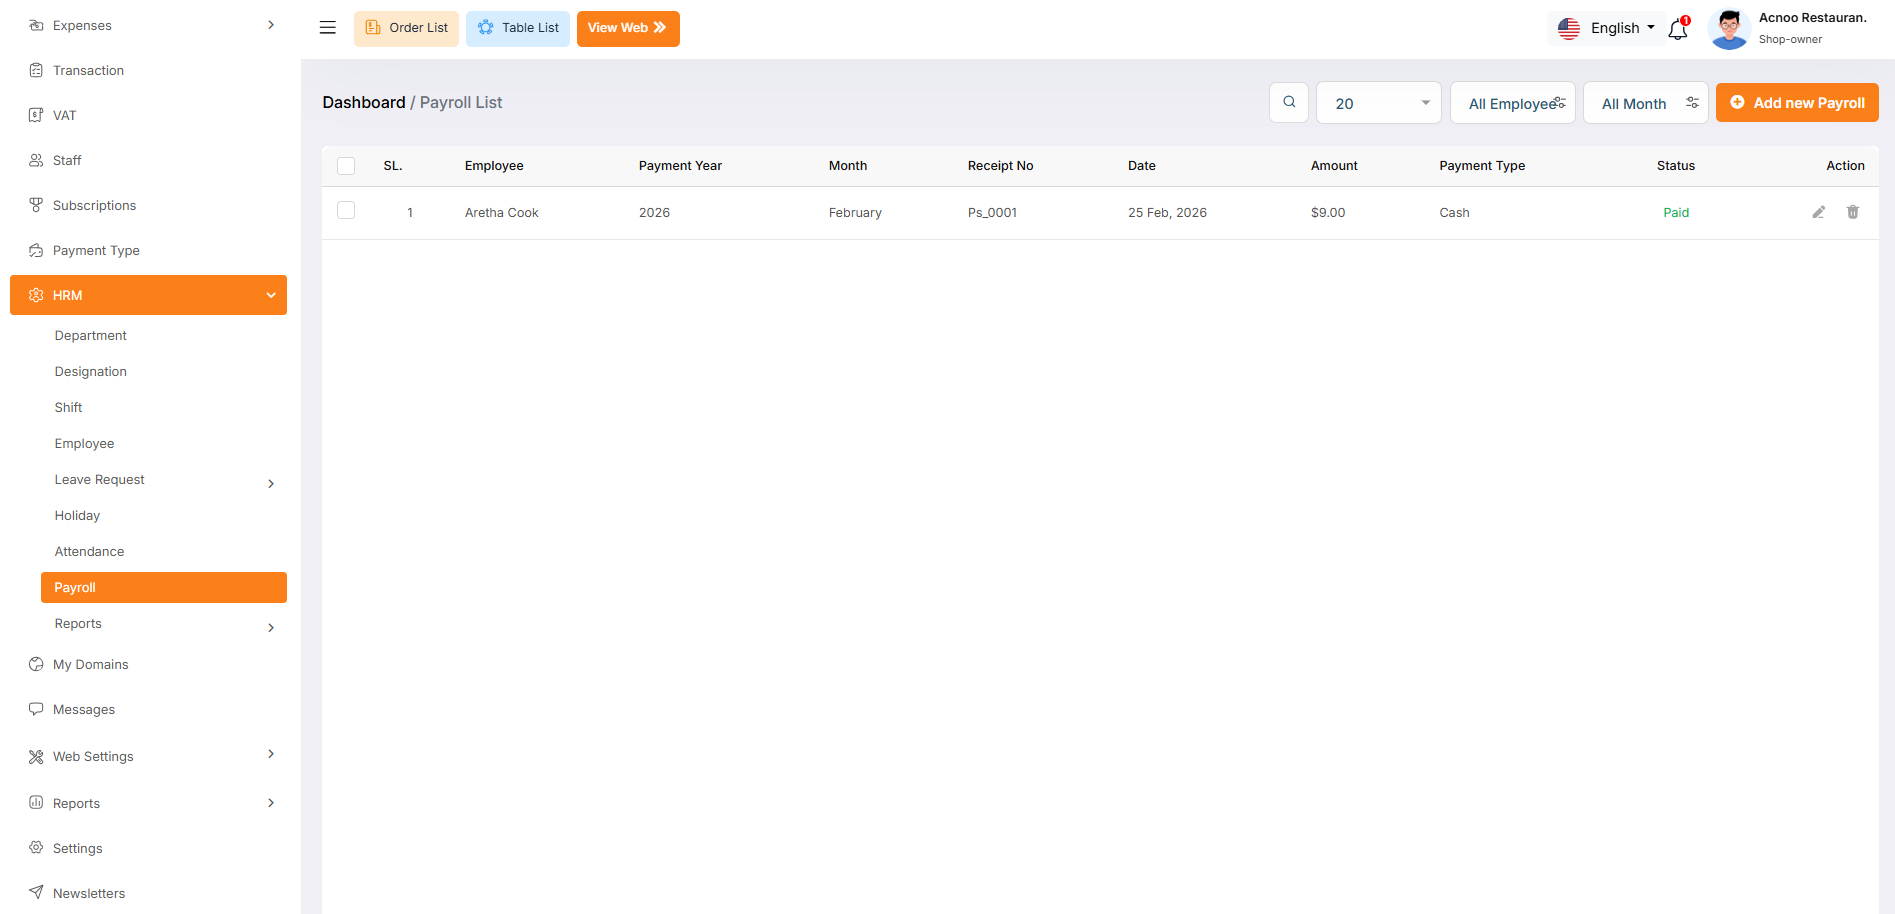
Payroll List
The Payroll List interface provides a comprehensive view of employee payroll transactions, enabling administrators to track payments, verify statuses, and manage records efficiently. This document outlines the key components, functionality, and observations from the displayed interface.Click the "Add New Payroll" button to navigate to a modal where you can add a new Payroll to the system.Clicking the three dots in the "Action" where you can edit,delete and view for Payroll.
Create New Payroll
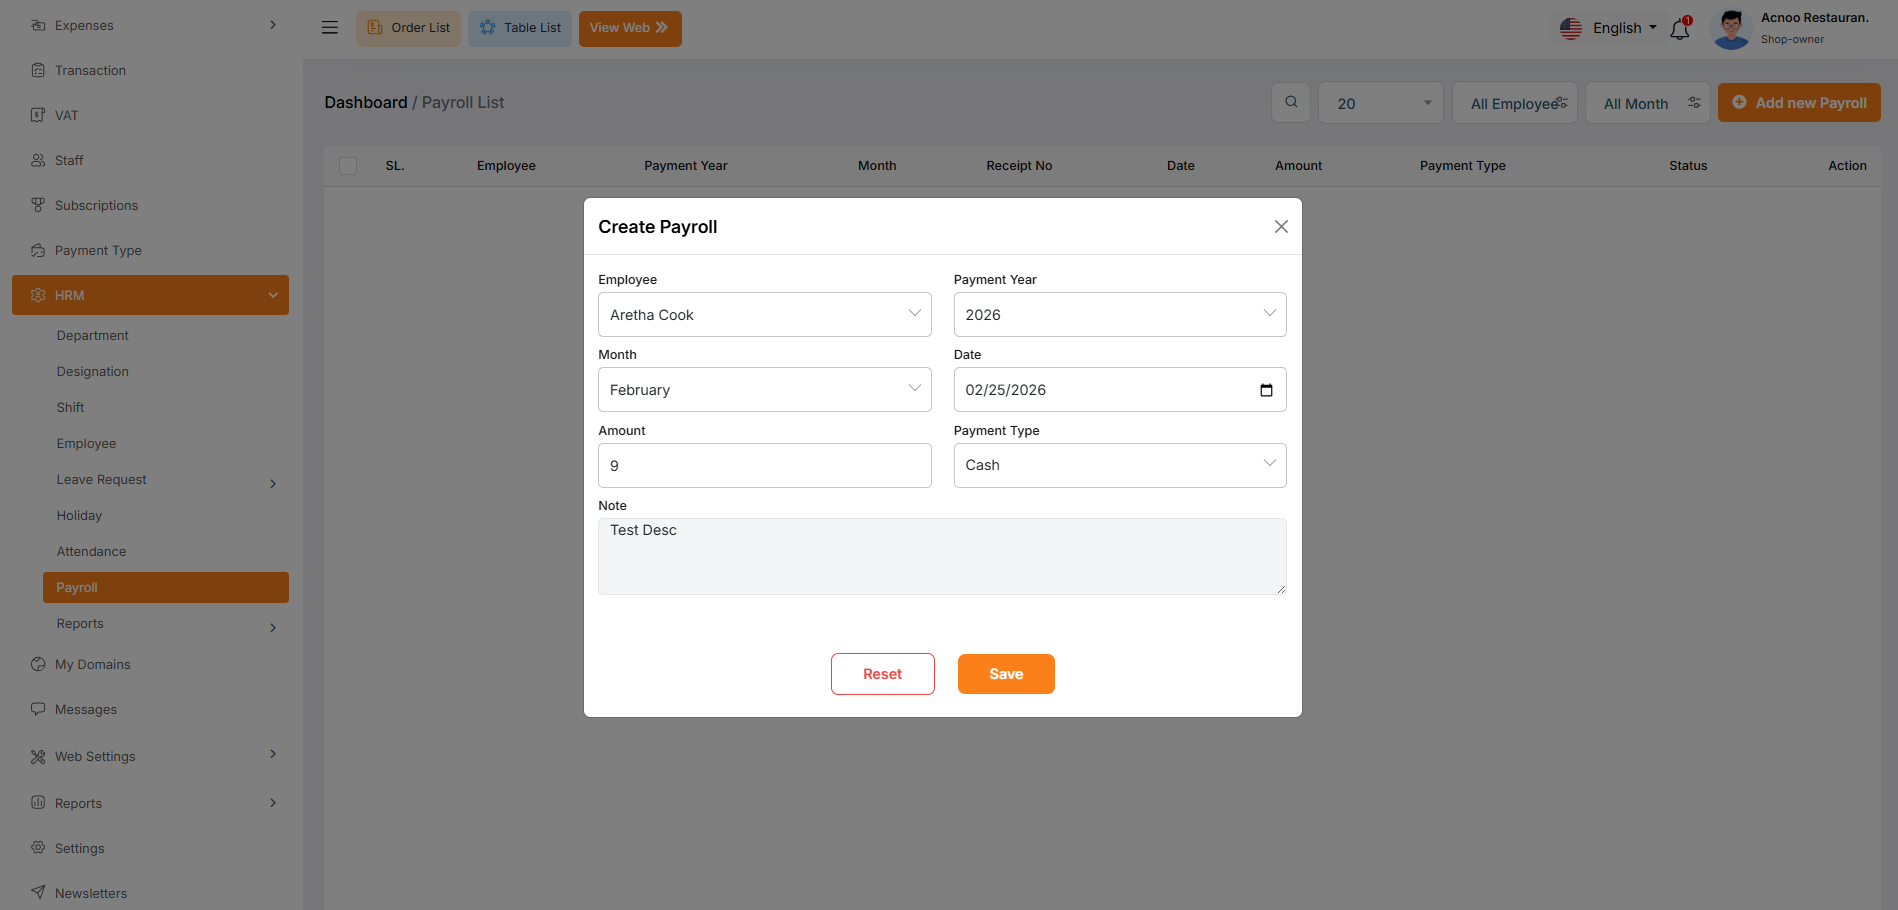
The "Add New Payroll" form appears as a pop-up or overlay on the "Payroll List" page. It contains filled the following input fields.
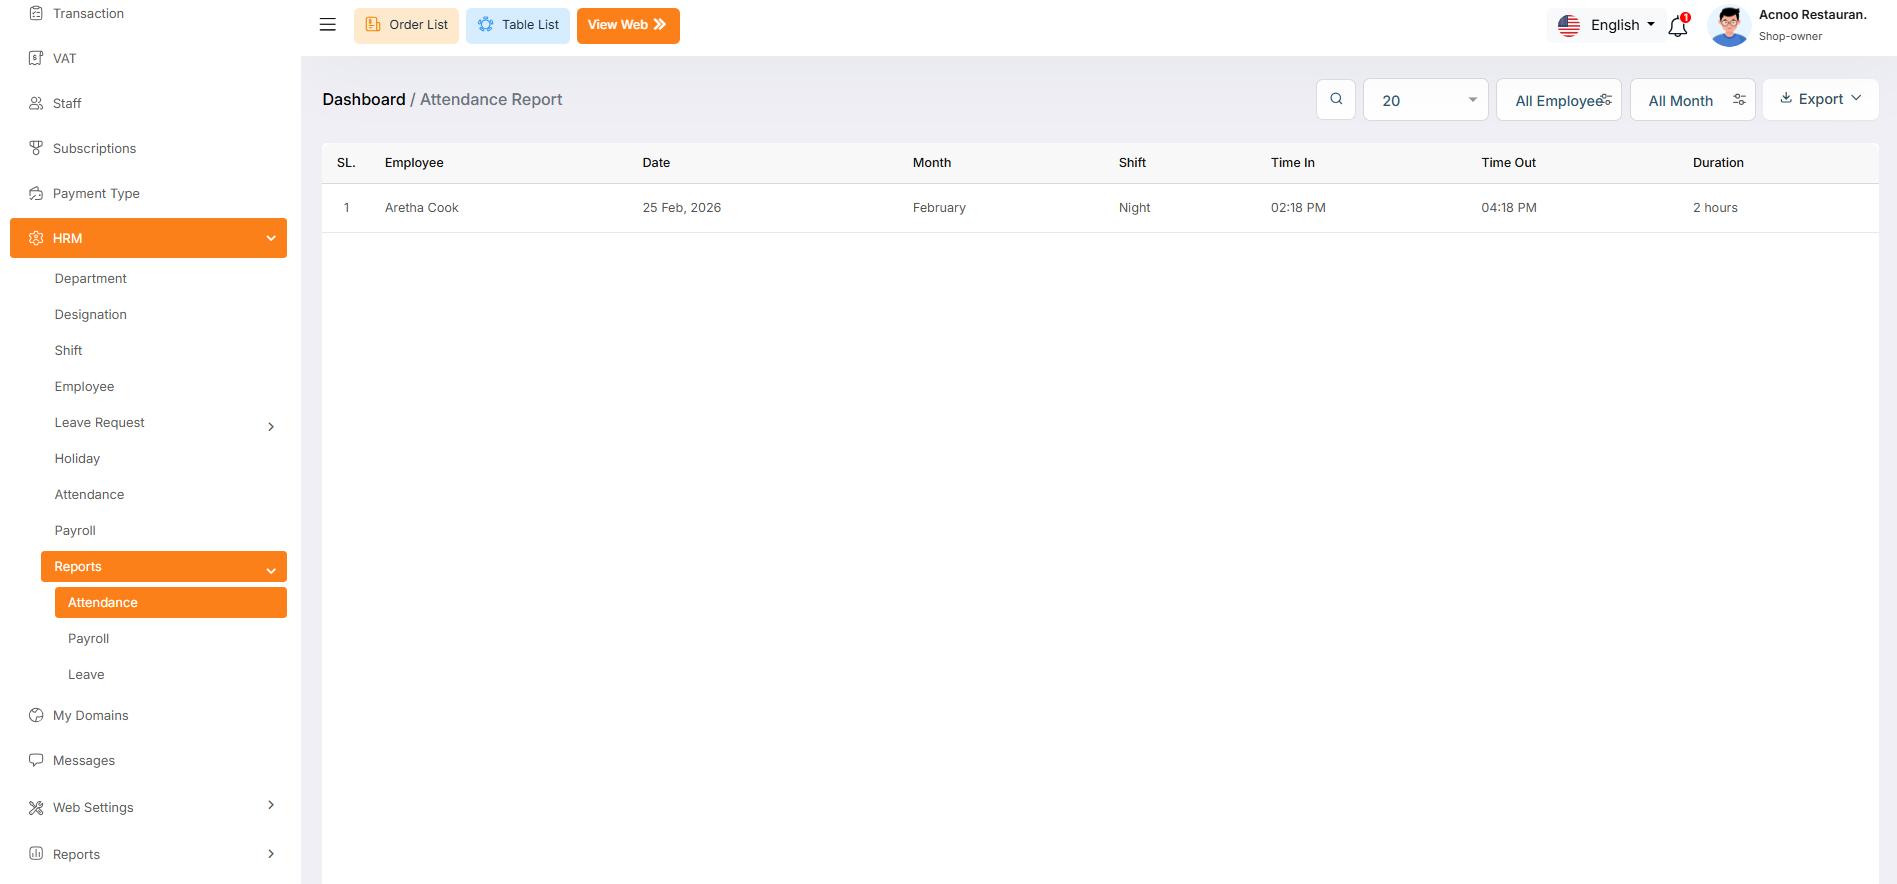
Attendance Reports
The Attendance Report module effectively tracks employee attendance with detailed shift and time data. Minor adjustments to filter logic, date formatting, and labeling would enhance accuracy and user experience.
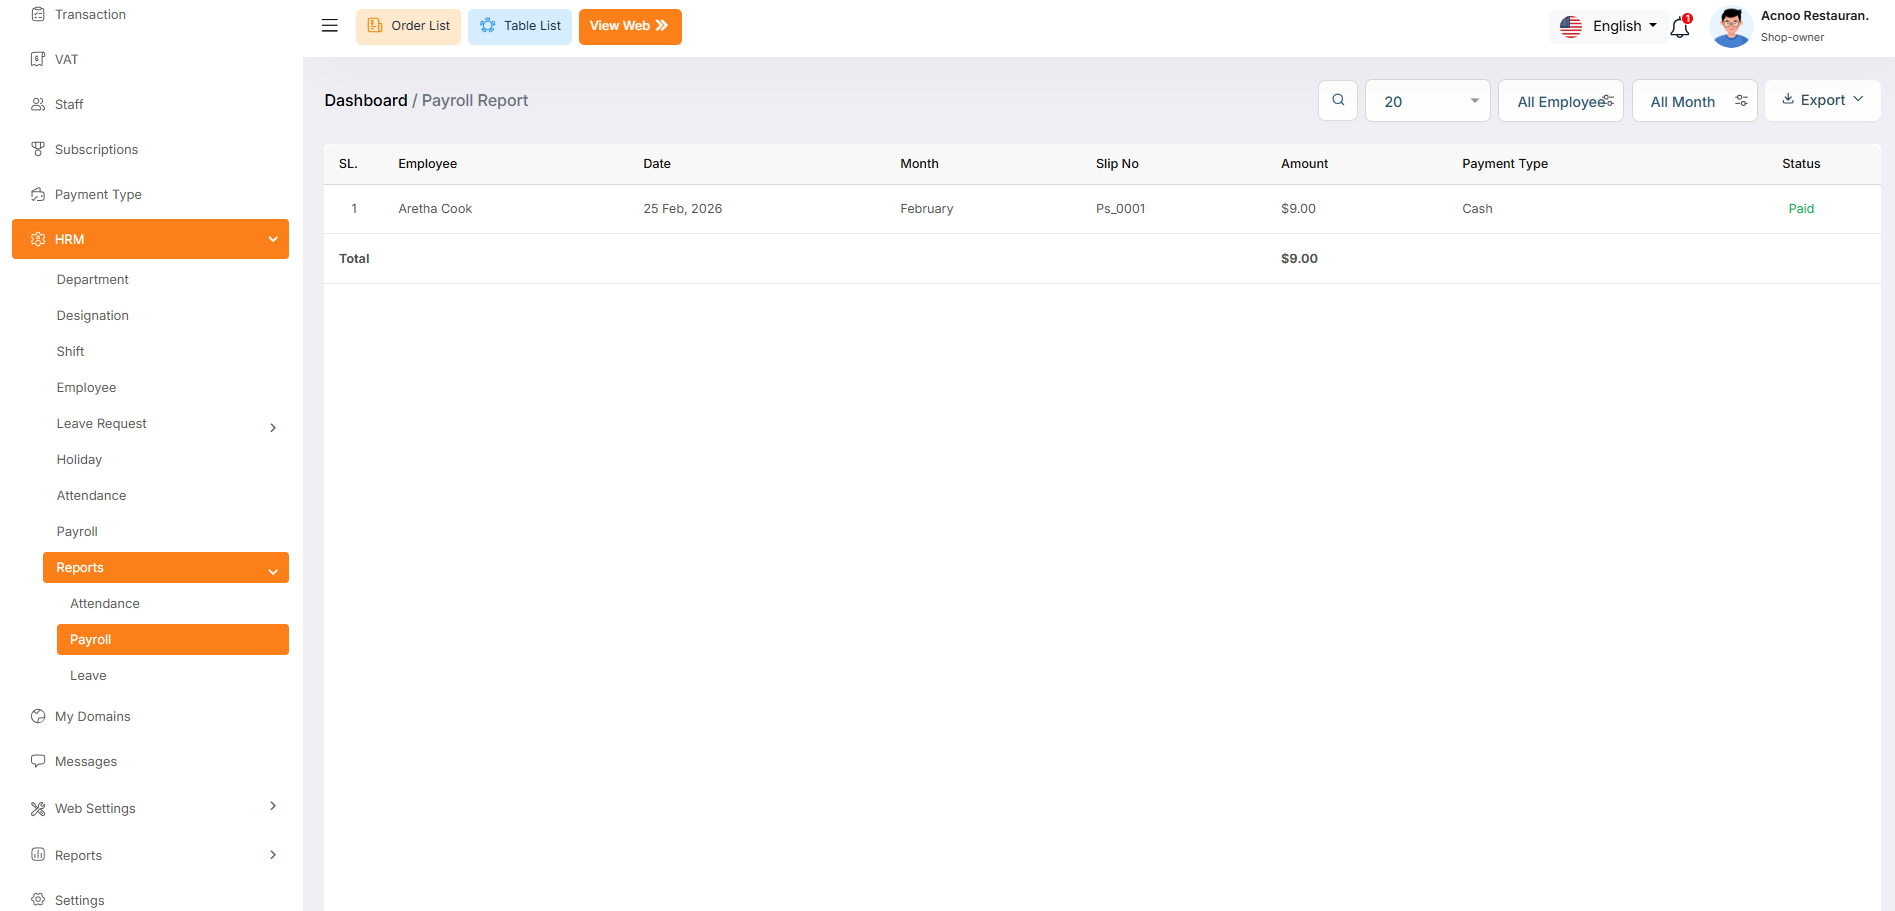
Payroll Reports
The Payroll Report module provides a consolidated view of employee compensation data, enabling HR teams to efficiently manage, verify, and audit payroll transactions.
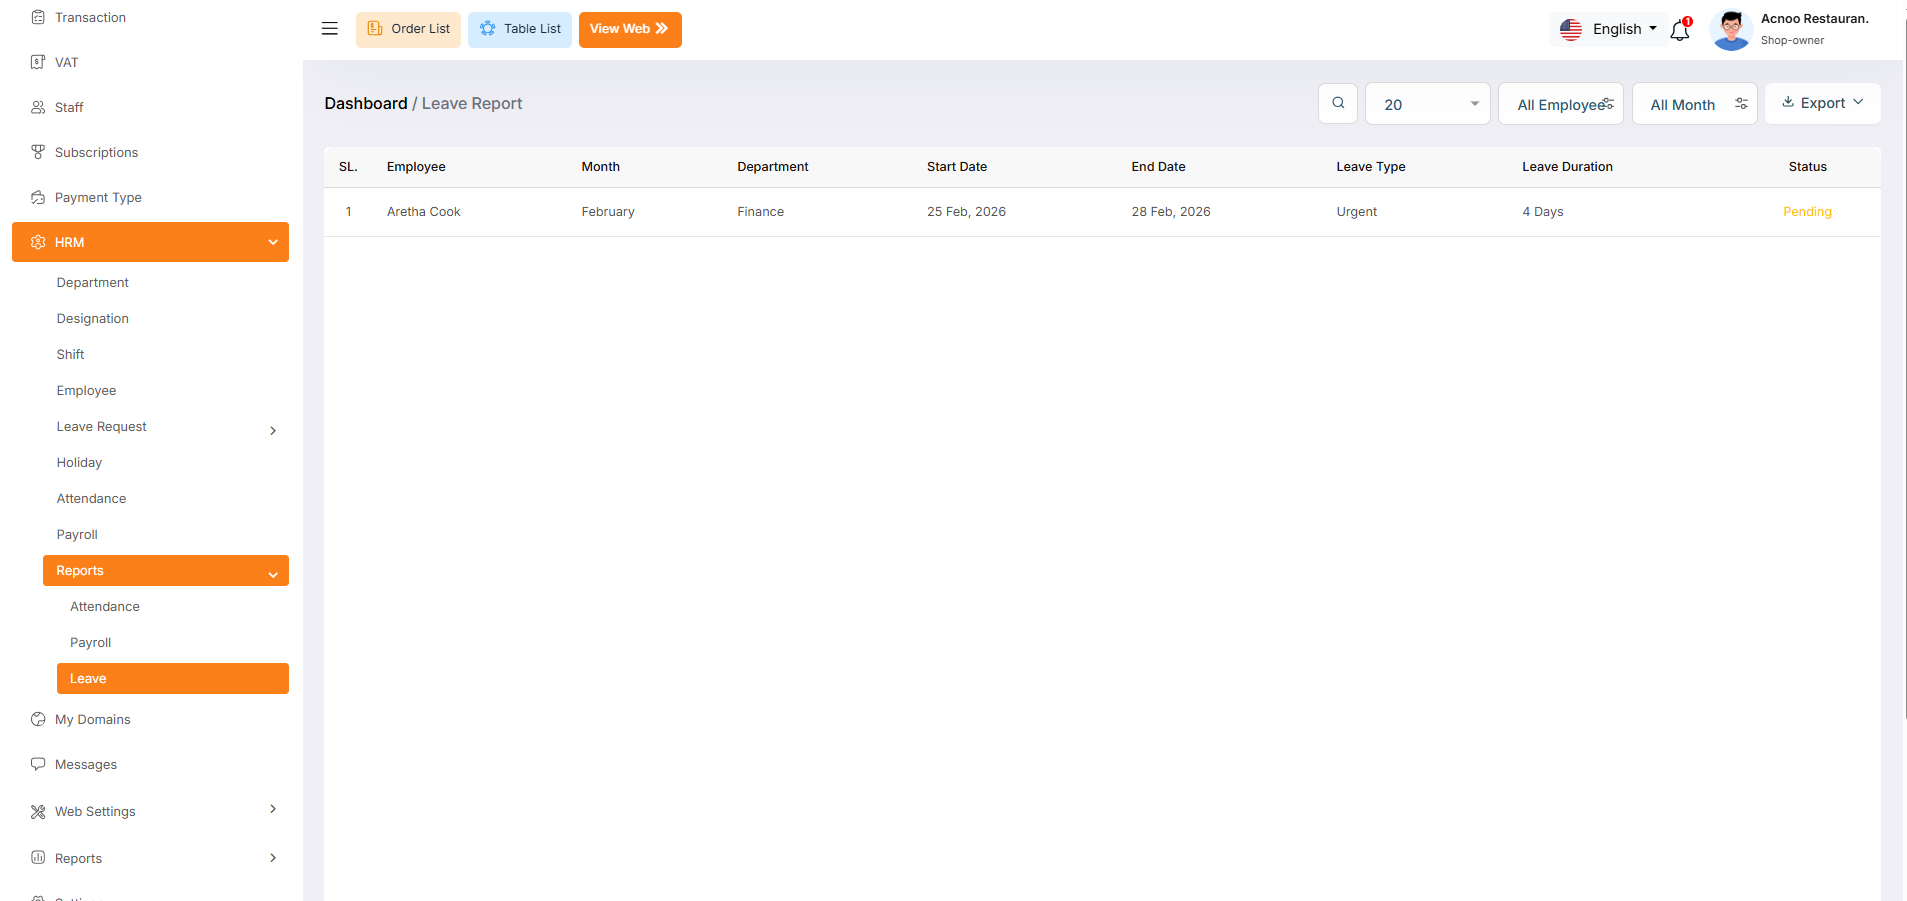
Leave Reports
The Leave Report provides a comprehensive view of employee leave requests, approvals, and tracking.
Menulyn Cash Register Add-on
📘 Overview:
The Cash Register Addon is designed to help businesses manage their daily cash transactions efficiently and maintain accurate financial control at the point of sale. In many businesses such as restaurants, retail shops, and service-based stores, cash handling happens frequently throughout the day. Without a proper system, it becomes difficult to track cash flow, identify discrepancies, and ensure accountability among staff members. This addon solves those problems by providing a structured and transparent cash management process.
🔑 Key Features
1. Overview Dashboard
The Overview section provides a quick summary of cash register activities. Users can easily monitor the current status of registers, view important financial metrics, and understand overall cash flow at a glance. This helps managers quickly assess daily performance without navigating through multiple sections.
2. Cash Register Management
This feature allows users to open and close cash register shifts with an initial opening balance. During the shift, all cash-related activities such as sales, cash in, and cash out are recorded. At the end of the shift, the system calculates the expected balance and compares it with the actual closing balance, helping identify any discrepancies immediately.
3. Approval System
The Approval feature ensures that sensitive cash operations require authorization. Managers or authorized users can review and approve requests related to cash adjustments, transactions, or register operations. This adds an extra layer of security and prevents unauthorized financial changes.
4. Denominations Management
The Denominations module allows users to count and record the physical cash by different currency denominations such as notes and coins. This makes cash reconciliation more accurate and organized when closing a shift, helping businesses maintain precise cash records.
5. Advanced Reports
The Reports section provides detailed insights into cash transactions and register activity. Users can generate reports such as transaction history, shift summaries, and financial overviews. With filtering options like date ranges and search functionality, businesses can easily analyze their cash flow and track financial performance.
6. Configuration and Settings
The Configuration section allows administrators to customize how the cash register system works. Businesses can define operational settings, user permissions, approval workflows, and other preferences to match their internal processes and operational requirements.
📦 Installation
The installation process for the Cash Register Add-on follows the same steps as outlined in the Business Add-on documentation.
👉 Please refer to the Business Add-on Installation Guide for detailed instructions.
Overview
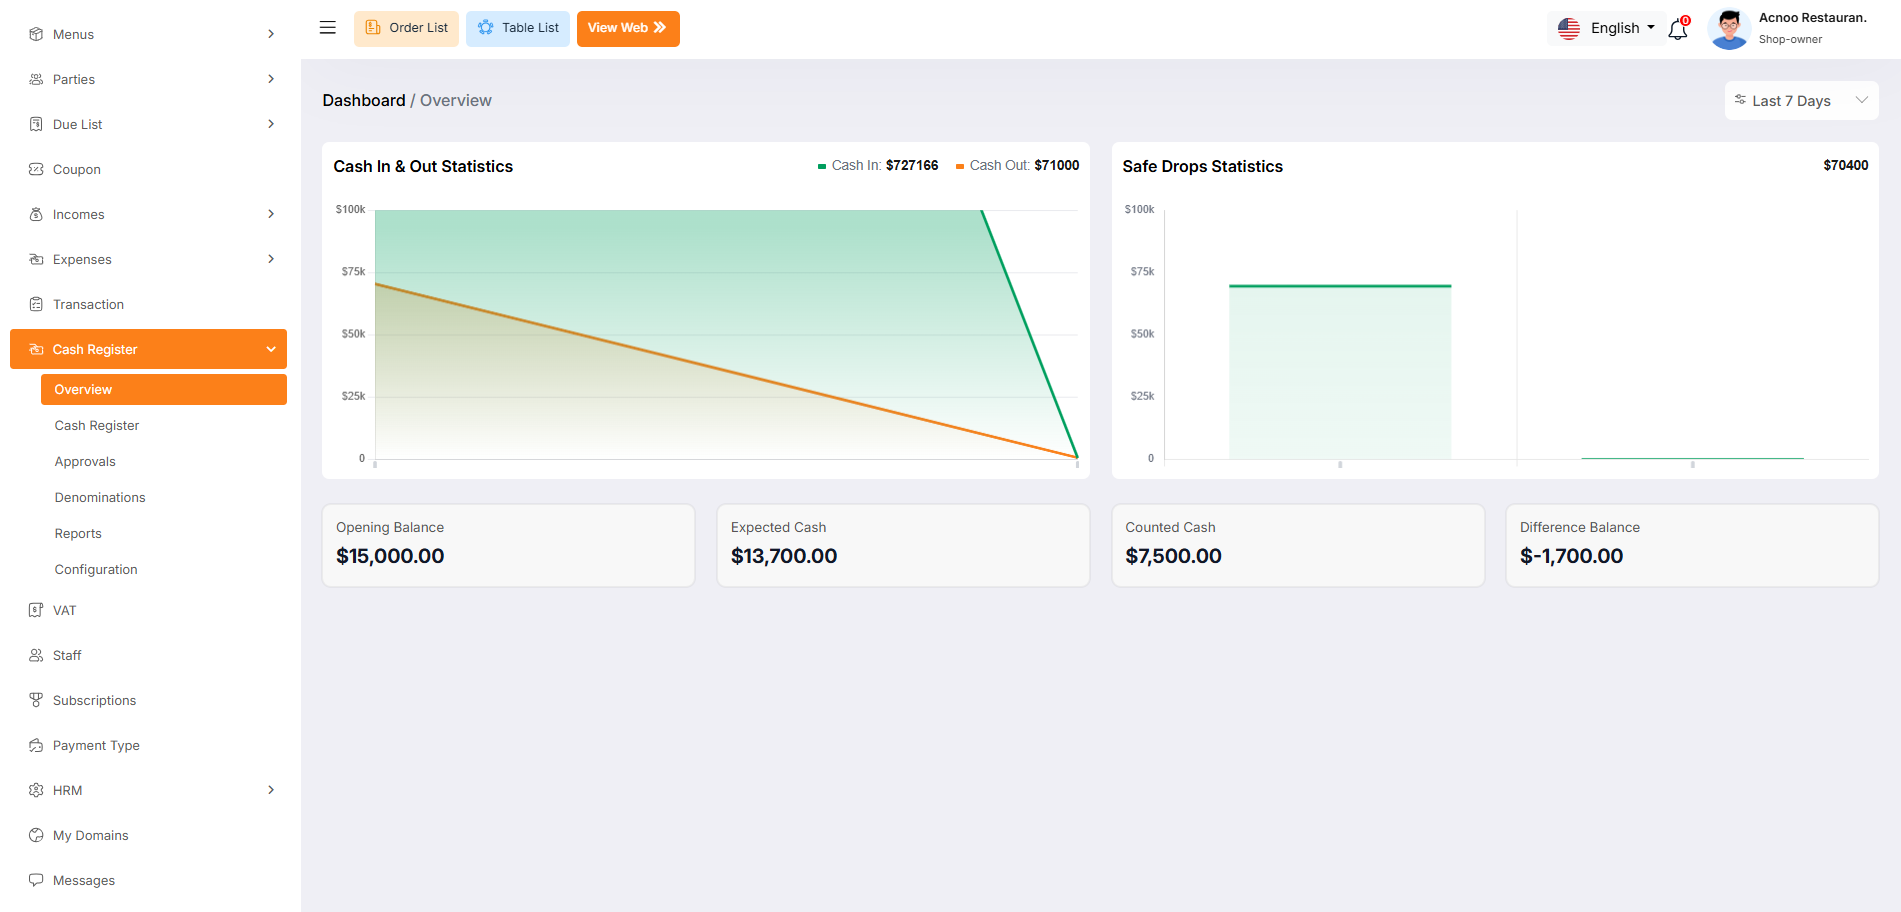
The Overview page serves as the central command center for monitoring the financial health of your restaurant's cash operations. It provides high-level visual analytics and summary totals, allowing managers to track trends in cash flow, security drops, and overall counting accuracy over time.
Visual Analytics (Graphs)
Two primary charts help identify patterns in how money enters and leaves the business:
Cash In & Out Statistics: This area chart compares manual funds added (Cash In - Green) versus funds removed (Cash Out - Orange). Monitoring this graph helps identify days with unusually high payouts or manual deposits.
Safe Drops Statistics: This bar chart tracks the frequency and volume of money moved to the safe. Steady bars indicate consistent security practices, while gaps might suggest that the drawer is being left with too much cash on hand.
Cash Register
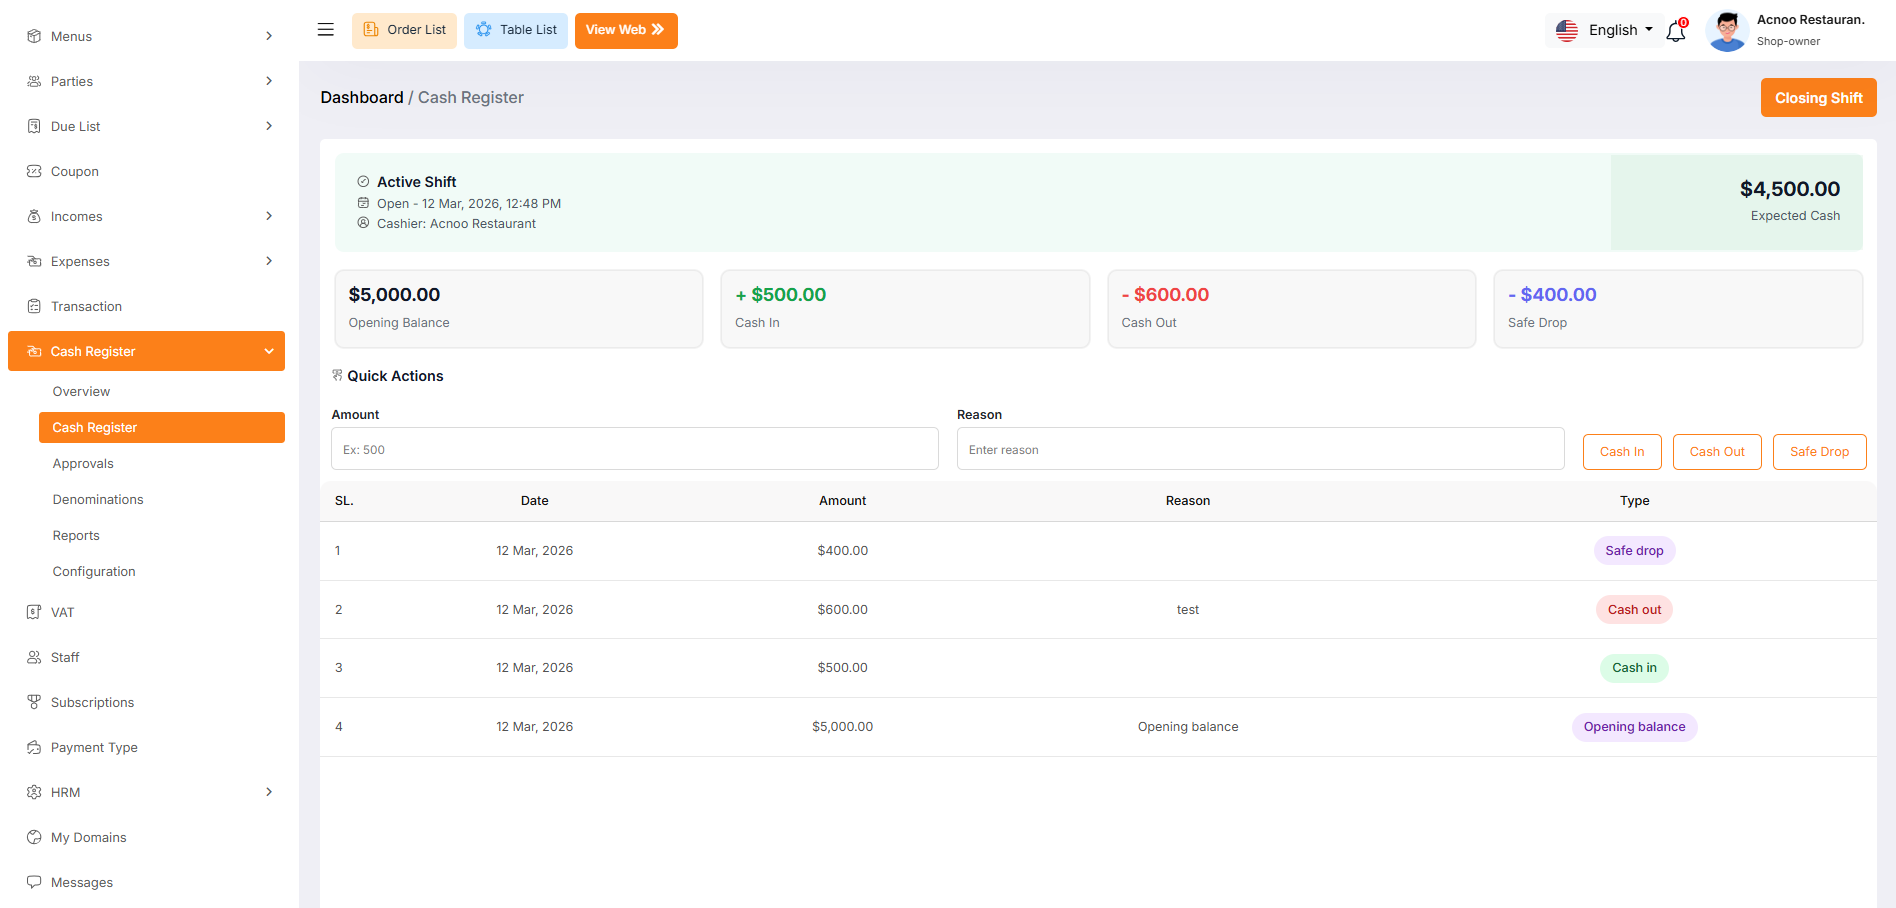
The Cash Register dashboard is designed to help you track real-time cash flow. It shows your Active Shift details, including the opening time and the cashier currently in charge. The Expected Cash ($4,500.00) is the total amount that should be in the drawer right now.
Financial Summary
Opening Balance: This is the starting cash in your drawer, currently set at $5,000.00.
Cash In: Total manual additions to the drawer, totaling $500.00.
Cash Out: Total manual withdrawals or payouts, totaling -$600.00.
Safe Drop: Large sums of cash moved to a secure safe for safety, totaling -$400.00.
Quick Actions
To record a new movement, enter the Amount and a Reason (like "payout" or "change"). Click Cash In to add money, Cash Out to remove it, or Safe Drop for secure transfers.
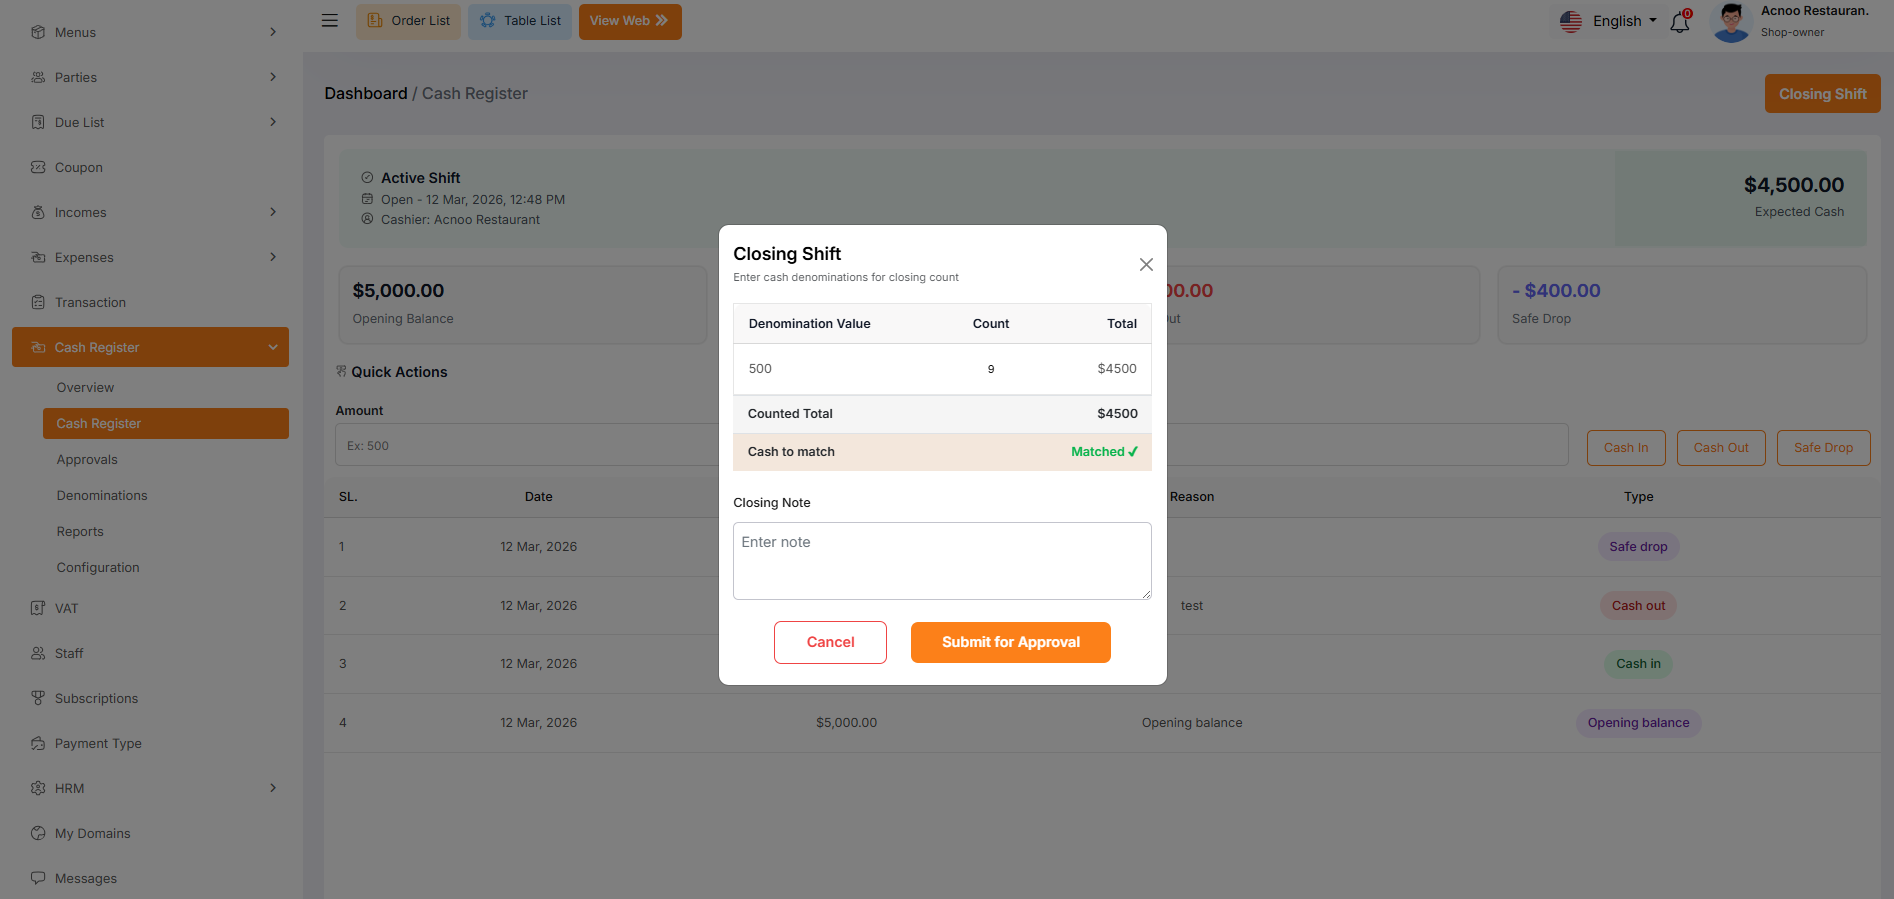
Closing the Shift
Before leaving, use the Closing Shift button. Strong Note: Always ensure your physical cash matches the expected balance to avoid discrepancies in your reports.
Approvals
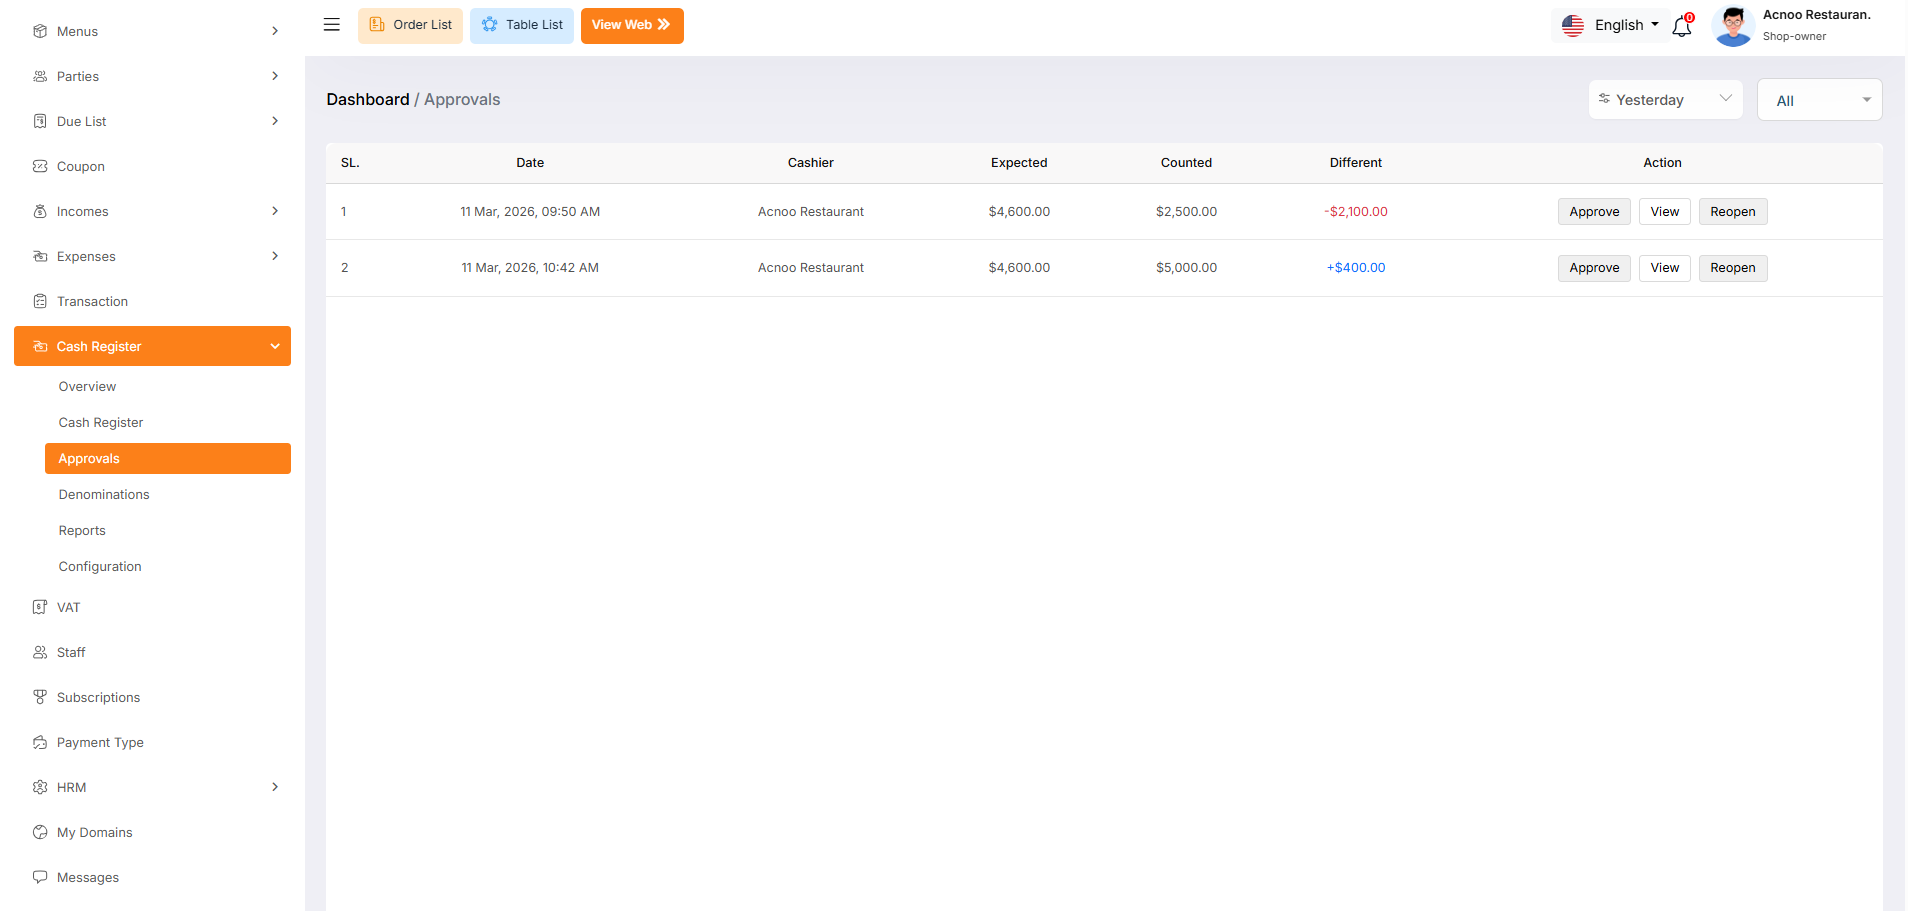
The Approvals dashboard is a critical auditing tool used to review and finalize cash shifts after they have been closed by a cashier. This screen allows managers to identify discrepancies between the system's expected cash and the physical amount counted at the end of a shift.
Shift Reconciliation Details
Each row in the table represents a closed shift awaiting management review. The following columns provide the necessary data for a proper audit:
Owner have three primary options to handle a closed shift under the Action column:
Approve: Use this to confirm that the shift is correct or that a discrepancy has been noted and accepted. Once approved, the shift is finalized in the financial reports.
View: Click this to see a full breakdown of every transaction, safe drop, and expense that occurred during that specific shift for a deeper investigation.
Reopen: If there is a significant error or the cashier needs to recount the drawer, this button allows the shift to be sent back into an active state.
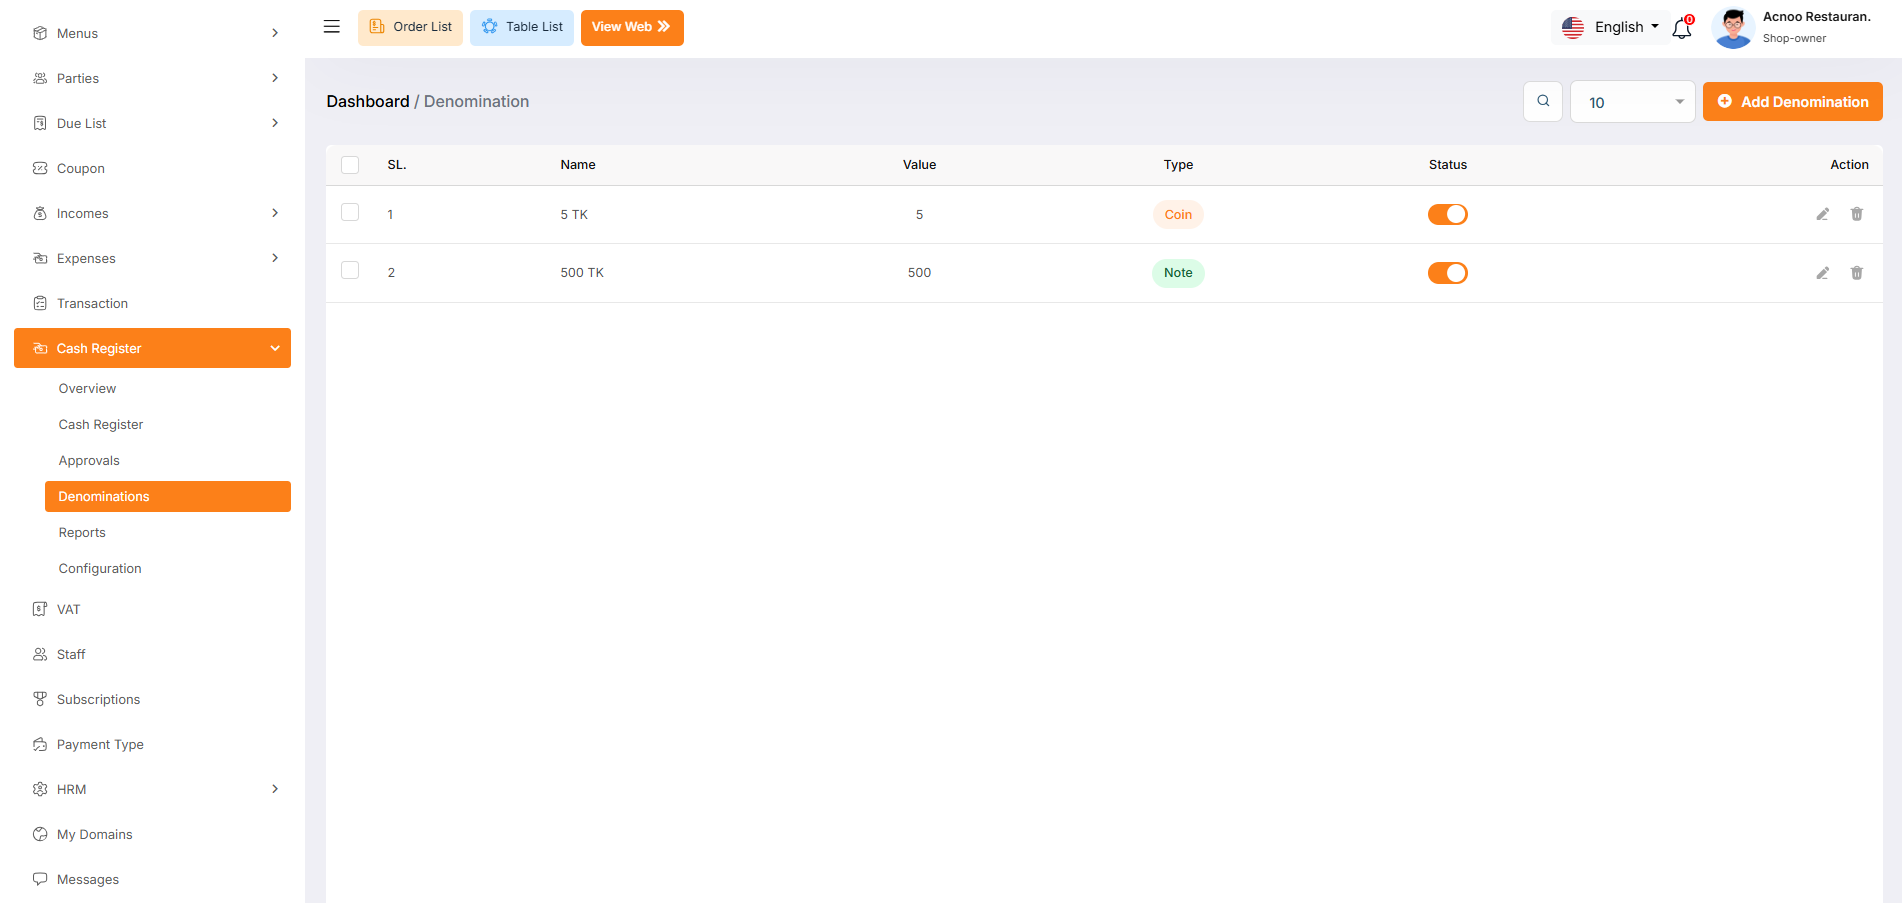
Denominations List
The Denominations page allows administrators to define the specific currency units (notes and coins) used by the business. Setting these up ensures that when a cashier closes a shift, they can perform an accurate physical count by entering the quantity of each specific bill or coin.
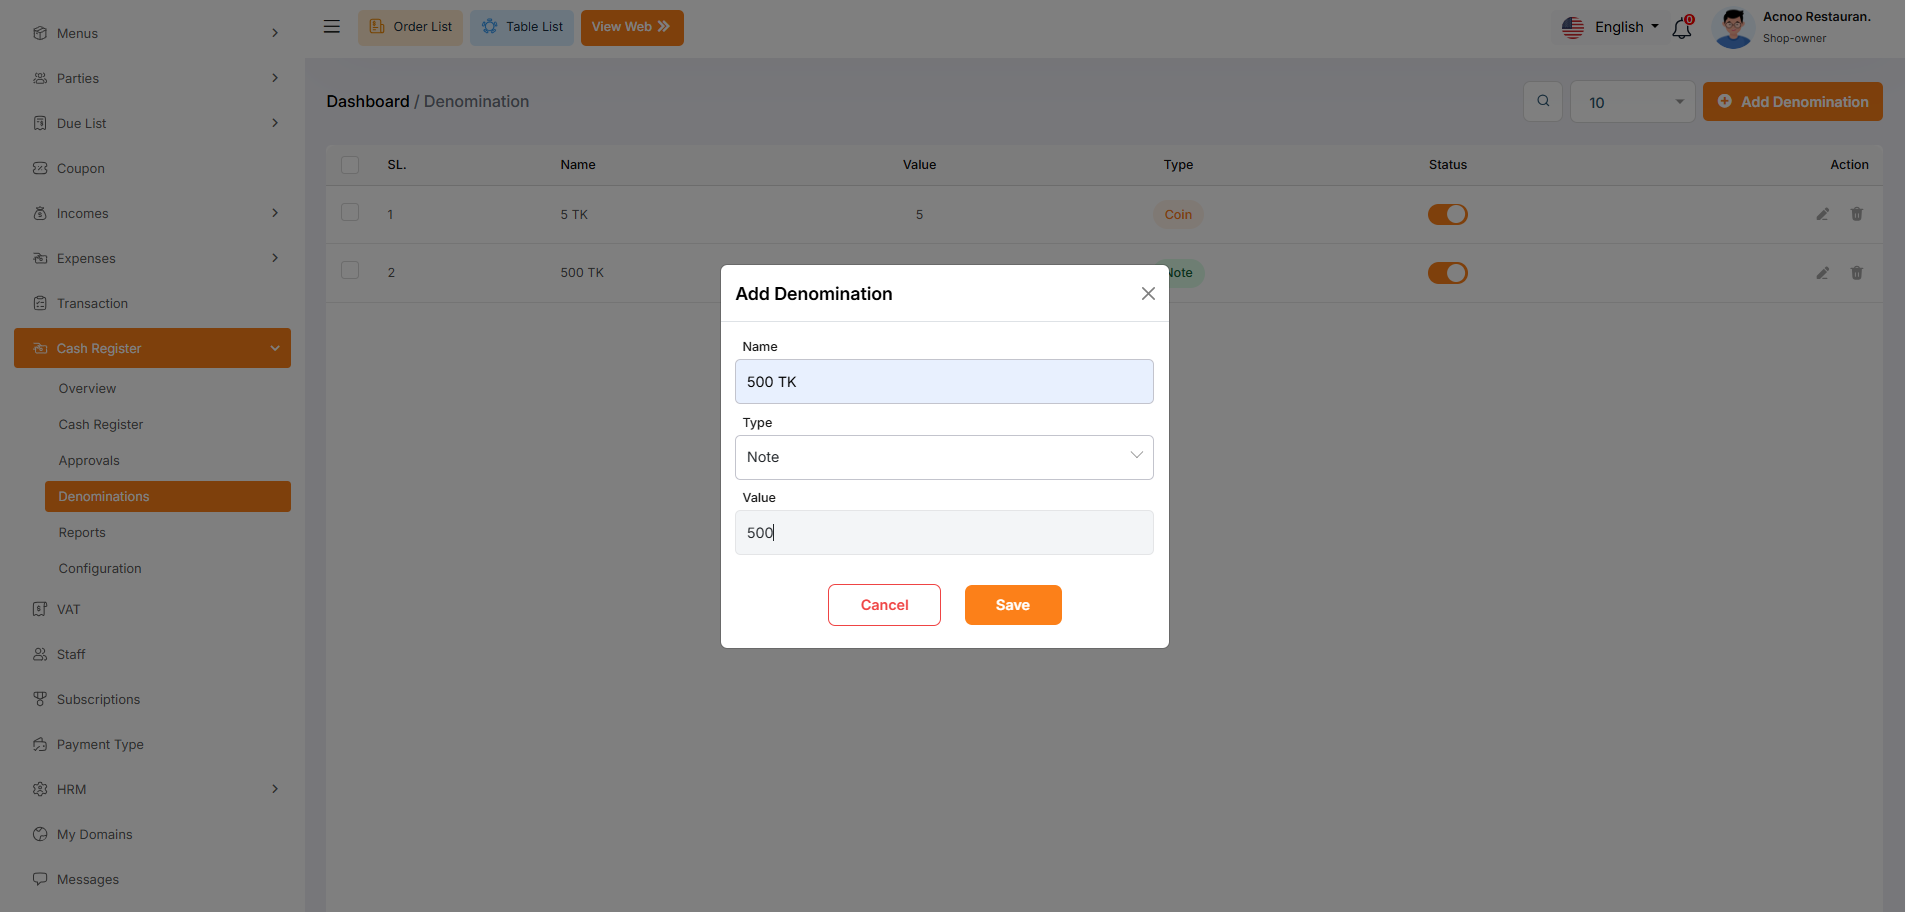
Denominations Create
The Denomination Create window is a pop-up form used to register a new currency unit into the system. This setup ensures that your cash register can accurately calculate the total money in the drawer based on the specific notes and coins you handle daily.
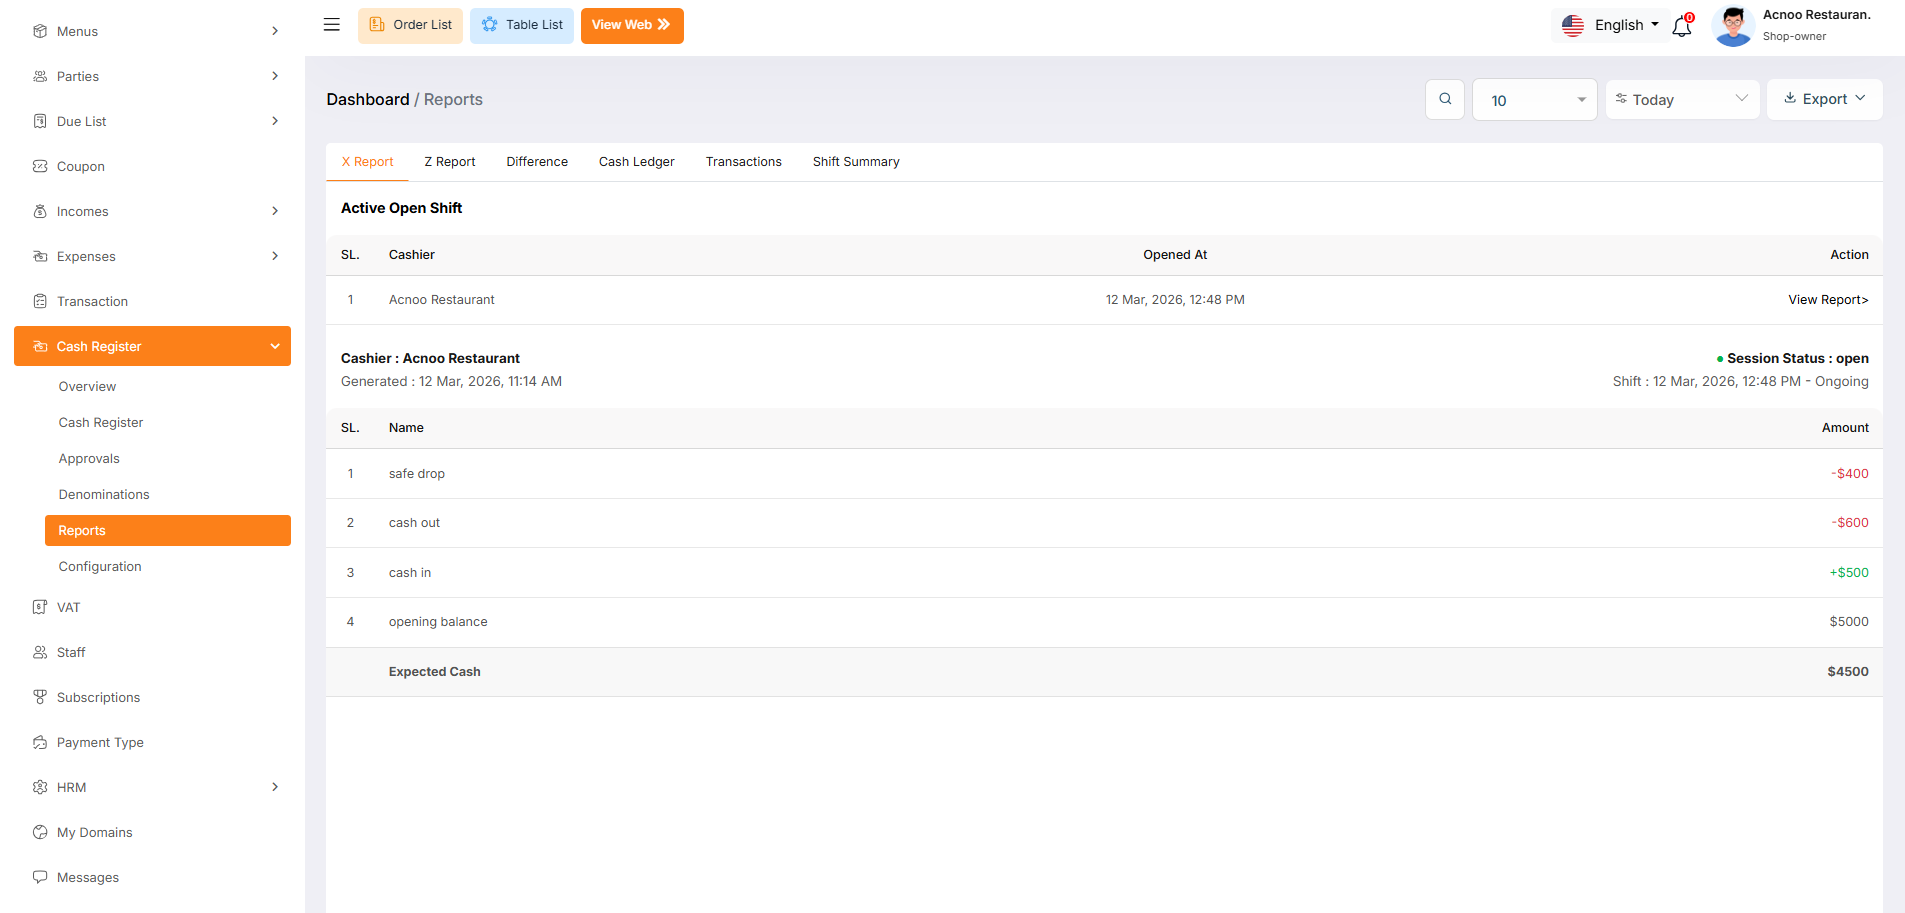
X Reports
The Open Shift Report, commonly known in the industry as an X Report, provides a summary of the current, active business session. Unlike a closed report, this document reflects live data for a shift that is still ongoing and has not yet been finalized by a manager.
This section identifies the current state of the register before any closing procedures have begun:
Session Status: Marked as "Open" or "Ongoing". This indicates that the cashier is still actively processing transactions and the drawer is still in use.
Opening Time: Records the exact moment the drawer was started (e.g., 12 Mar, 2026, 12:48 PM). This is useful for tracking how many hours the current cashier has been handling the register.
Z Reports
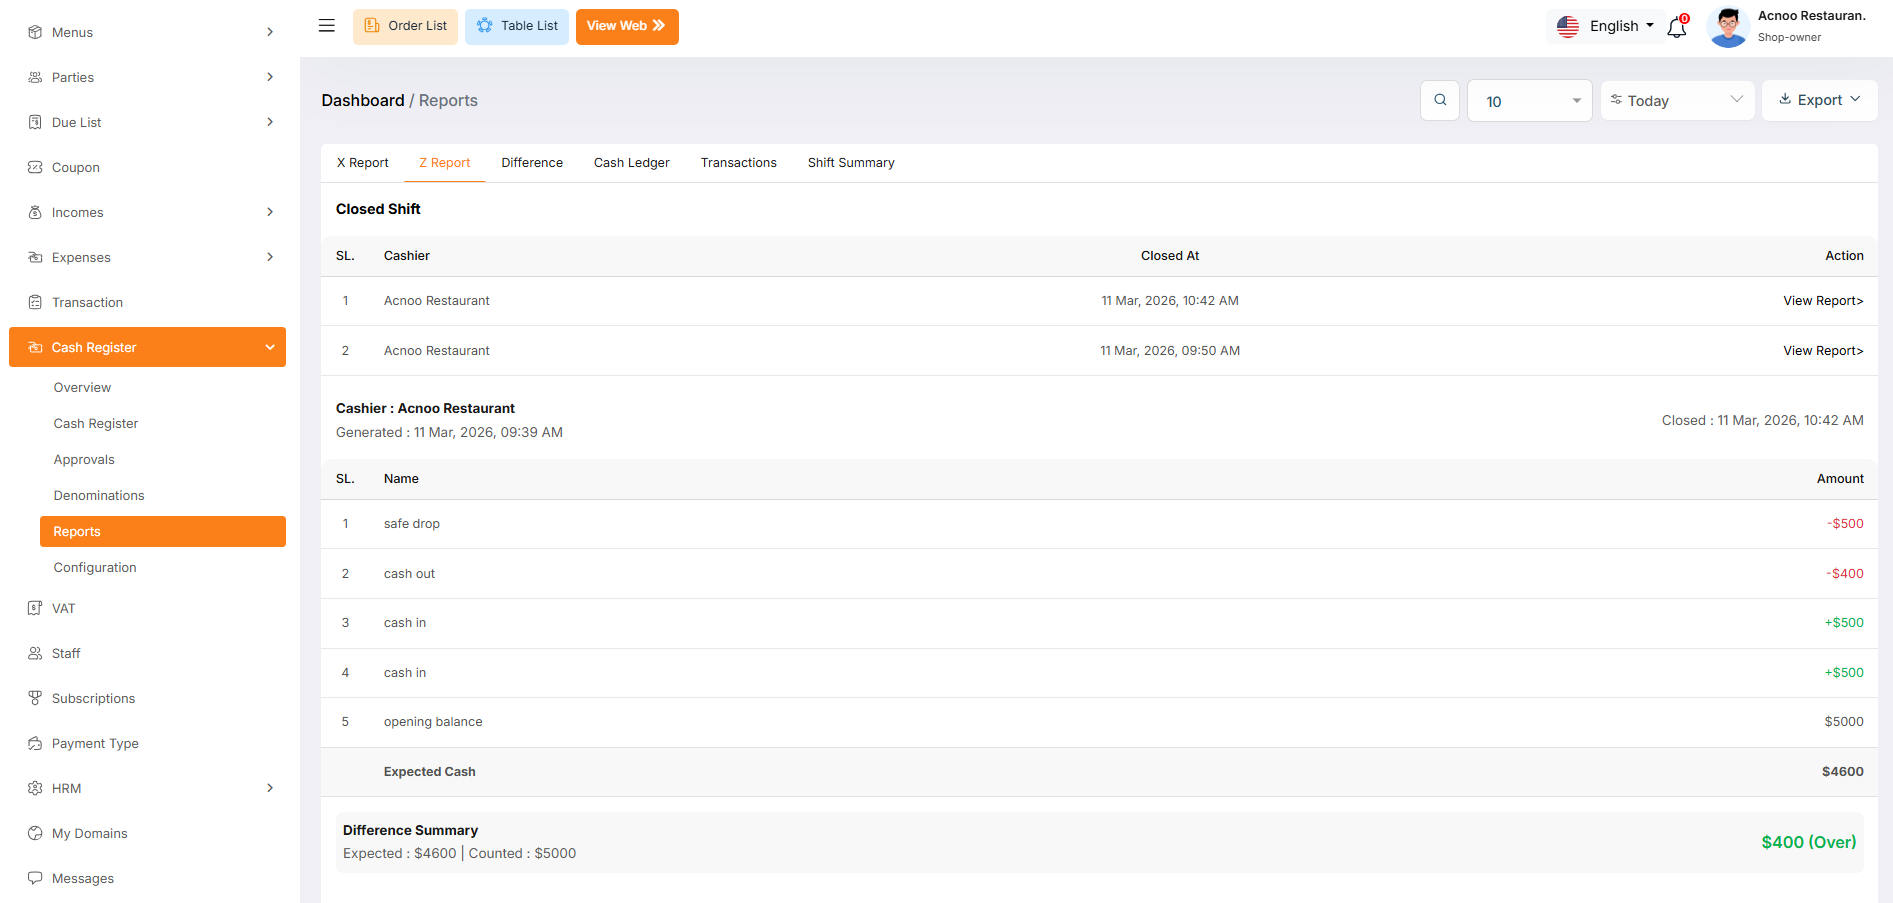
The Closed Shift report, traditionally known as a Z Report, provides the final financial summary of a completed work session. Unlike the X Report, which shows unclosed data, the Z Report is generated after a cashier has finished their shift and the drawer has been officially closed for reconciliation.
Closed Shift History
This section lists all historically completed shifts. It is used by management to review past performance and audit previous days.
Difference
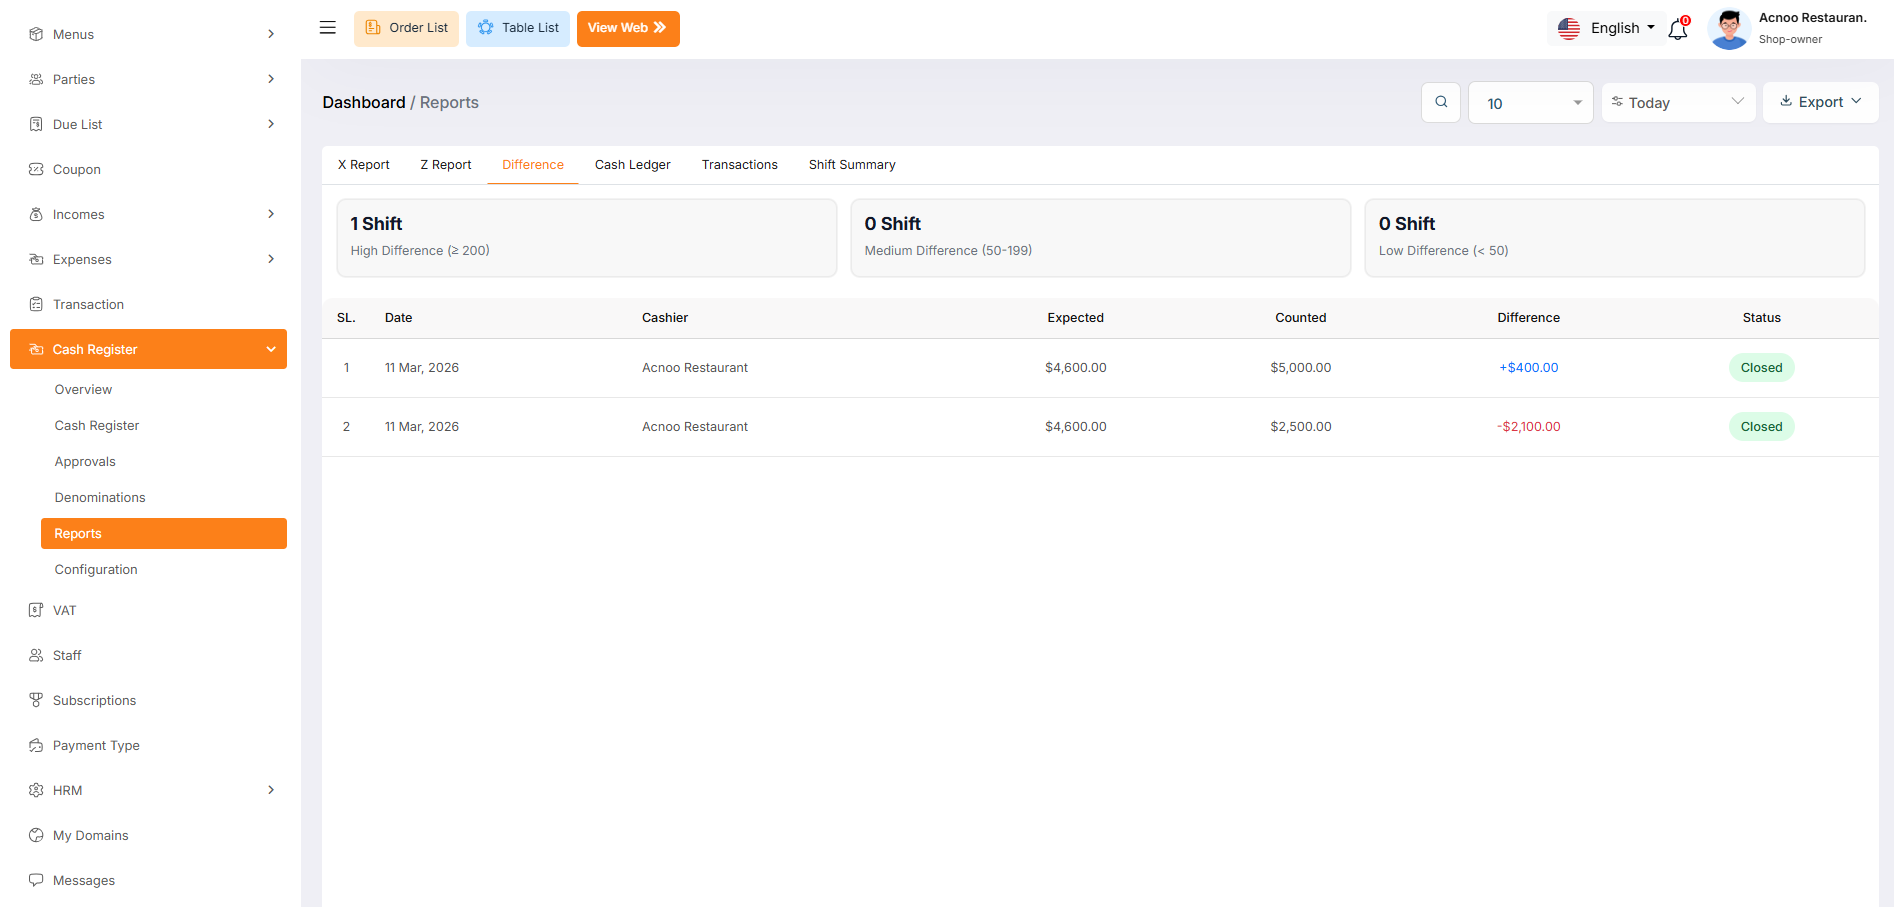
The Difference report is a specialized auditing tool used by management to track and categorize financial discrepancies. This page automatically flags shifts where the physical cash count does not match the system's expected total, allowing you to prioritize the investigation of significant losses or gains.
Difference Categorization Cards
At the top of the page, the system automatically groups shifts based on the severity of the discrepancy:
Cash Ledger
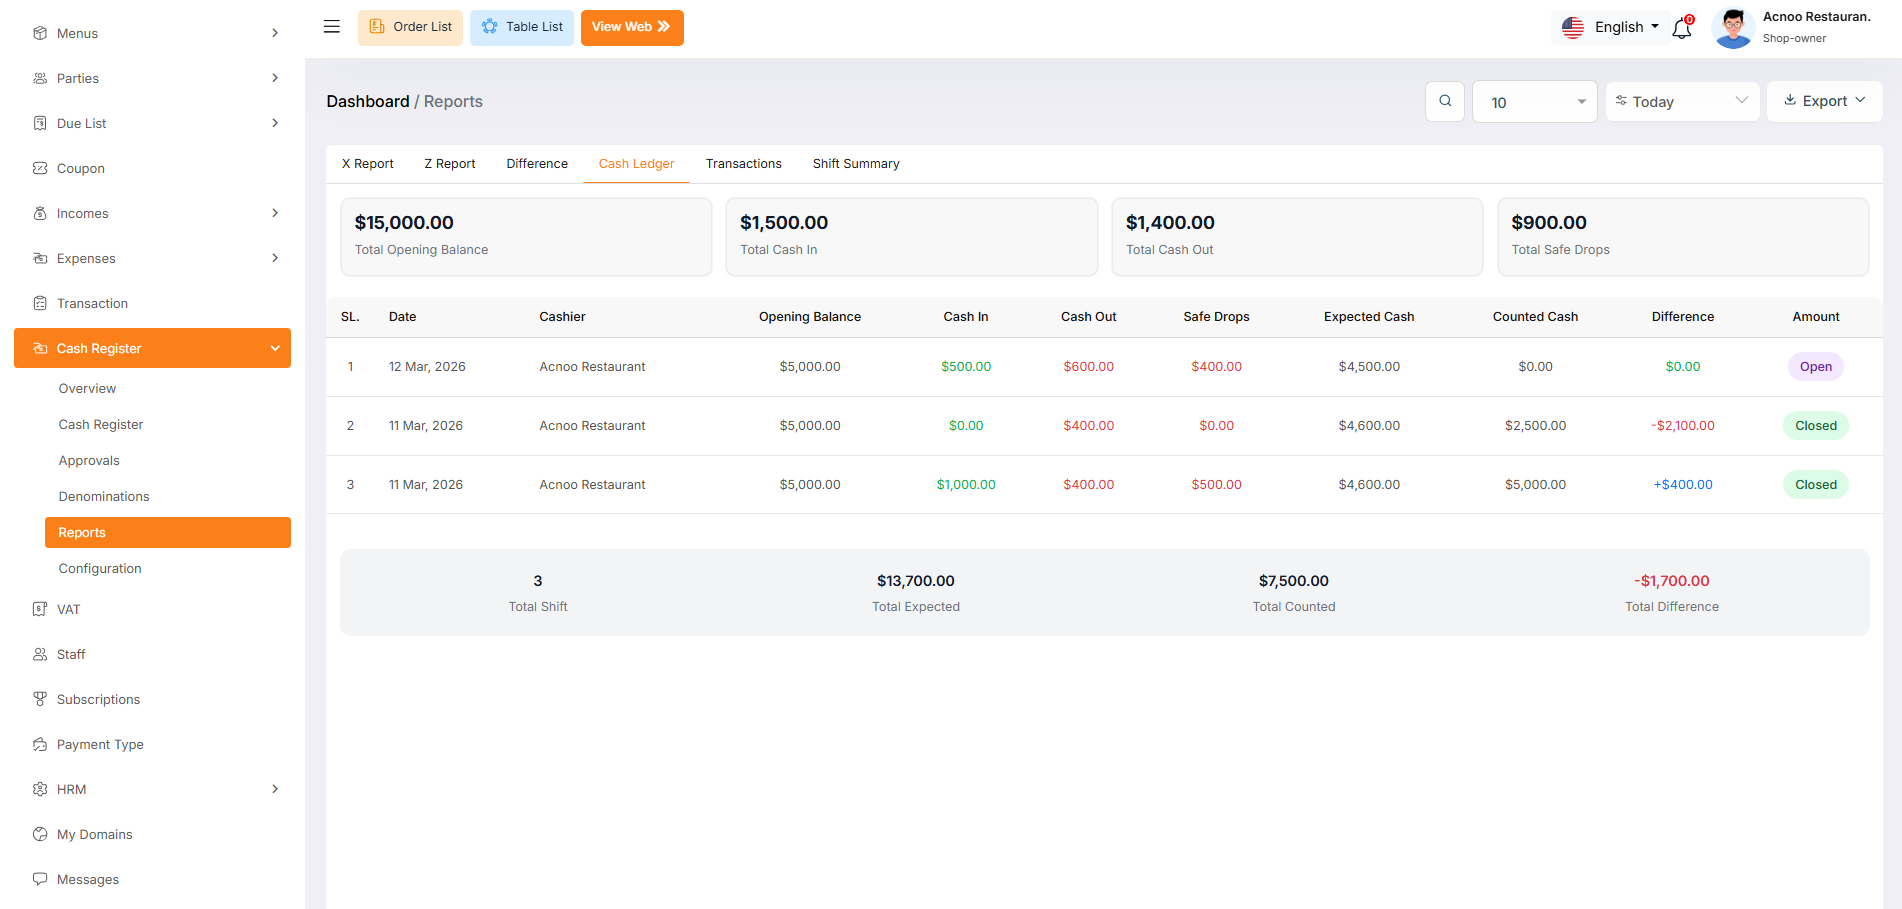
The Cash Ledger is the most comprehensive reporting view within the Cash Register module. It provides a complete, high-level overview of all financial activity across multiple shifts. This page is designed for deep auditing, allowing you to see exactly how cash moved from the moment a shift opened until it was finalized.
Aggregate Summary Cards
The top section provides a combined total for all shifts currently displayed in the list. This is useful for daily or weekly financial balancing:
Transactions
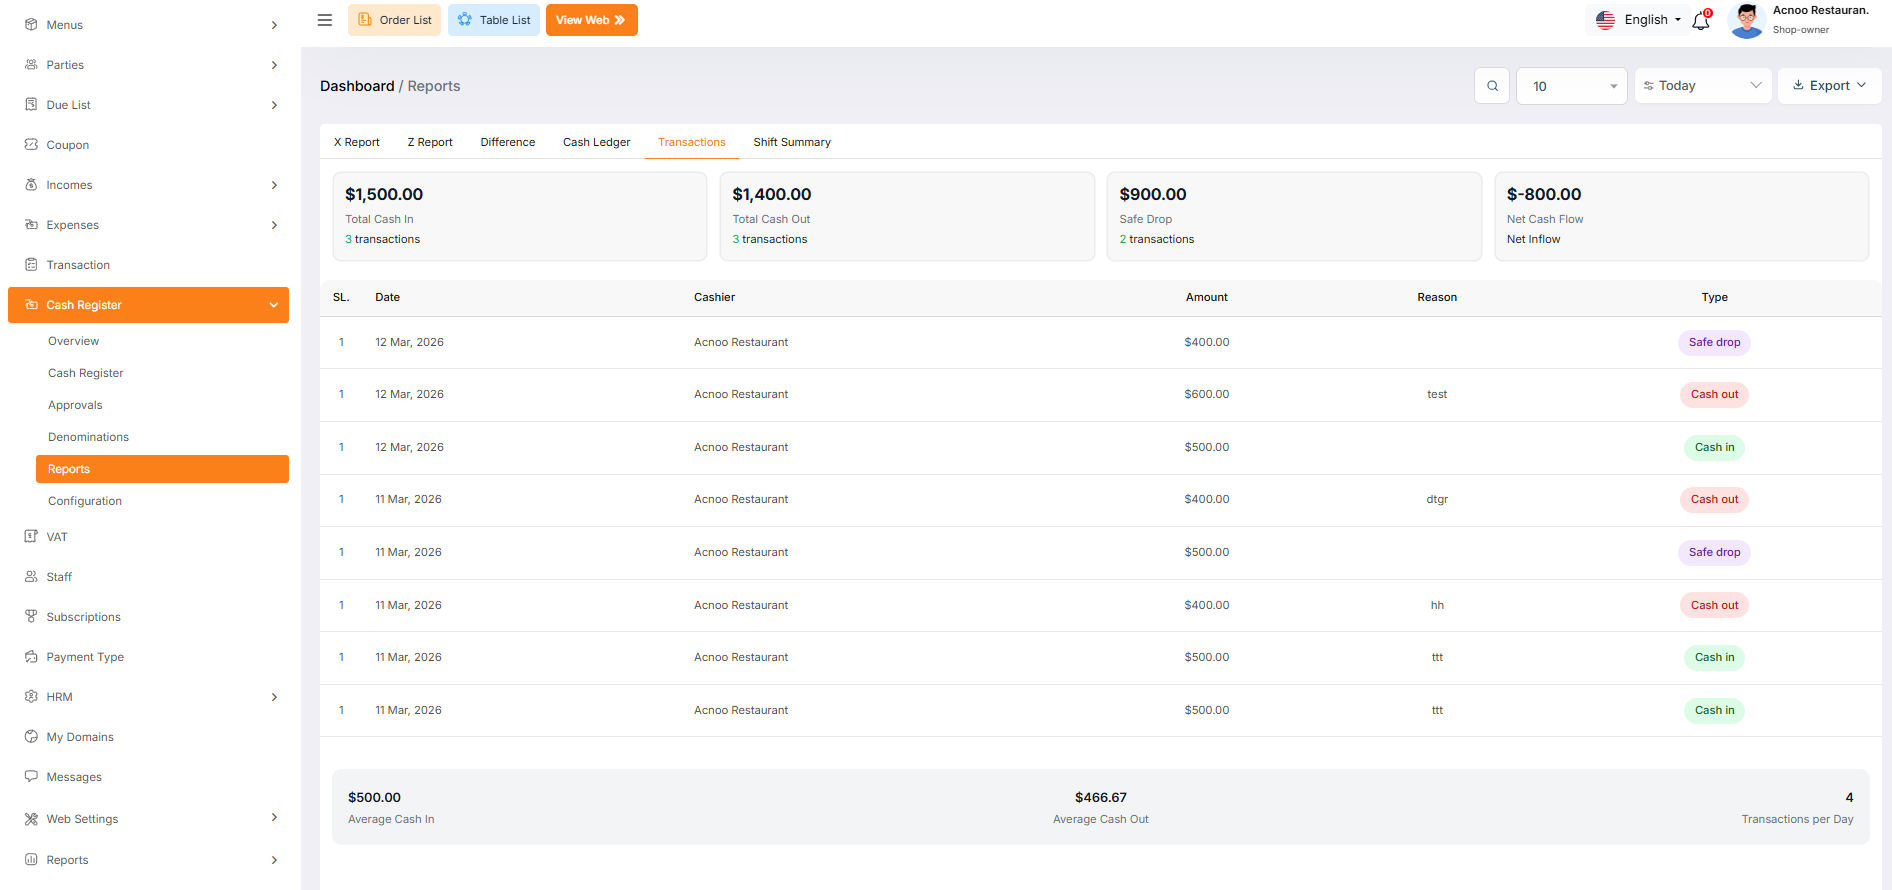
The Transactions report tab provides a detailed breakdown of every individual cash movement recorded within the system. While the Ledger provides a shift-level summary, the Transactions page is designed for auditing the specific "Why" and "When" of every dollar that enters or leaves the register.
Transaction Performance Cards
The top section summarizes all manual movements and automated inflows for the filtered period
Shift
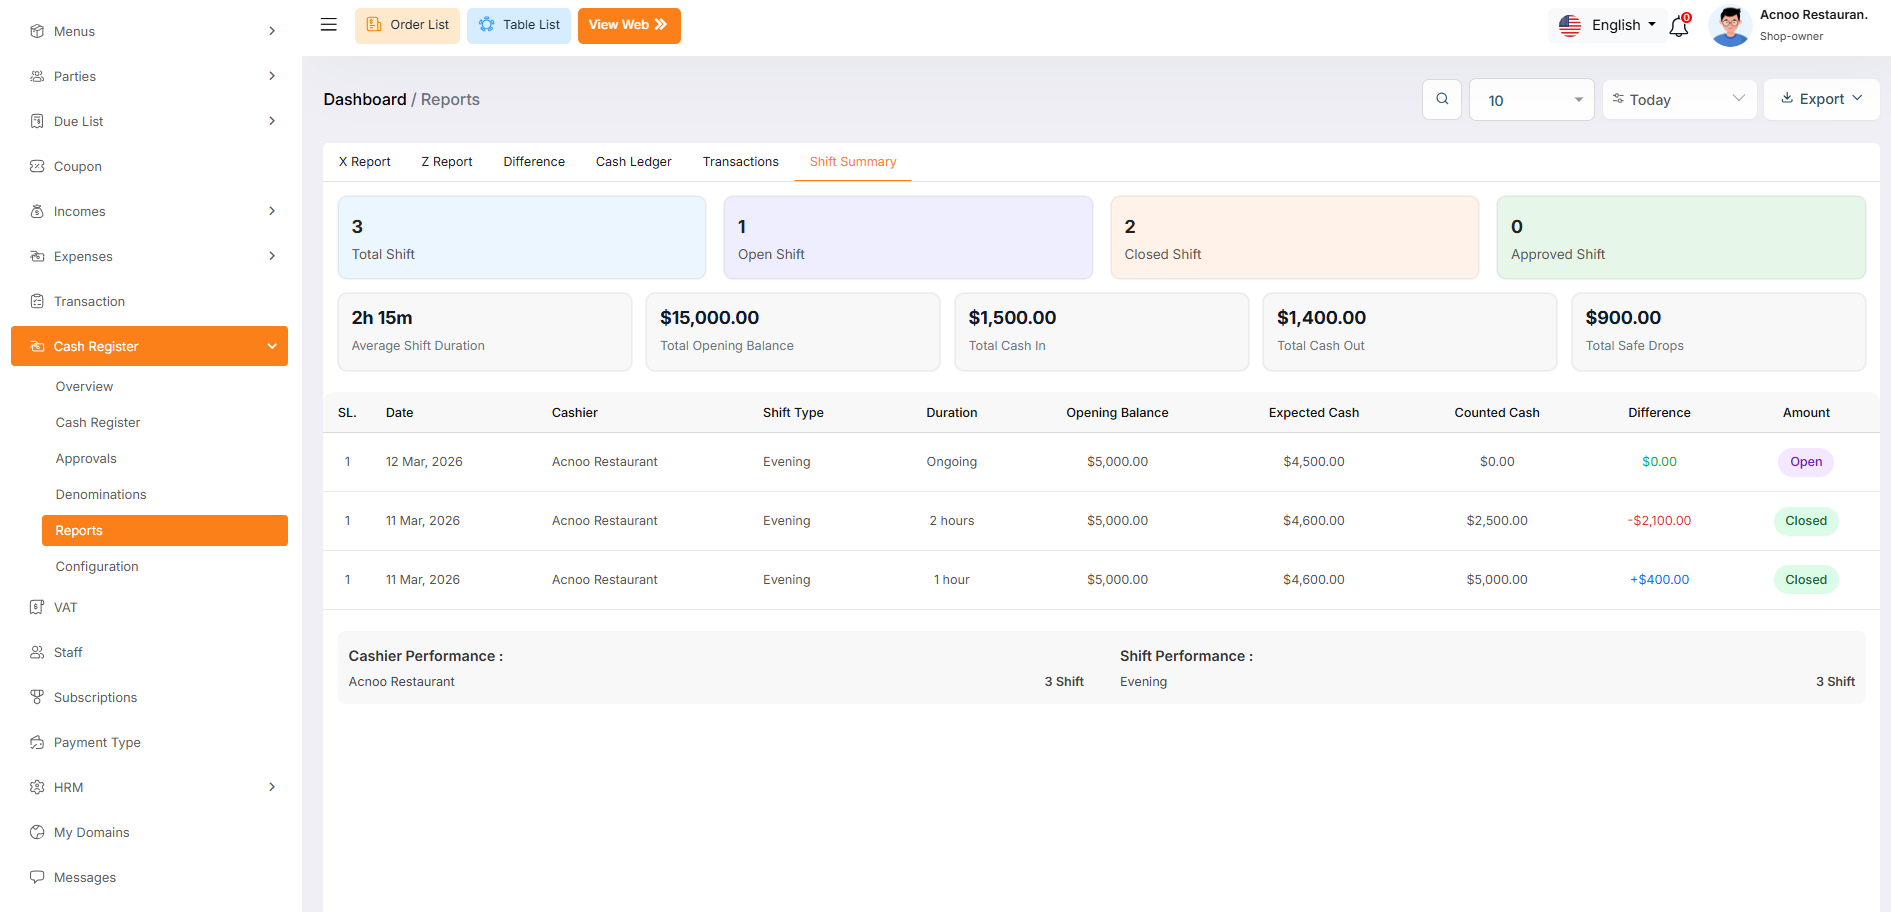
The Shift Summary tab provides a high-level analytical view of all cashier sessions. It is designed to help management monitor labor productivity, shift patterns, and overall financial accuracy across multiple time periods. This report focuses on the operational health of the register system.
Cashier Performance: Lists how many shifts each specific staff member has completed (e.g., Acnoo Restaurant - 3 Shifts).
Shift Performance: Tracks volume based on the time of day (e.g., Evening - 3 Shifts), helping you identify your busiest operating windows.
Configuration
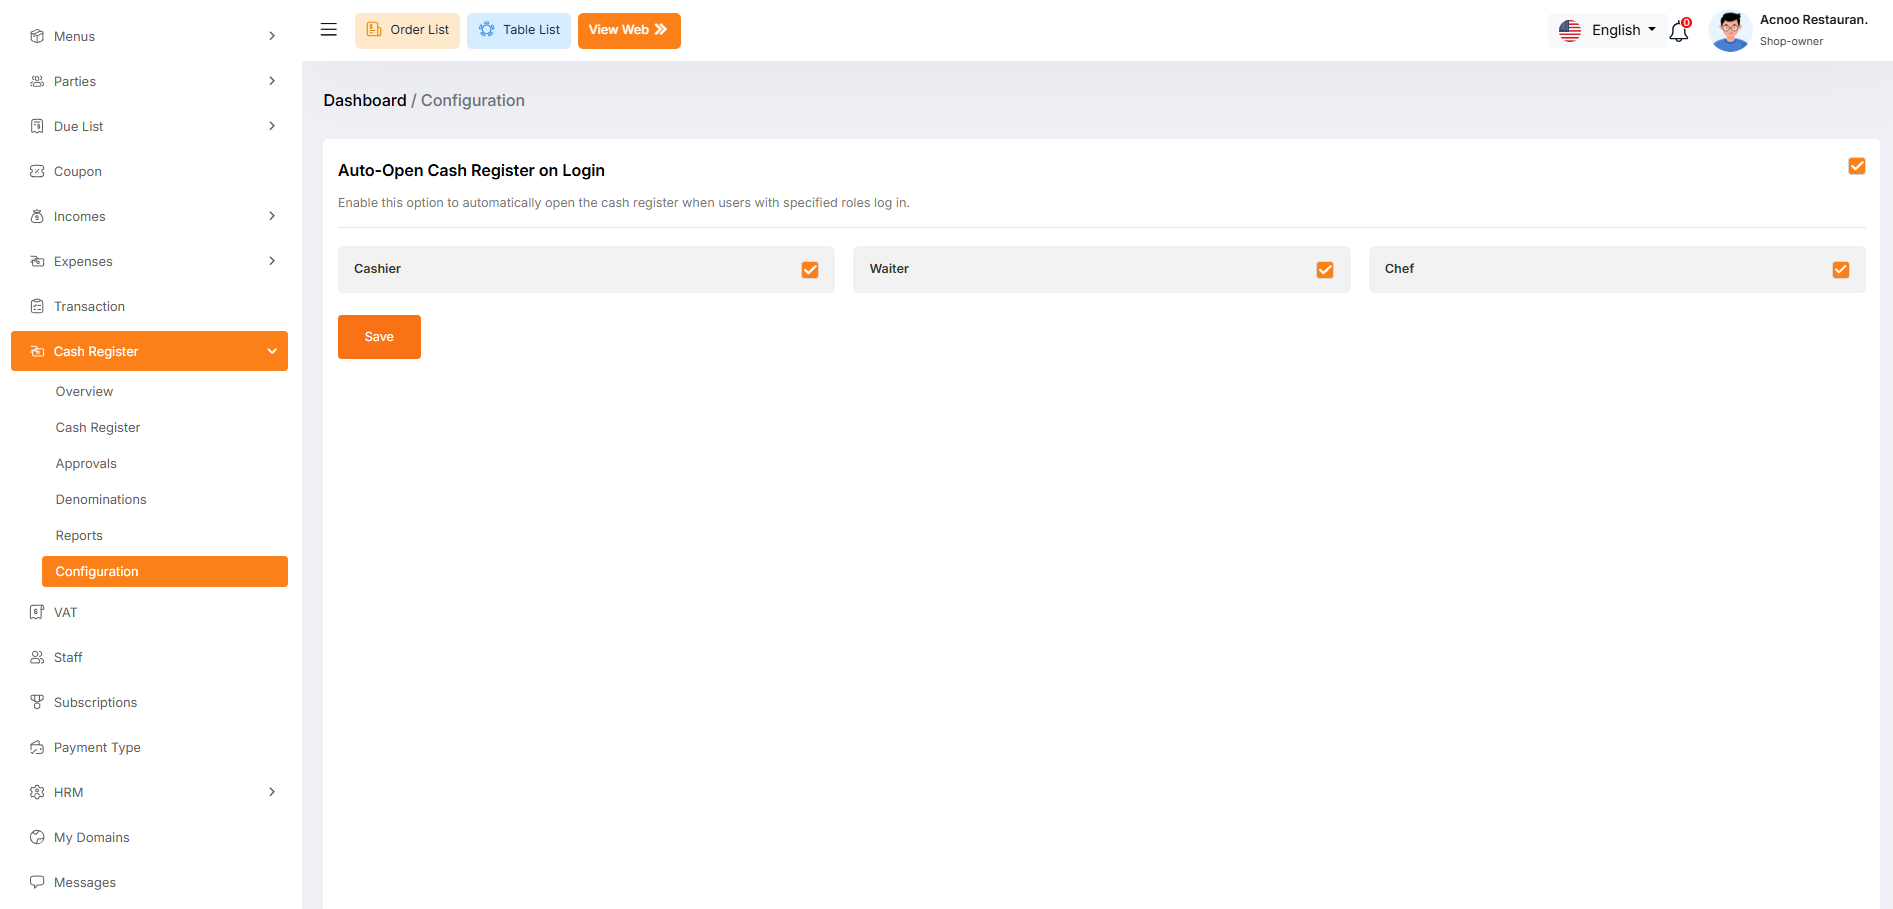
The Configuration page allows administrators to automate the cash management workflow. By adjusting these settings, you can control how the cash register interacts with different staff roles upon logging into the system.
Auto-Open Cash Register on Login
This feature simplifies the start-of-day process by automatically initiating a cash register session when specific users log in. This ensures that no sales are processed without an active, tracked cash shift.